SSD(Single Shot MultiBox Detector)目标检测实战
本文不去细讲SSD目标检测算法原理和网络结构,大家可参考作者论文及另外两位同学的论文阅读:SSD: Single Shot MultiBox Detector、SSD论文阅读(Wei Liu——【ECCV2016】SSD Single Shot MultiBox Detector)。
算法模型选择
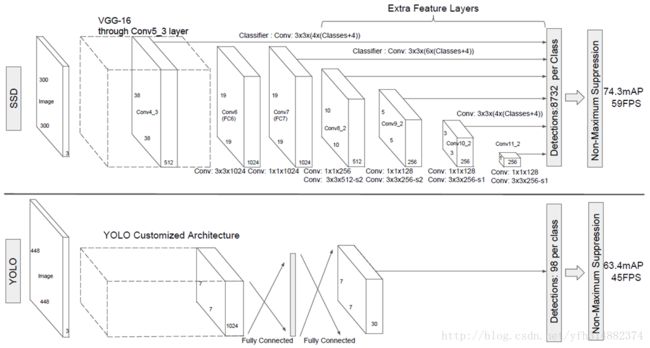
- 与YOLO比较:SSD比 YOLO(You Only Look Once)方法更快更精确。
- 与Faster R-CNN比较:保证速度的同时,其结果的 mAP 可与用 region proposals 技术的Faster R-CNN相媲美。
SSD简介
网络结构:
SSD(Single Shot MultiBox Detector) 是基于前向传播 的CNN 网络,其网络模型的最开始部分是用于图像分类的标准架构(称作 base network),在 base network 之后添加了额外辅助的网络结构:
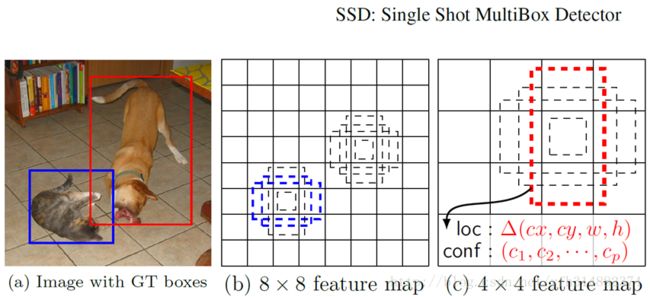
- Multi-scale feature maps for detection
- Convolutional predictors for detection
- Default boxes and aspect ratios

核心算法:
产生一系列固定大小(fixed-size)的bounding boxes,以及每一个 box 中包含物体实例的可能性(即 score),在feature map上使用小的卷积核,去predict一系列bounding boxes的box offsets,然后进行一个非极大值抑制(Non-maximum suppression)得到最终的 predictions。

Go!
数据准备
自制PASCALVOC数据格式:
1、录制flv视频,转成mp4
2、视频截图(工具),每秒一张图
3、参考:https://github.com/hyzhan/make_own_dataset
http://blog.csdn.net/ch_liu23/article/details/53558549
参考这两篇文章操作,编译好labelImg.py
(1)创建文件夹:先创建“MyDataName+年”格式的文件夹(VOC2007),进入再创建:Annotations、JPEGImages、ImageSets,ImageSet再包含:Layout、Main、Segmentation,其中自己训练目标识别,只用到Mian。文件夹一定提前创建好,不然后面生成xml文件后,再重新放文件,位置信息变更后xml也要变更很麻烦。
(2)批量重命名jpg图片:调用make_own_dataset/script_object_detectio/目录下的rename_images.py脚本,在JPEGImages/下生成000001.jpg等文件
(3)为目标识别打标签:调用./labelImg.py,执行后生成Annotations/下对应xml文件.

注意点:
a)生成的文件有xml version的头,通过delete_file_firstRow.py脚本去掉。
b)filename中文件的文件名名没有后缀,因此需要统一加上后缀
find -name ‘*.xml’ |xargs perl -pi -e ‘s||.jpg|g’
(4)拆分样本集:调用make_own_dataset/script_object_detection/下的create_trainval.py脚本
4、数据集转换成tfrecords(采用SSD模型中的转换脚本)
注意:要在pascalvoc_common.py中新增训练的种类
开始训练
fine-tuning from vgg_16:
#!/bin/bash
DATASET_DIR=./tfrecords/voc2007
TRAIN_DIR=./logs/My_chkp
CHECKPOINT_PATH=./checkpoints/vgg_16.ckpt
python3.4 train_ssd_network.py \
    --train_dir=${TRAIN_DIR} \
    --dataset_dir=${DATASET_DIR} \
    --dataset_name=pascalvoc_2007 \
    --dataset_split_name=train \
    --model_name=ssd_300_vgg \
    --checkpoint_path=${CHECKPOINT_PATH} \
    --checkpoint_model_scope=vgg_16 \
    --checkpoint_exclude_scopes=ssd_300_vgg/conv6,ssd_300_vgg/conv7,ssd_300_vgg/block8,ssd_300_vgg/block9,ssd_300_vgg/block10,ssd_300_vgg/block11,ssd_300_vgg/block4_box,ssd_300_vgg/block7_box,ssd_300_vgg/block8_box,ssd_300_vgg/block9_box,ssd_300_vgg/block10_box,ssd_300_vgg/block11_box \
    --trainable_scopes=ssd_300_vgg/conv6,ssd_300_vgg/conv7,ssd_300_vgg/block8,ssd_300_vgg/block9,ssd_300_vgg/block10,ssd_300_vgg/block11,ssd_300_vgg/block4_box,ssd_300_vgg/block7_box,ssd_300_vgg/block8_box,ssd_300_vgg/block9_box,ssd_300_vgg/block10_box,ssd_300_vgg/block11_box \
    --save_summaries_secs=60 \
    --save_interval_secs=600 \
    --weight_decay=0.0005 \
    --optimizer=adam \
    --learning_rate=0.001 \
    --learning_rate_decay_factor=0.94 \
    --batch_size=151
可以继续微调模型:
Once the network has converged to a good first result (~0.5 mAP for instance), you can fine-tuned the complete network as following:(https://github.com/balancap/SSD-Tensorflow)
#!/bin/bash
DATASET_DIR=./tfrecords/voc2007
TRAIN_DIR=./logs/My_chkp_finetune
CHECKPOINT_PATH=./logs/My_chkp/model.ckpt-221346
python3.4 train_ssd_network.py \
    --train_dir=${TRAIN_DIR} \
    --dataset_dir=${DATASET_DIR} \
    --dataset_name=pascalvoc_2007 \
    --dataset_split_name=train \
    --model_name=ssd_300_vgg \
    --checkpoint_path=${CHECKPOINT_PATH} \
    --checkpoint_model_scope=ssd_300_vgg\
    --save_summaries_secs=60 \
    --save_interval_secs=600 \
    --weight_decay=0.0005 \
    --optimizer=adam \
    --learning_rate=0.00001 \
    --learning_rate_decay_factor=0.94 \
    --batch_size=32
开始检测
我这里写了个脚本,读取image_test路径下的图片,检测之后的图片放到detected路径下,生成的每张图片中目标的坐标信息放到bboxes.txt文件中
import os
import math
import random

import numpy as np
import tensorflow as tf
import cv2

slim = tf.contrib.slim

#%matplotlib inline
#import matplotlib.pyplot as plt
#import matplotlib.image as mpimg

import sys
sys.path.append('../')

from nets import ssd_vgg_300, ssd_common, np_methods
from preprocessing import ssd_vgg_preprocessing
#from notebooks import visualization

# TensorFlow session: grow memory when needed. TF, DO NOT USE ALL MY GPU MEMORY!!!
gpu_options = tf.GPUOptions(allow_growth=True)
config = tf.ConfigProto(log_device_placement=False, gpu_options=gpu_options)
isess = tf.InteractiveSession(config=config)
#isess = tf.InteractiveSession()

# Input placeholder.
net_shape = (300, 300)
data_format = 'NHWC'
img_input = tf.placeholder(tf.uint8, shape=(None, None, 3))
# Evaluation pre-processing: resize to SSD net shape.
image_pre, labels_pre, bboxes_pre, bbox_img = ssd_vgg_preprocessing.preprocess_for_eval(
    img_input, None, None, net_shape, data_format, resize=ssd_vgg_preprocessing.Resize.WARP_RESIZE)
image_4d = tf.expand_dims(image_pre, 0)

# Define the SSD model.
reuse = True if 'ssd_net' in locals() else None
ssd_net = ssd_vgg_300.SSDNet()
with slim.arg_scope(ssd_net.arg_scope(data_format=data_format)):
    predictions, localisations, _, _ = ssd_net.net(image_4d, is_training=False, reuse=reuse)

# Restore SSD model.
ckpt_filename = '../logs/My_chkp_pq/model.ckpt-80304'
#ckpt_filename = '../checkpoints/ssd_300_vgg.ckpt'
# ckpt_filename = '../checkpoints/VGG_VOC0712_SSD_300x300_ft_iter_120000.ckpt'
isess.run(tf.global_variables_initializer())
saver = tf.train.Saver()
saver.restore(isess, ckpt_filename)

# SSD default anchor boxes.
ssd_anchors = ssd_net.anchors(net_shape)

# Main image processing routine.
def process_image(img, select_threshold=0.5, nms_threshold=.45, net_shape=(300, 300)):
    # Run SSD network.
    rimg, rpredictions, rlocalisations, rbbox_img = isess.run([image_4d, predictions, localisations, bbox_img],
                                                              feed_dict={img_input: img})

    # Get classes and bboxes from the net outputs.
    rclasses, rscores, rbboxes = np_methods.ssd_bboxes_select(
            rpredictions, rlocalisations, ssd_anchors,
            select_threshold=select_threshold, img_shape=net_shape, num_classes=21, decode=True)

    rbboxes = np_methods.bboxes_clip(rbbox_img, rbboxes)
    rclasses, rscores, rbboxes = np_methods.bboxes_sort(rclasses, rscores, rbboxes, top_k=400)
    rclasses, rscores, rbboxes = np_methods.bboxes_nms(rclasses, rscores, rbboxes, nms_threshold=nms_threshold)
    # Resize bboxes to original image shape. Note: useless for Resize.WARP!
    rbboxes = np_methods.bboxes_resize(rbbox_img, rbboxes)
    return rclasses, rscores, rbboxes

def bboxes_draw_on_img(imgname, img, classes, scores, bboxes, color=[0, 255, 0], thickness=2):
    shape = img.shape
    #colors = dict()
    file=open('bboxes.txt','a+')
    for i in range(bboxes.shape[0]):
        bbox = bboxes[i]
        #color = colors[classes[i]]
        # Draw bounding box...
        ymin = int(bbox[0] * shape[0])
        xmin = int(bbox[1] * shape[1])
        ymax = int(bbox[2] * shape[0])
        xmax = int(bbox[3] * shape[1])
        p1 = (ymin, xmin)
        p2 = (ymax, xmax)
        color_text = [255, 0, 255]
        cv2.rectangle(img, p1[::-1], p2[::-1], color, thickness)
        # Draw text...
        s = '%s/%.3f' % (classes[i], scores[i])
        p1 = (p1[0]+10, p1[1]+10)
        cv2.putText(img, s, p1[::-1], cv2.FONT_HERSHEY_DUPLEX, 0.6, color_text, 2)
        #save detected img
        cv2.imwrite("./detected/"+imgname, img)
        #write bbox site to file
        record = imgname + ' : ' + 'page[' +  str(classes[i]) + '] '  + ', coordinate[' + str(ymin) + ',' + str(xmin) + ',' + str(ymax) + ',' + str(xmax) + ']'
        print(record, file=file)
        #print>>file, imgname + ' : ' + str(ymin) + ',' + str(xmin) + ',' + str(ymax) + ',' + str(xmax)
    file.close()

path = './image_test/'
image_names = sorted(os.listdir(path))
for it  in image_names:
    img = cv2.imread(path + it)
    #img = mpimg.imread(path + it)
    #img_copy = img.copy()
    t1=cv2.getTickCount()
    rclasses, rscores, rbboxes =  process_image(img)
    #visualization.bboxes_draw_on_img(it, img, rclasses, rscores, rbboxes)
    bboxes_draw_on_img(it, img, rclasses, rscores, rbboxes)
    t2=cv2.getTickCount()
    print('time consumption:%.3f ms'%(1000*(t2-t1)/cv2.getTickFrequency()))
下面是我用来进行小猪佩奇书页识别的检测结果(这里用的SSD做目标检测来识别,当然还可以直接用mobilenet等做图像分类识别的方法)

应用效果
准确率:大概在80%左右,当然训练中根据应用场景在特征选取时做些取巧的操作,准确率会明显提升。
处理效率:在Tesla M40的机器上,每秒可检测20帧左右。
1、这里对游戏视频画面做了目标英雄检测,然后根据英雄坐标,对画面进行ROI编码,提升ROI区域的清晰度,降低整幅图的带宽消耗。
2、通过对画面中目标的检测,用来识别书本页,这里用mobilenet和squeezenet效率更高,分类效果也更好。
亟待解决的问题:
1、模型不容易收敛。
2、处理效率不高。
参考文献和开源代码:
[1]: https://github.com/balancap/SSD-Tensorflow
[2]: https://github.com/hyzhan/make_own_dataset
[3]: http://blog.csdn.net/ch_liu23/article/details/53558549
[4]: https://arxiv.org/abs/1512.02325

