Spring Cloud Eureka服务注册与发现
Eureka是什么?
Eureka是Netflix的一个子模块,也是核心模块之一。
Eureka能干什么?
Eureka是一个基于REST的服务,用于定位服务,以实现云端中间层服务发现和故障转移。
服务注册与发现对于微服务架构来说是非常重要的,有了服务发现与注册,只需要使用服务的标识符,就可以访问到服务,而不需要修改服务调用的配置文件了。功能类似于dubbo的注册中心,比如Zookeeper。当然目前的Spring Cloud高点的版本也可以使用Zookeeper来进行服务的注册与发现。后面会说两者的区别以及优缺点
Spring Cloud 封装了 Netflix 公司开发的 Eureka 模块来实现服务注册和发现。
Eureka 采用了 C-S 的设计架构。Eureka Server 作为服务注册功能的服务器,它是服务注册中心。而系统中的其他微服务,使用 Eureka 的客户端连接到 Eureka Server并维持心跳连接。这样系统的维护人员就可以通过 Eureka Server 来监控系统中各个微服务是否正常运行。SpringCloud 的一些其他模块(比如Zuul)就可以通过 Eureka Server 来发现系统中的其他微服务,并执行相关的逻辑。
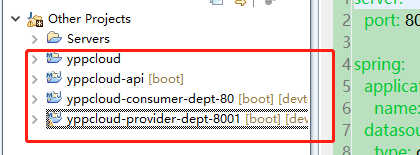
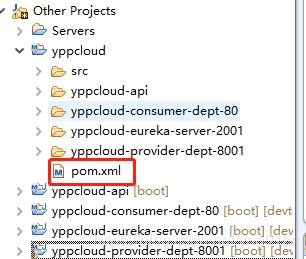
拿上一篇文章搭建的项目来理解:
源码地址:https://pan.baidu.com/s/155FPzaFX7pXafqINNbRe-A 提取码:mp5a
api是实体的一个服务,里面放的是entity的一些实体类。
80是消费者,也就是客户端。
8001是服务端,也就是提供服务的提供者。
注意区分80和8001与后面Eureka的客户端和服务端
当然以上3个都是Spring Cloud整体的其中一个微服务
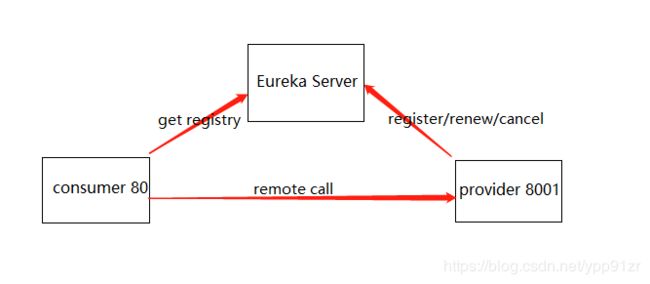
从上图看,图有点丑
Eureka Server 提供服务注册和发现
Service Provider 8001服务提供方将自身服务注册到Eureka,从而使服务消费方能够找到
Service Consumer 80 服务消费方从Eureka获取注册服务列表,从而能够消费服务
Eureka包含两个组件:Eureka Server和Eureka Client
Eureka Server提供服务注册服务
各个节点启动后,会在EurekaServer中进行注册,这样EurekaServer中的服务注册表中将会存储所有可用服务节点的信息,服务节点的信息可以在界面中直观的看到
EurekaClient是一个Java客户端,用于简化Eureka Server的交互,客户端同时也具备一个内置的、使用轮询(round-robin)负载算法的负载均衡器。在应用启动后,将会向Eureka Server发送心跳(默认周期为30秒)。如果Eureka Server在多个心跳周期内没有接收到某个节点的心跳,EurekaServer将会从服务注册表中把这个服务节点移除(默认90秒)
创建一个服务中心,端口使用2001:
创建一个maven module,在上面的项目代码基础上创建,创建完成
pom.xml:
	4.0.0

		com.ypp.springcloud
		yppcloud
		0.0.1-SNAPSHOT


	yppcloud-eureka-server-2001
	服务注册中心


			org.springframework.cloud
			spring-cloud-starter-eureka-server


			org.springframework
			springloaded


			org.springframework.boot
			spring-boot-devtools
application.yml:
server:
  port: 2001

eureka:
  instance:
    hostname: localhost #eureka服务端的实例名称  本机
  client:
    register-with-eureka: false #false表示不向注册中心注册自己,我就是注册中心
    fetch-registry: false  #false表示自己端就是注册中心,我的职责就是维护服务实例,并不需要去检索服务
    service-url:
      defaultZone: http://${eureka.instance.hostname}:${server.port}/eureka/       #设置与Eureka Server交互的地址查询服务和注册服务都需要依赖这个地址(单机)。
http://${eureka.instance.hostname}:${server.port}/eureka/等价于http://localhost:2001/eureka/
创建一个启动类:
EurekaServerApplication:
package com.ypp.springcloud;

import org.springframework.boot.SpringApplication;
import org.springframework.boot.autoconfigure.SpringBootApplication;
import org.springframework.cloud.netflix.eureka.server.EnableEurekaServer;

@SpringBootApplication
@EnableEurekaServer // 告诉springcloud我是EurekaServer端,接受其他服务可以进来
public class EurekaServerApplication {

	public static void main(String[] args) {
		SpringApplication.run(EurekaServerApplication.class, args);
	}
}
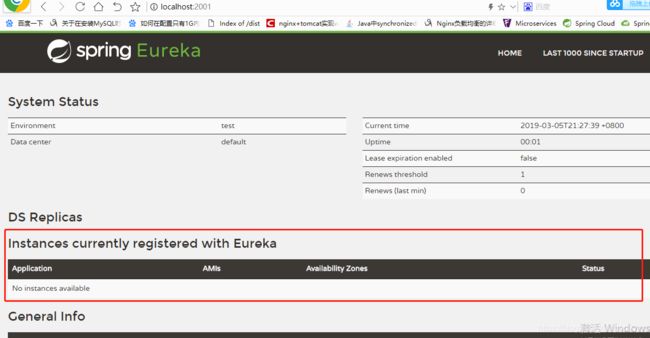
启动注册中心,然后输入localhost:2001,注册中心视图界面:
注册中心建立成功,目前没有服务,接下来我们需要把服务注册EurekaServer进去
将provider 8001 服务注册到EurekaServer
修改8001 application.yml配置,注册进EurekaServer,修改之前需要引进Eureka,在8001引入
			org.springframework.cloud
			spring-cloud-starter-eureka


			org.springframework.cloud
			spring-cloud-starter-config
在application.yml添加Eureka
eureka:
  client: #客户端注册进eureka服务列表内
    service-url:
      defaultZone: http://localhost:2001/eureka #这个地址就是EurekaServer注册中心的地址
defaultZone是EurekaServer的,即2001服务中心的地址
在8001服务添加@EnableEurekaClient注解
修改配置完成,启动2001和8001,localhost:2001 看服务中心视图界面:
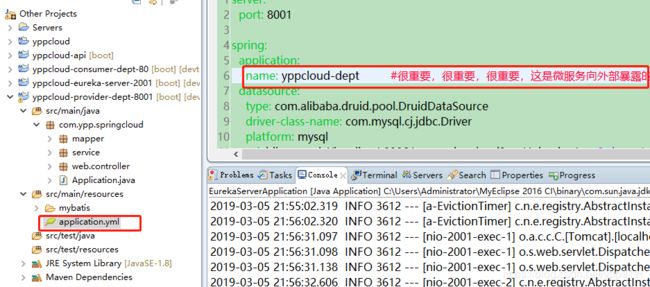
有服务了,这个服务的名字并不是Eureka取得,是我们自己定义的名字,在服务中的application.yml中
这个name已经注释了意思,很重要,很重要,很重要,重要的话说三遍,这是对外暴露的服务的名字
一个是client,一个是server,已经可以证明了刚才最开始说的Eureka是一个C-S的设计架构
在上图中,过了一会儿再来刷新页面或者重新访问页面,会发现有一串红色的英文提示语,意思是:紧急情况!Eureka可能错误地声称实例已经启动,而事实并非如此。续约低于阈值,因此实例不会为了安全而过期
出现上诉红色的提示语是因为Eureka有自我保护机制,自我保护机制前一篇文章有介绍
继续看下图:
现在provider服务注册到了Eureka,但是下图框1的太长并且不好看,还有框2信息的是鼠标移动到框1的时候的一个超链接,点击框1
其实框1的名字我们可以自己定义,并且左下角框2的信息我们也是可以修改的,你别看它链接是user-2018xxxxxx:8001,其实就是localhost:8001 修改成IP以便以后可以发现哪台机器有问题更好的定位等
修改Status对应的信息:
在8001客户端application.yml添加配置:
instance:
    instance-id: yppspringcloud-dept8001
    prefer-ip-address: true     #访问路径可以显示IP地址
修改后的8001的application.yml:
server:
  port: 8001

spring:
  application:
    name: yppcloud-dept         #很重要,很重要,很重要,这是微服务向外部暴露的微服务的名字
  datasource:
    type: com.alibaba.druid.pool.DruidDataSource
    driver-class-name: com.mysql.cj.jdbc.Driver
    platform: mysql
    url: jdbc:mysql://localhost:3306/ypp-springcloud?useUnicode=true&characterEncoding=UTF-8&allowMultiQueries=true&useSSL=false
    username: root
    password: admin
    initialSize: 5
    minIdle: 5
    maxActive: 20
    maxWait: 60000
    timeBetweenEvictionRunsMillis: 60000
    minEvictableIdleTimeMillis: 300000
    validationQuery: SELECT1FROMDUAL
    testWhileIdle: true
    testOnBorrow: false
    testOnReturn: false
    filters: stat,wall
    logSlowSql: true

mybatis:
  config-location: classpath:mybatis/mybatis.cfg.xml
  typeAliasesPackage: com.ypp.springcloud.entites
  mapper-locations: classpath:mybatis/mapper/**/*Mapper.xml

eureka:
  client: #客户端注册进eureka服务列表内
    service-url:
      defaultZone: http://localhost:2001/eureka    #这个地址就是EurekaServer注册中心的地址
       #defaultZone: http://eureka7001.com:7001/eureka/,http://eureka7002.com:7002/eureka/,http://eureka7003.com:7003/eureka/
  instance:
    instance-id: yppspringcloud-dept8001
    prefer-ip-address: true     #访问路径可以显示IP地址
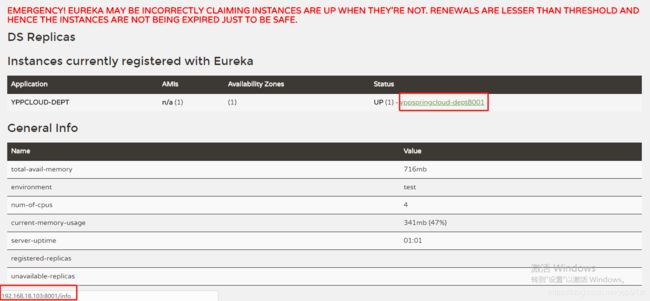
重启8001,再看Eureka:
红色的英文提示暂时不管它,已经修改成自己定义的instance-id和对应的IP了
可以看到请求是info,怎么让它显示我们自己的页面信息呢?
在8001的pom.xml添加监控信息的完善,因为这个服务是8001,
然后在父工程pom.xml添加构建信息
		yppcloud


				src/main/resources
				true


				org.apache.maven.plugins
				maven-resources-plugin


						$
再回到8001的application.yml:添加内容
info:
app.name: com.yppspring.cloud
company.name: www.yppspringcloud.com
build.artifactId: $springcloud$
build.version: $springcloud$
修改后的8001的application.yml:
server:
  port: 8001

spring:
  application:
    name: yppcloud-dept         #很重要,很重要,很重要,这是微服务向外部暴露的微服务的名字
  datasource:
    type: com.alibaba.druid.pool.DruidDataSource
    driver-class-name: com.mysql.cj.jdbc.Driver
    platform: mysql
    url: jdbc:mysql://localhost:3306/ypp-springcloud?useUnicode=true&characterEncoding=UTF-8&allowMultiQueries=true&useSSL=false
    username: root
    password: admin
    initialSize: 5
    minIdle: 5
    maxActive: 20
    maxWait: 60000
    timeBetweenEvictionRunsMillis: 60000
    minEvictableIdleTimeMillis: 300000
    validationQuery: SELECT1FROMDUAL
    testWhileIdle: true
    testOnBorrow: false
    testOnReturn: false
    filters: stat,wall
    logSlowSql: true

mybatis:
  config-location: classpath:mybatis/mybatis.cfg.xml
  typeAliasesPackage: com.ypp.springcloud.entites
  mapper-locations: classpath:mybatis/mapper/**/*Mapper.xml

eureka:
  client: #客户端注册进eureka服务列表内
    service-url:
      defaultZone: http://localhost:2001/eureka    #这个地址就是EurekaServer注册中心的地址
       #defaultZone: http://eureka7001.com:7001/eureka/,http://eureka7002.com:7002/eureka/,http://eureka7003.com:7003/eureka/
  instance:
    instance-id: yppspringcloud-dept8001
    prefer-ip-address: true     #访问路径可以显示IP地址

info:
  app.name: com.yppspring.cloud
  company.name: www.yppspringcloud.com
  build.artifactId: $springcloud$  #父工程那里配置的是$
  build.version: $springcloud$     #父工程那里配置的是$
重启2001和8001,再次点击之前框1:
就是我们设置的内容了,这里可以很友好的展示
文章太长,服务发现不贴了。用处不大
关键点DiscoveryClient,可以获取一些微服务的信息
启动类贴上注解@EnableDiscoveryClient
最后附上最终源码:https://pan.baidu.com/s/1Biy7A6dod4cQNAH6IlmejQ 提取码:d9mu
下一篇:Spring Cloud Eureka集群
