spring思维导图,让spring更加简单易懂
一:《spring简介》
关于Spring
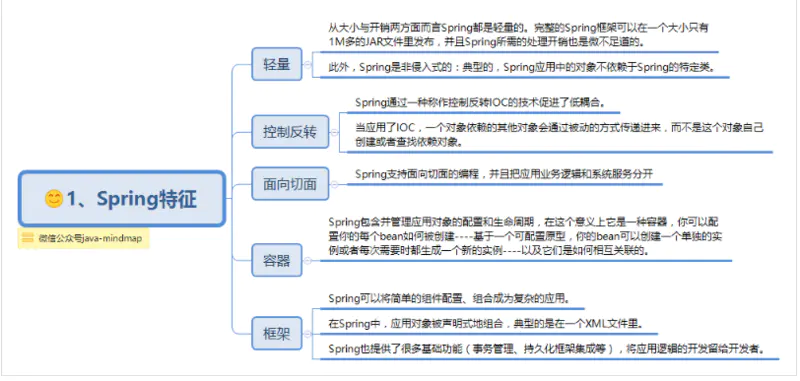
Spring是一个开源框架,是为了解决企业应用程序开发复杂性而创建的。框架的主要优势之一就是其分层架构,分层架构允许您选择使用哪一个组件,同时为 J2EE 应用程序开发提供集成的框架。
它是一个全面的、企业应用开发一站式的解决方案,贯穿表现层、业务层、持久层。但是Spring仍然可以和其他的框架无缝整合。
Sping架构
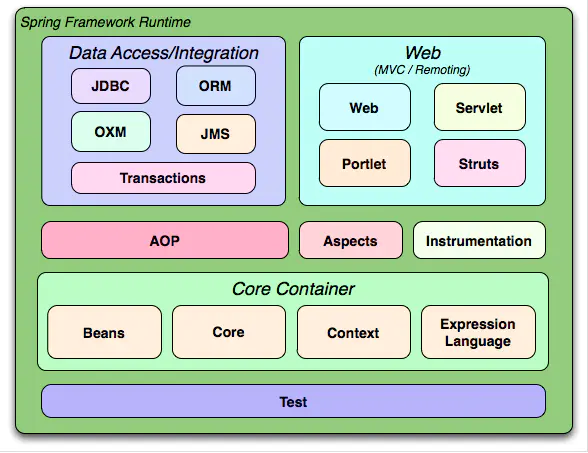
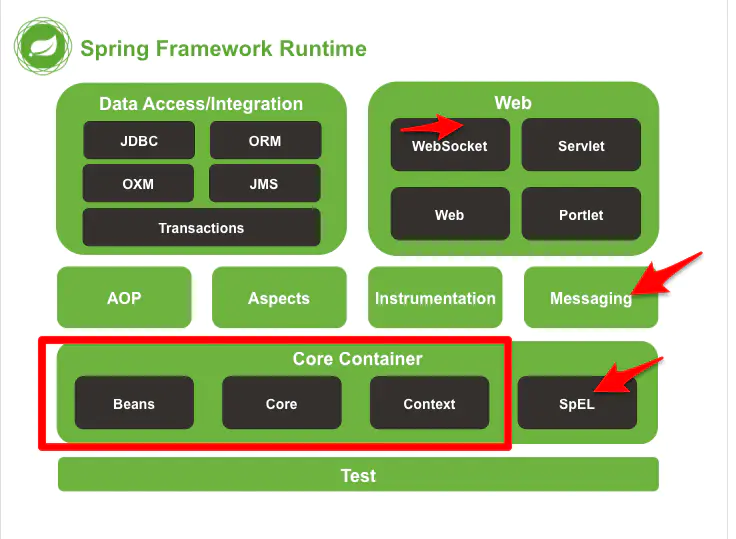
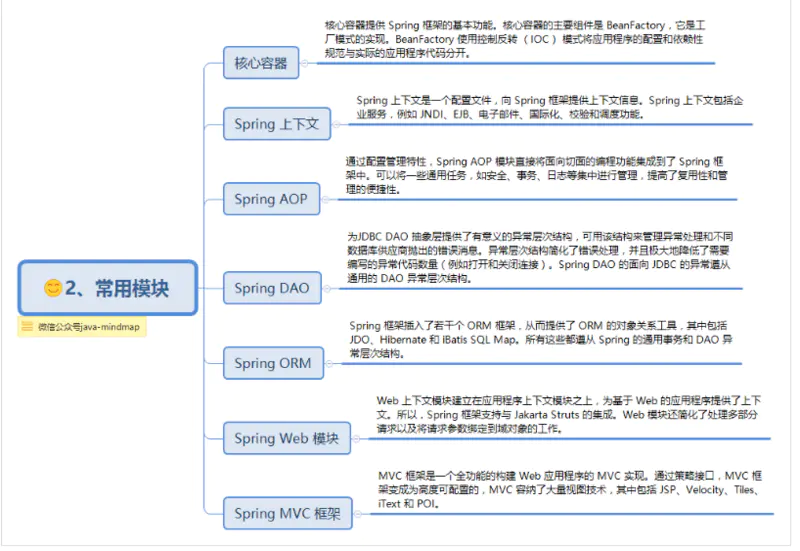
Spring框架是分模块存在,除了最核心的Spring Core Container(即Spring容器)是必要模块之外,其他模块都是可选,视需要而定。大约有20多个模块。
Spring3与Spring4是有区别的,4.0主要是对Java 8的新函数式语法进行支持,还有加强了对网络各种新技术比如http-streaming, websocket的更好的支持。
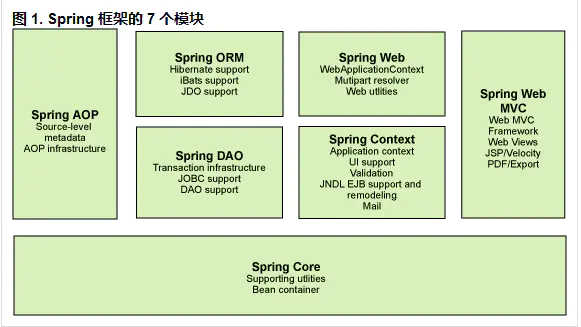
一般来说,Spring主要分为7个模块:
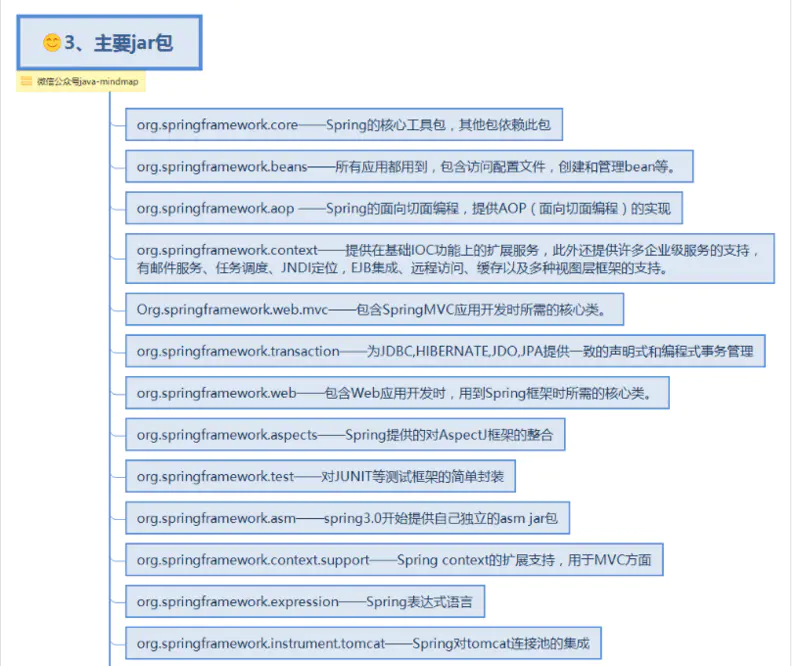
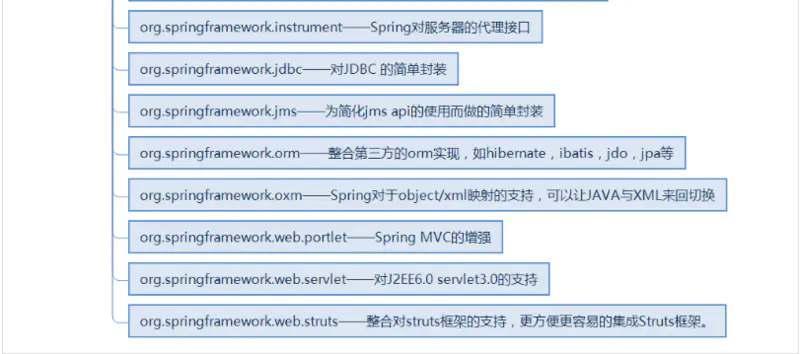
Spring的主要jar包
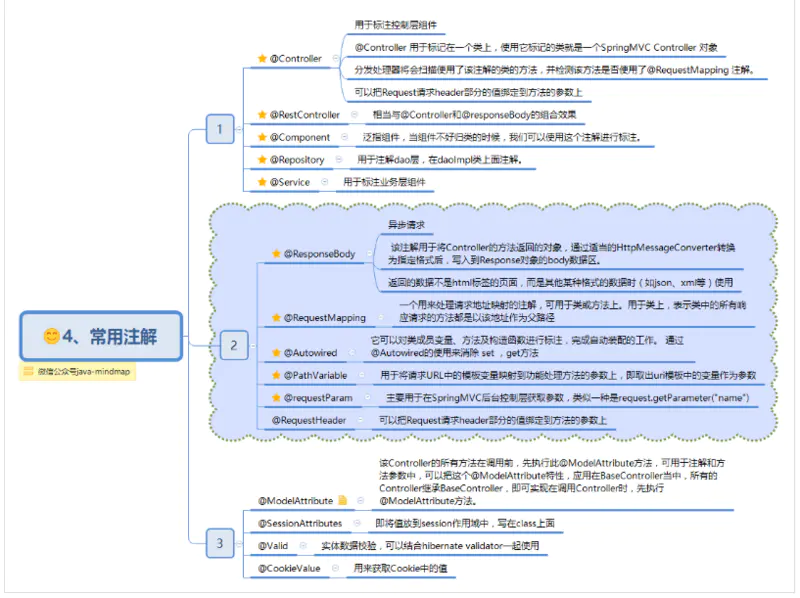
常用注解
bean注入与装配的的方式有很多种,可以通过xml,getset方式,构造函数或者注解等。简单易用的方式就是使用Spring的注解了,Spring提供了大量的注解方式,让项目阅读和开发起来更加方便。
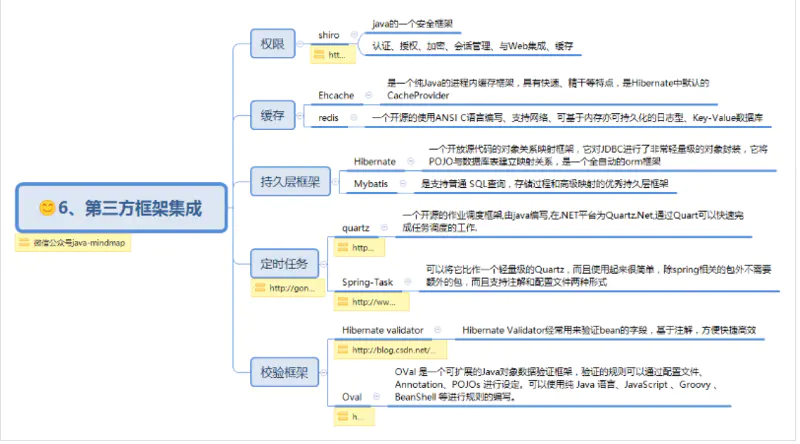
第三方框架集成
Spring框架的开发不是为了替代现有的优秀第三方框架,而是通过集成的方式把它们都连接起来。下面总结了一些常集成的优秀框架。
二:《spring之IOC》
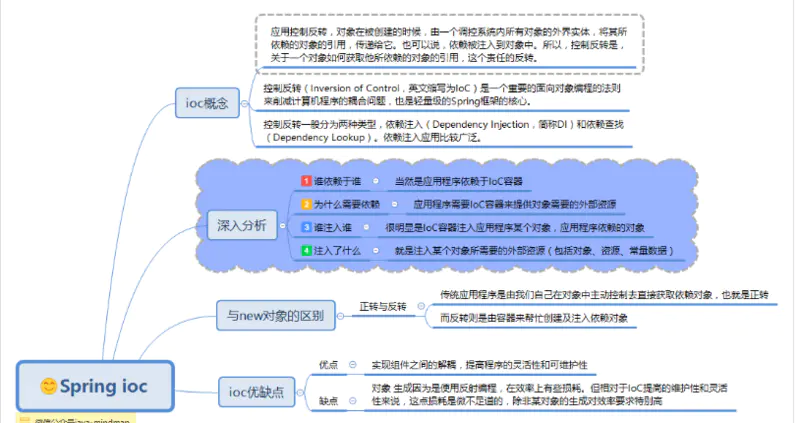
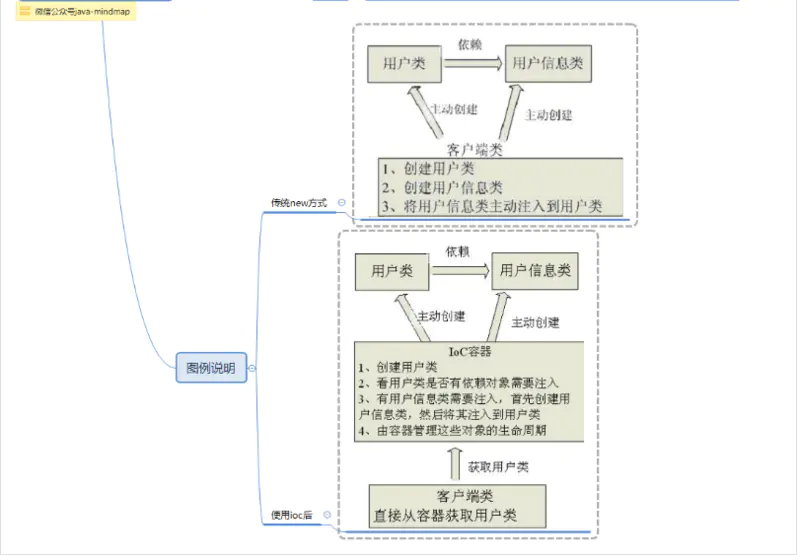
写过java的都知道:所有的对象都必须创建;或者说:使用对象之前必须先创建。而使用ioc之后,你就可以不再手动创建对象,而是从ioc容器中直接获取对象。
就好像我们无需考虑对象的销毁回收一样,因为java垃圾回收机制帮助我们实现了这个过程;而ioc则是让我们无需考虑对象的创建过程,由ioc容器帮我们实现对象的创建、注入等过程。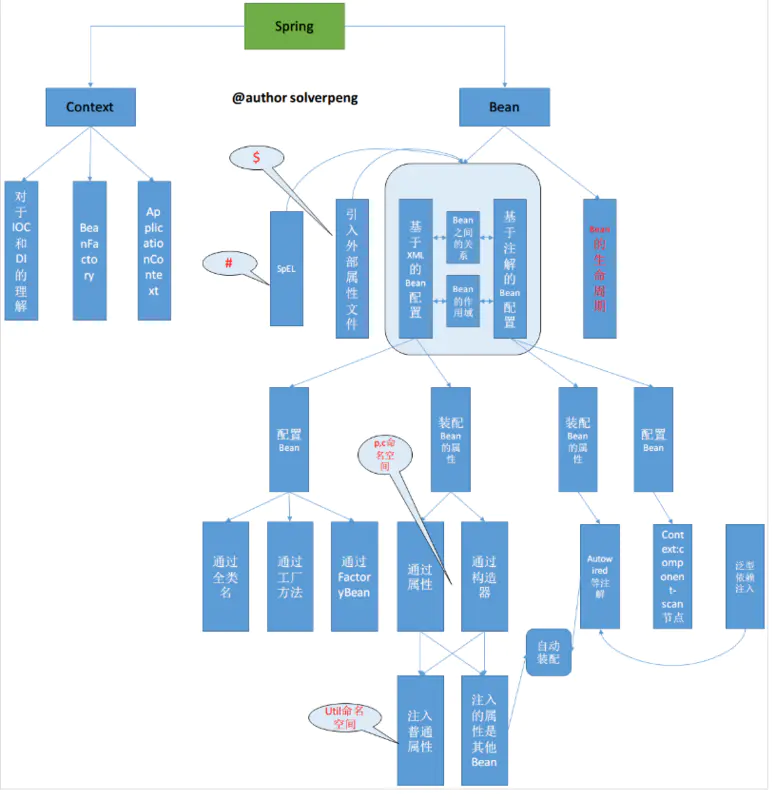
控制反转
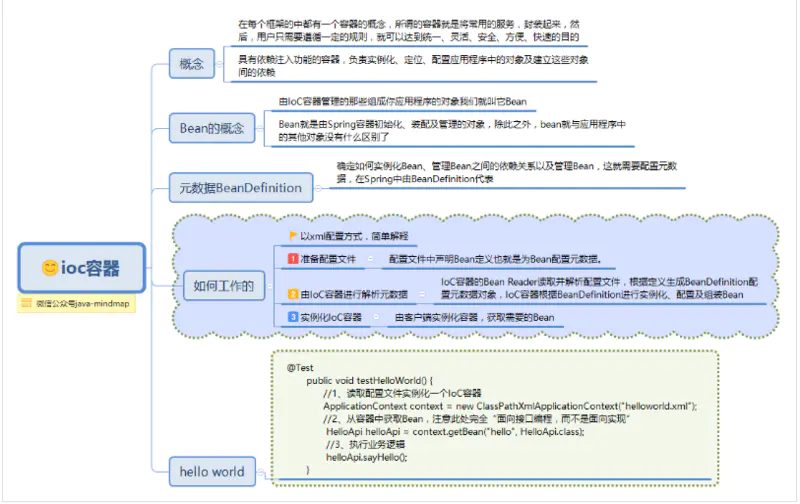
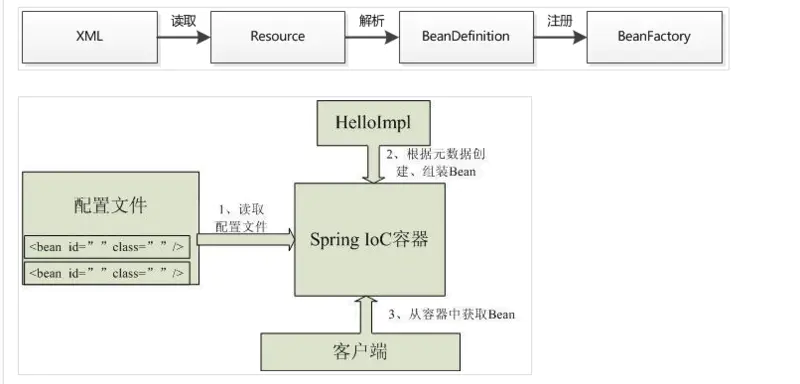
spring ioc容器
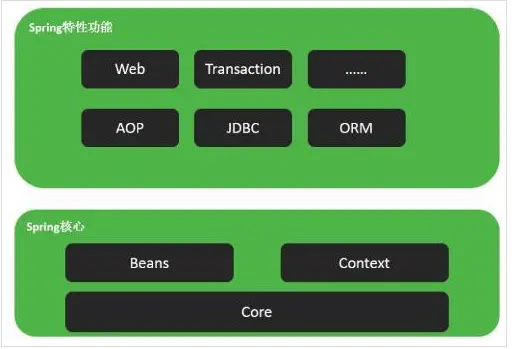
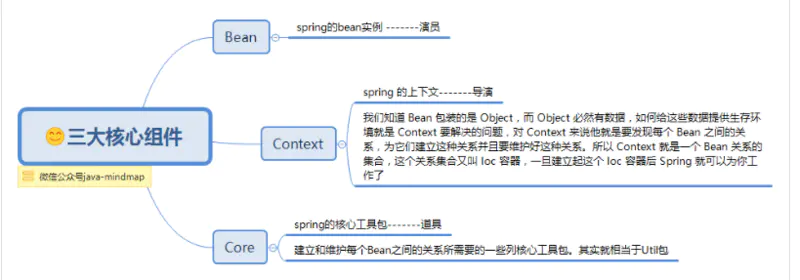
在Spring框架中的核心组件只有三个:Core、Context和Bean。它们构建起了整个Spring的骨骼架构,没有它们就不可能有AOP、Web等特性功能。
如果说在三个核心中再选出一个核心,那就非Bean莫属了。可以说,Spring就是面向Bean的编程,Bean在Spring中才是真正的主角。
Spring为何如此流行?你会发现Spring解决了一个非常关键的问题,它可以让你对对象之间的关系转而用配置文件来管理,或者注解,也就是它的依赖注入机制。而这个注入关系在一个叫Ioc的容器中管理。Ioc容器就是被Bean包裹的对象。Spring正是通过把对象包装在Bean中从而达到管理这些对象及做一些列额外操作的目的。
核心组件协同工作
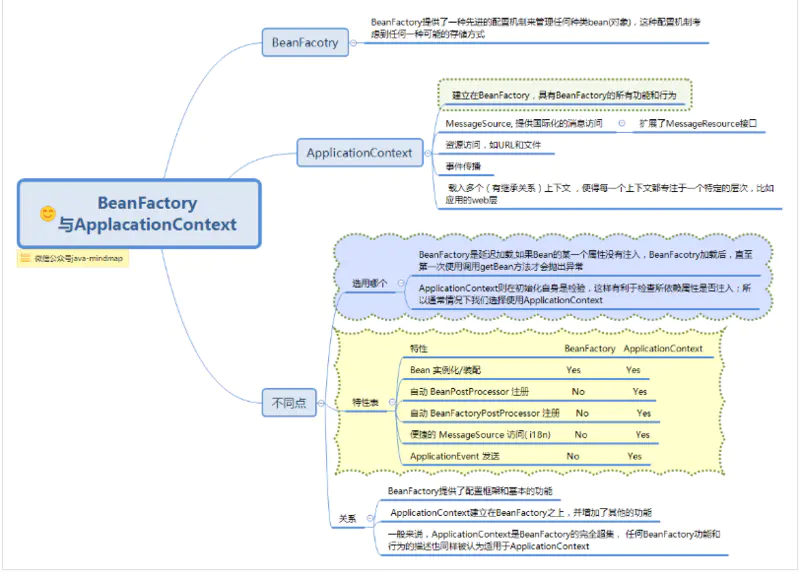
BeanFactory与ApplacationContext的区别
IOC中最核心的接口是Beanfactory提供IOC的高级服务,而ApplicationContext是建立在BeanFactory基础之上提供抽象的面向应用的服务。
3种注入方式
在Spring框架中,依赖注入(DI)的设计模式是用来定义对象彼此间的依赖。使用xml配置bean的情况下,它主要有两种类型:
Setter方法注入
构造器注入
当然,有了注解之后,使用注解的方式更加方便快捷。即自动装配功能实现属性自动注入(@autowire)。
写到这里,让我想起了最近在牛客网上看的一道选择题了:
下面有关spring的依赖注入,说法错误的是?
A、依赖注入通常有如下两种:设置注入和构造注入:
B、构造注入可以在构造器中决定依赖关系的注入顺序,优先依赖的优先注入
C、当设值注入与构造注入同时存在时,先执行构造注入,再执行设值注入
D、设值注入是指IoC容器使用属性的setter方法来注入被依赖的实例。这种注入方式比较简单、直观
牛客网给出的答案是选C,不过网友们好像对答案有不同的意见哈。查看网友评论及答案
原理解析
Spring的代码还真是不好读,分得太细了,文字也是难以描述出来,看了别人有关的博客,贴了好多代码,画了好多ER图来描述关键接口或类之间的关系。这么一篇这么长文章下来,大家也未必会认真读代码,看ER图,干脆也不跟风了。就贴了一点在我看来特关键的代码,嘿嘿。
context的初始化过程
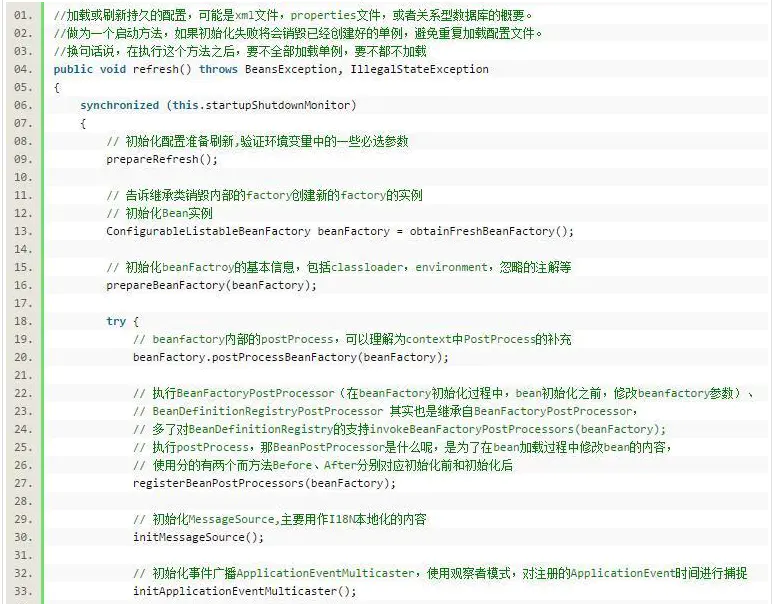
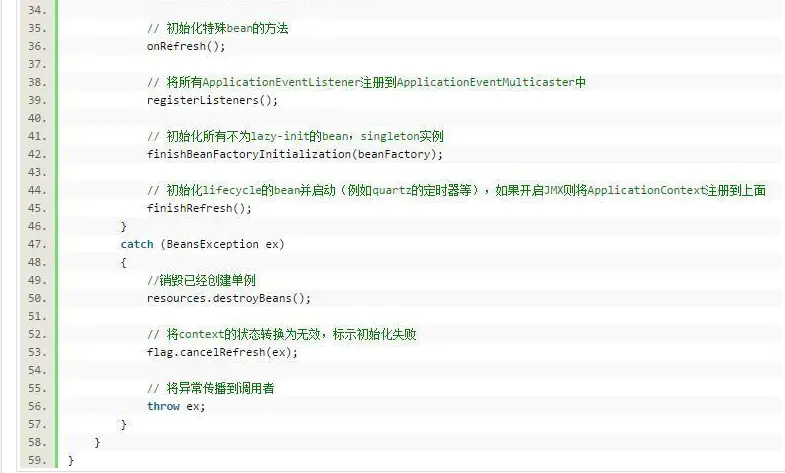
当运行ApplicationContext ctx = new ClassPathXmlApplicationContext("applicationContext.xml"); 构造方法ClassPathXmlApplicationContext(String configLocation)调用了this(new String[] {configLocation}, true, null);, 该构造方法具体代码如下。
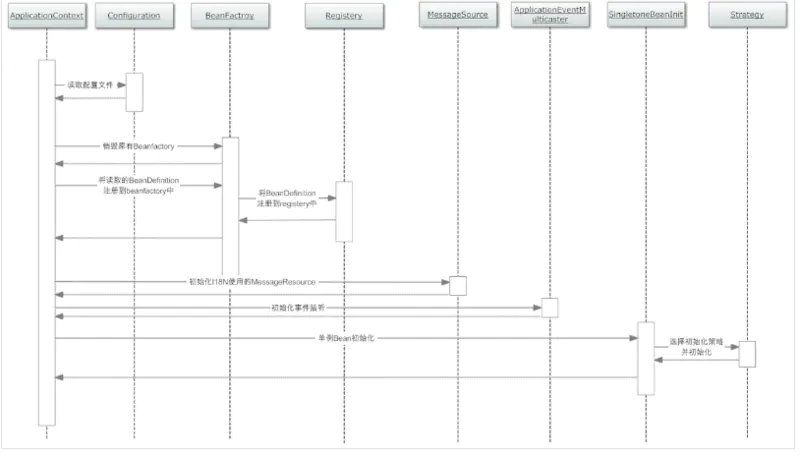
从时序图来看启动上述初始化
三:《spring之MVC》
spring mvc简介与运行原理
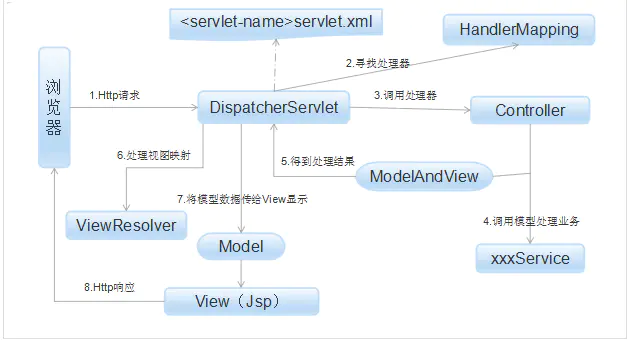
Spring的模型-视图-控制器(MVC)框架是围绕一个DispatcherServlet来设计的,这个Servlet会把请求分发给各个处理器,并支持可配置的处理器映射、视图渲染、本地化、时区与主题渲染等,甚至还能支持文件上传。
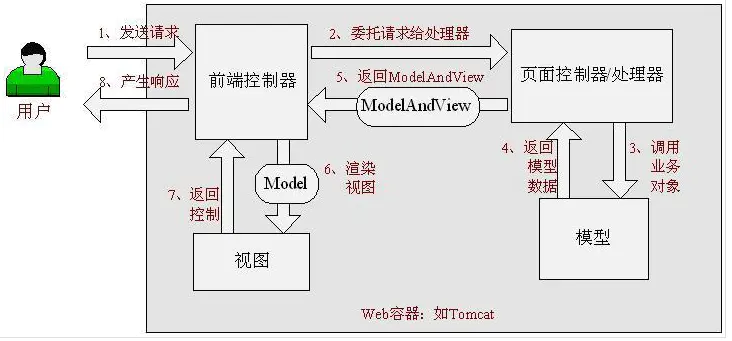
(1) Http请求:客户端请求提交到DispatcherServlet。
(2) 寻找处理器:由DispatcherServlet控制器查询一个或多个HandlerMapping,找到处理请求的Controller。
(3) 调用处理器:DispatcherServlet将请求提交到Controller。
(4)(5)调用业务处理和返回结果:Controller调用业务逻辑处理后,返回ModelAndView。
(6)(7)处理视图映射并返回模型: DispatcherServlet查询一个或多个ViewResoler视图解析器,找到ModelAndView指定的视图。
(8) Http响应:视图负责将结果显示到客户端。
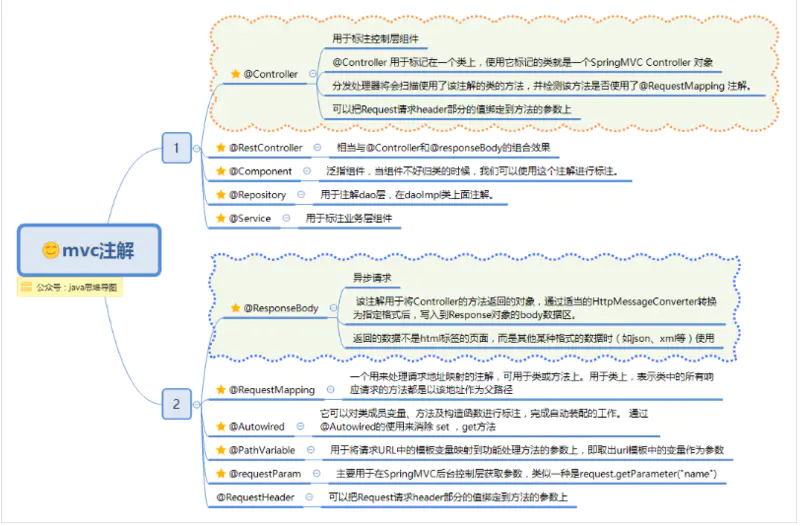
主要注解
ContextLoaderListener
在讲ContextLoaderListener之前,首先来了解一下web.xml的作用。
一个web中可以没有web.xml文件,也就是说,web.xml文件并不是web工程必须的。web.xml文件是用来初始化配置信息:比如Welcome页面、servlet、servlet-mapping、filter、listener、启动加载级别等。当你的web工程没用到这些时,你可以不用web.xml文件来配置你的Application。
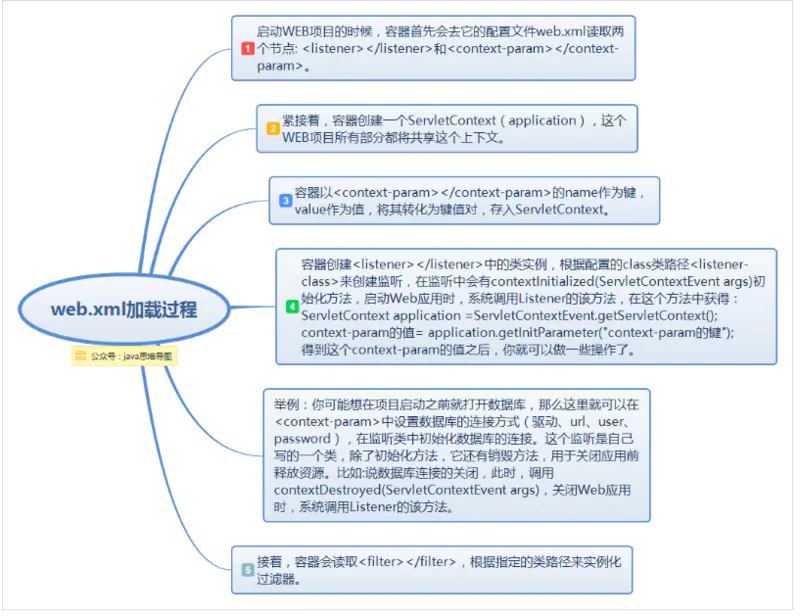
当要启动某个web项目时,服务器软件或容器如(tomcat)会第一步加载项目中的web.xml文件,通过其中的各种配置来启动项目,只有其中配置的各项均无误时,项目才能正确启动。web.xml有多项标签,在其加载的过程中顺序依次为:context-param >> listener >> fileter >> servlet。(同类多个节点以出现顺序依次加载)
而spring mvc启动过程大致分为两个过程:
ContextLoaderListener初始化,实例化IoC容器,并将此容器实例注册到ServletContext中。
DispatcherServlet初始化。
其中ContextLoaderListener监听器它实现了ServletContextListener这个接口,在web.xml配置这个监听器,启动容器时,就会默认执行它实现的方法。在ContextLoaderListener中关联了ContextLoader这个类,所以整个加载配置过程由ContextLoader来完成。
ContextLoaderListener在web.xml中的配置
 <param-name>contextConfigLocationparam-name>
<param-value>/WEB-INF/applicationContext.xmlparam-value>
context-param>

   <listener>
    <listener-class>org.springframework.web.context.ContextLoaderListenerlistener-class>
     listener>
ServletContextListener 接口有两个方法:contextInitialized,contextDestroyed
DispatcherServlet
Spring MVC框架,与其他很多web的MVC框架一样:请求驱动;所有设计都围绕着一个中央Servlet来展开,它负责把所有请求分发到控制器;同时提供其他web应用开发所需要的功能。不过Spring的中央处理器,DispatcherServlet,能做的比这更多。
下图展示了Spring Web MVC的DispatcherServlet处理请求的工作流。熟悉设计模式的朋友会发现,DispatcherServlet应用的其实就是一个“前端控制器”的设计模式(其他很多优秀的web框架也都使用了这个设计模式)。
流程图
在web.xml中的配置
<servlet>
<servlet-name>dispatcherservlet-name>
<servlet-class>org.springframework.web.servlet.DispatcherServletservlet-class>
<load-on-startup>1load-on-startup>
servlet>
<servlet-mapping>
<servlet-name>dispatcherservlet-name>
<url-pattern>/url-pattern>
 servlet-mapping>
其中
load-on-startup:表示启动容器时初始化该Servlet;
url-pattern:表示哪些请求交给Spring Web MVC处理, “/” 是用来定义默认servlet映射的。也可以如“*.html”表示拦截所有以html为扩展名的请求。
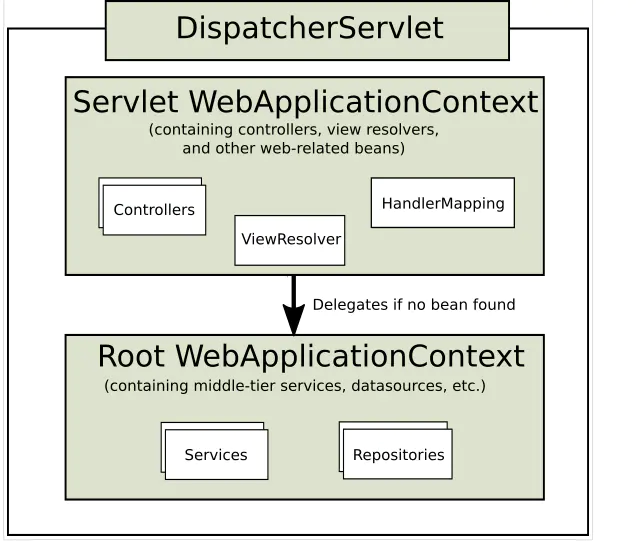
在Spring MVC中,每个DispatcherServlet都持有一个自己的上下文对象WebApplicationContext,它又继承了根(root)WebApplicationContext对象中已经定义的所有bean。这些继承的bean可以在具体的Servlet实例中被重载,在每个Servlet实例中你也可以定义其scope下的新bean。
WebApplicationContext继承自ApplicationContext,它提供了一些web应用经常需要用到的特性。它与普通的ApplicationContext不同的地方在于,它支持主题的解析,并且知道它关联到的是哪个servlet(它持有一个该ServletContext的引用)
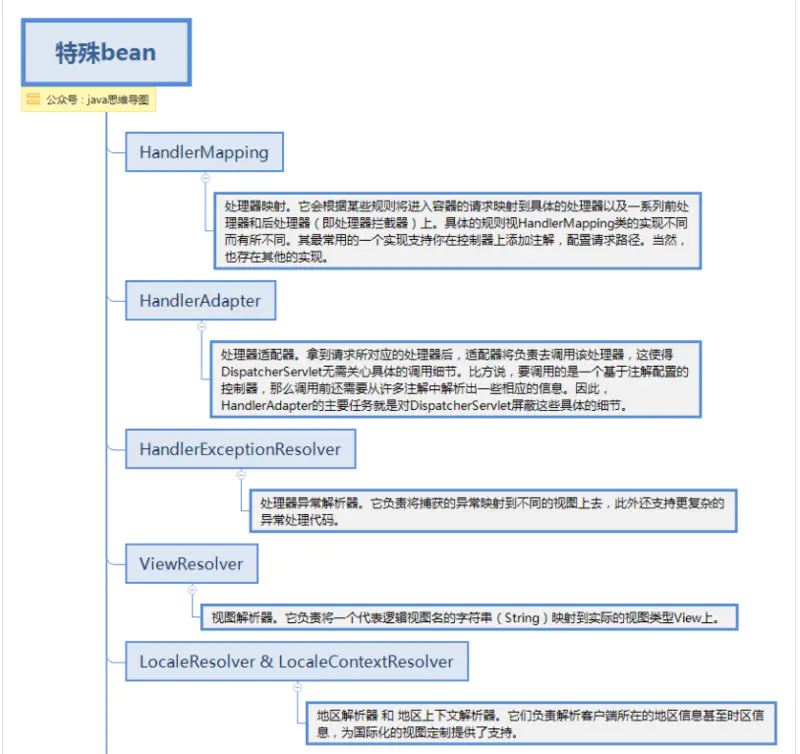
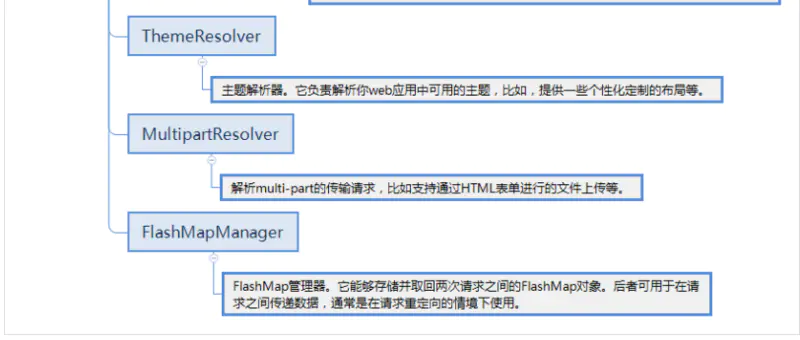
spring mvc同时提供了很多特殊的注解,用于处理请求和渲染视图等。DispatcherServlet初始化的过程中会默认使用这些特殊bean进行配置。如果你想指定使用哪个特定的bean,你可以在web应用上下文WebApplicationContext中简单地配置它们。
其中,常用的ViewResolver的配置。以jsp作为视图为例
    <bean class="org.springframework.web.servlet.view.InternalResourceViewResolver">
       <property name="prefix" value="/WEB-INF/jsp/" />
     <property name="suffix" value=".jsp" />
bean>

配置上传文件限制MultipartResolver


 <bean id="multipartResolver"                         class="org.springframework.web.multipart.commons.CommonsMultipartResolver">

 <property name="maxUploadSize" value="32505856"/>
bean>
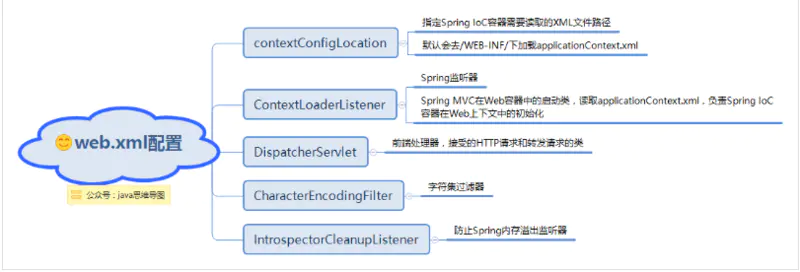
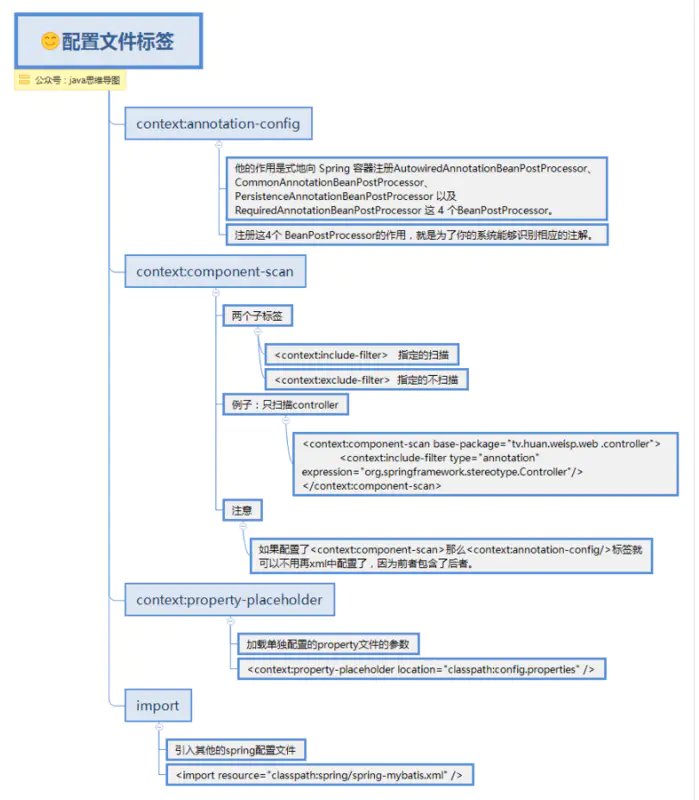
applicationContext.xml中的标签
文件上传
前面说到DispatcherServlet中有个特殊的Bean叫MultipartResolver,可用于限制文件的上传大小等。当解析器MultipartResolver完成处理时,请求便会像其他请求一样被正常流程处理。
表单
<form method="post" action="/form" enctype="multipart/form-data">
 <input type="text" name="name"/>
 <input type="file" name="file"/>
  <input type="submit"/>
    form>
控制器
     @RequestMapping(path = "/form", method = RequestMethod.POST)
         @RequestParam("file") MultipartFile file) {
if (!file.isEmpty()) {
      byte[] bytes = file.getBytes();
      // store the bytes somewhere
      return "redirect:uploadSuccess";
       }
   return "redirect:uploadFailure";
}
异常处理
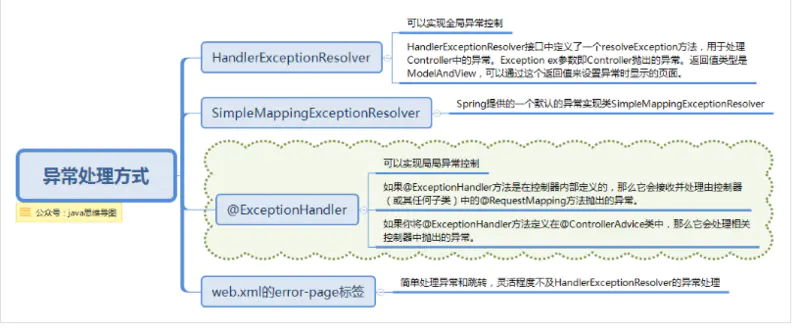
先来说下常见的异常处理有几种方式,如下图:
Spring的处理器异常解析器HandlerExceptionResolver接口的实现负责处理各类控制器执行过程中出现的异常。也是上面提到的,是DispatcherServlet中的特殊bean,可以自定义配置处理。
某种程度上讲,HandlerExceptionResolver与你在web应用描述符web.xml文件中能定义的异常映射(exception mapping)很相像,不过它比后者提供了更灵活的方式。比如它能提供异常被抛出时正在执行的是哪个处理器这样的信息。
HandlerExceptionResolver 提供resolveException接口
 public interface HandlerExceptionResolver {
ModelAndView resolveException(
        HttpServletRequest request, HttpServletResponse response, Object handler,                            Exception ex);
     }
在BaseController中使用 @ExceptionHandler注解处理异常
   @ExceptionHandler(Exception.class)
   public Object exceptionHandler(Exception ex, HttpServletResponse response,
          HttpServletRequest request) throws IOException {
    String url = "";
    String msg = ex.getMessage();
    Object resultModel = null;
    try {
        if (ex.getClass() == HttpRequestMethodNotSupportedException.class) {
            url = "admin/common/500";
            System.out.println("--------毛有找到对应方法---------");
        } else if (ex.getClass() == ParameterException.class) {//自定义的异常

        } else if (ex.getClass() == UnauthorizedException.class) {
            url = "admin/common/unauth";
            System.out.println("--------毛有权限---------");
        }

        String header = req.getHeader("X-Requested-With");
        boolean isAjax = "XMLHttpRequest".equalsIgnoreCase(header);
        String method = req.getMethod();
        boolean isPost = "POST".equalsIgnoreCase(method);

        if (isAjax || isPost) {
            return Message.error(msg);
        } else {
            ModelAndView view = new ModelAndView(url);
            view.addObject("error", msg);
            view.addObject("class", ex.getClass());
            view.addObject("method", request.getRequestURI());
            return view;
        }
    } catch (Exception exception) {
        logger.error(exception.getMessage(), exception);
        return resultModel;
    } finally {
        logger.error(msg, ex);
        ex.printStackTrace();
    }
}
在web.xml中处理异常
 <error-page>
<error-code>403error-code>
<location>/403.htmllocation>
error-page>
  <error-page>
<error-code>404error-code>
<location>/404.htmllocation>
  error-page>


      <error-page>
          <error-code>500error-code>
     <location>/500.htmllocation>
      error-page>


   <error-page>
<exception-type>java.lang.Exceptionexception-type>
<location>/500.jsplocation>
     error-page>

     <error-page>
<exception-type>java.lang.Throwableexception-type>
<location>/500.jsplocation>
  error-page>
来一个问题:HandlerExceptionResolver和web.xml中配置的error-page会有冲突吗?
解答:如果resolveException返回了ModelAndView,会优先根据返回值中的页面来显示。不过,resolveException可以返回null,此时则展示web.xml中的error-page的500状态码配置的页面。 当web.xml中有相应的error-page配置,则可以在实现resolveException方法时返回null。 API文档中对返回值的解释: return a corresponding ModelAndView to forward to, or null for default processing.
四:《spring之aop》
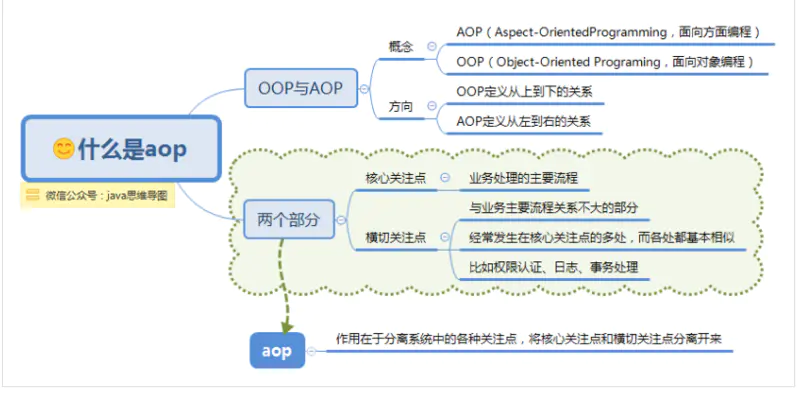
什么是aop
AOP(Aspect-OrientedProgramming,面向方面编程),可以说是OOP(Object-Oriented Programing,面向对象编程)的补充和完善。OOP允许你定义从上到下的关系,但并不适合定义从左到右的关系。例如日志功能。日志代码往往水平地散布在所有对象层次中,而与它所散布到的对象的核心功能毫无关系。这种散布在各处的无关的代码被称为横切(cross-cutting)代码,在OOP设计中,它导致了大量代码的重复,而不利于各个模块的重用。
而AOP技术则恰恰相反,它利用一种称为“横切”的技术,剖解开封装的对象内部,并将那些影响了多个类的公共行为封装到一个可重用模块,并将其名为“Aspect”,即方面。所谓“方面”,简单地说,就是将那些与业务无关,却为业务模块所共同调用的逻辑或责任封装起来,便于减少系统的重复代码,降低模块间的耦合度,并有利于未来的可操作性和可维护性。
aop使用场景
aop框架种类
- AspectJ
- JBoss AOP
- Spring AOP
使用aop可以做的事情有很多。
- 性能监控,在方法调用前后记录调用时间,方法执行太长或超时报警。
- 缓存代理,缓存某方法的返回值,下次执行该方法时,直接从缓存里获取。
- 软件破解,使用AOP修改软件的验证类的判断逻辑。
- 记录日志,在方法执行前后记录系统日志。
- 工作流系统,工作流系统需要将业务代码和流程引擎代码混合在一起执行,那么我们可以使用AOP将其分离,并动态挂接业务。
- 权限验证,方法执行前验证是否有权限执行当前方法,没有则抛出没有权限执行异常,由业务代码捕捉。
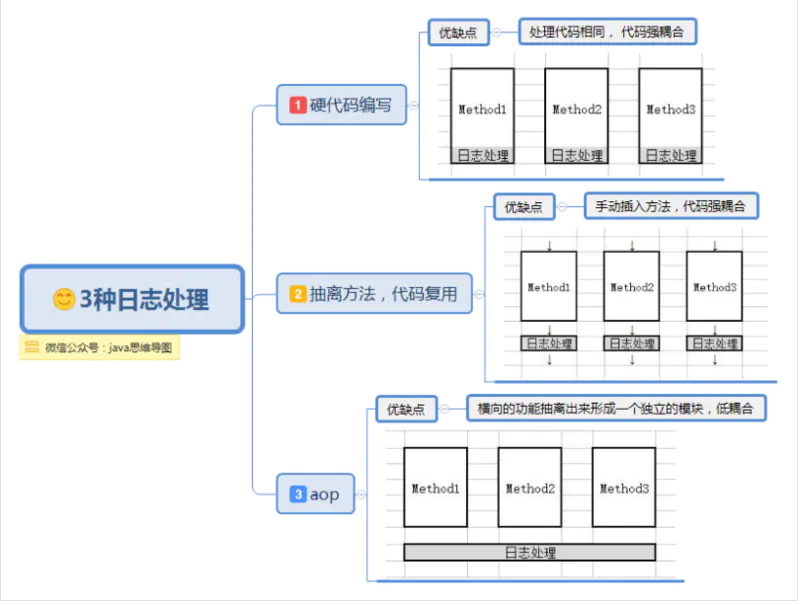
观察一下传统编码方式与使用aop的区别
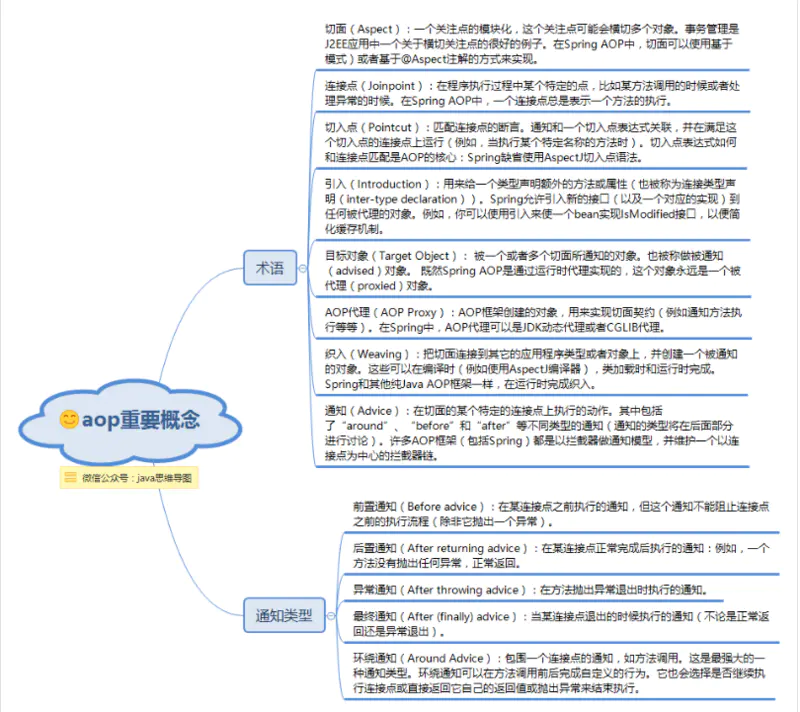
核心概念
描述AOP常用的一些术语有通知(Adivce)、切点(Pointcut)、连接点(Join point)、切面(Aspect)、引入(Introduction)、织入(Weaving)、通知(Advice)等。
简单例子
相比xml配置,基于注解的方式更加简洁方便。
@Aspect
public class TransactionDemo {
@Pointcut(value="execution(* com.yangxin.core.service.*.*.*(..))")
public void point(){
}
@Before(value="point()")
public void before(){
    System.out.println("transaction begin");
}

@AfterReturning(value = "point()")
public void after(){
    System.out.println("transaction commit");
}
@Around("point()")
public void around(ProceedingJoinPoint joinPoint) throws Throwable{
    System.out.println("transaction begin");
    joinPoint.proceed();
    System.out.println("transaction commit");
         }
     }
在applicationContext.xml中配置。
id = "transactionDemo" class = "com.yangxin.core.transaction.TransactionDemo" />
spring aop原理
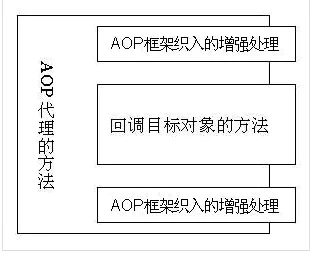
通过前面介绍可以知道:AOP 代理其实是由 AOP 框架动态生成的一个对象,该对象可作为目标对象使用。AOP 代理包含了目标对象的全部方法,但 AOP 代理中的方法与目标对象的方法存在差异:AOP 方法在特定切入点添加了增强处理,并回调了目标对象的方法。
Spring 的 AOP 代理由 Spring 的 IoC 容器负责生成、管理,其依赖关系也由 IoC 容器负责管理。因此,AOP 代理可以直接使用容器中的其他 Bean 实例作为目标,这种关系可由 IoC 容器的依赖注入提供。
aop开发时,其中需要程序员参与的只有 3 个部分:
- 定义普通业务组件。
- 定义切入点,一个切入点可能横切多个业务组件。
- 定义增强处理,增强处理就是在 AOP 框架为普通业务组件织入的处理动作。
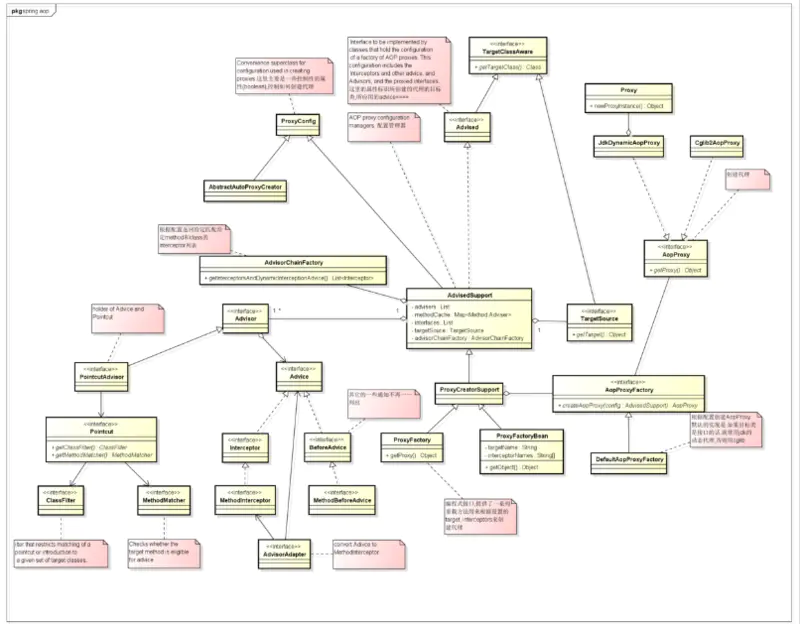
为了理清关系,先来个类关系图。
两种动态代理方式
Spring默认采取的动态代理机制实现AOP,当动态代理不可用时(代理类无接口)会使用CGlib机制。
Spring提供了两种方式来生成代理对象: JDKProxy和Cglib,具体使用哪种方式生成由AopProxyFactory根据AdvisedSupport对象的配置来决定。默认的策略是如果目标类是接口,则使用JDK动态代理技术,否则使用Cglib来生成代理。
JDK动态代理
- JDK动态代理主要涉及到java.lang.reflect包中的两个类:Proxy和InvocationHandler。InvocationHandler是一个接口,通过实现该接口定义横切逻辑,并通过反射机制调用目标类的代码,动态将横切逻辑和业务逻辑编制在一起。
- Proxy利用InvocationHandler动态创建一个符合某一接口的实例,生成目标类的代理对象。
CGLib动态代理
- CGLib全称为Code Generation
Library,是一个强大的高性能,高质量的代码生成类库,可以在运行期扩展Java类与实现Java接口,CGLib封装了asm,可以再运行期动态生成新的class。和JDK动态代理相比较:JDK创建代理有一个限制,就是只能为接口创建代理实例,而对于没有通过接口定义业务方法的类,则可以通过CGLib创建动态代理。
知识拓展
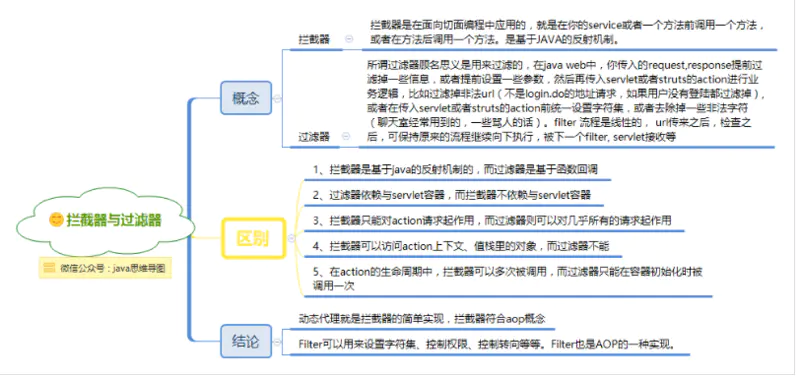
通过上面的分析,大家是否有种熟悉的感觉,似乎和拦截器、过滤器的功能相似。那么问题来了,aop与拦截器、过滤器是什么关系。
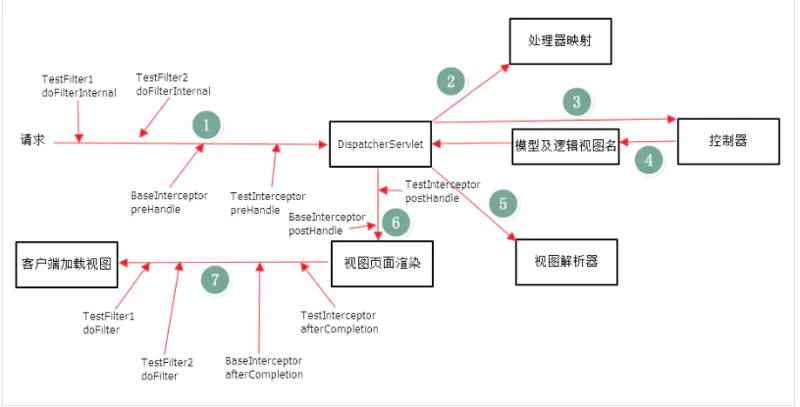
先来回顾一下拦截器与过滤器。如下图一网友的测试,在web.xml中注册了TestFilter1和TestFilter2。然后在spring的配置文件中配置了BaseInterceptor和TestInterceptor。得到的结果如下图所示。从图中可以看出,拦截器和过滤器都横切了业务方法,看似符合aop的思想。
Filter过滤器:拦截web访问url地址。 Interceptor拦截器:拦截以 .action结尾的url,拦截Action的访问。 Spring AOP拦截器:只能拦截Spring管理Bean的访问(业务层Service)
五:《spring之cache》
关于缓存
缓存是实际工作中非常常用的一种提高性能的方法。而在java中,所谓缓存,就是将程序或系统经常要调用的对象存在内存中,再次调用时可以快速从内存中获取对象,不必再去创建新的重复的实例。这样做可以减少系统开销,提高系统效率。
在增删改查中,数据库查询占据了数据库操作的80%以上,而非常频繁的磁盘I/O读取操作,会导致数据库性能极度低下。而数据库的重要性就不言而喻了:
- 数据库通常是企业应用系统最核心的部分
- 数据库保存的数据量通常非常庞大
- 数据库查询操作通常很频繁,有时还很复杂
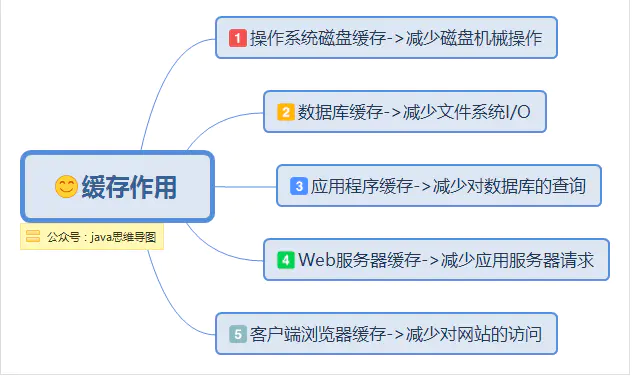
在系统架构的不同层级之间,为了加快访问速度,都可以存在缓存
spring cache特性与缺憾
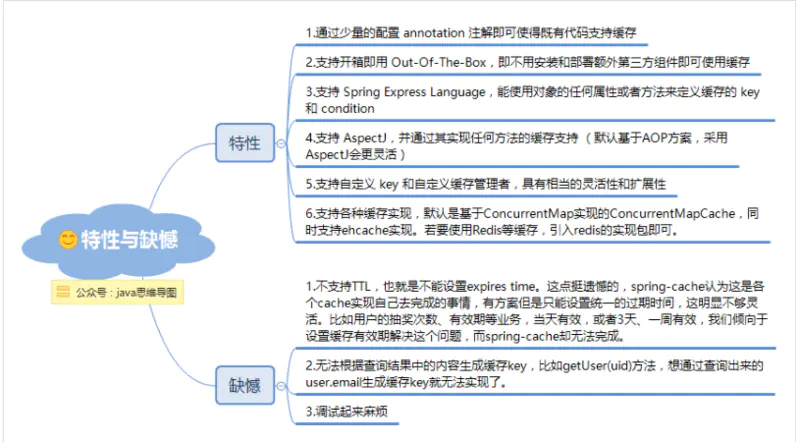
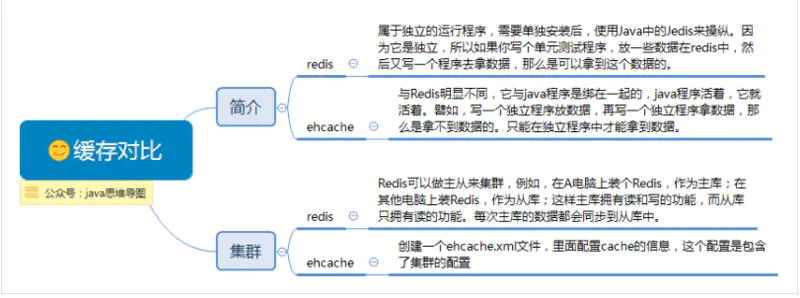
现在市场上主流的缓存框架有ehcache、redis、memcached。spring cache可以通过简单的配置就可以搭配使用起来。其中使用注解方式是最简单的。
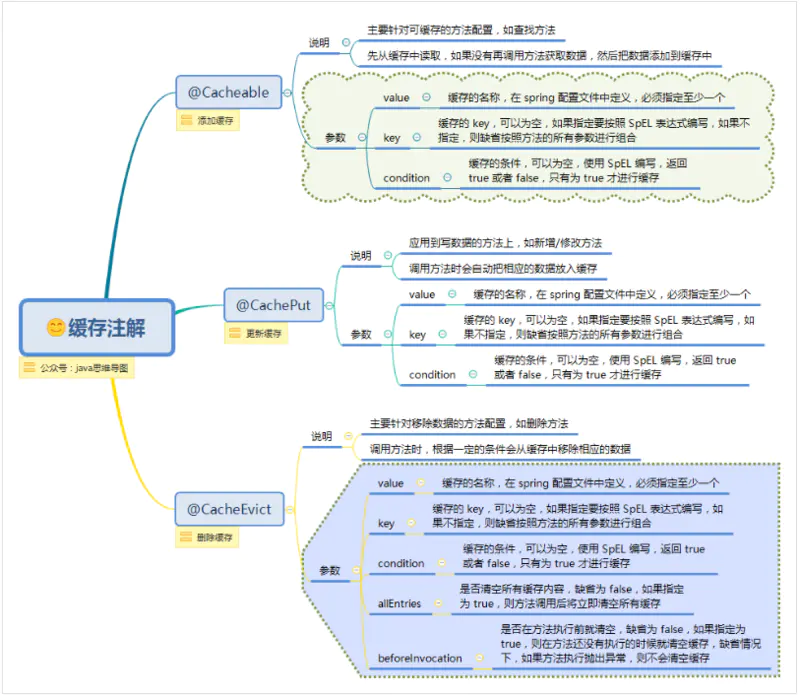
Cache注解
从以上的注解中可以看出,虽然使用注解的确方便,但是缺少灵活的缓存策略,
缓存策略:
- TTL(Time To Live ) 存活期,即从缓存中创建时间点开始直到它到期的一个时间段(不管在这个时间段内有没有访问都将过期)
- TTI(Time To Idle) 空闲期,即一个数据多久没被访问将从缓存中移除的时间
项目中可能有很多缓存的TTL不相同,这时候就需要编码式使用编写缓存。
条件缓存
根据运行流程,如下@Cacheable将在执行方法之前( #result还拿不到返回值)判断condition,如果返回true,则查缓存;
 @Cacheable(value = "user", key = "#id", condition = "#id lt 10")
 public User conditionFindById(final Long id)
如下@CachePut将在执行完方法后(#result就能拿到返回值了)判断condition,如果返回true,则放入缓存
   @CachePut(value = "user", key = "#id", condition = "#result.username ne 'zhang'")
   public User conditionSave(final User user)
如下@CachePut将在执行完方法后(#result就能拿到返回值了)判断unless,如果返回false,则放入缓存;(即跟condition相反)
    @CachePut(value = "user", key = "#user.id", unless = "#result.username eq 'zhang'")
     public User conditionSave2(final User user)
如下@CacheEvict, beforeInvocation=false表示在方法执行之后调用(#result能拿到返回值了);且判断condition,如果返回true,则移除缓存;
    @CacheEvict(value = "user", key = "#user.id", beforeInvocation = false, condition =                "#result.username ne 'zhang'")
    public User conditionDelete(final User user)
小试牛刀,综合运用:
        @CachePut(value = "user", key = "#user.id")
        public User save(User user) {
   users.add(user);
   return user;
   }
    @CachePut(value = "user", key = "#user.id")
     public User update(User user) {
   users.remove(user);
   users.add(user);
   return user;
  }
 @CacheEvict(value = "user", key = "#user.id")
 public User delete(User user) {
   users.remove(user);
   return user;
 }
 @CacheEvict(value = "user", allEntries = true)
 public void deleteAll() {
   users.clear();
  }
 @Cacheable(value = "user", key = "#id")
 public User findById(final Long id) {
   System.out.println("cache miss, invoke find by id, id:" + id);
   for (User user : users) {
       if (user.getId().equals(id)) {
           return user;
       }
   }
   return null;
   }
配置ehcache与redis
spring cache集成ehcache,spring-ehcache.xml主要内容:
 <dependency>
 <groupId>net.sf.ehcachegroupId>
 <artifactId>ehcache-coreartifactId>
 <version>${ehcache.version}version>
dependency>


 <bean id="ehcacheManager" class="org.springframework.cache.ehcache.EhCacheManagerFactoryBean">
<property name="configLocation" value="classpath:xml/ehcache.xml"/>
     bean>
    <bean id="cacheManager" class="org.springframework.cache.ehcache.EhCacheCacheManager">
<property name="cacheManager" ref="ehcacheManager"/>
<property name="transactionAware" value="true"/>
     bean>


        <cache:annotation-driven cache-manager="cacheManager" proxy-target-class="true"/>
spring cache集成redis,spring-redis.xml主要内容:
 <dependency>
  <groupId>org.springframework.datagroupId>
  <artifactId>spring-data-redisartifactId>
 <version>1.8.1.RELEASEversion>
   dependency>
 <dependency>
 <groupId>org.apache.commonsgroupId>
<artifactId>commons-pool2artifactId>
<version>2.4.2version>
dependency>
<dependency>
<groupId>redis.clientsgroupId>
<artifactId>jedisartifactId>
<version>2.9.0version>
dependency>


<description>redis配置description>

<bean id="jedisPoolConfig" class="redis.clients.jedis.JedisPoolConfig">
 <property name="maxIdle" value="${redis.pool.maxIdle}"/>
<property name="maxTotal" value="${redis.pool.maxActive}"/>
<property name="maxWaitMillis" value="${redis.pool.maxWait}"/>
<property name="testOnBorrow" value="${redis.pool.testOnBorrow}"/>
<property name="testOnReturn" value="${redis.pool.testOnReturn}"/>
bean>


    <bean id="jedisConnectionFactory" class="org.springframework.data.redis.connection.jedis.JedisConnectionFactory">
<property name="hostName" value="${redis.master.ip}"/>
<property name="port" value="${redis.master.port}"/>
<property name="poolConfig" ref="jedisPoolConfig"/>
bean>

<bean id="redisTemplate" class="org.springframework.data.redis.core.RedisTemplate"
 p:connectionFactory-ref="jedisConnectionFactory">
 <property name="keySerializer">
   <bean class="org.springframework.data.redis.serializer.JdkSerializationRedisSerializer">bean>
 property>
 <property name="valueSerializer">
   <bean class="org.springframework.data.redis.serializer.JdkSerializationRedisSerializer"/>
 property>
 <property name="hashKeySerializer">
   <bean class="org.springframework.data.redis.serializer.JdkSerializationRedisSerializer"/>
 property>
 <property name="hashValueSerializer">
   <bean class="org.springframework.data.redis.serializer.JdkSerializationRedisSerializer"/>
property>
bean>


 <bean id="cacheManager" class="org.springframework.data.redis.cache.RedisCacheManager"
 c:redisOperations-ref="redisTemplate">

 <property name="defaultExpiration" value="600"/>
 <property name="usePrefix" value="true"/>

<property name="expires">
   <map key-type="java.lang.String" value-type="java.lang.Long">
       <entry key="halfHour" value="1800"/>
       <entry key="hour" value="3600"/>
       <entry key="oneDay" value="86400"/>

       <entry key="authorizationCache" value="1800"/>
       <entry key="authenticationCache" value="1800"/>
       <entry key="activeSessionCache" value="1800"/>
   map>
property>
bean>

   <cache:annotation-driven cache-manager="cacheManager" proxy-target-class="true"/>
项目中注解缓存只能配置一个,所以可以通过以下引入哪个配置文件来决定使用哪个缓存。
<import resource="classpath:spring/spring-ehcache.xml"/>
当然,可以通过其他配置搭配使用两个缓存机制。比如ecache做一级缓存,redis做二级缓存。
更加详细的使用与配置,可以参考项目中spring-shiro-training中有关spring cache的配置。
推荐一个交流学习群:478030634 里面会分享一些资深架构师录制的视频录像:有Spring,MyBatis,Netty源码分析,高并发、高性能、分布式、微服务架构的原理,JVM性能优化这些成为架构师必备的知识体系。还能领取免费的学习资源,目前受益良多:
