node.js+mongDB创建简单博客
技术栈
node.js
express
mongoDB
Ajax
art-template
bootstrap
jquery
实现登陆,注册,退出,分页,修改个人资料等功能
源代码在这里 https://dev.tencent.com/u/Lucky7190/p/blog/git
实现步骤
- 创建目录结构
models 中分别为文章模型和用户模型,用于对数据库的操作
router.js为所有的路由控制,实现页面之间的交互逻辑和业务逻辑
views里存放页面模板

- 整合前端页面(include,block,extend)
设计路由(登陆,注册,退出,修改,发帖,分页)
| 路径 | 方法 | get 参数 | post 参数 | 是否需要登录 | 备注 |
|---|---|---|---|---|---|
| / | GET | 渲染首页 | |||
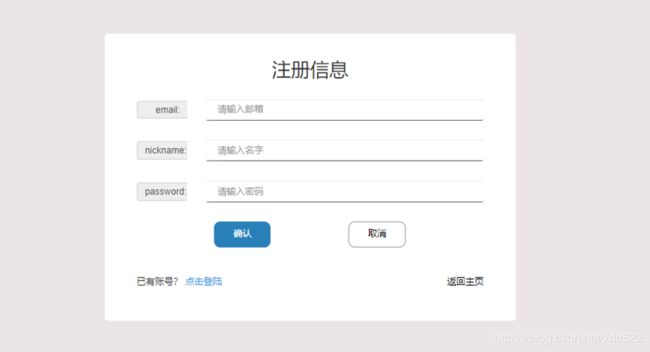
| /register | GET | 渲染注册页面 | |||
| /register | POST | email nickname password | 处理注册请求 | ||
| /login | GET | 渲染登录页面 | |||
| /login | POST | email password | 处理登录请求 | ||
| /logout | GET | 是 | 处理退出请求 | ||
| /publish | GET | 是 | 渲染发布主题页面 | ||
| /publish | POST | title content nickname | 是 | 处理发布主题请求 | |
| /userInfo | GET | 是 | 渲染个人资料页面 | ||
| /userInfo | POET | email nickname gender | 是 | 处理修改资料请求 | |
| /page | GET | 渲染分页页面 |
- 连接数据库
- 实现功能
登陆,注册,退出,修改,发帖
先处理好客户端页面内容 (name,收集表单数据,发起请求)
操作数据库
有错的话发送500告诉客户端服务端错了
其他的根据你的业务发送不同的响应数据
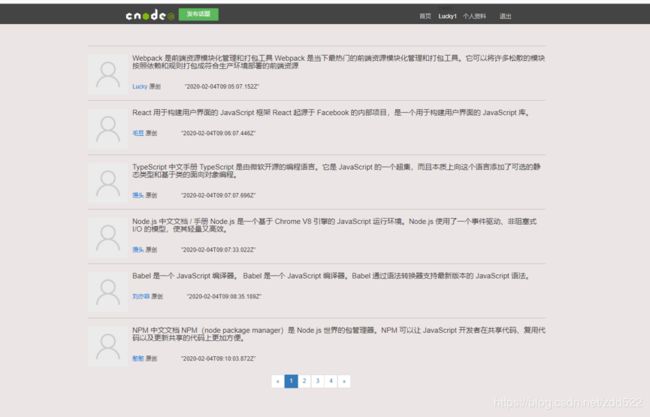
首页整体布局
一.app.js
主要职责:做一些服务相关配置,模板引擎,body-parser解析表单post请求体,提供静态资源服务,挂载路由,监听端口启动服务
值得注意的地方是:配置表单post请求体插件和session一定要在挂载路由之前
const express = require('express');
const app = express();
const router = require('./router');
const bodyParser = require('body-parser');
const path = require('path');
const port = 3000;
const session = require('express-session');
app.use(session({
    secret: 'keyboard cat',
    resave: false,
    saveUninitialized: false
}))
app.use('/public', express.static(path.join(__dirname, './public/')));
app.use('/node_modules', express.static(path.join(__dirname, './node_modules/')));
app.engine('html', require('express-art-template'));
app.set('views', path.join(__dirname, './views')) ;
app.use(bodyParser.json());
app.use(bodyParser.urlencoded());
app.use(router);
app.listen(port, () => console.log('now you kan listening to localhost:3000'));
二.路由设计(router.js)
简单列举两个值得我注意的地方
1.先说一个简单的注册功能
获取表单提交的数据(req.body)
操作数据库,判断用户或者用户名是否存在,存在就不允许注册,不存在注册新用户,发送响应,注册成功即显示登陆,通过session插件,把通过注册表单获取到的数据user传到session的user里面,
注册后或登陆状态
退出或未登录状态
注册时使用md5对密码重复加密
导包方式
const md5 = require('blueimp-md5');
加密后在之后登陆验证的时候,也要记得加密
另外mongDB的 或 操作方式,例
db.users.find({ '$or' : [{'name' : 'hurry'}, {'age' : 18}] },{'name' : 1, 'age' : 1, 'skills' : 1});
router.post('/register', (req, res) => {
    console.log(req.body);
    User.findOne({
        $or: [{
                email: req.body.email
            },
            {
                nickname: req.body.nickname
            }
        ]
    }, (err, data) => {
        if (err) {
            return res.status(500).json({
                code: 500,
                message: '服务端错误'
            })
        }
        if (data) {
            return res.status(200).json({
                code: 1,
                message: '已存在'
            })
        }
        req.body.password = md5(md5(req.body.password)) //此处使用md5对密码重复加密
        new User(req.body).save((err, user) => {
            if (err) {
                return res.status(500).json({
                    code: 500,
                    message: '服务端错误'
                })
            }
            req.session.user = user;
           res.status(200).json({
                code: 0,;
                message: 'ok'
            })
        })
    })
})
根据处理结果发送出不同的响应数据(code),接收后做判断
   $.ajax({
                type: 'POST',
                url: '/register',
                data: formData,
                dataType: 'json',
                success: function (data) {
                    console.log(data)
                    if (data.code === 0) {
                        // window.alert('注册成功,即将跳转')
                        window.location.href = "/"
                    } else if (data.code === 1) {
                        // window.alert('邮箱或者昵称已存在')
                    } else if (data.code === 500) {
                        // window.alert('服务端错误')
                    }
                }
            })
2.最值得说的就是分页了
渲染首页时服务端先从数据库拿数据,获取发帖数量,计算页码数,将页码数存放在数组中,客户端遍历显示页码数
点击前后页码按钮的时候,需要通过记录当前被按下具有active样式的index值
然后将index值转化成前一页或者后一页的索引值来确定页码数,发送到服务端,很长时间没用过这两个方法了,学啥记不住啥,写的时候头都大了
$(selector).index()
他用于获得第一个匹配元素相对于其同胞元素的 index 位置。
而eq() 方法返回带有被选元素的指定索引号的元素。
索引号从 0 开头,所以第一个元素的索引号是 0(不是 1)。
JS代码如下:
      $('.previous-button').click(() => {
            var index = $('.active').index()-2;
            console.log(index);
            if(index >= 0 ){
                $('.pagination').children('.pageCode').eq(index).click();
            }
        })
        $('.next-botton').click(() => {
            var index = $('.active').index();
            console.log(index);
            if(index < $('.pageCode').length ){
                $('.pagination').children('.pageCode').eq(index).click();
            }
        })
        $('.pageCode').click(function(e) {
            // e.preventDefault();
            e.preventDefault;
            $(this).addClass('active').siblings('.active').removeClass('active');
            $.ajax({
                type: 'GET',
                url: '/page',
                data:`num=${$(this).children('a').html()}`,
                dataType: 'json',
                success: function (data) {
                    $('.inner').html('');
                    console.log(data)
                    for (let i = 0; i < data.topic.length; i  ) {
                        let datas = data.topic[i]
                        $('.inner').append(
                            `


                                       ${datas.content}


                                       ${datas.nickname} 原创 	        				                ${datas.createTime}


                                   `)
                    }
                }
            })

        })
接收当前页码数据,计算在该页显示的数据然后响应
这里当时让我困惑的是我用req.body获取数据,结果获取的出来的都是NaN
我就纳闷了,后来搜了才知道body 不是 nodejs 默认提供的,需要载入 body-parser 中间件才可以使用 req.body,他通常用于处理post请求
而query由nodejs默认提供,无需载入中间件,第一次用node写东西,知道的少,不熟练,还忘得快
router.get('/page', (req, res) => {
    const num = parseInt(req.query.num,10);
    console.log(num);
    const startNum = (num - 1) * 6;
    const endNum = startNum   6 ;
    Invitation.find((err,data) => {
        if(err){
            return res.end('Server Err');
        }
        data = data.slice(startNum,endNum);
        res.json({topic: data});
    })
})
其他功能相对简单,具体代码在这https://dev.tencent.com/u/Lucky7190/p/blog/git
菜鸟博主,代码有问题的话欢迎指正,共同进步!