Spring中Aop的代理----(JDK代理,CGLIB代理,AspectJ的xml方式、注解方式,总之你收藏就完事
此篇博文不会说太多原理,大家看代码体会,说再多无益,需要知道原理的请自行去查,如果你还觉得不错,请留下一个赞
文章目录
- 一、静态代理
- 二、JDK动态代理
- 三、CGLIB动态代理
- 四、AspectJ常的用两种方式
- 五、分享交流
一、静态代理
- 代理究竟是什么意思?
这样跟你说吧:你有一个韩国的朋友,有一天你突然想要买韩国的化妆品,你自己飞过去显然不合适,所以你就授权给你韩国的朋友,让他代理你去购买化妆品
故事听完了,这就是代理,那它在代码中如何体现呢?
既然你要让你朋友代理你的授权,那代码中要体现这一点,它是直接把目标类,即你把它丢到代理类中。
纸上得来终且浅,得知此事码先行。
/**
 * 静态代理
 */
//这里就不一个一个.java给你分开来看了,我直接放在一起看

//接口类
public interface PersonService {
	void savePerson();
	void updatePerson();
	void deletePerson();
}

//接口实现(也是目标类)
import org.springframework.stereotype.Service;

/**
 * 这个是目标类,就是自己要实现的东西(要实现的逻辑业务)
 * @author 1710269824
 *
 */

@Service("personService")
public class PersonServiceImp implements PersonService {

	@Override
	public void savePerson() {
		// TODO Auto-generated method stub
		System.out.println("保存数据");

	}

	@Override
	public void updatePerson() {
		// TODO Auto-generated method stub
		System.out.println("更新数据");
	}

	@Override
	public void deletePerson() {
		// TODO Auto-generated method stub
		System.out.println("删除数据");
	}
}

//增强类
import org.springframework.stereotype.Component;

/**
 * 增强类,说白了就是额外增加的方法类(这些方法是增强到目标类中的)
 * @author 1710269824
 *
 */
@Component("transaction")
public class Transaction {
	public void beginTransaction(){
		System.out.println("开启事务 ");
	}
	public void commit(){
		System.out.println("提交事务");
	}
}
//代理类
package cn.proxy.study;

import javax.annotation.Resource;

import org.springframework.stereotype.Component;

/**
 * 代理类:说白了就是将目标类与增强类结合(代理类忙前忙后,目标类才是正在主角)
 * @author 1710269824
 *
 */

@Component("personServiceProxy")
public class PersonServiceProxy implements PersonService {
	//需要将目标类、增强类作为代理类的成员变量

	//目标类
	@Resource(name="personService")
	private PersonService p;
	@Resource(name="transaction")
	//增强类
	private Transaction t;


	public PersonServiceProxy(PersonService p, Transaction t) {
		super();
		this.p = p;
		this.t = t;
	}

	@Override
	public void savePerson() {
		// TODO Auto-generated method stub
		//增强类增强方法
		t.beginTransaction();
		//目标类实现它的业务
		p.savePerson();
		//增强类增强方法
		t.commit();

	}

	@Override
	public void updatePerson() {
		// TODO Auto-generated method stub
		//增强类增强方法
		t.beginTransaction();
		//目标类实现它的业务
		p.updatePerson();
		//增强类增强方法
		t.commit();

	}

	@Override
	public void deletePerson() {
		// TODO Auto-generated method stub
		//增强类增强方法
		t.beginTransaction();
		//目标类实现它的业务
		p.deletePerson();
		//增强类增强方法
		t.commit();
	}

}
//测试类
/**
 * 静态代理学习
 */

import org.springframework.context.ApplicationContext;
import org.springframework.context.support.ClassPathXmlApplicationContext;

public class ProxyTestDemo {
	@SuppressWarnings("resource")
	public static void main(String[] args) {
		//定义配置文件的路径
		String xmlPath = "cn/proxy/study/config3.xml";
		//加载配置文件
		ApplicationContext applicationContext = new ClassPathXmlApplicationContext(xmlPath);
		//获取对象
		PersonServiceProxy pro = (PersonServiceProxy) applicationContext.getBean("personServiceProxy");
		//执行业务操作 (这里表面上是代理类在执行,内部实际是目标类在执行)
		pro.savePerson();
		System.out.println("------------");
		pro.deletePerson();
		System.out.println("------------");
		pro.updatePerson();
	}
}
xml配置文件
<?xml version="1.0" encoding="UTF-8"?>
<beans xmlns="http://www.springframework.org/schema/beans"
	xmlns:xsi="http://www.w3.org/2001/XMLSchema-instance"
	xmlns:context="http://www.springframework.org/schema/context"
	xsi:schemaLocation="http://www.springframework.org/schema/beans http://www.springframework.org/schema/beans/spring-beans.xsd
		http://www.springframework.org/schema/context http://www.springframework.org/schema/context/spring-context-4.3.xsd">
		<!-- 开启扫描,扫描的是类 -->
<context:component-scan base-package="cn.proxy.study"></context:component-scan>
</beans>
运行结果截图:

代码说明:对象的管理交给了Spring容器,所以需要配置文件,如果用传统的new对象,那不用配置文件,也不用导入Spring的jar包
分析一波:
- 这就是静态代理,在代理类中,将目标类和增强类作为代理类的成员变量(其实就是现实生活中的授权,不然它怎么实现代理人的权利哟!!),这样有什么弊端呢?
- 弊端就是:当我有多个业务都需要增强类来增强时,就必须为每个业务建立一个代理类,然后重写上面类似的代码,但是我的增强类是不变的呀!!,这样重复写,是不是代码很冗余呢。所以有下面的动态代理
二、JDK动态代理
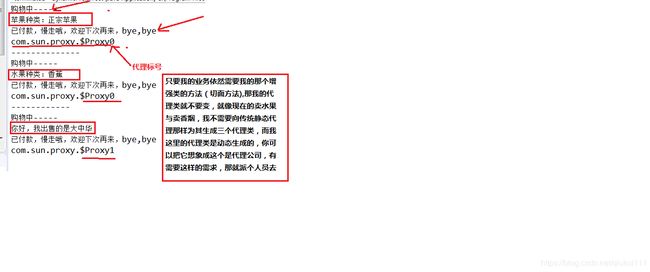
我逼逼一下:代码是记不住的,如果小伙伴们,看到这里,希望自行去了解一下JDK动态代理的原理:
a. 动态代理就是来解决静态代理的问题的,它的代理类是动态生成的,不需要静态代理那样,每次实现一个代理都得写一下,然后把增强类和目标类结合在一起。
b. 直接看代码
//接口类(卖水果,说出水果名)
public interface SaleFruits {
	void sayFruitsName();
}

//接口类(卖香烟)
public interface SaleCigarette {
	void saleSomthing();

}

//实现类(目标类,这里有两个)
//苹果
public class Apple implements SaleFruits {

	@Override
	public void sayFruitsName() {
		// TODO Auto-generated method stub
		System.out.println("苹果种类:正宗苹果");
	}
}

//香蕉
public class Banana implements SaleFruits {

	@Override
	public void sayFruitsName() {
		// TODO Auto-generated method stub
		System.out.println("水果种类:香蕉");
	}
}

//卖香烟实现类
public class ZhongHua implements SaleCigarette {

	@Override
	public void saleSomthing() {
		// TODO Auto-generated method stub
		System.out.println("你好,我出售的是大中华");
	}
}

/**
 * 增强类
 * @author 1710269824
 *
 */
public class MyAspect {
	public void saleBefore()
	{
		System.out.println("购物中-----");
	}
	public void saleAfter()
	{
		System.out.println("已付款,慢走哦,欢迎下次再来,bye,bye");
	}
}
//销售代理类
import java.lang.reflect.InvocationHandler;
import java.lang.reflect.Method;
import java.lang.reflect.Proxy;

public class SaleProxy implements InvocationHandler {
	//目标类
	private Object traget;
	public SaleProxy(Object traget) {
		// TODO Auto-generated constructor stub
		this.traget = traget;
	}

	//动态创建代理类
	public Object createProxy()
	{
		return Proxy.newProxyInstance(traget.getClass().getClassLoader(), traget.getClass().getInterfaces(), this);
	}

	@Override
	public Object invoke(Object proxy, Method method, Object[] args) throws Throwable {
		// TODO Auto-generated method stub
		//需要增强的操作
		MyAspect myAspect = new MyAspect();
		myAspect.saleBefore();
		method.invoke(traget, args);
		myAspect.saleAfter();
		return null;
	}
}

/**
 * 动态代理测试
 * @author 1710269824
 *
 */

public class dynamicProxyTest {
	public static void main(String[] args) {
		//1.创建目标对象
		SaleFruits apple = new Apple();
		//2. 创建代理对象
		SaleFruits saleProxy1 = (SaleFruits) new SaleProxy(apple).createProxy();
		saleProxy1.sayFruitsName();
		//获取代理的名字(编号)
		System.out.println(saleProxy1.getClass().getName());
		System.out.println("--------------");
		//创建目标对象
		SaleFruits banana = new Banana();
		//创建代理对象
		SaleFruits saleProxy2 = (SaleFruits) new SaleProxy(banana).createProxy();
		saleProxy2.sayFruitsName();
		//获取代理的名字(编号)
		System.out.println(saleProxy2.getClass().getName());
		System.out.println("------------");
		//创建目标对象
		SaleCigarette cigarette = new ZhongHua();
		//创建代理对象
		SaleCigarette saleProxy3 = (SaleCigarette) new SaleProxy(cigarette).createProxy();
		saleProxy3.saleSomthing();
		//获取代理的名字(编号)
		System.out.println(saleProxy3.getClass().getName());
	}
}
三、CGLIB动态代理
上面的JDK代理,你发现一个问题没,它代理的都是实现了某个接口的类,记住这是共性也是JDK代理的条件。,那没有实现接口的类可以代理吗?,肯定可以,现在就引出我们的主角----> CGLIB动态代理
原理和上面的都是一样的,所以直接上代码
//目标类
public class UserDao {
	public void delete()
	{
		System.out.println("删除成功");
	}
	public void update()
	{
		System.out.println("更新成功");
	}
}
//切面类(增强类)同上

//代理类
import java.lang.reflect.Method;

import org.springframework.cglib.proxy.Enhancer;
import org.springframework.cglib.proxy.MethodInterceptor;
import org.springframework.cglib.proxy.MethodProxy;

import cn.aop.jdk.MyAspect;

public class CglibProxy implements MethodInterceptor{
	public Object create(Object target)
	{
		//1.创建对象
		Enhancer enhancer = new Enhancer();
		//2.设置父接口
		enhancer.setSuperclass(target.getClass());
		//3.设置回调
		enhancer.setCallback(this);
		//4.返回对象
		return enhancer.create();
	}

	@Override
	public Object intercept(Object arg0, Method arg1, Object[] arg2, MethodProxy arg3) throws Throwable {
		// TODO Auto-generated method stub
		//创建切面类对象(增强类)
		MyAspect myAspect = new MyAspect();
		//执行增强方法
		myAspect.chkPri();
		arg3.invokeSuper(arg0, arg2);
		//执行增强方法
		myAspect.log();
		return null;
	}
}
//测试类
/**
 * cglib动态代理测试(如果要对没有实现接口的类进行代理,那么可以使用 CGL旧代理)
 */

class CglibTest {

	@Test
	void test() {
		//1.创建代理对象
		CglibProxy cglibProxy = new CglibProxy();
		//2.创建目标对象
		UserDao userDao = new UserDao();
		UserDao userDao1 = (UserDao) cglibProxy.create(userDao);
		//执行方法
		userDao1.delete();
		System.out.println("------------------");
		userDao1.update();
	}
}
代码运行截图:自行尝试,代码没有问题
四、AspectJ常的用两种方式
上面的方法是不是感觉还是有点麻烦,那就试试下面这两种吧!!,推荐使用注解的方式
- xml方式
//接口类
public interface UserDao {
	public void add();
	public void update();
	public void del();
	public void quey();
}

//1.目标类,需要增强的类
public class UserDaoImpl implements UserDao {
	//2.Joinpoint:连接点,该类里的所有方法
	//3.某个需要增强的方法:Pointcut 切入点
	@Override
	public void add() {
		// TODO Auto-generated method stub
		System.out.println("添加");

	}

	@Override
	public void update() {
		// TODO Auto-generated method stub
		System.out.println("修改");

	}

	@Override
	public void del() {
		// TODO Auto-generated method stub
		System.out.println("删除");
	}

	@Override
	public void quey() {
		// TODO Auto-generated method stub
		System.out.println("查询");
	}
}

//切面类
import org.aspectj.lang.JoinPoint;
import org.aspectj.lang.ProceedingJoinPoint;

public class MyAspect {
	//前置通知
	public void myBefore(JoinPoint joinPoint)
	{
		System.out.println("前置通知,模拟执行权限检查……");
		System.out.print("目标类:"+joinPoint.getTarget());
		System.out.println(",被植入增强处理的目标方法为:"+joinPoint.getSignature().getName());
	}

	//后置通知
	public void myAfterReturning(JoinPoint joinPoint)
	{
		System.out.println("后置通知:模拟记录日志……");
		System.out.println(",被植入增强处理的目标方法为:"+joinPoint.getSignature().getName());
	}

	//环绕通知
	public Object myAround(ProceedingJoinPoint proceedingJoinPoint) throws Throwable
	{
		//环绕开始
		System.out.println("环绕开始,执行目标方法之前,模拟开启事务");
		//执行当前目标方法
		Object obj = proceedingJoinPoint.proceed();
		//环绕结束
		System.out.println("环绕结束,执行目标方法之后,模拟关闭事务");
		return obj;
	}

	//异常通知
	public void myAfterThrowing(JoinPoint joinPoint, Throwable e)
	{
		System.out.println("异常通知:出错了"+e.getMessage());
	}

	//最终通知
	public void myAfter()
	{
		System.out.println("最终通知,模拟方法结束后的释放资源");
	}
}

//测试类
package cn.aop.aspectj.xml;

import org.springframework.context.ApplicationContext;
import org.springframework.context.support.ClassPathXmlApplicationContext;

public class AspectTest {
	@SuppressWarnings("resource")
	public static void main(String[] args) {
		//配置文件路径
		String xmlPath = "cn/aop/aspectj/xml/config4.xml";
		//获取spring容器(上下文)
		ApplicationContext applicationContext = new ClassPathXmlApplicationContext(xmlPath);
		//获取ben对象
		UserDao userDao = (UserDao) applicationContext.getBean("userDao");
		userDao.add();
	}
}
关键是xml配置:
<?xml version="1.0" encoding="UTF-8"?>
<beans xmlns="http://www.springframework.org/schema/beans"
        xmlns:xsi="http://www.w3.org/2001/XMLSchema-instance"
        xmlns:aop="http://www.springframework.org/schema/aop"
        xsi:schemaLocation="http://www.springframework.org/schema/beans
        http://www.springframework.org/schema/beans/spring-beans-4.3.xsd
        http://www.springframework.org/schema/aop
        http://www.springframework.org/schema/aop/spring-aop-4.3.xsd">
<!--1.目标类 -->
<bean id="userDao" class="cn.aop.aspectj.xml.UserDaoImpl"></bean>
<!-- 2.切面 -->
<bean id="myAspect" class="cn.aop.aspectj.xml.MyAspect"></bean>
<!-- 3. aop编程 -->
<aop:config>
<!-- 配置切面 -->
<aop:aspect ref="myAspect">
<!-- 3.1配置切入点 -->
<aop:pointcut expression="execution(* cn.aop.aspectj.xml.*.*(..))" id="myPointcut"/>
<!-- 3.2 关联通知Advice和切入点pointCut -->
<!-- 3.2.1 前置通知 -->
<aop:before method="myBefore" pointcut-ref="myPointcut"/>
<!-- 3.2.2 前置通知 -->
<aop:after-returning method="myAfterReturning" pointcut-ref="myPointcut" returning="returnVal"/>
<!-- 3.2.3 环绕通知 -->
<aop:around method="myAround" pointcut-ref="myPointcut"/>
<!-- 3.2.4 异常通知 -->
<aop:after-throwing method="myAfterThrowing" pointcut-ref="myPointcut" throwing="e"/>
<!-- 3.2.4 最终通知 -->
<aop:after method="myAfter" pointcut-ref="myPointcut"/>
</aop:aspect>
</aop:config>
</beans>
代码运行结果截图:

2. 推荐的注解方式来了
代码基本和上面一样,核心看如下:
import org.aspectj.lang.JoinPoint;
import org.aspectj.lang.ProceedingJoinPoint;
import org.aspectj.lang.annotation.After;
import org.aspectj.lang.annotation.AfterReturning;
import org.aspectj.lang.annotation.AfterThrowing;
import org.aspectj.lang.annotation.Around;
import org.aspectj.lang.annotation.Aspect;
import org.aspectj.lang.annotation.Before;
import org.aspectj.lang.annotation.Pointcut;
import org.springframework.stereotype.Component;

@Aspect
@Component
public class MyAspect {
	//定义切点表达式
	@Pointcut("execution(* cn.aop.aspectj.annotation.*.*(..))")
	//使用 个返回值为 void 、方法体为空的方法来命名切入点
	private void myPointCut() {}


	//前置通知
	@Before("myPointCut()")
	public void myBefore(JoinPoint joinPoint)
	{
		System.out.println("前置通知,模拟执行权限检查……");
		System.out.print("目标类:"+joinPoint.getTarget());
		System.out.println(",被植入增强处理的目标方法为:"+joinPoint.getSignature().getName());
	}

	//后置通知
	@AfterReturning(value="myPointCut()")
	public void myAfterReturning(JoinPoint joinPoint)
	{
		System.out.println("后置通知:模拟记录日志……");
		System.out.println(",被植入增强处理的目标方法为:"+joinPoint.getSignature().getName());
	}

	//环绕通知
	@Around("myPointCut()")
	public Object myAround(ProceedingJoinPoint proceedingJoinPoint) throws Throwable
	{
		//环绕开始
		System.out.println("环绕开始,执行目标方法之前,模拟开启事务");
		//执行当前目标方法
		Object obj = proceedingJoinPoint.proceed();
		//环绕结束
		System.out.println("环绕结束,执行目标方法之后,模拟关闭事务");
		return obj;
	}

	//异常通知
	@AfterThrowing(value="myPointCut()",throwing = "e")
	public void myAfterThrowing(JoinPoint joinPoint, Throwable e)
	{
		System.out.println("异常通知:出错了"+e.getMessage());
	}

	//最终通知
	@After("myPointCut()")
	public void myAfter()
	{
		System.out.println("最终通知,模拟方法结束后的释放资源");
	}
}
xml配置文件
<?xml version="1.0" encoding="UTF-8"?>
<beans xmlns="http://www.springframework.org/schema/beans"
  xmlns:xsi="http://www.w3.org/2001/XMLSchema-instance"
  xmlns:aop="http://www.springframework.org/schema/aop"
  xmlns:context="http://www.springframework.org/schema/context"
  xsi:schemaLocation="http://www.springframework.org/schema/beans
  http://www.springframework.org/schema/beans/spring-beans-4.3.xsd
  http://www.springframework.org/schema/aop
  http://www.springframework.org/schema/aop/spring-aop-4.3.xsd
  http://www.springframework.org/schema/context
  http://www.springframework.org/schema/context/spring-context-4.3.xsd">
      <!-- 指定需要扫描的包,使注解生效 -->
      <context:component-scan base-package="cn.aop.aspectj.annotation" />
      <!-- 启动基于注解的声明式AspectJ支持 -->
      <aop:aspectj-autoproxy></aop:aspectj-autoproxy>
</beans>
还有一点,因为是使用注解方式,所以在UserDaoImpl类上加上@Repository("userDao")
其它代码不变。
五、分享交流
最后有兴趣一起交流的,可以关注我的公众号:这里你能够学到很实用的技巧,不是常用的我不说,公众号回复提取码即可获取以下学习资料啦啦啦啦,喜欢就拿去吧!!
(链接时常会失效,若出现此类情况,可以加我微信:17722328325(加时请备注:学习资料))
-
Java web从入门到精通电子书
-
Python机器学习电子书
-
Python400集(北京尚学堂)
-
JavaScript项目案例、经典面试题
-
Java300集(入门、精通)
-
Java后端培训机构录集(同事培训内部提供)
-
java重要知识pdf文档(价值连城呀呀,不收藏你会后悔的)
喜欢就关注吧,点个赞吧
