SpringSecurity+OAuth2实现单点登录SSO(详细教程+源码)
文章目录
- 一、父级项目sso-oauth2-demo
- 二、授权服务器auth-server
- 三、客户端应用client-a与client-b
- 四、启动与测试
本节源码在https://github.com/laolunsi/spring-boot-examples上,请放心食用
本节利用Spring Security Oauth2实现SpringBoot项目的单点登录功能。
创建三个SpringBoot应用:auth-server, client-a, client-b,其中auth-server是授权服务器,用于登录、获取用户信息。
本节采用SpringBoot 2.1.9.RELEASE和Spring security 2.1.9.RELEASE
一、父级项目sso-oauth2-demo
首先我们创建一个父maven项目,取名sso-oauth2-demo。而上面说的三个应用是这个项目的子应用。父级项目maven引入如下配置:
<project xmlns="http://maven.apache.org/POM/4.0.0"
         xmlns:xsi="http://www.w3.org/2001/XMLSchema-instance"
         xsi:schemaLocation="http://maven.apache.org/POM/4.0.0 http://maven.apache.org/xsd/maven-4.0.0.xsd">
    <modelVersion>4.0.0modelVersion>

    <groupId>com.examplegroupId>
    <artifactId>sso-oauth2-demoartifactId>
    <version>1.0-SNAPSHOTversion>

    <properties>
        <java.version>1.8java.version>
        <spring-boot.version>2.1.9.RELEASEspring-boot.version>
        <spring-security.version>2.1.9.RELEASEspring-security.version>
    properties>

    <dependencies>
        <dependency>
            <groupId>org.springframework.bootgroupId>
            <artifactId>spring-boot-starter-securityartifactId>
        dependency>

        <dependency>
            <groupId>org.springframework.security.oauth.bootgroupId>
            <artifactId>spring-security-oauth2-autoconfigureartifactId>
            <version>${spring-security.version}version>
        dependency>
    dependencies>

    <dependencyManagement>
        <dependencies>
            <dependency>
                <groupId>org.springframework.bootgroupId>
                <artifactId>spring-boot-dependenciesartifactId>
                <version>${spring-boot.version}version>
                <scope>importscope>
                <type>pomtype>
            dependency>
        dependencies>
    dependencyManagement>


project>
这个父级项目只有一个maven的pom.xml,不需要代码。下面我们开始创建授权服务器和客户端应用A/B
二、授权服务器auth-server
在这个sso-oauth2-demo项目下创建子SpringBoot项目——auth-server,引入如下依赖配置:
<project xmlns="http://maven.apache.org/POM/4.0.0" xmlns:xsi="http://www.w3.org/2001/XMLSchema-instance"
         xsi:schemaLocation="http://maven.apache.org/POM/4.0.0 https://maven.apache.org/xsd/maven-4.0.0.xsd">
    <modelVersion>4.0.0modelVersion>
    <parent>
        <groupId>com.examplegroupId>
        <artifactId>sso-oauth2-demoartifactId>
        <version>1.0-SNAPSHOTversion>
        <relativePath/>
    parent>

    <artifactId>auth-serverartifactId>
    <version>0.0.1-SNAPSHOTversion>
    <name>auth-servername>
    <description>Demo project for Spring Bootdescription>

    <dependencies>
        <dependency>
            <groupId>org.springframework.bootgroupId>
            <artifactId>spring-boot-starter-webartifactId>
        dependency>

        <dependency>
            <groupId>org.springframework.bootgroupId>
            <artifactId>spring-boot-starter-testartifactId>
            <scope>testscope>
        dependency>
    dependencies>

    <build>
        <plugins>
            <plugin>
                <groupId>org.springframework.bootgroupId>
                <artifactId>spring-boot-maven-pluginartifactId>
            plugin>
        plugins>
    build>

project>
这里我们可以看到是继承了父级的sso-oauth2-demo项目,从父级项目继承了一些公共的依赖。
配置:
server:
  port: 8300
  servlet:
    context-path: '/auth'
PS:授权服务器的配置文件比较简单,不需要其他东西。
启动类:
@SpringBootApplication
@EnableResourceServer
public class AuthServerApplication {

    public static void main(String[] args) {
        SpringApplication.run(AuthServerApplication.class, args);
    }

}
PS: 启用资源服务器
下面需要进行一些关于auth和security的配置,这里需要两个类:
/**
 * 授权服务器配置
 */
@Configuration
@EnableAuthorizationServer
public class AuthServerConfig extends AuthorizationServerConfigurerAdapter {

    @Autowired
    private BCryptPasswordEncoder passwordEncoder;

    @Override
    public void configure(final AuthorizationServerSecurityConfigurer oauthServer) throws Exception {
        oauthServer.tokenKeyAccess("permitAll")
                .checkTokenAccess("isAuthenticated()");
    }

    @Override
    public void configure(final ClientDetailsServiceConfigurer clients) throws Exception {
        clients.inMemory()
                .withClient("SampleClientId")
                .secret(passwordEncoder.encode("secret"))
                .authorizedGrantTypes("authorization_code")
                .scopes("user_info")
                .autoApprove(true)
                .redirectUris("http://localhost:8301/login", "http://localhost:8302/login");
    }

    // 必须进行redirectUris的配置,否则请求授权码时会报错:error="invalid_request", error_description="At least one redirect_uri must be registered with the client."
}
PS:BCryptPasswordEncoder如果注入不了,可以直接尝试new。
/**
 * security基本配置
 * 本demo中,登录用户名与密码是固定的,实际项目中应该从数据库读取
 */
@Configuration
@Order(1)
public class SecurityConfig extends WebSecurityConfigurerAdapter {

    @Override
    protected void configure(HttpSecurity http) throws Exception {
        http.requestMatchers()
                .antMatchers("/login", "/oauth/authorize")
                .and()
                .authorizeRequests()
                .anyRequest()
                .authenticated()
                .and()
                .formLogin()
                .permitAll()
                .and().csrf().disable();
    }

    @Override
    protected void configure(AuthenticationManagerBuilder auth) throws Exception {
        auth.inMemoryAuthentication()
                .withUser("eknown")
                .password(passwordEncoder().encode("123"))
                .roles("USER");
    }

    @Bean
    public BCryptPasswordEncoder passwordEncoder() {
        return new BCryptPasswordEncoder();
    }
}
到这一步,授权服务器的基本配置已经完成了,下面我们需要提供一个获取登陆用户信息的接口:
/**
 * 该接口类中的唯一接口,用于ClientA和ClientB在登录成功后获取用户信息用
 * 该接口地址可以任意修改,只要与ClientA/B中配置的用户信息地址一致即可
 */
@RestController
@RequestMapping(value = "user")
public class UserAction {

    @GetMapping(value = "me")
    public Principal me(Principal principal) {
        System.out.println("调用me接口获取用户信息:" + principal);
        return principal;
    }
}
PS:上述接口将交由ClientA和ClientB使用,在配置中指明,用于登录后获取当前的用户信息。
好了,下面我们创建两个测试应用——client-a和client-b
三、客户端应用client-a与client-b
创建父级maven的子SpringBoot项目——client-a和client-b,这里仅展示client-a的创建和配置过程,而client-b仅是名字不同而已。
修改maven文件:
<project xmlns="http://maven.apache.org/POM/4.0.0" xmlns:xsi="http://www.w3.org/2001/XMLSchema-instance"
         xsi:schemaLocation="http://maven.apache.org/POM/4.0.0 https://maven.apache.org/xsd/maven-4.0.0.xsd">
    <modelVersion>4.0.0modelVersion>
    <parent>
        <groupId>com.examplegroupId>
        <artifactId>sso-oauth2-demoartifactId>
        <version>1.0-SNAPSHOTversion>
        <relativePath/>
    parent>

    <artifactId>client-aartifactId>
    <version>0.0.1-SNAPSHOTversion>
    <name>client-aname>
    <description>Demo project for Spring Bootdescription>

    <dependencies>
        <dependency>
            <groupId>org.springframework.bootgroupId>
            <artifactId>spring-boot-starter-webartifactId>
        dependency>

        <dependency>
            <groupId>org.springframework.bootgroupId>
            <artifactId>spring-boot-starter-testartifactId>
            <scope>testscope>
        dependency>


        <dependency>
            <groupId>org.springframework.bootgroupId>
            <artifactId>spring-boot-starter-thymeleafartifactId>
        dependency>

        <dependency>
            <groupId>org.thymeleaf.extrasgroupId>
            <artifactId>thymeleaf-extras-springsecurity5artifactId>
        dependency>
    dependencies>

    <build>
        <plugins>
            <plugin>
                <groupId>org.springframework.bootgroupId>
                <artifactId>spring-boot-maven-pluginartifactId>
            plugin>
        plugins>
    build>

project>
配置,这里较为复杂,务必注意:
server:
  port: 8301
  servlet:
    session:
      cookie:
        name: CLIENT_A_SESSION

security:
  oauth2:
    client:
      client-id: SampleClientId
      client-secret: secret
      access-token-uri: http://localhost:8300/auth/oauth/token
      user-authorization-uri: http://localhost:8300/auth/oauth/authorize
    resource:
      user-info-uri: http://localhost:8300/auth/user/me # 从授权服务器获取当前登录用户信息的地址

spring:
  thymeleaf:
    cache: false
PS:上面的user-info-uri与之前的auth-server中的接口对应上了!
启动类不需要修改。下面需要一个security的配置类:
@EnableOAuth2Sso
@Configuration
public class MySecurityConfig extends WebSecurityConfigurerAdapter {

    @Override
    public void configure(HttpSecurity http) throws Exception {
        http.antMatcher("/**")
            .authorizeRequests()
            .antMatchers("/", "/login**")
            .permitAll()
            .anyRequest()
            .authenticated();
    }

}
到这一步,基本配置已经完成了。下面我们来创建测试页面和接口:
在resources文件夹下——即application.yml的同级目录下,创建一个templaes文件夹, 并放入两个页面:
index.html:
<html lang="en">
<head>
<meta http-equiv="Content-Type" content="text/html; charset=utf-8" />
<title>Spring Security SSOtitle>
<link rel="stylesheet"
	href="https://maxcdn.bootstrapcdn.com/bootstrap/3.3.2/css/bootstrap.min.css" />
head>

<body>
<div class="container">
	<div class="col-sm-12">
		<h1>Spring Security SSO 客户端Ah1>
		<a class="btn btn-primary" href="securedPage">Logina>
	div>
div>
body>
html>
securedPage.html:
<html lang="en" xmlns:th="http://www.w3.org/1999/xhtml">
<head>
<meta http-equiv="Content-Type" content="text/html; charset=utf-8" />
<title>Spring Security SSOtitle>
<link rel="stylesheet"
	href="https://maxcdn.bootstrapcdn.com/bootstrap/3.3.2/css/bootstrap.min.css" />
head>

<body>
<div class="container">
	<div class="col-sm-12">
		<h1>Secured Page, Client Ah1>
		Welcome, <span th:text="${#authentication.name}">Namespan>
	div>
div>
body>
html>
PS:index.html是不需要验证的,而securedPage或使用authentication.name,所以需要授权。
下面我们创建获取页面的接口:
/**
 * 获取页面的接口
 */
@Controller
public class IndexAction {

    @GetMapping(value = "")
    public String index() {
        System.out.println("进入ClientA首页");
        return "index.html";
    }

    @GetMapping(value = "securedPage")
    public String home() {
        System.out.println("进入ClientA securedPage");
        return "securedPage.html";
    }
}
然后按照上面的方式,同样步骤创建client-b项目,注意修改一些client-a和client-b相关的名称或配置。
创建完毕后,我们就可以进入测试阶段了!
四、启动与测试
启动这三个项目,分别运行在8300/8301/8302三个端口上。
首先我们访问http://localhost:8301,进入到index.html:
点击login,注意这个接口仅仅是打开了securedPage.html,而由于securedPage.html使用了需要进行授权的用户信息,会oauth2自动重定向到auth-server对应的http://localhost:8300/auth/login页面了:
输入默认的用户名eknow和密码123进行登录:
下面打开client-b的首页:
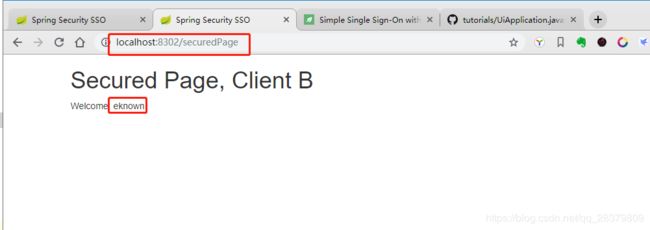
点击login后,发现并没有重定向到auth-server的登录页面,而是获取到了用户数据,进入了clientB的secured页面,这表示单点登录成功了!
也就是ClientA登录成功后,位于同一浏览器上的ClientB应用,自动进行了授权验证操作,不需要再次登录了!
好了,到这一步,我们的sso-oauth2-demo项目已经完成了!
参考:
- Simple Single Sign-On With Spring Security OAuth2: https://www.baeldung.com/sso-spring-security-oauth2


