SpringBoot2.x系列教程12--SpringBoot自动配置原理探析
SpringBoot系列教程12--SpringBoot自动配置原理探析
作者:一一哥
一.SpringBoot自动配置概述
1.概述
在Spring 4.x之后,提供了一个按条件配置Bean的功能,并且结合“习惯优于配置”的理念,后面推出了Spring Boot这个全新的开发框架。
在Spring Boot中,自动配置可以说是精髓了。当然这个自动配置的原理,一般也就只有在面试的时候才用得上,但是我们学习过程中也有必要了解这个自动配置,有助于加深我们对Spring Boot的了解。
2.Spring Boot的配置文件
在Spring Boot中有一个全局的配置文件:application.properties或application.yml。
我们开发过程中,各种配置属性都可以在这个文件中进行配置,常用的一些配置属性,比如:server.port、spring.application.name等等,当然实际开发中,我们往往只是用到很少的一部分,其实这些属性非常的多,具体可以参考下面的链接:
https://docs.spring.io/spring-boot/docs/2.1.0.RELEASE/reference/htmlsingle/#common-application-properties
下面截取了官方提供的部分属性:
# ===================================================================
# COMMON SPRING BOOT PROPERTIES
#
# This sample file is provided as a guideline. Do NOT copy it in its
# entirety to your own application.               ^^^
# ===================================================================


# ----------------------------------------
# CORE PROPERTIES
# ----------------------------------------
debug=false # Enable debug logs.
trace=false # Enable trace logs.

# LOGGING
logging.config= # Location of the logging configuration file. For instance, `classpath:logback.xml` for Logback.
logging.exception-conversion-word=%wEx # Conversion word used when logging exceptions.
logging.file= # Log file name (for instance, `myapp.log`). Names can be an exact location or relative to the current directory.
logging.file.max-history=0 # Maximum of archive log files to keep. Only supported with the default logback setup.
logging.file.max-size=10MB # Maximum log file size. Only supported with the default logback setup.
logging.group.*= # Log groups to quickly change multiple loggers at the same time. For instance, `logging.level.db=org.hibernate,org.springframework.jdbc`.
logging.level.*= # Log levels severity mapping. For instance, `logging.level.org.springframework=DEBUG`.
logging.path= # Location of the log file. For instance, `/var/log`.
logging.pattern.console= # Appender pattern for output to the console. Supported only with the default Logback setup.
logging.pattern.dateformat=yyyy-MM-dd HH:mm:ss.SSS # Appender pattern for log date format. Supported only with the default Logback setup.
logging.pattern.file= # Appender pattern for output to a file. Supported only with the default Logback setup.
logging.pattern.level=%5p # Appender pattern for log level. Supported only with the default Logback setup.
logging.register-shutdown-hook=false # Register a shutdown hook for the logging system when it is initialized.

# AOP
spring.aop.auto=true # Add @EnableAspectJAutoProxy.
spring.aop.proxy-target-class=true # Whether subclass-based (CGLIB) proxies are to be created (true), as opposed to standard Java interface-based proxies (false).

# IDENTITY (ContextIdApplicationContextInitializer)
spring.application.name= # Application name.

# ADMIN (SpringApplicationAdminJmxAutoConfiguration)
spring.application.admin.enabled=false # Whether to enable admin features for the application.
spring.application.admin.jmx-name=org.springframework.boot:type=Admin,name=SpringApplication # JMX name of the application admin MBean.

# AUTO-CONFIGURATION
spring.autoconfigure.exclude= # Auto-configuration classes to exclude.

# BANNER
spring.banner.charset=UTF-8 # Banner file encoding.
spring.banner.location=classpath:banner.txt # Banner text resource location.
spring.banner.image.location=classpath:banner.gif # Banner image file location (jpg or png can also be used).
spring.banner.image.width=76 # Width of the banner image in chars.
spring.banner.image.height= # Height of the banner image in chars (default based on image height).
spring.banner.image.margin=2 # Left hand image margin in chars.
spring.banner.image.invert=false # Whether images should be inverted for dark terminal themes.
在SpringBoot中,提供了这么多的配置,那么这些配置是如何在Spring Boot项目中自动生效的呢?
本章节就为大家讲解Spring Boot自动配置的实现方式和工作原理。
二.自动配置原理剖析
1.自动配置代码所在jar包
Spring Boot关于自动配置的源码在spring-boot-autoconfigure-x.x.x.x.jar包中:
其中,我们主要是依靠Spring Boot启动类上的@SpringBootApplication注解来实现自动配置。
2.@EnableAutoConfiguration
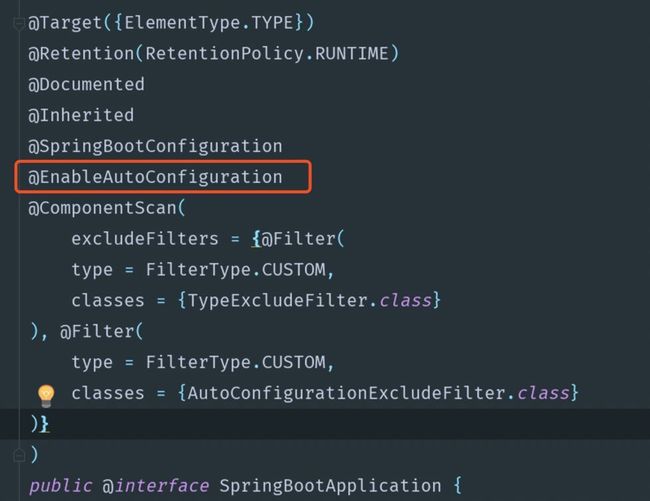
@SpringBootApplication被称为复合注解或派生注解,在@SpringBootApplication里面有一个@EnableAutoConfiguration注解,看名称就是开启自动配置,其源码如下:
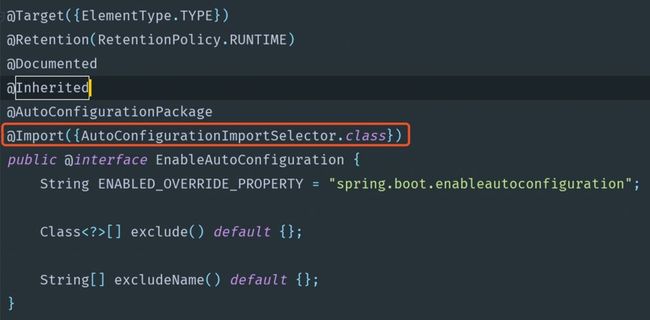
而这个注解也是一个复合注解,其中的关键功能由@Import实现,@Import的核心由AutoConfigurationImportSelector来完成。
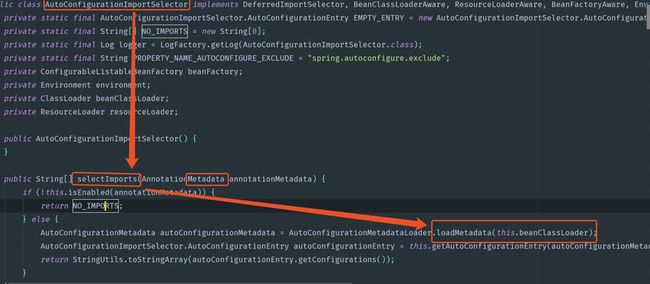
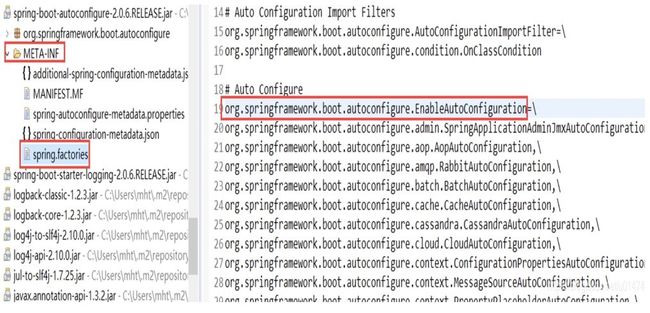
我们可以看到在AutoConfigurationImportSelector中有一个selectImports()方法,该方法会通过SpringFactoriesLoader.loadFactoryNames()方法扫描所有具有META-INF/spring.factories文件的jar包。spring-boot-autoconfigure-x.x.x.x.jar里面就有一个这样的spring.factories文件。
spring.factories文件是键值对key=value的形式,其中一个key是EnableAutoConfiguration类的全类名,而它的value是一个xxxxAutoConfiguration的类名的列表,这些类名以逗号分隔,如下图所示:
这个@EnableAutoConfiguration注解通过@SpringBootApplication被间接的标记在了Spring Boot的启动类上。然后会在入口类main()方法里,SpringApplication.run(...)的内部就会执行selectImports()方法,找到所有JavaConfig自动配置类的全限定名对应的class,然后将所有自动配置类加载到Spring容器中。
3.自动配置的生效条件
每一个XxxAutoConfiguration自动配置类都是在满足某些条件之后才会生效,这些限制条件在Spring Boot中是以注解的形式来体现,常见的条件注解有如下几项:
@ConditionalOnBean:当容器里有指定的bean存在时满足。

@ConditionalOnMissingBean:当容器里不存在指定的bean时满足。

@ConditionalOnClass:当类路径下有指定的类时满足。

@ConditionalOnMissingClass:当类路径下不存在指定的类时满足。

@ConditionalOnProperty:指定的属性是否有指定的值,比如@ConditionalOnProperties(prefix=”xxx.xxx”, value=”enable”, matchIfMissing=true),代表当xxx.xxx为enable时条件的布尔值为true,如果没有设置的情况下也为true。
4.自动配置举例分析
比如我们要实现server.port=8081端口的自动配置为例,该配置的实现主要是利用ServletWebServerFactoryAutoConfiguration配置类来实现的,如果没有配置会有默认值,这个默认值来自于org.apache.catalina.startup.Tomcat。
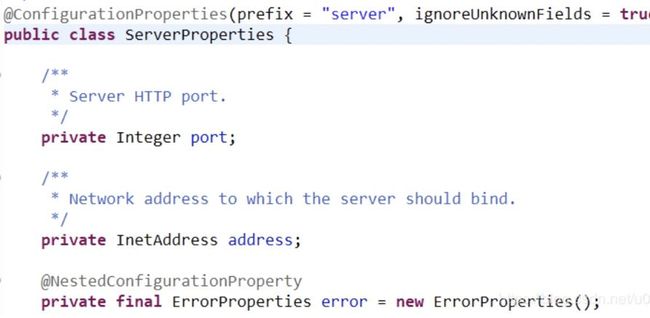
在ServletWebServerFactoryAutoConfiguration类上,有一个@EnableConfigurationProperties注解:开启配置属性,而它后面的参数是一个ServerProperties类,这就是习惯优于配置的一个体现。
然后在ServerProperties这个类上,我们看到了一个注解:@ConfigurationProperties,它就可以用来从配置文件中,读取对应的属性到对应的bean上。
再然后@EnableConfigurationProperties负责把这个绑定了属性的bean导入到spring容器中。也就是说,我们只要在全局配置文件中,把ServerProperties类中的属性复写了,就可以实现自动配置。所以,真正“限制”我们可以在全局配置文件中到底可以配置哪些属性的类就是这些XxxxProperties类,它与配置文件中定义的prefix关键字开头的一组属性是唯一对应的。
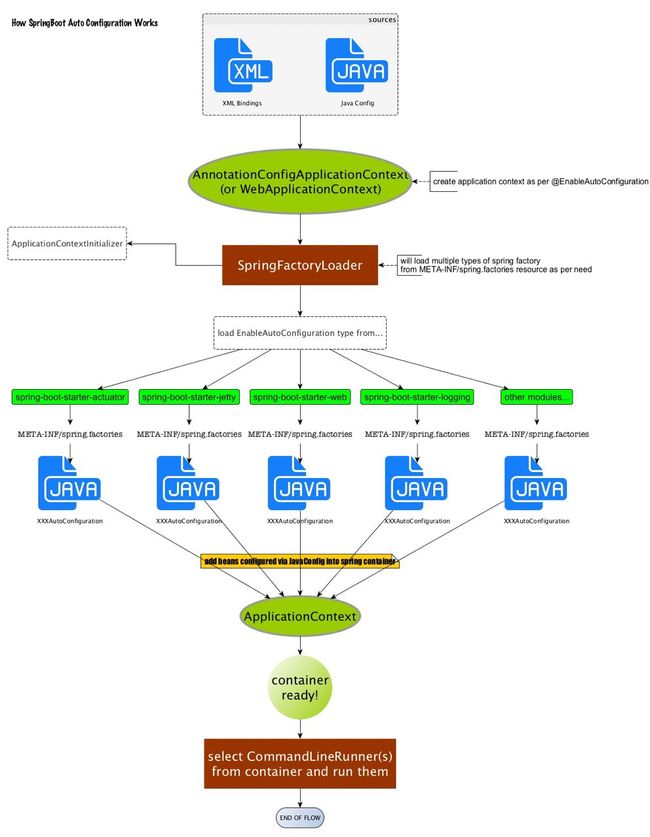
最后我们再梳理一下思路,在全局配置文件中配置的属性如:server.port等,通过@ConfigurationProperties注解,绑定到对应的XxxProperties配置实体类上封装为一个bean,然后再通过@EnableConfigurationProperties注解导入到Spring容器中。
而诸多的XxxAutoConfiguration自动配置类,就是Spring容器的JavaConfig形式,作用就是为Spring 容器导入bean,而所有导入的bean所需要的属性都通过xxxProperties的bean来获得。
5.自动配置的面试回答技巧
我们面试的时候,只需要按照下面这样来回答:
Spring Boot启动的时候会通过@EnableAutoConfiguration注解找到META-INF/spring.factories配置文件中的所有自动配置类,并对其进行加载;
而这些自动配置类都是以AutoConfiguration结尾来命名的。它们实际上就是一个JavaConfig形式的Spring容器配置类,
这些配置类通过寻找以Properties结尾命名的类,进而取得在全局配置文件中配置的属性,如:server.port。
然后XxxProperties类再通过@ConfigurationProperties注解与全局配置文件中对应的属性进行绑定。
通过一张图标来理解一下这一繁复的流程:
