BootStrap学习笔记——第一天
BootStrap学习打卡
- BootStrap学习笔记---第一天
- BootStrap笔记 第一天
- BootStrap-Day1 --- CSS框架(对css样式的封装)
- 引言
- 概念: Bootstrap是美国[Twitter](https://baike.baidu.com/item/Twitter/2443267)公司的设计师Mark Otto和Jacob Thornton合作基于HTML、CSS、[JavaScript](https://baike.baidu.com/item/JavaScript/321142) 开发的简洁、直观、强悍的[前端](https://baike.baidu.com/item/%E5%89%8D%E7%AB%AF/5956545)开发框架,使得 Web 开发更加快捷
- 特点:Bootstrap 是最受欢迎的 HTML、CSS 和 JS 框架,用于开发响应式布局、移动设备优先的 WEB 项目
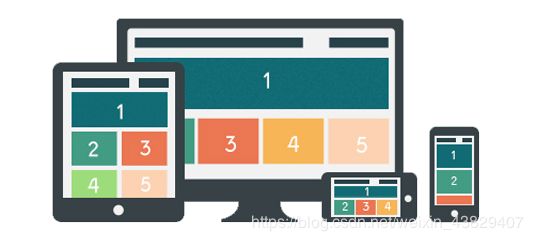
- 响应式布局:响应式网站设计是一种网络页面设计布局,其理念是:集中创建页面的图片排版大小,可以智能地根据用户行为以及使用的设备环境进行相对应的布局。
- 环境搭建
- 全局CSS样式
- 排版
- 标题
- 页面主体
- 中心内容
- 高亮
- 被删除的文本
- 无用文本
- 插入文本
- 着重
- 斜体
- 对齐
- 改变大小写
- 基本缩略语
- 无序列表
- 有序列表
- 内联列表
- 描述
- 表格
- 基本实例
- 条纹状表格
- 带边框的表格
- 鼠标悬停
- 紧缩表格
- 状态类
- 栅格系统
- 流式布局容器
- 基本实例
- 列偏移
- 嵌套列
- 表单
- 基本实例
- 内联表单
- 输入框
- 文本域
- 单选框与复选框
- 内联单选和多选框
- 下拉列表(select)
- 被禁用的 `fieldset`
- 校验状态
- 控件尺寸
- 调整列尺寸
- 按钮
- 预定义样式
- 调整按钮大小
- 激活状态
- 禁用状态
- 图片
- 响应式图片
- 图片形状
- 辅助类
- 情境文本颜色
- 情景背景色
- 关闭按钮
- 三角符号
BootStrap学习笔记—第一天
BootStrap笔记 第一天
BootStrap-Day1 — CSS框架(对css样式的封装)
引言
概念: Bootstrap是美国Twitter公司的设计师Mark Otto和Jacob Thornton合作基于HTML、CSS、JavaScript 开发的简洁、直观、强悍的前端开发框架,使得 Web 开发更加快捷
特点:Bootstrap 是最受欢迎的 HTML、CSS 和 JS 框架,用于开发响应式布局、移动设备优先的 WEB 项目
响应式布局:响应式网站设计是一种网络页面设计布局,其理念是:集中创建页面的图片排版大小,可以智能地根据用户行为以及使用的设备环境进行相对应的布局。
环境搭建
1.https://v3.bootcss.com/getting-started/#download 下载关于bootstrap的zip包
2.解压缩 并放入项目中
CSS BootStrap的全局CSS样式
Font 提供对应的图标
JS 关于BootStrap的js
3.移动设备优先设置
全局CSS样式
排版
标题
HTML 中的所有标题标签,
到
均可使用。另外,还提供了 .h1 到 .h6 类,为的是给内联(inline)属性的文本赋予标题的样式。
h1. Bootstrap heading
h2. Bootstrap heading
h3. Bootstrap heading
h4. Bootstrap heading
h5. Bootstrap heading
h6. Bootstrap heading
在标题内还可以包含 标签或赋予 .small 类的元素,可以用来标记副标题。
页面主体
Bootstrap 将全局 font-size 设置为 14px,line-height 设置为 1.428。这些属性直接赋予 <body> 元素和所有段落元素。另外,<p> (段落)元素还被设置了等于 1/2 行高(即 10px)的底部外边距(margin)。
            <p>...p>
中心内容
通过添加 .lead 类可以让段落突出显示。
<p class="lead">...p>
高亮
You can use the mark tag to <mark>highlightmark> text.
被删除的文本
对于被删除的文本使用 <del> 标签
    <del>This line of text is meant to be treated as deleted text.del>
无用文本
对于没用的文本使用 <s> 标签。
<s>This line of text is meant to be treated as no longer accurate.s>
插入文本
额外插入的文本使用 <ins> 标签。
    <ins>This line of text is meant to be treated as an addition to the document.ins>
着重
通过增加 font-weight 值强调一段文本。
<strong>rendered as bold textstrong>
斜体
用斜体强调一段文本。
<em>rendered as italicized textem>
对齐
<p class="text-left">Left aligned text.p>             居左
<p class="text-center">Center aligned text.p>         局中
<p class="text-right">Right aligned text.p>           局右
改变大小写
通过这几个类可以改变文本的大小写
<p class="text-lowercase">Lowercased text.p>        大写转小写
<p class="text-uppercase">Uppercased text.p>        小写转大写
<p class="text-capitalize">Capitalized text.p>      首字母大写
基本缩略语
<abbr title="attribute">attrabbr> title代表悬停过后展示的内容
无序列表
<ul>
  <li>...li>
ul>
有序列表
<ol>
  <li>...li>
ol>
内联列表
<ul class="list-inline">
  <li>...li>
ul>
描述
带有描述的短语列表
<dl>
  <dt>...dt>
  <dd>...dd>
dl>
水平排列的描述
class="dl-horizontal"
表格
基本实例
...
条纹状表格
<table class="table table-striped">
  ...
table>
带边框的表格
<table class="table table-bordered">
  ...
table>
鼠标悬停
<table class="table table-hover">
  ...
table>
紧缩表格
<table class="table table-condensed">
  ...
table>
状态类
<tr class="active">...tr>
<tr class="success">...tr>
<tr class="warning">...tr>
<tr class="danger">...tr>
<tr class="info">...tr>


<tr>
  <td class="active">...td>
  <td class="success">...td>
  <td class="warning">...td>
  <td class="danger">...td>
  <td class="info">...td>
tr>
栅格系统
Bootstrap 提供了一套响应式、移动设备优先的流式栅格系统,随着屏幕或视口(viewport)尺寸的增加,系统会自动分为最多12列
流式布局容器
将最外面的布局元素 .container 修改为 .container-fluid,就可以将固定宽度的栅格布局转换为 100% 宽度的布局。
<div class="container-fluid">
div>
基本实例
<div class="container-fluid">
    <div class="row">
        <div class="col-md-1">1div>
        <div class="col-md-1">2div>
        <div class="col-md-1">3div>
        <div class="col-md-1">4div>
        <div class="col-md-1">5div>
        <div class="col-md-1">6div>
        <div class="col-md-1">7div>
        <div class="col-md-1">8div>
        <div class="col-md-1">9div>
        <div class="col-md-1">10div>
        <div class="col-md-1">11div>
        <div class="col-md-1">12div>
    div>
    <div class="row">
        <div class="col-md-6">6div>
        <div class="col-md-6">6div>
    div>
    <div class="row">
        <div class="col-md-4">4div>
        <div class="col-md-4">4div>
    div>
div>
列偏移
<div class="container-fluid">
        <div class="row">
             <div class="col-md-4">4div>
             <div class="col-md-4  col-md-offset-2 ">4div>
        div>
      <div class="row">
          <div class="col-md-2 col-md-offset-2">2div>
          <div class="col-md-5  col-md-offset-3 ">4div>
      div>
  div>
嵌套列
为了使用内置的栅格系统将内容再次嵌套,可以通过添加一个新的 .row 元素和一系列 .col-sm-* 元素到已经存在的 .col-sm-* 元素内
<div class="container-fluid">
    <div class="row">
        <div  class="col-md-6">
                <div class="row">
                     <div class="col-md-6">6div>
                     <div class="col-md-6">6div>
                div>
        div>
        <div  class="col-md-6">6div>
    div>

    <div class="row">
        <div  class="col-md-4">
        div>
        <div  class="col-md-8">
            <div class="row">
                <div class="col-md-3">6div>
                <div class="col-md-9">6div>
            div>
        div>
    div>

div>
表单
基本实例
##### 水平排列表单
```html
内联表单
<form class="form-horizontal">

    <div class="form-group">
        <label for="inputEmail3" class="col-sm-2 control-label">Emaillabel>
        <div class="col-sm-10">
            <input type="email" class="form-control" id="inputEmail3" placeholder="Email">
        div>
    div>
    <div class="form-group">
        <label for="inputPassword3" class="col-sm-2 control-label">Passwordlabel>
        <div class="col-sm-10">
            <input type="password" class="form-control" id="inputPassword3" placeholder="Password">
        div>
    div>
form>
输入框
包括大部分表单控件、文本输入域控件,还支持所有 HTML5 类型的输入控件: text、password、datetime、datetime-local、date、month、time、week、number、email、url、search、tel 和 color。
必须添加类型声明
<input type="text" class="form-control" placeholder="Text input">
<input type="password" class="form-control" placeholder="Text input">
<input type="datetime-local" class="form-control" placeholder="时间">
<input type="date" class="form-control" placeholder="时间">
<input type="number" class="form-control" placeholder="请输入数字">
<input type="email" class="form-control" placeholder="请输入邮箱格式">
<input type="url" class="form-control" placeholder="请输入地址">
<input type="color" class="form-control" placeholder="请选择颜色">
文本域
支持多行文本的表单控件。可根据需要改变 rows 属性。
<textarea class="form-control" rows="3">textarea>
单选框与复选框
多选框(checkbox)用于选择列表中的一个或多个选项,而单选框(radio)用于从多个选项中只选择一个。
<div class="radio">
    <label>
        <input type="radio" name="optionsRadios"  value="option1" checked>
        男
    label>
div>
<div class="radio   disabled">
    <label>
        <input type="radio" name="optionsRadios"  value="option2"  disabled>
        女
    label>
div>
内联单选和多选框
通过将 .checkbox-inline 或 .radio-inline 类应用到一系列的多选框(checkbox)或单选框(radio)控件上,可以使这些控件排列在一行

<label  class="radio-inline">
        <input type="radio" name="optionsRadios"  value="option1" checked>
        男
    label>


    <label class="radio-inline">
        <input type="radio" name="optionsRadios"  value="option2"  disabled>
        女
    label>
下拉列表(select)
<select class="form-control">
  <option>1option>
  <option>2option>
  <option>3option>
  <option>4option>
  <option>5option>
select>
对于标记了 multiple 属性的 <select> 控件来说,默认显示多选项。
  <select multiple class="form-control">
  <option>1option>
  <option>2option>
  <option>3option>
  <option>4option>
  <option>5option>
select>
被禁用的 fieldset
为<fieldset> 设置 disabled 属性,可以禁用 <fieldset> 中包含的所有控件。
校验状态
bootstrap 对表单控件的校验状态,如 error、warning 和 success 状态,都定义了样式。使用时,添加 .has-warning、.has-error 或 .has-success 类到这些控件的父元素即可
<form class="form-horizontal">

    <div class="form-group  has-success">
        <label for="inputEmail3" class="col-sm-2 control-label">Emaillabel>
        <div class="col-sm-10">
            <input type="email" class="form-control" id="inputEmail3" placeholder="Email">
        div>
    div>
    <div class="form-group has-warning">
        <label for="inputPassword3" class="col-sm-2 control-label">Passwordlabel>
        <div class="col-sm-10">
            <input type="password" class="form-control" id="inputPassword3" placeholder="Password">
        div>
    div>
form>
控件尺寸
通过 .input-lg 类似的类可以为控件设置高度,通过 .col-lg-* 类似的类可以为控件设置宽度。
高度尺寸
调整列尺寸
<div class="row">
  <div class="col-xs-2">
    <input type="text" class="form-control" placeholder=".col-xs-2">
  div>
  <div class="col-xs-3">
    <input type="text" class="form-control" placeholder=".col-xs-3">
  div>
  <div class="col-xs-4">
    <input type="text" class="form-control" placeholder=".col-xs-4">
  div>
div>
按钮
可作为按钮使用的标签或元素
为 <a>、<button> 或 <input> 元素添加按钮类(button class)即可使用 Bootstrap 提供的样式。
<a class="btn btn-default" href="#">Linka>
<button class="btn btn-default" type="submit">Buttonbutton>
<input class="btn btn-default" type="button" value="Input">
预定义样式
使用下面列出的类可以快速创建一个带有预定义样式的按钮。
<button type="button" class="btn btn-default">(默认样式)Defaultbutton>


<button type="button" class="btn btn-primary">(首选项)Primarybutton>


<button type="button" class="btn btn-success">(成功)Successbutton>


<button type="button" class="btn btn-info">(一般信息)Infobutton>


<button type="button" class="btn btn-warning">(警告)Warningbutton>


<button type="button" class="btn btn-danger">(危险)Dangerbutton>


<button type="button" class="btn btn-link">(链接)Linkbutton>
调整按钮大小
需要让按钮具有不同尺寸吗?使用 .btn-lg、.btn-sm 或 .btn-xs 就可以获得不同尺寸的按钮。
激活状态
当按钮处于激活状态时,其表现为被按压下去(底色更深、边框夜色更深、向内投射阴影)。对于 <button> 元素,是通过 :active 状态实现的
禁用状态
为 <button> 元素添加 disabled 属性,使其表现出禁用状态。
图片
响应式图片
<img src="..." class="img-responsive" alt="Responsive image">
图片形状
<img src="../images/2.jpg" alt="..." class="img-rounded">
<img src="../images/3.jpg" alt="..." class="img-circle">
<img src="../images/4.jpg" alt="..." class="img-thumbnail">
辅助类
情境文本颜色
<p class="text-muted">...p>
<p class="text-primary">...p>
<p class="text-success">...p>
<p class="text-info">...p>
<p class="text-warning">...p>
<p class="text-danger">...p>
情景背景色
和情境文本颜色类一样,使用任意情境背景色类就可以设置元素的背景。链接组件在鼠标经过时颜色会加深,就像上面所讲的情境文本颜色类一样。
<p class="bg-primary">...p>
<p class="bg-success">...p>
<p class="bg-info">...p>
<p class="bg-warning">...p>
<p class="bg-danger">...p>
关闭按钮
<button type="button" class="close" aria-label="Close"><span aria-hidden="true">×span>button>
三角符号
<span class="caret">span>
