一步一步解读神经网络编译器TVM(二)——利用TVM完成C++端的部署
从 https://www.bookstack.cn/read/HyperDL-Tutorial/5.deploy-README.md
的对比来看,ncnn是最轻量的一个框架,不过功能相对单一,速度不是最快但也不错。
从https://tvm.ai/2018/10/03/auto-opt-all.html
对比来看TVM要比ncnn快一点
目前还不能指望通过更换框架得到太多的速度提升。
注意:以下翻译总结可能没有原文详尽,更逗内容请查看官方文档
TVM简介
TVM是一个开源深度学习编译栈,支持CPU、GPU和特定的加速器。它旨在缩小以生产为导向的深度学习框架和以性能为导向的硬件后端。TVM有两个主要特性:
1、支持将Keras、MxNet、PyTorch、Tensorflow、CoreML、DarkNet框架的深度学习模型编译为多种硬件后端的最小可部署模型。
2、能够2自动生成和优化多个后端的张量操作并达到更好的性能。
TVM堆栈始于华盛顿大学Paul G. Allen计算机科学与工程学院SAMPL小组的研究项目。该项目现在由一个涉及多个行业和学术机构的开源社区推动,遵循Apache协议。
TVM提供如下图所示的两个等级的优化。计算图优化包括高级操作融合、层转换和内存管理。张量操作优化和代码生成层优化张量操做。

部署和集成
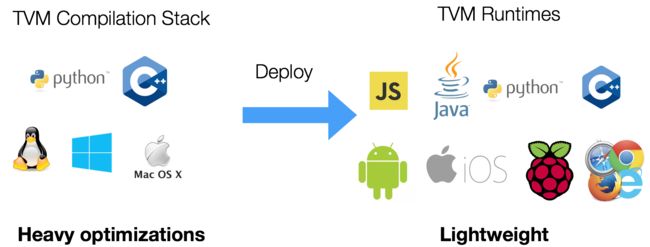
TVM包含两个主要部分:
1、TVM编译器,用来做编译和优化。
2、TVM运行环境,用来在目标设备上运行。
还可以使用RPC进行远程测试和优化。
安装
Install from Source
1、首先用C++代码编译动态库(libtvm.so for linux, libtvm.dylib for macOS and libtvm.dll for windows)
2、设置语言包
clone代码 git clone --recursive https://github.com/dmlc/tvm
编译动态库
- 在Linux上是libtvm.so, libtbm_topi.so
- macOS上是libtvm.dylib, libtvm_topi.dylib
- Windows上是libtvm.dll, libtvm_topi.dll
最小编译依赖:
- 支持C++ 11的c++编译器(g++4.8或更高版本)
- CMake 3.5 或更高版本
- 强烈建议使用LLVM编译以打开所有特性
- 如果只用CUDA/OpenCL,可以不依赖LLVM
- 如果使用NNVM编译器,需要LLVM
使用cmake编译,配置可以在config.cmake中修改
- 首先,检查系统的cmake。如果没有可以从official website下载最新版。
- 先创建一个编译目录,复制 cmake/config.cmake到该目录。
mkdir build
cp cmake/config.cmake build
- 编辑build/config.cmake定制编译选项
- 在macOS,对于一些版本的Xcode,需要在LDFLAGS中添加
-lc++abi,否则会有链接错误。 - 修改
set(USE_CUDA OFF)为set(USE_CUDA ON)打开CUDA后端。其他后端和库(OpenCL、RCOM、METAL、VULKAN等)也是如此。
- 根据某些选项TVM会依赖LLVM。有些CPU平台的编译会需要LLVM。
- 如果依赖LLVM,需要 4.0 或者更高版本。记住默认的LLVM版本可能低于4.0。
- 因为源码编译LLVM会花费很多时间,可以从LLVM Download Page
下载预编译版本。
(1)解压到指定目录,修改build/config.cmake去添加set(USE_LLVM /path/to/your/llvm/bin/llvm-config)
(2)也可以直接设置set(USE_LLVM ON)让cmake搜索可用的LLVM。 - 也可以使用LLVM Nightly Ubuntu Build
注意apt包要在llvm-config后面跟上版本号。比如,如果已经经安装了set(LLVM_CONFIG llvm-config-4.0)
接下来执行
cd build
cmake ..
make all
安装Python包
python包位于 tvm/python .有两种方式安装这些包:
方式1
这种方式适用于可能修改代码的开发者。
在.bashrc中设置环境变量PYTHONPATH告诉python在哪里找这个库。
export TVM_HOME=/path/to/tvm
export PYTHONPATH=$TVM_HOME/python:$TVM_HOME/topi/python:$TVM_HOME/nnvm/python:${PYTHONPATH}
方式2
使用setup.py安装
# install tvm package for the current user
# NOTE: if you installed python via homebrew, --user is not needed during installaiton
#       it will be automatically installed to your user directory.
#       providing --user flag may trigger error during installation in such case.
export MACOSX_DEPLOYMENT_TARGET=10.9  # This is required for mac to avoid symbol conflicts with libstdc++
cd python; python setup.py install --user; cd ..
cd topi/python; python setup.py install --user; cd ../..
cd nnvm/python; python setup.py install --user; cd ../..
Python依赖
- 必需的依赖:
pip install --user numpy decorator attrs
- 如果使用RPC
pip install --user tornado
- 如果使用自动调优模块
pip install --user tornado psutil xgboost
安装NNPACK
NNPACK是一个神经网络加速包,可以运行在x86-64,ARMv7,或者ARM64架构CPU上。使用NNPACK,高级的库像MXNet可以在多核CPU上面加速运行,包括笔记本电脑和移动设备。
Note:因为TVM已经内置了调优,NNPACK在这里主要用来参考和对比。正常使用优先选TVM内置优化。
TVM支持NNPACK做卷积、最大池化和全连接层的前向计算。
使用
如何利用 TVM 优化深度学习GPU op?教你用几十行Python代码实现2-3倍提升
编译和部署
部署时需要交叉编译运行时环境,然后部署到目标设备上。
如果运行环境为Linux系统:
git clone --recursive https://github.com/dmlc/tvm
cd tvm
mkdir build
cp cmake/config.cmake build
cd build
cmake ..
make runtime
如果是编译tvm编译器,就把make runtime改为make即可。
调优
推荐使用RPC API在嵌入式目标设备上进行测试、调优,下面是相关链接:
- Cross Compilation and RPC
- tutorial-deploy-model-on-mali-gpu
- Deploy the Pretrained Model on Raspberry Pi
1、 交叉编译和RPC
通过交叉编译和RPC,可以在本地机器编译程序然后再远测设备运行。这在远程设备资源受限时是有用的,比如树莓派和手机。In this tutorial, we will take Raspberry Pi for CPU example and Firefly-RK3399 for opencl example.
(1)在设备上编译运行时环境
第一步是在远程设备编译TVM运行环境。
注意:
这部分和下部分的所有指令都应该运行在目标设备上,我们目标设备假设是Linux系统。
(在目标设备上)编译目标设备运行环境:
git clone --recursive https://github.com/dmlc/tvm
cd tvm
make runtime -j2
运行环境编译完成后,需要在(目标设备) /.bashrc中设置环境变量,添加(假定TVM目录在/tvm)
export PYTHONPATH=$PYTHONPATH:~/tvm/python
运行 source ~/.bashrc激活环境变量。
(2)在目标设备设置RPC服务
在远程设备执行以下命令启动RPC服务
python -m tvm.exec.rpc_server --host 0.0.0.0 --port=9090
如果看到下面这行,说明RPC服务已经成功启动
INFO:root:RPCServer: bind to 0.0.0.0:9090
(3)在本地机器声明和交叉编译内核
注意:
现在切换到有完整TVM环境的本地机器(PC)。
这里我们在本地机器声明一个简单的kernel:
import numpy as np

import tvm
from tvm import rpc
from tvm.contrib import util

n = tvm.convert(1024)
A = tvm.placeholder((n,),name='A')
B = tvm.compute((n,), lambda i: A[i]+1.0, name='B')
s = tvm.create_schedule(B.op)
然后我们交叉编译这个kernel. 对于Raspberry Pi 3B, target应该是 llvm -target=armv7l-linux-gnueabihf,但是这里我们使用llvm使得能够运行在我们得网页server上。
local_demo = True

if local_demo:
    target = 'llvm'
else:
    target = 'llvm -target=armv7l-linux-gnueabihf'

func = tvm.build(s, [A, B], target=target, name='add_one')
# save the lib at a local temp folder
temp = util.tempdir()
path = temp.relpath('lib.tar')
func.export_library(path)
注意:
如果要在真实的远程设备运行,修改local_demo为False并且将build函数中的target修改为设备真正的架构。不同设备可能会不同。比如, Raspberry Pi 3B 是llvm -target=armv7l-linux-gnueabihf, RK3399是llvm -target=aarch64-linux-gnu
(4)通过RPC远程运行CPU kernel
我们展示在远程设备运行生成的cpu kernel。首先,从远程设备获取RPC会话。
if local_demo:
    remote = rpc.LocalSession()
else:
    # The following is my environment, change this to the IP address of your target device
    host = '10.77.1.162'
    port = 9090
    remote = rpc.connect(host, port)
上传 lib到远程设备,然后调用设备编译器重新链接它。现在func是一个远程module对象。
remote.upload(path)
func = remote.load_module('lib.tar')

# create arrays on the remote device
ctx = remote.cpu()
a = tvm.nd.array(np.random.uniform(size=1024).astype(A.dtype), ctx)
b = tvm.nd.array(np.zeros(1024, dtype=A.dtype), ctx)
# the function will run on the remote device
func(a, b)
np.testing.assert_equal(b.asnumpy(), a.asnumpy() + 1)
使用time_evaluator多次运行,评估每次运行的时间
time_f = func.time_evaluator(func.entry_name, ctx, number=10)
cost = time_f(a, b).mean
print('%g secs/op' % cost)
部署
调优完成后,需要把模型不依赖RPC部署到目标设备。以下是参考链接:
- Deploy TVM Module using C++ API
- Get TVM Runtime Library
- Dynamic Library vs. System Module
- Deploy to Android
- Build model for Android Target
- TVM Runtime for Android Target
- Deploy NNVM Modules
- Deploy as System Module
- Integrate TVM into Your Project
- DLPack Support
- Integrate User Defined C++ Array
- Integrate User Defined Python Array
1、使用C++ API部署TVM模型
部署示例:apps/howto_deploy
执行以下命令运行示例:
cd apps/howto_deploy
./run_example.sh
(1)获取TVM运行库
现在需要做的是在目标平台链接运行库。TVM提供了一个最小运行库,大约300k到600k,取决于模型大小。大多数情况下,可以使用 编译时产生的 libtvm_runtime.so。
如果libtvm_runtime难以编译,checkout tvm_runtime_pack.cc。它是一个能够获取TVM运行环境的 all in one file 例子。你可以把它编译并且包含到你的工程中。
你也可以checkout apps
示例应用,包含iOS,Android和其他平台。
(2)动态库 vs 系统模块
TVM提供两种编译库的方式。你可以checkout prepare_test_libs.py
了解如何生成库,checkout cpp_deploy.cc了解如何使用。
a.保存为动态库并且动态加载到工程中。
b.Bundle the compiled library into your project in system module mode.
动态加载更加灵活并且可以在运行时加载新模块。系统模块是一个更加static的方法。我们可以在动态加载被禁用的地方使用系统模块。
2、部署到Android
(1)为Android编译模型
Android平台模型的NNVM编译可以采用一些方法比如android_rpc.
示例chainer-nnvm-example
上面的例子会以RPC的方式直接在目标设备上运行编译好的模型。下面对于rum_mobile.py修改android平台需要的编译输出
lib.export_library("deploy_lib.so", ndk.create_shared)
with open("deploy_graph.json", "w") as fo:
    fo.write(graph.json())
with open("deploy_param.params", "wb") as fo:
    fo.write(nnvm.compiler.save_param_dict(params))
把生成的deploy_lib.so, deploy_graph.json, deploy_param.params放到Android设备上。
(2)Android TVM运行环境
参考here
去编译CPU/OpenCL版本的TVM运行环境到Android设备。从android java TVM AP加载运行模型参考这个java代码。
实践:用TVM部署Tensorflow模型到Android
首先根据上面的内容搭建好编译和运行环境,下面开始部署模型。
Android的部署可以使用TVM4J,详见 here
这里我们不用Java,仍然使用C++。
一、环境配置
环境依赖有llvm和tvm runtime。
1、对于llvm 我们从LLVM Download Page下载armv7a Linux 架构的预编译库。可能需要根据Android系统的环境选取其他版本。
2、对于tvm runtime, 我们把tvm的源码放入Android Studio,然后将 tvm_runtime_pack.cc加入到CMakeLists.txt中进行编译。
二、模型部署
1、Tensorflow转onnx
https://github.com/onnx/tutorials/blob/master/tutorials/OnnxTensorflowExport.ipynb
示例代码:https://github.com/onnx/tutorials/blob/master/tutorials/assets/tf-train-mnist.py
(1)编译时保存模型图
在模型训练代码中加上以下代码
with open("graph.proto", "wb") as file:
  graph = tf.get_default_graph().as_graph_def(add_shapes=True)
  file.write(graph.SerializeToString())
(2)Graph Freezing,将模型图和参数合并到一个文件
Secondly, we freeze the graph. Here, we include quotes from Tensorflow documentation about what graph freezing is:
One confusing part about this is that the weights usually aren't stored inside the file format during training. Instead, they're held in separate checkpoint files, and there are Variable ops in the graph that load the latest values when they're initialized. It's often not very convenient to have separate files when you're deploying to production, so there's the freeze_graph.py script that takes a graph definition and a set of checkpoints and freezes them together into a single file.
Thus here we build the freeze_graph tool in the Tensorflow source folder and execute it with the information about where the GraphProto is, where the checkpoint file is and where to put the frozen graph. One caveat is that you need to supply the name of the output node to this utility. If you are having trouble finding the name of the output node, please refer to this article for help.
bazel build tensorflow/python/tools:freeze_graph
bazel-bin/tensorflow/python/tools/freeze_graph \
    --input_graph=/home/mnist-tf/graph.proto \
    --input_checkpoint=/home/mnist-tf/ckpt/model.ckpt \
    --output_graph=/tmp/frozen_graph.pb \
    --output_node_names=fc2/add \
    --input_binary=True
Note that now we have obtained the frozen_graph.pb with graph definition as well as weight information in one file.
(3)模型转换
Thirdly, we convert the model to ONNX format using onnx-tensorflow. Using tensorflow_graph_to_onnx_model from onnx-tensorflow API (documentation available at https://github.com/onnx/onnx-tensorflow/blob/master/doc/API.md).
import tensorflow as tf
from onnx_tf.frontend import tensorflow_graph_to_onnx_model

with tf.gfile.GFile("frozen_graph.pb", "rb") as f:
    graph_def = tf.GraphDef()
    graph_def.ParseFromString(f.read())
    onnx_model = tensorflow_graph_to_onnx_model(graph_def,
                                     "fc2/add",
                                     opset=6)

    file = open("mnist.onnx", "wb")
    file.write(onnx_model.SerializeToString())
    file.close()
此步骤完成后得到一个onnx模型文件。
2、导出onnx模型编译为动态库
这里的onnx模型也就是前面所说的kernel。导出代码可以参考https://oldpan.me/archives/the-first-step-towards-tvm-2
注意修改target。
这里会导出三个文件 xxx.so, xxx.json, xxx.params。
3、将第2步导出的三个文件放到Android设备中,加载到TVM推理代码中运行。
关于tvm_runtime的线程安全:https://discuss.tvm.ai/t/is-tvmruntime-thread-safe/84