SpringBoot2集成MyBatis、Druid连接池、PageHelper分页操作
主要知识点
SpringBoot2集成MyBatis,实现基本的CURD操作,这其中涉及到相关内容也是关注重点:
- PageHelper 数据库分页查询,重点配置和使用
- Durid 数据库连接池集成,主要为sql监控而生。重点配置和使用
- MyBatis 集成及使用
- Controller controller层接收参数
SpringBoot整合Mybatis
之前已经说过:SpringBoot框架不是对Spring功能上的增强,而是提供了一种快速使用Spring的方式
所以说,SpringBoot整合Mybatis的思想和Spring整合Mybatis的思想基本相同,不同之处有两点:
- Mapper接口的XML配置文件变化。之前我们使用Mybatis接口代理开发,规定Mapper映射文件要和接口在一个目录下;而这里Mapper映射文件置于resources/mapper/下,且置于src/main/java/下的Mapper接口需要用@Mapper注解标识,不然映射文件与接口无法匹配。
- SpringBoot建议使用YAML作为配置文件,它有更简便的配置方式。所以整合Mybatis在配置文件上有一定的区别,但最终都是那几个参数的配置。
整合配置文件
在Spring阶段用XML配置mybatis无非就是配置:1.连接池;2.数据库url连接;3.mysql驱动;4.其他初始化配置
SpringBoot 推荐yml格式配置文件,配置更加简洁,当然.properties格式也是支持的,对于其它配置一样,都在yml配置文件中,配置最大程度简单话,尽量摒弃之前SpringMVC中的xml配置
server:
  port: 8081

spring:
    datasource:
        name: local_mysql_a50
       # url: jdbc:mysql://127.0.0.1:3306/supports-demo2?useUnicode=true&characterEncoding=UTF-8&allowMultiQueries=true
        url: jdbc:mysql://localhost:3306/ssm_a50_db?useUnicode=true&characterEncoding=UTF-8&allowMultiQueries=true
        username: root
        password: WFCwfc123456!@#
        # 使用druid数据源
        type: com.alibaba.druid.pool.DruidDataSource
        driver-class-name: com.mysql.jdbc.Driver
        filters: stat,wall #通过别名的方式配置扩展插件,常用的插件有:监控统计用的filter:stat,日志用的filter:log4j,防御sql注入的filter:wall
        minIdle: 10       #最小空闲连接个数
        maxActive: 100                       #最大连接个数
        initialSize: 10                      #初始化连接个数
        maxWait: 60000    #获取连接时最大等待时间,单位毫秒
        timeBetweenEvictionRunsMillis: 60000 #配置间隔多久才进行一次检测,检测需要关闭的空闲连接,单位是毫秒ååå
        minEvictableIdleTimeMillis: 300000   #配置一个连接在池中最小生存的时间,单位是毫秒
        validationQuery: select 'x'          #用来检测连接是否有效的sql,要求是一个查询语句。
        testWhileIdle: true                  #建议配置为true,不影响性能,并且保证安全性。如果空闲时间大于timeBetweenEvictionRunsMillis,执行validationQuery检测连接是否有效
        testOnBorrow: false                  #申请连接时执行validationQuery检测连接是否有效,做了这个配置会降低性能
        testOnReturn: false                  #归还连接时执行validationQuery检测连接是否有效,做了这个配置会降低性能
        poolPreparedStatements: true         #是否缓存preparedStatement,也就是PSCache。PSCache对支持游标的数据库性能提升巨大,比如说oracle。在mysql下建议关闭。
        maxPoolPreparedStatementPerConnectionSize: 100  #要启用PSCache,必须配置大于0,当大于0时,poolPreparedStatements自动触发修改为true。在Druid中,不会存在Oracle下PSCache占用内存过多的问题,可以把这个数值配置大一些,比如说100
        maxOpenPreparedStatements: 100                  #要启用PSCache,必须配置大于0,当大于0时,poolPreparedStatements自动触发修改为true。在Druid中,不会存在Oracle下PSCache占用内存过多的问题,可以把这个数值配置大一些,比如说100
mybatis:
  mapper-locations: classpath:mapper/*.xml
  type-aliases-package: com.mybatisstudy.domain

mapper:
  mappers: com.mybatisstudy.dao
  not-empty: false
  identity: MYSQL

pagehelper:
    helperDialect: mysql
    reasonable: true
    supportMethodsArguments: true
    params: count=countSql
    returnPageInfo: check
注意:空格代表节点层次;注释部分用#标记
解释
- 我们实现的是spring-mybatis的整合,包含mybatis的配置以及datasource数据源的配置当然属于spring配置中的一部分,所以需要在spring:下。
- mapper-locations相当于XML中的用来扫描Mapper层的配置文件,由于我们的配置文件在resources下,所以需要指定classpath:。
- type-aliases-package相当与XML中别名配置,一般取其下实体类类名作为别名。
- datasource数据源的配置,name表示当前数据源的名称,类似于之前的id属性,这里可以任意指定,因为我们无需关注Spring是怎么注入这个Bean对象的。
- druid代表本项目中使用了阿里的druid连接池,driver-class-name:相当于XML中的
<property
    name="driverClassName">;url代表XML中的<property
    name="url">;username代表XML中的<property
    name="username">;password代表XML中的<property
    name="password">;
其他druid的私有属性配置不再解释。这里注意druid连接池和c3p0连接池在XML的的name中就不同,在此处SpringBoot的配置中当然名称也不同。
如果Spring整合Mybtis的配置你已经很熟悉了,那么这个配置你肯定也很眼熟,从英文名称上就很容易区分出来。这里需要注意的就是YAML语法规定不同行空格代表了不同的层级结构。
既然完成了SpringBoot-Mybatis基本配置下面我们实战讲解如何实现基本的CRUD。其它配置按照相应的格式配置即可
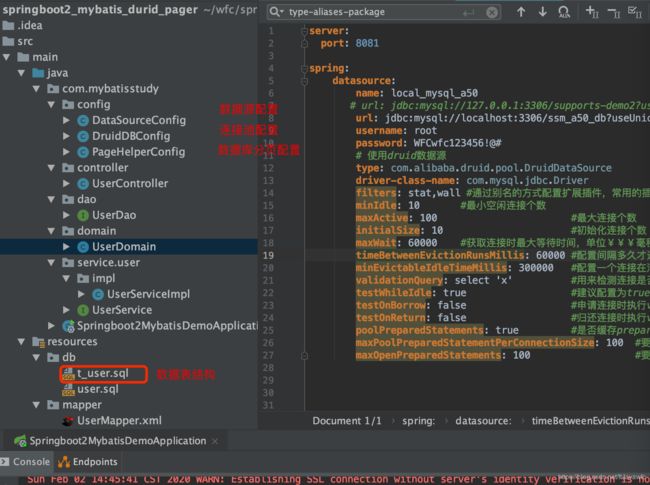
项目结构图
MyBatis相关
- 配置文件:上面提到,SpringBoot集成MyBatis和SpringMVC集成MyBatis使用上面无太大不同,主要是配置方式不同,上面配置已经介绍
- 数据源配置:DataSourceConfig.java文件中,需要到三个注解
@Configuration
@MapperScan("com.mybatisstudy.dao")
@EnableTransactionManagement
@Configuration
@MapperScan("com.mybatisstudy.dao")
@EnableTransactionManagement
public class DataSourceConfig {
    @Autowired
    private Environment env;

    @Autowired
    private PageInterceptor pageInterceptor;

    @Bean
    public SqlSessionFactory sqlSessionFactory(DataSource dataSource) throws Exception {
        SqlSessionFactoryBean fb = new SqlSessionFactoryBean();
        fb.setDataSource(dataSource);
        //该配置非常的重要,如果不将PageInterceptor设置到SqlSessionFactoryBean中,导致分页失效
        fb.setPlugins(new Interceptor[]{pageInterceptor});
        fb.setTypeAliasesPackage(env.getProperty("mybatis.type-aliases-package"));
        fb.setMapperLocations(new PathMatchingResourcePatternResolver().getResources(env.getProperty("mybatis.mapper-locations")));
        return fb.getObject();
    }

}
对于@MapperScan 必须写明,不然DAO层无法到对应的文件.xml文件
Druid相关
Druid配置,数据库连接池,除了池概念就是sql监控
- 配置文件:yml配置文件中,配置druid内容
- 配置数据源:配置数据源,注解web过滤器,后台管理的Servlet.在DruidDBConfig.java 文件中配置,主要用@Configuration 注解即可,然后进行配置。
@Configuration
public class DruidDBConfig {
    private Logger logger = LoggerFactory.getLogger(DruidDBConfig.class);

    @Value("${spring.datasource.url}")
    private String dbUrl;

    @Value("${spring.datasource.username}")
    private String username;

    @Value("${spring.datasource.password}")
    private String password;

    @Value("${spring.datasource.driver-class-name}")
    private String driverClassName;

    @Value("${spring.datasource.initialSize}")
    private int initialSize;

    @Value("${spring.datasource.minIdle}")
    private int minIdle;

    @Value("${spring.datasource.maxActive}")
    private int maxActive;

    @Value("${spring.datasource.maxWait}")
    private int maxWait;

    @Value("${spring.datasource.timeBetweenEvictionRunsMillis}")
    private int timeBetweenEvictionRunsMillis;

    @Value("${spring.datasource.minEvictableIdleTimeMillis}")
    private int minEvictableIdleTimeMillis;

    @Value("${spring.datasource.validationQuery}")
    private String validationQuery;

    @Value("${spring.datasource.testWhileIdle}")
    private boolean testWhileIdle;

    @Value("${spring.datasource.testOnBorrow}")
    private boolean testOnBorrow;

    @Value("${spring.datasource.testOnReturn}")
    private boolean testOnReturn;

    @Value("${spring.datasource.poolPreparedStatements}")
    private boolean poolPreparedStatements;

    @Value("${spring.datasource.maxPoolPreparedStatementPerConnectionSize}")
    private int maxPoolPreparedStatementPerConnectionSize;

    @Value("${spring.datasource.filters}")
    private String filters;

    @Value("{spring.datasource.connectionProperties}")
    private String connectionProperties;

    @Bean     //声明其为Bean实例
    @Primary  //在同样的DataSource中,首先使用被标注的DataSource
    public DataSource dataSource() {
        DruidDataSource datasource = new DruidDataSource();
        datasource.setUrl(this.dbUrl);
        datasource.setUsername(username);
        datasource.setPassword(password);
        datasource.setDriverClassName(driverClassName);
        //configuration
        datasource.setInitialSize(initialSize);
        datasource.setMinIdle(minIdle);
        datasource.setMaxActive(maxActive);
        datasource.setMaxWait(maxWait);
        datasource.setTimeBetweenEvictionRunsMillis(timeBetweenEvictionRunsMillis);
        datasource.setMinEvictableIdleTimeMillis(minEvictableIdleTimeMillis);
        datasource.setValidationQuery(validationQuery);
        datasource.setTestWhileIdle(testWhileIdle);
        datasource.setTestOnBorrow(testOnBorrow);
        datasource.setTestOnReturn(testOnReturn);
        datasource.setPoolPreparedStatements(poolPreparedStatements);
        datasource.setMaxPoolPreparedStatementPerConnectionSize(maxPoolPreparedStatementPerConnectionSize);
        try {
            datasource.setFilters(filters);
        } catch (SQLException e) {
            logger.error("druid configuration initialization filter", e);
        }
        datasource.setConnectionProperties(connectionProperties);
        return datasource;
    }

    //1、配置一个管理后台的Servlet
    @Bean
    public ServletRegistrationBean statViewServlet() {
        ServletRegistrationBean bean = new ServletRegistrationBean(new StatViewServlet(), "/druid/*");
        Map<String, String> initParams = new HashMap<>();
        initParams.put("loginUsername", "admin");
        initParams.put("loginPassword", "admin");
        initParams.put("allow", "");//默认就是允许所有访问
        initParams.put("deny", "192.168.15.21");//黑名单的IP
        bean.setInitParameters(initParams);
        return bean;
    }

    //2、配置一个web监控的filter
    @Bean
    public FilterRegistrationBean webStatFilter() {
        FilterRegistrationBean bean = new FilterRegistrationBean();
        bean.setFilter(new WebStatFilter());
        Map<String, String> initParams = new HashMap<>();
        initParams.put("exclusions", "*.js,*.css,/druid/*");
        bean.setInitParameters(initParams);
        bean.setUrlPatterns(Arrays.asList("/*"));
        return bean;
    }
分页组件pagehelper相关
- 配置到yml文件:
pagehelper:
helperDialect: mysql
reasonable: true
supportMethodsArguments: true
params: count=countSql
returnPageInfo: check
- 配置注解:
@Configuration
public class PageHelperConfig {
    @Value("${pagehelper.helperDialect}")
    private String helperDialect;
    @Bean
    public PageInterceptor pageInterceptor(){
        PageInterceptor pageInterceptor = new PageInterceptor();
        Properties properties = new Properties();
        properties.setProperty("helperDialect", helperDialect);
        pageInterceptor.setProperties(properties);
        return pageInterceptor;
    }
}
- 使用:
在dao层,进行查询的时候,直接调用api,传入具体参数。
    @Override
    public List<UserDomain> findAllUser(int pageNum, int pageSize) {
        //将参数传给这个方法就可以实现物理分页了,非常简单。
        PageHelper.startPage(pageNum, pageSize);
        return userDao.selectUsers();
    }
在调用数据库之前,PageHelper.startPage(pageNum, pageSize);非常简单。如果需要其它功能,可以具体查一下具体api即可。
Controller层:
@Controller
@RequestMapping(value = "/user")
public class UserController {

    @Autowired
    private UserService userService;
    @ResponseBody
    @PostMapping("/add")
    public int addUser(@RequestBody UserDomain user) {
        return userService.addUser(user);
    }
	@ResponseBody
	@GetMapping("/all")
	public Object findAllUser(@RequestParam(name = "pageNum", required = false, defaultValue = "1") int pageNum,
							  @RequestParam(name = "pageSize", required = false, defaultValue = "5") int pageSize) {
		return userService.findAllUser(pageNum, pageSize);
	}
}
注意点:
SpringBoot2中搞清楚视图层:@RestController 和 @Controller 的区别
- 在springboot中,@RestController 相当于 @Controller + @ResponseBody;
- 即在Controller类中,若想返回jsp或html页面,则不能用@RestController,只能使用@Controller;
- 若返回的是json或xml数据,可以有两种写法:
1. @RestController注解,然后直接return json数据即可;
2. @Controller注解放类之前,然后若类中某个方法需要返回json数据,则需在该方法前添加@ResponseBody注解;
Durid监控
项目跑起来后,我们在durid配置中已经配置了Selevlet的拦截器,并配置了账号密码
//1、配置一个管理后台的Servlet
    @Bean
    public ServletRegistrationBean statViewServlet() {
        ServletRegistrationBean bean = new ServletRegistrationBean(new StatViewServlet(), "/druid/*");
        Map<String, String> initParams = new HashMap<>();
        initParams.put("loginUsername", "admin");
        initParams.put("loginPassword", "admin");
        initParams.put("allow", "");//默认就是允许所有访问
        initParams.put("deny", "192.168.15.21");//黑名单的IP
        bean.setInitParameters(initParams);
        return bean;
    }
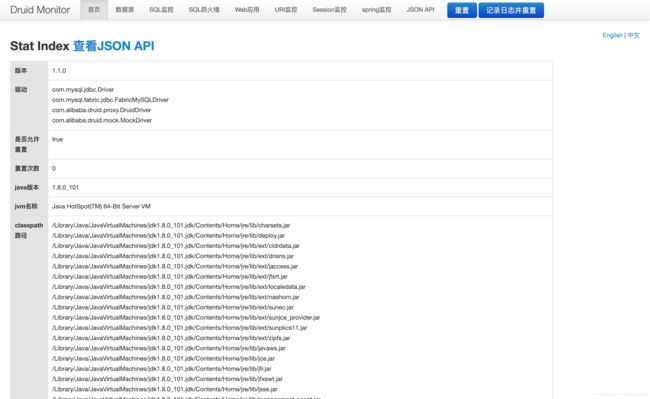
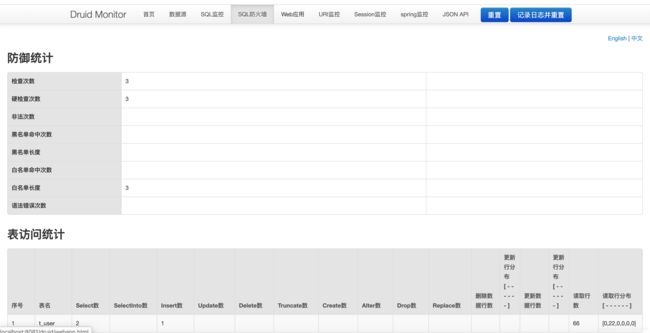
直接访问监控后台页面:http://localhost:8081/druid/datasource.html
根据自己设置端口,更改端口。监控极大利于研发人员对性能进行监控,改善系统性能。


