SpringBoot学习笔记——第四节,Spring常用配置
一.Scope
之前我们提到过,Spring中默认使用“单例模式”进行开发,IOC容器会自动为那些注册了的每一个Bean创建一个实例,并通过AnnotationConfigApplicationContext 对象的 getBean()方法获取该实例的引用。
但是在开发过程中,我们也会遇到需要多个实例的情况。Scope是用来描述IOC容器如何创建实例的。我们可以通过@Scope注解来更改Bean的Scope。
Scope有下面几种状态:
| Singleton | 一个Spring容器中只有一个Bean实例(单例模式),这是Spring默认配置 |
| Prototype | 每次调用新建一个Bean实例。 |
| Request | Web项目,给每个http request新建一个实例。不推荐使用。 |
| Session | Web项目,给每个http session新建一个实例。不推荐使用。 |
| GlobalSession | 这个只在portal应用中有用,给每个global http session新建bean实例。 |
我们这里主要关注 Singleton 和 Prototype 这两种状态。
·Singleton
Singleton是Spring的默认状态,也就是Spring容器中只存在一个该类的实例。这个单一实例会被存储到单例缓存(singleton cache)中,并且所有针对该bean的后续请求和引用都会返回被缓存的对象实例。
· Prototype
Prototype状态的Bean,Spring在每次收到一个访问请求的,或者调用getBean()方法的时候,都会创建一个新的Bean,相当于new操作。
需要非常注意的一点是,Spring不会对一个Prototype的Bean的整个生命周期负责。Spring容器在初始化,配置,装饰或者是装配完一个peototype实例后,将他交给程序,随后就对该实例不闻不问了。
在Singleton状态下,不管是何种作用域,容器都会调用所有对象的初始化生命周期回掉方法,但是对于prototype状态的Bean则不会执行此项操作。所以,客户端必须要清除prototype作用域的对象并释放任何prototype bean所持有的昂贵资源。
注意:
singleton模式是对某个对象的完全共享,包括代码块和数据块。在这种情况下,一个Bean假如有成员变量,那么这个成员变量的值是各个线程共享的,当线程A对变量进行赋值后,线程B就能够马上读出这个值。
下面我们来演示一下如何设置Bean的Scope
import org.springframework.context.annotation.Scope;
import org.springframework.stereotype.Service;

@Service
@Scope("prototype")    //设置Scope为prototype
public class Student {
	private int id;
	private String name;
	public int getId() {
		return id;
	}
	public void setId(int id) {
		this.id = id;
	}
	public String getName() {
		return name;
	}
	public void setName(String name) {
		this.name = name;
	}
}二.Spring 配置
·SpringEl
Spring3中引入了Spring表达式语言—SpringEL,SpEL是一种强大,简洁的装配Bean的方式,他可以通过运行期间执行的表达式将值装配到我们的属性或构造函数当中,更可以调用JDK中提供的静态常量,获取外部Properties文件中的的配置 。
Spring主要在注解@Value()的参数中使用Spring El表达式。
·为什么要使用SpringEl
在实际开发过程中我们会涉及到许多值,这些值零落的分布在各个类中,可能是一些网址,或者是一些属性。一段时间后当我们再想修改的话,就必须要到使用到这些资源的类中去修改,这是一个非常头疼的问题。
Spring的资源调用提供了一种注解的方式。我们在properties文件统一对这些资源进行管理,之后我们可以直接再properties文件中统一进行修改。
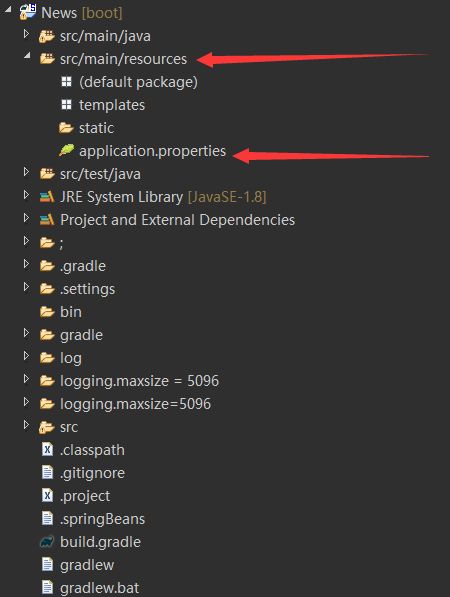
SpringBoot项目会为我们在src/main/resources包下自动生成一个application.properties文件,这个文件会被Spring自动检测到,我们就能直接使用@Value注解进行资源注入。假如我们要使用自己新建的properties文件的话需要在被注入的类前使用PropertySource("classpath:properties文件的完整路径")声明我们要在当前类中使用哪个properties文件才能使用@Value注入资源。
三.实例演示
这是一个我们需要被注入的类
public class News {
	private int news_id;
	public String content;
	private String news_time;
	private String news_address;                        //需要被注入的属性
	private String news_img;
	private int news_type;

	public String getContent() {
		return content;
	}
	public void setContent(String content) {
		this.content = content;
	}
	public int getNews_id() {
		return news_id;
	}
	public void setNews_id(int news_id) {
		this.news_id = news_id;
	}
	public String getNews_time() {
		return news_time;
	}
	public void setNews_time(String news_time) {
		this.news_time = news_time;
	}
	public String getNews_address() {
		return news_address;
	}
	public void setNews_address(String news_address) {
		this.news_address = news_address;
	}
	public String getNews_img() {
		return news_img;
	}
	public void setNews_img(String news_img) {
		this.news_img = news_img;
	}
	public int getNews_type() {
		return news_type;
	}
	public void setNews_type(int news_type) {
		this.news_type = news_type;
	}
}
我们这里需要对news_address属性注入一个url
Spring boot project会自动为我们生成一个resources包,这里一般存放我们的资源文件。
而包中会有一个application.properties文件。这个文件就是我们的全局的resource文件,Spring在运行时会自动找到这个文件。
然后在该文件中加入
news.address=https://spring.io 注意:等号左右不能有空格
然后我们进行注入
public class News {
	private int news_id;
	public String content;
	private String news_time;
        @Value(${news.address})                            //使用@Value属性实现注入
	private String news_address;                        //需要被注入的属性
	private String news_img;
	private int news_type;

	public String getContent() {
		return content;
	}
	public void setContent(String content) {
		this.content = content;
	}
	public int getNews_id() {
		return news_id;
	}
	public void setNews_id(int news_id) {
		this.news_id = news_id;
	}
	public String getNews_time() {
		return news_time;
	}
	public void setNews_time(String news_time) {
		this.news_time = news_time;
	}
	public String getNews_address() {
		return news_address;
	}
	public void setNews_address(String news_address) {
		this.news_address = news_address;
	}
	public String getNews_img() {
		return news_img;
	}
	public void setNews_img(String news_img) {
		this.news_img = news_img;
	}
	public int getNews_type() {
		return news_type;
	}
	public void setNews_type(int news_type) {
		this.news_type = news_type;
	}
}
使用了资源注入以后我们就能对统一的对资源进行管理。例如多个类都用到了news.address值得话我们只需要在application.properties文件中修改掉news.address属性就可以了。
YAML配置
YAML全称是 YAML Ain't Markup Language 它强调以数据为中心,而不是标记。它是一种直观的能被计算机识别序列化数据格式,而且非常适合人类,容易和脚本语言交互。 YAML比xml json 等更加适合作为配置文件来使用。
使用方式:
预告
下一节我们将介绍Spring MVC,以及基于Spring boot的Spring MVC配置
