Vue + Spring Boot 项目实战(十八):博客功能开发
![]()
重要链接:
「系列文章目录」
「项目源码(GitHub)」
本篇目录
- 前言
- 一、mavon-editor 编辑器
- 二、功能设计
- 三、功能实现
- 1.数据库设计
- 2.编辑器的引入与改造
- 3.文章列表页面
- 4.文章详情页面
- 5.文章管理页面
- 下一步
前言
各位朋友们你们好哇,隐约感觉我已经鸽了好几周了,所以虽然快过年了,我还是决定肝出一篇文章出来。前几篇文章发布后好多同学表示看不懂了,但我觉得都到第十八篇了,有些问题确实应该让你们自己尝试解决一下。不过放心,这篇文章是特地写给你们找自信的。
博客可以说是技术人的标配了,有个自己运营的博客网站更是可以在小白面前装一波逼。网上有很多开源的博客系统,如 WordPress、Hexo 等,功能强大页面美观运行稳定,但毕竟不是自己做的。一开始我也没想在这个项目里加这个模块,后来做着做着越来越像 CMS,这就好比你和朋友出去玩他想上厕所你陪他到了门口虽然你并没有什么库存但是来都来了放空一下也不是不可以,所以我就花了几个晚上把这个功能弄了一下。如果你们有兴趣真的可以搞个服务器尝试当博客运营一下,能学到很多东西。
这篇文章除了讲解如何搭出一个博客系统,还设计到如下知识点:
- 如何使用开源编辑器?
- Vue 如何在不同页面传递参数?
- Spring Data JPA 分页功能如何使用?
一、mavon-editor 编辑器
其实项目一开始的时候我就暗搓搓地安装了这个编辑器,所以如果你们复制过我的 package.json 文件或者直接从 github 上下的源码,就不用再安装了。
目前常见的文本编辑器有两种,即富文本编辑器和 markdown 编辑器,我一直写作用的都是 markdown,基本不用动鼠标,而且在各个平台样式比较统一,方便迁移。一开始可能觉得语法麻烦,其实用的多的就那么几个,写几篇就熟悉了。
简单介绍一下,这个 mavon-editor 编辑器应该是最火的国产开源 markdown 编辑器里最火的一个,github 3.4k star。功能比较齐全,界面比较舒服,作者也很热情地解决使用者的问题,我用了一下,暂时没发现什么 BUG。仓库地址:
https://github.com/hinesboy/mavonEditor
readme 提供了 API 文档。
markdown 编辑器的本质是把你的输入源(按一定语法规则组织的文本)转换为 html 代码,以在浏览器上生动形象地展示,这个过程其实类似于「翻译」或者说「编译」。同时作为一个成熟的应用,又需要一些附加的按钮、快捷键等功能,但其实 markdown 本身就是为了简化功能的使用,类似加粗、斜体等操作都有相对应的语法,完全可以直接键入,不必要过分使用快捷键或按钮。
二、功能设计
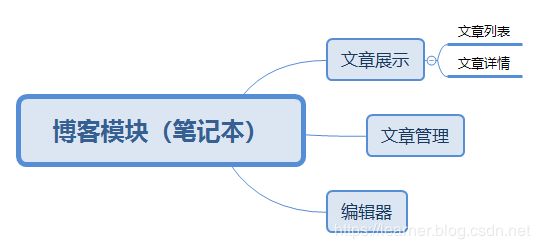
博客功能大概可以分为三个部分,分别是文章展示、文章管理和编辑器,文章展示又可以划分为文章列表与文章详情两个部分。
虽然编辑器提供预览功能,但一般我们在前台只不需要向用户展示 markdown 原文,所以最好还是单独编写一个文章详情页面渲染出 html。有两种思路:
- 第一种,在数据库中仅保存 markdown 语法的文本,在需要使用时解析为 html,并在前台渲染
- 第二种,markdown、html 均保存在数据库中,需要使用时取出 html 并在前台渲染
第一种的好处就是节省传输的数据量与数据库空间,坏处就是需要自己编写解析方法,相当于又重写了一遍编辑器,而且难以保证解析出来的样式跟原编辑器一致(用一些公开的解析函数也存在这个问题)。
当然,如果编辑器提供了解析的 API 那就比较舒服了,但我暂时没找到相关的内容。作者可能并不想这么做,而是提供了一个可以传递 markdown 与 html 值的 save 方法,因此就这个编辑器而言,我觉得选择第二种方法方便一些。
下面是各个页面的初步设计与功能介绍:
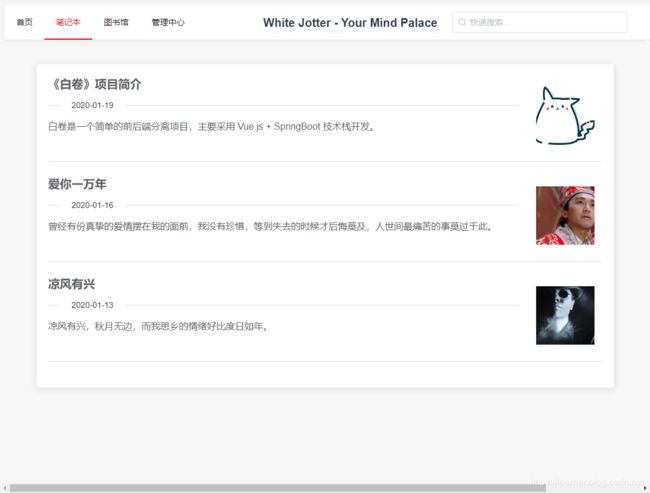
文章列表:
展示文章的题目、摘要、封面等信息,提供文章详情页面入口。主要是前端设计与分页功能实现,后期可以扩展分类标签、检索、归档等功能,还可以在侧边栏加入作者简介等信息。
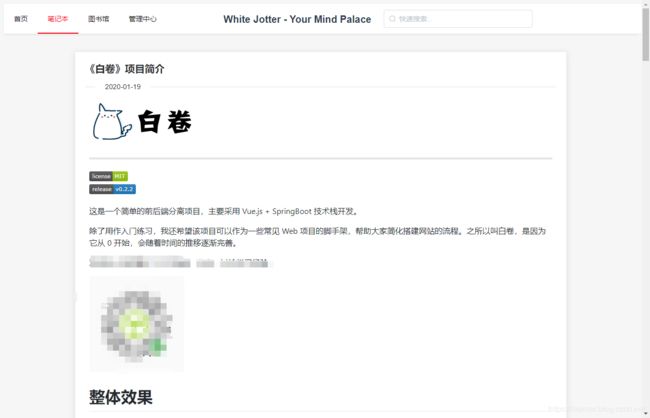
文章详情:
这个页面用于展示文章的具体内容,也就是渲染从数据库中取出的 html。打码的部分说明了我是一个遵守平台规则的老实人。
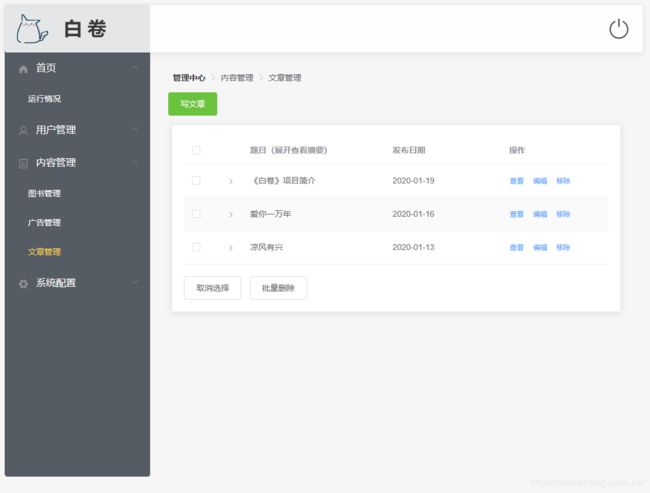
文章管理:
后台的管理页面,提供查看、发布、修改文章的入口以及删除功能,需要内容管理权限。
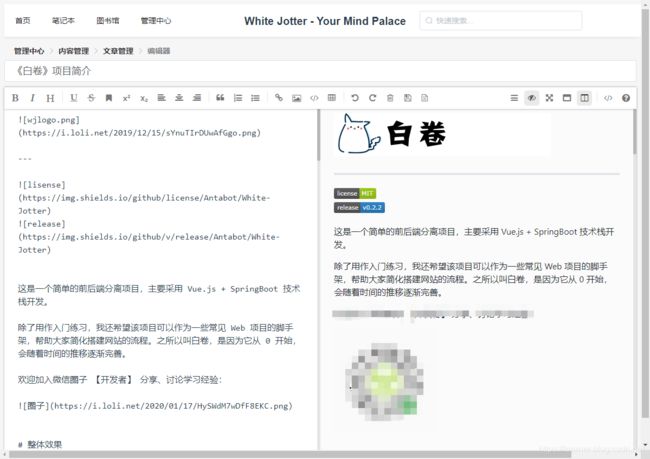
编辑器:
核心页面,在开源编辑器的基础上,添加了标题、摘要及封面设置功能。
三、功能实现
1.数据库设计
为了保存文章相关的信息,设计 jotter_article 表如下:
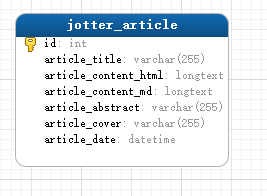
目前包含的字段是 id、标题、文章 html、md 原文、文章摘要、文章标题和发文日期。
2.编辑器的引入与改造
如果之前没有安装过编辑器,可以先在项目 wj-vue 根目录下执行如下命令:
$ npm install mavon-editor --save
再在 main.js 里全局注册一下:
import mavonEditor from 'mavon-editor'
...
...
Vue.use(mavonEditor)
即可在组件中使用。考虑到编辑功能应该向具有内容管理权限的用户使用,我们在 components/admin/content 文件夹下新建一个组件,命名为 ArticleEditor.vue。该组件的主体就是 mavon-editor 编辑器,最初的状态如下:
<template>
  <mavon-editor
    v-model="article.articleContentMd"
    style="height: 100%;"
    ref=md
    @save="saveArticles"
    fontSize="16px">
  mavon-editor>
template>

<script>
  export default {
    name: 'Editor',
    data () {
      return {
        article: {}
      }
    }
script>
接下来我们需要对它做一些邪恶的事情,把它改造成我们想要的样子。改造工序是:
- 第一步,添加标题输入栏
- 第二步,插入自定义工具,提供摘要与封面录入功能
- 第三步,编写 save 方法,与后端交互
实现标题的输入只需要添加一个
      <el-input
        v-model="article.articleTitle"
        style="margin: 10px 0px;font-size: 18px;"
        placeholder="请输入标题">el-input>
插入自定义工具,文档中并没有相关内容,但是我寻思肯定有人会问,就搜了一下 issues,果然
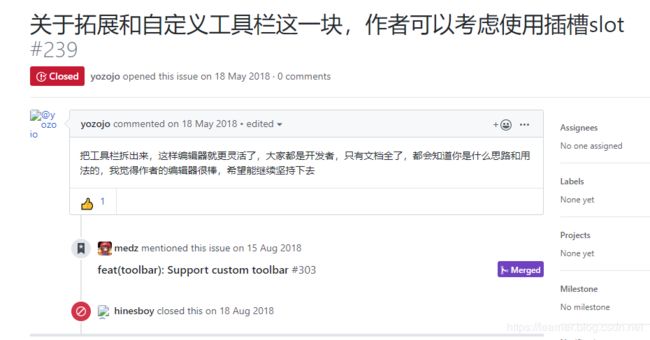
作者在 2018 年 8 月份就这个问题提交了一次更新。当然其实也可以直接看源码,里面设置了 4 个插槽,对应不同的插入位置。
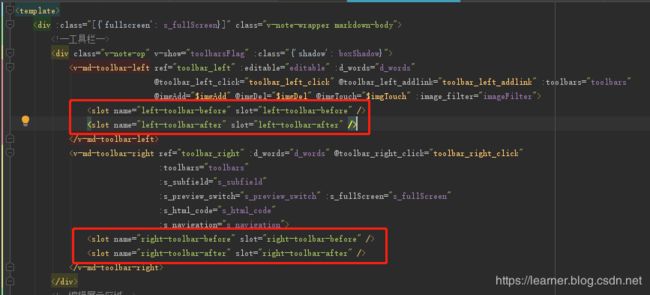
为了保证我们插入的图标跟原来的图标样式一致,需要再瞅一眼 tool-bar 的源码。里面的按钮大概是这样写的
<button type="button"
		v-if="toolbars.save"
		@click="$clicks('save')"
		class="op-icon fa fa-mavon-floppy-o"
        aria-hidden="true"
        :title="`${d_words.tl_save} (ctrl+s)`">button>
我们照葫芦画瓢设置一下 type、class 和 title 属性,弄一个添加摘要和封面的按钮:
<button type="button"
		class="op-icon el-icon-document"
		:title="'摘要/封面'"
		slot="left-toolbar-after"
		@click="dialogVisible = true">button>
其实样式主要是 class 里的 op-icon 控制的。
添加摘要和封面的表单被我做在弹出框里了。上传文章封面复用之前上传图书封面的组件。
<el-dialog
  :visible.sync="dialogVisible"
  width="30%">
  <el-divider content-position="left">摘要el-divider>
  <el-input
    type="textarea"
    v-model="article.articleAbstract"
    rows="6"
    maxlength="255"
    show-word-limit>el-input>
  <el-divider content-position="left">封面el-divider>
  <div style="margin-top: 20px">
    <el-input v-model="article.articleCover" autocomplete="off" placeholder="图片 URL">el-input>
    <img-upload @onUpload="uploadImg" ref="imgUpload" style="margin-top: 5px">img-upload>
  div>
  <span slot="footer" class="dialog-footer">
    <el-button @click="dialogVisible = false">取 消el-button>
    <el-button type="primary" @click="dialogVisible = false">确 定el-button>
  span>
el-dialog>
界面是这个样子:

然后我惊奇地发现图片上传不了,好像之前也有同学反映过这个问题,我没当回事。后来折腾半天,发现是图片上传这个组件比较狗,需要单独设置属性才能带上 cookie,不带 cookie 后端就拿不到 sessionId,就会被 shiro 拦截。修改后的组件模板部分如下:
<template>
  <el-upload
    class="img-upload"
    ref="upload"
    action="http://localhost:8443/api/admin/content/books/covers"
    with-credentials
    :on-preview="handlePreview"
    :on-remove="handleRemove"
    :before-remove="beforeRemove"
    :on-success="handleSuccess"
    multiple
    :limit="1"
    :on-exceed="handleExceed"
    :file-list="fileList">
    <el-button size="small" type="primary">点击上传el-button>
    <div slot="tip" class="el-upload__tip">只能上传jpg/png文件,且不超过500kbdiv>
  el-upload>
template>
相比之前添加了 with-credentials。
最后一步编写保存方法,常规操作,向后端发送数据即可。
组件完整的代码如下:
<template>
  <div>
    <el-row style="margin: 18px 0px 0px 18px ">
      <el-breadcrumb separator-class="el-icon-arrow-right">
        <el-breadcrumb-item :to="{ path: '/admin/dashboard'}">管理中心el-breadcrumb-item>
        <el-breadcrumb-item :to="{ path: '/admin/content/book'}">内容管理el-breadcrumb-item>
        <el-breadcrumb-item :to="{ path: '/admin/content/article'}">文章管理el-breadcrumb-item>
        <el-breadcrumb-item>编辑器el-breadcrumb-item>
      el-breadcrumb>
    el-row>
    <el-row>
      <el-input
        v-model="article.articleTitle"
        style="margin: 10px 0px;font-size: 18px;"
        placeholder="请输入标题">el-input>
    el-row>
    <el-row style="height: calc(100vh - 140px);">
      <mavon-editor
        v-model="article.articleContentMd"
        style="height: 100%;"
        ref=md
        @save="saveArticles"
        fontSize="16px">
        <button type="button" class="op-icon el-icon-document" :title="'摘要/封面'" slot="left-toolbar-after"
                @click="dialogVisible = true">button>
      mavon-editor>
      <el-dialog
        :visible.sync="dialogVisible"
        width="30%">
        <el-divider content-position="left">摘要el-divider>
        <el-input
          type="textarea"
          v-model="article.articleAbstract"
          rows="6"
          maxlength="255"
          show-word-limit>el-input>
        <el-divider content-position="left">封面el-divider>
        <div style="margin-top: 20px">
          <el-input v-model="article.articleCover" autocomplete="off" placeholder="图片 URL">el-input>
          <img-upload @onUpload="uploadImg" ref="imgUpload" style="margin-top: 5px">img-upload>
        div>
        <span slot="footer" class="dialog-footer">
          <el-button @click="dialogVisible = false">取 消el-button>
          <el-button type="primary" @click="dialogVisible = false">确 定el-button>
        span>
      el-dialog>
    el-row>
  div>
template>

<script>
  import ImgUpload from './ImgUpload'

  export default {
    name: 'Editor',
    components: {ImgUpload},
    data () {
      return {
        article: {},
        dialogVisible: false
      }
    },
    mounted () {
      if (this.$route.params.article) {
        this.article = this.$route.params.article
      }
    },
    methods: {
      saveArticles (value, render) {
        // value 是 md,render 是 html
        this.$confirm('是否保存并发布文章?', '提示', {
          confirmButtonText: '确定',
          cancelButtonText: '取消',
          type: 'warning'
        }).then(() => {
            this.$axios
              .post('/admin/content/article', {
                id: this.article.id,
                articleTitle: this.article.articleTitle,
                articleContentMd: value,
                articleContentHtml: render,
                articleAbstract: this.article.articleAbstract,
                articleCover: this.article.articleCover,
                articleDate: this.article.articleDate
              }).then(resp => {
              if (resp && resp.status === 200) {
                this.$message({
                  type: 'info',
                  message: '已保存成功'
                })
              }
            })
          }
        ).catch(() => {
          this.$message({
            type: 'info',
            message: '已取消发布'
          })
        })
      },
      uploadImg () {
        this.article.articleCover = this.$refs.imgUpload.url
      }
    }
  }
script>
后端部分首先是 pojo、DAO、service 一套,目前没什么可说的,不想自己写可以参考源码:
https://github.com/Antabot/White-Jotter/tree/master/wj/src/main/java/com/gm/wj
controller 中保存对应的方法如下:
 @PostMapping("api/admin/content/article")
 public Result saveArticle(@RequestBody JotterArticle article) {
     jotterArticleService.addOrUpdate(article);
     return ResultFactory.buildSuccessResult("保存成功");
 }
前端路由写法参考:
 {
   path: '/admin/content/editor',
   name: 'Editor',
   component: Editor,
   meta: {
     requireAuth: true
   }
 }
由于编辑器不在后台管理目录中,所以不用设置动态加载,虽然前端非要访问也能访问,但是反正没有写的权限,所以无所谓了。
3.文章列表页面
这个页面主要涉及到分页的问题。之前我们图书馆页面的分页是纯靠前端进行的,这里我们用后端来实现一下。
Spring Data 提供了 org.springframework.data.domain.Page 类,该类包含了页码、页面尺寸等信息,可以很方便地实现分页。我们要做的,就是编写一个传入页码与页面尺寸参数的方法,这个方法可以写在 service 层。
public Page list(int page, int size) {
    Sort sort = new Sort(Sort.Direction.DESC, "id");
    return  jotterArticleDAO.findAll(PageRequest.of(page, size, sort));
}
这里我们构造了一个 PageRequest 类来配合查询,sort 参数是可选的,如果报错了可能是版本问题,较新的版本里取消了公共构造方法,而是用静态工厂方法代替。将语句替换为
Sort sort = Sort.by(Sort.Direction.DESC, "id")
即可。接下来编写 controller 对应方法:
@GetMapping("/api/article/{size}/{page}")
public Page listArticles(@PathVariable("size") int size, @PathVariable("page") int page) {
    return jotterArticleService.list(page - 1, size);
}
这里 page 是 1 的话其实会查询到第二页的内容,而前端组件传入的参数就是当页页码,所以需要 - 1。随便输个参数测试一下,可以看到后端查询出来的数据结构如下:
{"content":[{"id":1,"articleTitle":"凉风有兴","articleContentHtml":"凉风有兴,秋月无边,而我思乡的情绪好比度日如年。虽然我风流倜傥玉树临风,但我还是有聪明的头脑和强健的臂腕。","articleContentMd":"凉风有兴,秋月无边,而我思乡的情绪好比度日如年。虽然我风流倜傥玉树临风,但我还是有聪明的头脑和强健的臂腕。","articleAbstract":"凉风有兴,秋月无边,而我思乡的情绪好比度日如年。","articleCover":"https://i.loli.net/2020/01/16/d2ZlKI1WRE4p7XB.png","articleDate":"2020-01-13"}],
"pageable":
{"sort":{"sorted":true,"unsorted":false,"empty":false},"offset":4,"pageSize":4,"pageNumber":1,"paged":true,"unpaged":false},
"totalElements":5,
"totalPages":2,
"last":true,
"number":1,
"size":4,
"sort":{"sorted":true,"unsorted":false,"empty":false},
"numberOfElements":1,
"first":false,
"empty":false}
结合前端,我们实际上需要的内容只有两个: content,即数据库中的内容,totalElements,即总数量。
页面大小交由前端控制即可。前端的分页组件可以写成:
<el-pagination
  background
  layout="total, prev, pager, next, jumper"
  @current-change="handleCurrentChange"
  :page-size="pageSize"
  :total="total">
el-pagination>
页面变更时触发的方法为:
handleCurrentChange (page) {
  var _this = this
  this.$axios.get('/article/' + this.pageSize + '/' + page).then(resp => {
    if (resp && resp.status === 200) {
      _this.articles = resp.data.content
      _this.total = resp.data.totalElements
    }
  })
}
打开页面时默认加载第一页,查询的方法可以写成:
loadArticles () {
  var _this = this
  this.$axios.get('/article/' + this.pageSize + '/1').then(resp => {
    if (resp && resp.status === 200) {
      _this.articles = resp.data.content
      _this.total = resp.data.totalElements
    }
  })
}
这样这个页面的核心部分就完成了。组件 Articles.vue 可以放在 component/jotter 文件夹中,完整代码如下:
<template>
  <div style="margin-top: 40px">

    <div class="articles-area">
      <el-card style="text-align: left">
        <div v-for="article in articles" :key="article.id">
          <div style="float:left;width:85%;height: 150px;">
            <router-link class="article-link" :to="{path:'jotter/article',query:{id: article.id}}"><span style="font-size: 20px"><strong>{{article.articleTitle}}strong>span>router-link>
            <el-divider content-position="left">{{article.articleDate}}el-divider>
            <router-link class="article-link" :to="{path:'jotter/article',query:{id: article.id}}"><p>{{article.articleAbstract}}p>router-link>
          div>
          <el-image
            style="margin:18px 0 0 30px;width:100px;height: 100px"
            :src="article.articleCover"
            fit="cover">el-image>
          <el-divider>el-divider>
        div>
      el-card>
    div>
    <el-pagination
      background
      layout="total, prev, pager, next, jumper"
      @current-change="handleCurrentChange"
      :page-size="pageSize"
      :total="total">
    el-pagination>
  div>
template>

<script>

  export default {
    name: 'Articles',
    data () {
      return {
        articles: [],
        pageSize: 4,
        total: ''
      }
    },
    mounted () {
      this.loadArticles()
    },
    methods: {
      loadArticles () {
        var _this = this
        this.$axios.get('/article/' + this.pageSize + '/1').then(resp => {
          if (resp && resp.status === 200) {
            _this.articles = resp.data.content
            _this.total = resp.data.totalElements
          }
        })
      },
      handleCurrentChange (page) {
        var _this = this
        this.$axios.get('/article/' + this.pageSize + '/' + page).then(resp => {
          if (resp && resp.status === 200) {
            _this.articles = resp.data.content
            _this.total = resp.data.totalElements
          }
        })
      }
    }
  }
script>

<style scoped>
  .articles-area {
    width: 990px;
    height: 750px;
    margin-left: auto;
    margin-right: auto;
  }

  .article-link {
    text-decoration: none;
    color: #606266;
  }

  .article-link:hover {
    color: #409EFF;
  }
style>
最后一个要说的地方是向详情页面传入参数,以查询指定的文章内容。
通过 vue 的 router 传递参数有两种方式。第一种称为命名路由传参,即使用 params,形式如下:
this.$router.push({ name: 'editor', params: { id: 1 }})
这种方式里面 name 是指在路由中定义的那个 name,而不是页面路径。跳转到的页面路由不会包含相关参数信息,所以刷新后就丢失了。我们可能会想要把某一篇文章分享给别人,如果采用这种方式,就无法实现链接分享,所以这里采用第二种,成为查询传参,形式如下:
this.$router.push({ path: 'jotter/article', query: { id: 1 }});
结合超链接,即可实现点击标题或摘要传递参数到文章详情页面并跳转功能,只要在详情页面获取到该参数并向数据库发送请求即可。获取参数的形式如下:
this.$route.query.id
记得修改对应路由信息,之前我们的 /jotter 路由对应的是其它组件,被我改成文章列表了:
 {
   path: '/jotter',
   name: 'Jotter',
   component: Articles
 }
4.文章详情页面
这个页面的需要解决的问题主要是正确渲染 html。上面说过渲染的结果最好与原编辑器中预览的效果一致,但作者又没有提供相关接口,没办法,只能把编辑器的 css 文件给整到本地了。
文件可以自己从模块里找,也可以从
https://github.com/Antabot/White-Jotter/blob/master/wj-vue/src/styles/markdown.css
拷贝,放在 /src/styles/ 文件夹下即可。接着我们在 component/jotter 文件夹中新建 ArticleDetails 组件,在 style 中引入 css:
@import "../../styles/markdown.css";
然后在渲染 html 的上一层加上 class="markdown-body 即可。
该页面完整的代码如下:
<template>
  <div class="articles-area">
    <el-card style="text-align: left;width: 990px;margin: 35px auto 0 auto">
      <div>
        <span style="font-size: 20px"><strong>{{article.articleTitle}}strong>span>
        <el-divider content-position="left">{{article.articleDate}}el-divider>
        <div class="markdown-body">
          <div v-html="article.articleContentHtml">div>
        div>
      div>
    el-card>
  div>
template>

<script>
  export default {
    name: 'ArticleDetails',
    data () {
      return {
        article: []
      }
    },
    mounted () {
      this.loadArticle()
    },
    methods: {
      loadArticle () {
        var _this = this
        this.$axios.get('/article/' + this.$route.query.id).then(resp => {
          if (resp && resp.status === 200) {
            _this.article = resp.data
          }
        })
      }
    }
  }
script>

<style scoped>
  @import "../../styles/markdown.css";
style>
使用 vue 的 v-html 属性即可方便地渲染。后端只需要编写一个对应的方法查询指定 id 的记录即可:
@GetMapping("/api/article/{id}")
public JotterArticle getOneArticle(@PathVariable("id") int id) {
    return jotterArticleService.findById(id);
}
5.文章管理页面
这个页面在图书管理页面的基础上,需要调整如下内容:
- 【写文章】按钮,跳转到编辑器页面
- 查看操作,跳转到指定文章详情页面
- 编辑操作,跳转到编辑器页面,并传入文章内容参数
- 添加分页组件
新建组件 ArticleManagement 放在 ArticleEditor 同级目录,代码如下:
<template>
  <div>
    <el-row style="margin: 18px 0px 0px 18px ">
      <el-breadcrumb separator-class="el-icon-arrow-right">
        <el-breadcrumb-item :to="{ path: '/admin/dashboard' }">管理中心el-breadcrumb-item>
        <el-breadcrumb-item>内容管理el-breadcrumb-item>
        <el-breadcrumb-item>文章管理el-breadcrumb-item>
      el-breadcrumb>
    el-row>
    <el-link href="/admin/content/editor" :underline="false" target="_blank" class="add-link">
      <el-button type="success">写文章el-button>
    el-link>
    <el-card style="margin: 18px 2%;width: 95%">
      <el-table
        :data="articles"
        stripe
        style="width: 100%"
        :max-height="tableHeight">
        <el-table-column
          type="selection"
          width="55">
        el-table-column>
        <el-table-column type="expand">
          <template slot-scope="props">
            <el-form label-position="left" inline>
              <el-form-item>
                <span>{{ props.row.articleAbstract }}span>
              el-form-item>
            el-form>
          template>
        el-table-column>
        <el-table-column
          prop="articleTitle"
          label="题目(展开查看摘要)"
          fit>
        el-table-column>
        <el-table-column
          prop="articleDate"
          label="发布日期"
          width="200">
        el-table-column>
        <el-table-column
          fixed="right"
          label="操作"
          width="180">
          <template slot-scope="scope">
            <el-button
              @click.native.prevent="viewArticle(scope.row.id)"
              type="text"
              size="small">
              查看
            el-button>
            <el-button
              @click.native.prevent="editArticle(scope.row)"
              type="text"
              size="small">
              编辑
            el-button>
            <el-button
              @click.native.prevent="deleteArticle(scope.row.id)"
              type="text"
              size="small">
              移除
            el-button>
          template>
        el-table-column>
      el-table>
      <div style="margin: 20px 0 50px 0">
        <el-pagination
          background
          style="float:right;"
          layout="total, prev, pager, next, jumper"
          @current-change="handleCurrentChange"
          :page-size="pageSize"
          :total="total">
        el-pagination>
      div>
    el-card>
  div>
template>

<script>
  export default {
    name: 'ArticleManagement',
    data () {
      return {
        articles: [],
        pageSize: 10,
        total: ''
      }
    },
    mounted () {
      this.loadArticles()
    },
    computed: {
      tableHeight () {
        return window.innerHeight - 320
      }
    },
    methods: {
      loadArticles () {
        var _this = this
        this.$axios.get('/article/' + this.pageSize + '/1').then(resp => {
          if (resp && resp.status === 200) {
            _this.articles = resp.data.content
            _this.total = resp.data.totalElements
          }
        })
      },
      handleCurrentChange (page) {
        var _this = this
        this.$axios.get('/article/' + this.pageSize + '/' + page).then(resp => {
          if (resp && resp.status === 200) {
            _this.articles = resp.data.content
            _this.total = resp.data.totalElements
          }
        })
      },
      viewArticle (id) {
        let articleUrl = this.$router.resolve(
          {
            path: '../../jotter/article',
            query: {
              id: id
            }
          }
        )
        window.open(articleUrl.href, '_blank')
      },
      editArticle (article) {
        this.$router.push(
          {
            name: 'Editor',
            params: {
              article: article
            }
          }
        )
      },
      deleteArticle (id) {
        this.$confirm('此操作将永久删除该文章, 是否继续?', '提示', {
          confirmButtonText: '确定',
          cancelButtonText: '取消',
          type: 'warning'
        }).then(() => {
            this.$axios
              .delete('/admin/content/article/' + id).then(resp => {
              if (resp && resp.status === 200) {
                this.loadArticles()
              }
            })
          }
        ).catch(() => {
          this.$message({
            type: 'info',
            message: '已取消删除'
          })
        })
      }
    }
  }
script>

<style scoped>
  .add-link {
    margin: 18px 0 15px 10px;
    float: left;
  }
style>
这里由于想要实现在新窗口打开文章详情页,又要传入参数,所以需要写成如下形式:
 viewArticle (id) {
   let articleUrl = this.$router.resolve(
     {
       path: '../../jotter/article',
       query: {
         id: id
       }
     }
   )
   window.open(articleUrl.href, '_blank')
 }
而编辑方法则使用 params 传入了参数,毕竟不用分享编辑器链接给别人。这个页面在管理模块,别忘了往数据库的 menu 表中新增一条记录。
![]()
后端新增了一个删除指定文章的方法:
@DeleteMapping("/api/admin/content/article/{id}")
public Result deleteArticle(@PathVariable("id") int id) {
    jotterArticleService.delete(id);
    return ResultFactory.buildSuccessResult("删除成功");
}
这样这个页面也就完事儿了。
OK,到这里我要讲的东西就结束了。还有很多组件你们可以自己往上加,比如点赞、评论、统计之类。另外有一些查询方法也可以优化一下,比如文章列表页面没有必要查询全量信息。
下一步
接下来我想着手对项目作一些优化,一直在往上堆东西,网页加载速度已经慢的不行了。
终于要回家了,虽然我一年休了不少次假,但上次回家还是 7 月份的时候。不瞒你们说,我要工作到初三才能放假,这还是人生头一次不能在家过年,虽然早就做了心理准备,但到跟前还是有些失落。现在又是这么个情况,我心里其实慌的一批。
这次不皮了,希望武汉挺住,全国人民挺住。
上一篇:Vue + Spring Boot 项目实战(十七):后台角色、权限与菜单分配
下一篇:Vue + Spring Boot 项目实战(十九):Web 项目优化解决方案