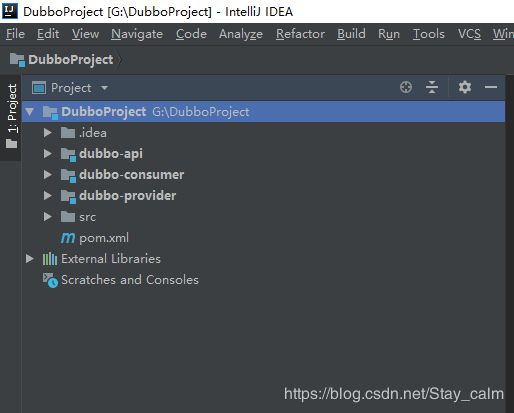
IDEA搭建springBoot+Dubbo+zookeeper+Mybatis微服务框架
IDEA搭建springBoot+Dubbo+zookeeper+Mybatis微服务框架
文章参考地址:https://www.cnblogs.com/gaopengfirst/
先准备zookeeper。下载解压后进入bin目录点击zkServer.cmd启动。这里不多说了,百度一大堆。
    4.0.0

    com.st
    DubboProject
    pom
    1.0-SNAPSHOT

        org.springframework.boot
        spring-boot-starter-parent
        2.0.4.RELEASE


        dubbo-api

        dubbo-provider

        dubbo-consumer


        UTF-8
        UTF-8
        1.8
        2.5.5
        0.10
        1.16.18
        1.5.7


            org.springframework.boot
            spring-boot-starter


            org.springframework.boot
            spring-boot-starter-web


            org.projectlombok
            lombok
            ${lombok.version}
            provided


            com.alibaba
            dubbo
            ${dubbo.version}


                    log4j
                    log4j


            com.101tec
            zkclient
            ${zkClient.version}


            org.springframework.boot
            spring-boot-devtools
            runtime
            true


                org.apache.maven.plugins
                maven-compiler-plugin

                    ${java.version}
                    ${java.version}
                    UTF-8


                org.apache.maven.plugins
                maven-resources-plugin

                    UTF-8


                org.springframework.boot
                spring-boot-maven-plugin

                    true
                    true
引入上面的这些依赖后再来看下dubbo-api工程
首先看一下dubbo-api中的pom.xml
    com.st
    1.0-SNAPSHOT
    4.0.0
    jar

    dubbo-api
    springBoot_Dubbo_API


        org.springframework.boot
        spring-boot-starter-parent
        2.0.4.RELEASE


        UTF-8
        UTF-8
        1.8


            org.springframework.boot
            spring-boot-starter


            org.springframework.boot
            spring-boot-starter-test
            test


                org.springframework.boot
                spring-boot-maven-plugin
引入上面的依赖后创建公共的实体(一定要序列化)和接口
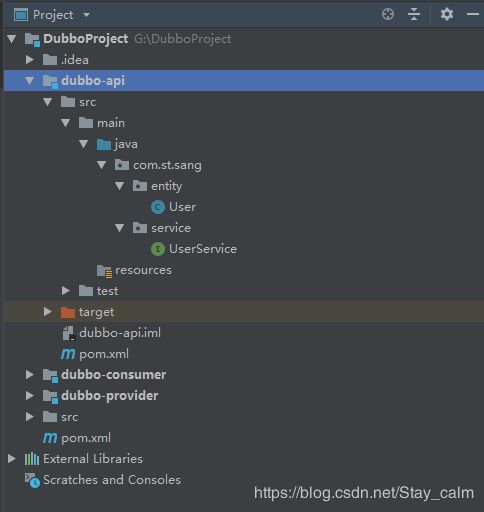
下面是User实体代码
package com.st.sang.entity;

import java.io.Serializable;

/**
 * @author SangJx
 * @description 用户实体
 * @date 2019/6/26 2:13
 */
public class User implements Serializable {

    private static final long serialVersionUID = -1688765204850364609L;
    private Integer id;
    private String userName;
    private String passWord;

    public Integer getId() {
        return id;
    }
    public void setId(Integer id) {
        this.id = id;
    }
    public String getUserName() {
        return userName;
    }
    public void setUserName(String userName) {
        this.userName = userName;
    }
    public String getPassWord() {
        return passWord;
    }
    public void setPassWord(String passWord) {
        this.passWord = passWord;
    }
}
下面是UserService代码,这里就只写一个接口
package com.st.sang.service;

import com.st.sang.entity.User;

import java.util.List;

public interface UserService {
    List getAllUser();
}
到这里父工程和dubbo-api就写完了,下面就是服务提供者dubbo-provider和消费者dubbo-consumer
先展示下dubbo-privoder模块结构
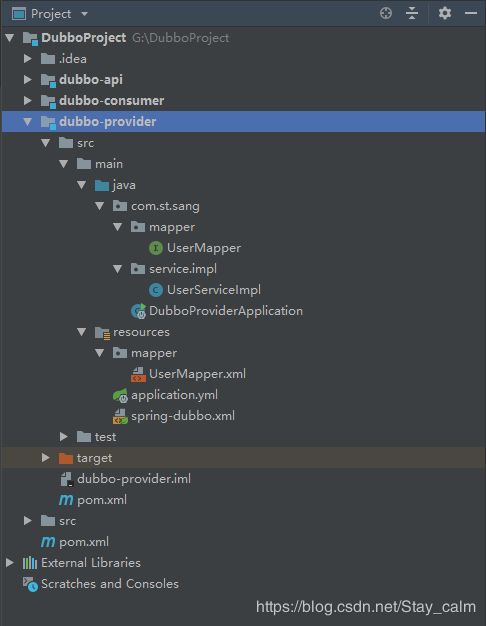
下面是dubbo-provider的pom.xml文件
    4.0.0

    com.st
    dubbo-provider
    1.0-SNAPSHOT
    jar

    springBoot_Dubbo_Provider


        org.springframework.boot
        spring-boot-starter-parent
        2.0.4.RELEASE


        UTF-8
        UTF-8
        1.8
        2.5.5
        0.10


            com.st
            dubbo-api
            1.0-SNAPSHOT


            org.springframework.boot
            spring-boot-starter


            org.springframework.boot
            spring-boot-starter-test
            test


            com.alibaba
            dubbo
            ${dubbo.version}


                    log4j
                    log4j


            com.101tec
            zkclient
            ${zkClient.version}


            org.mybatis.spring.boot
            mybatis-spring-boot-starter
            1.3.1


            org.springframework.boot
            spring-boot-starter-jdbc


            mysql
            mysql-connector-java
            5.1.35


            com.alibaba
            druid
            1.0.11


                org.springframework.boot
                spring-boot-maven-plugin
接下来是application.yml,没有这个文件的朋友可以把默认创建的application.properties文件删了,在resource上右键新建file
server:
  port: 8082
  servlet:
    context-path: /
spring:
  datasource:
    name: test
    url: jdbc:mysql://127.0.0.1:3306/st
    username: root
    password: root
    # 使用druid数据源
    type: com.alibaba.druid.pool.DruidDataSource
    driver-class-name: com.mysql.jdbc.Driver
    filters: stat
    maxActive: 20
    initialSize: 1
    maxWait: 60000
    minIdle: 1
    timeBetweenEvictionRunsMillis: 60000
    minEvictableIdleTimeMillis: 300000
    testWhileIdle: true
    testOnBorrow: false
    testOnReturn: false
    poolPreparedStatements: true
    maxOpenPreparedStatements: 20

#Mybatis配置
mybatis:
  typeAliasesPackage: com.st.sang.entity
  mapperLocations: classpath:mapper/*.xml
  #打印Mybatis的sql语句
  configuration:
    log-impl: org.apache.ibatis.logging.stdout.StdOutImpl
这里我们改一下端口号提供者为8082,消费者为8081,并配置druid数据库连接池和Mybatis
然后我们在resource文件夹下新建一个下xml文件,spring-dubbo.xml在项目启动的时候去加载,让此项目作为服务提供者
配置完以上这些就可以写服务提供者接口实现和dao层了
package com.st.sang.service.impl;

import com.alibaba.dubbo.config.annotation.Service;
import com.st.sang.entity.User;
import com.st.sang.mapper.UserMapper;
import com.st.sang.service.UserService;

import javax.annotation.Resource;
import java.util.List;

/**
 * @author SangJx
 * @description
 * @date 2019/6/26 2:44
 */
@Service(timeout = 10000)
public class UserServiceImpl implements UserService {

    @Resource
    private UserMapper userMapper;

    public List getAllUser() {
        List userList = userMapper.getAllUser();
        return userList;
    }
}
这里的@Service注解一定要注意是dubbo的,接下来在UserMapper中定义一个查询所有用户接口
package com.st.sang.mapper;

import com.st.sang.entity.User;
import java.util.List;

public interface UserMapper {
    List getAllUser();
}
然后在UserMapper.xml中写sql
id, userName, passWord
最后一步是完成dubbo-provider的启动类DubboProviderApplication
package com.st.sang;

import org.mybatis.spring.annotation.MapperScan;
import org.springframework.boot.SpringApplication;
import org.springframework.boot.autoconfigure.SpringBootApplication;
import org.springframework.context.annotation.ImportResource;

import java.io.IOException;

/**
 * @author SangJx
 * @description 启动类
 * @date 2019/6/26 2:50
 */
@SpringBootApplication
@ImportResource("classpath:spring-dubbo.xml")
@MapperScan("com.st.sang.mapper")
public class DubboProviderApplication {
    public static void main(String[] args){
        SpringApplication.run(DubboProviderApplication.class,args);
        System.out.println("服务端启动成功!!!!!!!!!!!!!!");
        try {
            System.in.read();
        } catch (IOException e) {
            e.printStackTrace();
        }
    }
}
到这里dubbo-provider模块结束,下面是消费者模块,同样先来看下目录结构
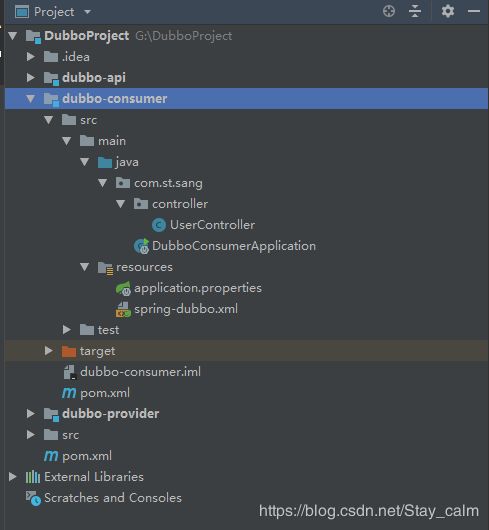
在pom.xml中添加需要的依赖
    4.0.0

    com.st
    dubbo-consumer
    1.0-SNAPSHOT
    jar

    springBoot_Dubbo_Consumer


        org.springframework.boot
        spring-boot-starter-parent
        2.0.4.RELEASE


        UTF-8
        UTF-8
        1.8
        2.5.5
        0.10


            com.st
            dubbo-api
            1.0-SNAPSHOT


            org.springframework.boot
            spring-boot-starter


            org.springframework.boot
            spring-boot-starter-test
            test


            org.springframework.boot
            spring-boot-starter-web


            com.alibaba
            dubbo
            ${dubbo.version}


                    log4j
                    log4j


            com.101tec
            zkclient
            ${zkClient.version}


                org.springframework.boot
                spring-boot-maven-plugin
然后我们需要在resource目录下创建spring-dubbo.xml,让此模块成为一个消费者
配置完spring-dubbo后,书写controller来调用服务
package com.st.sang.controller;

import com.alibaba.dubbo.config.annotation.Reference;
import com.st.sang.entity.User;
import com.st.sang.service.UserService;
import org.springframework.web.bind.annotation.RequestMapping;
import org.springframework.web.bind.annotation.RestController;

import java.util.List;

/**
 * @author SangJx
 * @description
 * @date 2019/6/26 12:36
 */
@RestController
public class UserController {

    @Reference
    UserService userService;

    @RequestMapping("/getAllUser")
    public List getAllUser(){
        System.out.println("进来了!!!!!!!!!");
        List list = userService.getAllUser();
        return list;
    }
}
这里使用@Reference注解注入接口,@Refence一般用来注入分布式的远程服务对象,配合dubbo使用。
最后我们给dubbo-consumer模块添加启动类,springBoot的程序入口DubboConsumerApplication
package com.st.sang;

import org.springframework.boot.SpringApplication;
import org.springframework.boot.autoconfigure.SpringBootApplication;
import org.springframework.context.annotation.ImportResource;

/**
 * @author SangJx
 * @description 消费者启动类
 * @date 2019/6/26 12:35
 */
@SpringBootApplication
@ImportResource("classpath:spring-dubbo.xml")
public class DubboConsumerApplication {

    public static void main(String[] args){
        SpringApplication.run(DubboConsumerApplication.class,args);
        System.out.println("消费端启动成功!!!!");
    }
}
至此,所有的模块dubbo-api、dubbo-provider、dubbo-consumer都已书写完毕,另外User表的建表语句
CREATE TABLE `user` (
  `id` int(11) NOT NULL AUTO_INCREMENT COMMENT '主键',
  `userName` varchar(255) DEFAULT NULL COMMENT '用户名',
  `passWord` varchar(255) DEFAULT NULL COMMENT '密码',
  `roleList` varchar(255) DEFAULT NULL COMMENT '角色',
  PRIMARY KEY (`id`)
) ENGINE=InnoDB AUTO_INCREMENT=4 DEFAULT CHARSET=utf8;
让我们测试一下,先启动dubbo-provider,然后启动dubbo-consumer,使用postman发送一下请求
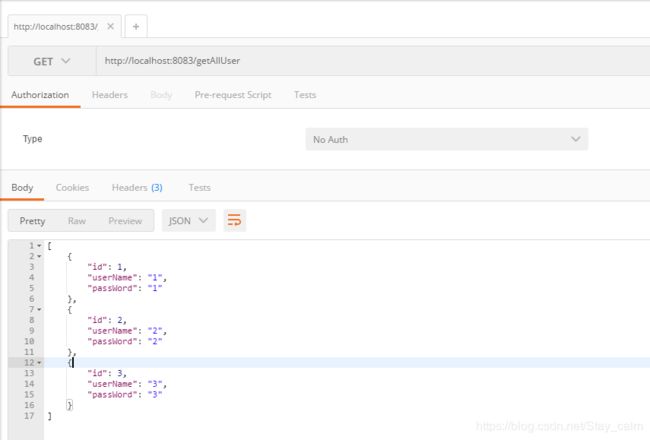
可以看到,我们从数据库中查出的数据,服务消费成功。
