CornerNet:不用 Anchor Boxes 也能进行目标检测(Object Detection)
一、简介
目标检测(Object Detection)是图像识别的一个重要领域,近来看了一篇19年8月的相关综述《Recent Advances in Deep Learning for Object Detection》[1],发现自己又落伍了,现在已经到了不用 anchor boxes也能进行目标定位了。我们来看看文中给出的一个 Object Detection 的发展脉络:
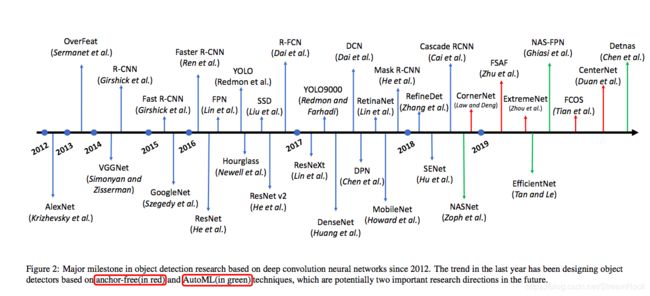
图1 基于深度学习的目标检测的发展脉络
从图中我们看到两个趋势,其一为 anchor free,另一个是 AutoML,让我们先来了解一下 anchor free 方案,这也是本文的中心。
Anchor Boxes 直译为“锚矩形”(没翻译成“锚盒”,因为我觉得“矩形”似乎更贴合其使用场景),Anchor Boxes是目标定位的基准,它们在图像中的位置是固定的,而我们通过卷积网络regression得到的目标bounded boxes 坐标一般都是以anchor boxes为基准的相对位置,并归一化,由bounded boxes相对位置结合Anchor Boxes的绝对位置,我们就可以对 Objects 进行定位。
在CornerNet出现前的检测模型,不论是One Stage的还是Two Stages的,皆有此设置,然而,Anchor boxes这一机制有两大问题:
1、凡采用anchor boxes的模型,都会在图上定义大量的anchor boxes,这一方面增加了计算量,另一方面也引入了正、负例不均衡,从而导致的训练效果下降;
2、Anchor boxes 是需要设计的,这不仅增加了大量的超级参数,需要手动设置,还因为不同尺度对象需要从不同的Feature Maps中提取,增加了网络的复杂度。
正是为了消除anchor boxes的这两个缺陷,CornerNet[2]提出了 Anchor free 的方案,以下我们就 CornerNet 的实现详细地展开。
二、Anchor Free 的实现原理
CornerNet的实现原理图如下:

图2、CornerNet的实现框图
它的实现流程分为三个部分:
1、ConvNet 卷积网络,提取特征;
2、Predicting Module,由Corner Pooling预测出:Heapmaps、Offset、Embedding 三部分,它们皆用于计算目标的定位;
3、损失Loss部分:分成多个部分 Loss ,加起来形成总的损失,并采用Adam训练各网络参数。
接下来,我们研究一下各个部分的具体实现:
2.1 ConvNet 作为backbone
CornerNet 所选的卷积网络是一个称为 Hourglass 的网络,所谓 Hourglass 就是沙漏,[2] 中有一段文字是这样叙述的:
The hourglass network was first introduced for the human pose estimation task. It is a fully convolutional neural network that consists of one or more hourglass modules. An hourglass module first down samplesthe input features by a series of convolution and maxpooling layers. It then up samplesthe features back to the original resolutionby a series of upsampling and convolution layers. Since details are lost in the max pooling layers, skip layersare added to bring back the details to the upsampled features. The hourglass module captures both global and local features in a single unified structure. When multiple hourglass modules are stacked in the network, the hourglass modules can reprocess the features to capture higher-level of information. These properties make the hourglass network an ideal choice for object detection as well.
简单翻译如下:一个沙漏模块由两部分组成,其中第一部分由conv和max-pooling构成,使feature maps 尺度逐层缩小,而第二部分采用upsampling和conv,使feature maps再恢复到原来的尺寸,为减少max pooling对原图信息的丢失,采用skip layers,将丢失的details补充回来。沙漏模块可以叠加,形成检测网络。由于其featuremap 先缩,而后再扩展,如同一个沙漏,由此得名hourglass。
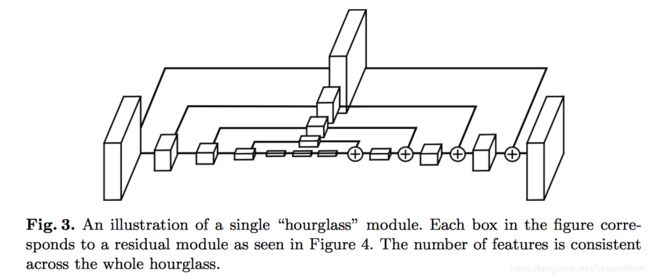
图3、hourglass结构图[3]
CornerNet 的 backbone 由两个 hourglasses 模块堆叠而成,图2简单地用了两个打横的沙漏来表示。另外,CornerNet 为简化实现,将max pooling直接用stride=2 来代替了,其它的细节可以从代码实现中得到[4]。
2.2 网络的predict部分
由图2部分,可以看到在 hourglass 模块后有两个 prediction module,分别用于预测bounding box的左上角(top-left corner)和右下角(bottom-right corner),这是CornerNet的实现的关键。Hourglass 的输出特征图(feature maps)经 Corner Pooling 后,会最终输出三组Predictions:Heatmaps、 Embeddings 和 Offsets,最后的目标定位由它们经 post-processing algorithm 得到。
以下,我们先来看看这三组 Predictions 都是些什么东西,然后再看看 Corner Pooling 的实现原理。
2.2.1 Heatmaps
按 [2] 中所述,Heatmaps 是一个 C * H * W 张量,其中H 表示高度,W表示宽度,反映图的size;C是channels,其数量与目标分类(Category)数量相同。在Heatmap上的一点 p c i j p_{cij} pcij 表示在图(image)中(i,j)位置上是 c 分类角点(top-left 或 bottom-right corner点)的score,它是一个小于1大于0的数,可看作概率。
作为 ground truth bounding boxes,每一个都有且仅有一个 top-left corner(或 bottom-right corner),角点位置 y c i j y_{cij} ycij 取值为 1,若不是角点则 y c i j y_{cij} ycij 取值为 0。由此,可定义一个二进制交叉熵损失:
L d e t = − 1 N ∑ c = 1 C ∑ i = 1 W ∑ j = 1 H { l o g ( p c i j ) if y c i j = 1 l o g ( 1 − p c i j ) if otherwise ( 1 ) L_{det}= -\frac 1N \sum_{c=1}^C \sum_{i=1}^W \sum_{j=1}^H \left \{ \begin{array} {cc} log(p_{cij}) & \text{if } \ y_{cij}=1\\ log(1-p_{cij}) & \text{if otherwise} \end{array} \right. \qquad(1) Ldet=−N1c=1∑Ci=1∑Wj=1∑H{log(pcij)log(1−pcij)if ycij=1if otherwise(1)
用上述Loss训练网络,会因为positive case 与 negative case 数量不平衡,而导致训练效果不好,[5]给出了一个平衡不均衡训练样例的方法—— focal loss ,其原文摘抄如下:
1、Easily classified negatives comprise the majority of the loss and dominate the gradient.
即容易进行分辨的负例占样例的大多数,它们主导了梯度计算。
2、We propose to add a modulating factor ( 1 − p t ) γ (1-p_t)^{\gamma} (1−pt)γ to the cross entropy loss, with tunable focusing parameter γ ≥ 0 \gamma \ge 0 γ≥0. We define the focal loss as:
F = − ( 1 − p t ) γ l o g ( p t ) F = -(1-p_t)^{\gamma} log(p_t) F=−(1−pt)γlog(pt)
通过对交叉熵添加一个衰减因子 ( 1 − p t ) γ (1-p_t)^{\gamma} (1−pt)γ,使 p t p_t pt 大的(即容易分辨的样本)衰减大,使 p t p_t pt 小的(即不容易分辨的样本)衰减小。一般取 γ ∈ [ 0 , 5 ] \gamma \in [0,5] γ∈[0,5]。
若根据这个思路,改造公式(1),有:
L d e t = − 1 N ∑ c = 1 C ∑ i = 1 W ∑ j = 1 H { ( 1 − p c i j ) α l o g ( p c i j ) if y c i j = 1 ( p c i j ) α l o g ( 1 − p c i j ) if otherwise ( 2 ) L_{det}= -\frac 1N \sum_{c=1}^C \sum_{i=1}^W \sum_{j=1}^H \left \{ \begin{array} {cc} (1-p_{cij})^{\alpha}log(p_{cij}) & \text{if } \ y_{cij}=1\\ (p_{cij})^{\alpha}log(1-p_{cij}) & \text{if otherwise} \end{array} \right. \qquad(2) Ldet=−N1c=1∑Ci=1∑Wj=1∑H{(1−pcij)αlog(pcij)(pcij)αlog(1−pcij)if ycij=1if otherwise(2)
因而[2]觉得[5]的 focal loss 思想可用,但还不够,因为实在是positive太少,negative太多,想想也是,因为整个平面上真正的角点(positive)没几个,大部分都是非角点(negative),于是,[2]平滑了正负例,它在原来的ground truth角点上引入了一个高斯模糊,这使得ground truth不再是非1即0,而是一个光滑变化的曲面,具体处理如下:
y c i j = e x 2 + y 2 2 σ 2 ( 3 ) y_{cij}=e^{\frac {x^2+y^2}{2\sigma^2}} \qquad(3) ycij=e2σ2x2+y2(3)
上式中, x = i − i ^ t l , y = j − j ^ t l x=i-\hat i_{tl}, \ y=j-\hat j_{tl} x=i−i^tl, y=j−j^tl,其中 ( i ^ t l , j ^ t l ) (\hat i_{tl}, \hat j_{tl}) (i^tl,j^tl) 表示ground-truth 的 top-left,因此 x 2 + y 2 x^2+y^2 x2+y2 表示 ( i , j ) (i,j) (i,j) 与 ( i ^ t l , j ^ t l ) (\hat i_{tl}, \hat j_{tl}) (i^tl,j^tl) 的距离。 σ \sigma σ 等于 1 3 Radius \frac 13 \text{Radius} 31Radius,Radius由目标大小决定。
于是,公式(2)变成了:
L d e t = − 1 N ∑ c = 1 C ∑ i = 1 W ∑ j = 1 H { ( 1 − p c i j ) α l o g ( p c i j ) if y c i j = 1 ( 1 − y c i j ) β ( p c i j ) α l o g ( 1 − p c i j ) if otherwise ( 3 ) L_{det}= -\frac 1N \sum_{c=1}^C \sum_{i=1}^W \sum_{j=1}^H \left \{ \begin{array} {cc} (1-p_{cij})^{\alpha}log(p_{cij}) & \text{if } \ y_{cij}=1\\ (1-y_{cij})^{\beta}(p_{cij})^{\alpha}log(1-p_{cij}) & \text{if otherwise} \end{array} \right. \qquad(3) Ldet=−N1c=1∑Ci=1∑Wj=1∑H{(1−pcij)αlog(pcij)(1−ycij)β(pcij)αlog(1−pcij)if ycij=1if otherwise(3)
由上式,我们看到,加入了 ( 1 − y c i j ) β (1-y_{cij})^{\beta} (1−ycij)β 因子,使ground truth附近的点,对Loss贡献减少了,[2] 中是这样说的:
With the Gaussian bumps encoded in y c i j y_{cij} ycij , the ( 1 − y c i j ) (1-y_{cij}) (1−ycij) term reduces the penalty around the ground truth locations.
大概[2]的作者认为,在角点附近的点被判定为角点的概率很高,属于 easily 判断的cases,因此,需要减少它的作用吧。
上式一般取 α = 2 , β = 4 \alpha=2, \beta=4 α=2,β=4,下面来看看这部分代码:
## from [4] /models/py_utils/kp_utils.py
def _neg_loss(preds, gt):
    pos_inds = gt.eq(1)
    neg_inds = gt.lt(1)

    neg_weights = torch.pow(1 - gt[neg_inds], 4)

    loss = 0
    for pred in preds:
        pos_pred = pred[pos_inds]
        neg_pred = pred[neg_inds]

        pos_loss = torch.log(pos_pred) * torch.pow(1 - pos_pred, 2)
        neg_loss = torch.log(1 - neg_pred) * torch.pow(neg_pred, 2) * neg_weights

        num_pos  = pos_inds.float().sum()
        pos_loss = pos_loss.sum()
        neg_loss = neg_loss.sum()

        if pos_pred.nelement() == 0:
            loss = loss - neg_loss
        else:
            loss = loss - (pos_loss + neg_loss) / num_pos
    return loss
在上面代码中,gt表示来自样本的标注,其处理有:
## from [4] /sample/coco.py
def kp_detection(db, k_ind, data_aug, debug):
    ...
    # allocating memory
    images      = np.zeros((batch_size, 3, input_size[0], input_size[1]), dtype=np.float32)
    tl_heatmaps = np.zeros((batch_size, categories, output_size[0], output_size[1]), dtype=np.float32)
    br_heatmaps = np.zeros((batch_size, categories, output_size[0], output_size[1]), dtype=np.float32)
   ...
           if gaussian_bump:
                width  = detection[2] - detection[0]
                height = detection[3] - detection[1]

                width  = math.ceil(width * width_ratio)
                height = math.ceil(height * height_ratio)

                if gaussian_rad == -1:
                    radius = gaussian_radius((height, width), gaussian_iou)  #计算目标的半径
                    radius = max(0, int(radius))
                else:
                    radius = gaussian_rad

                draw_gaussian(tl_heatmaps[b_ind, category], [xtl, ytl], radius) #用2D Gaussian函数处理角点周围点
                draw_gaussian(br_heatmaps[b_ind, category], [xbr, ybr], radius)
            else:
                tl_heatmaps[b_ind, category, ytl, xtl] = 1
                br_heatmaps[b_ind, category, ybr, xbr] = 1
    ...
在上述代码中可以看到 Radius 由函数 gaussian_radius( ) 得到, y c i j y_{cij} ycij 由 draw_gaussian( ) 得到,这两个函数如下。
## from [4] /sample/utils.py
def gaussian_radius(det_size, min_overlap):
    height, width = det_size

    a1  = 1
    b1  = (height + width)
    c1  = width * height * (1 - min_overlap) / (1 + min_overlap)
    sq1 = np.sqrt(b1 ** 2 - 4 * a1 * c1)
    r1  = (b1 - sq1) / (2 * a1)

    a2  = 4
    b2  = 2 * (height + width)
    c2  = (1 - min_overlap) * width * height
    sq2 = np.sqrt(b2 ** 2 - 4 * a2 * c2)
    r2  = (b2 - sq2) / (2 * a2)

    a3  = 4 * min_overlap
    b3  = -2 * min_overlap * (height + width)
    c3  = (min_overlap - 1) * width * height
    sq3 = np.sqrt(b3 ** 2 - 4 * a3 * c3)
    r3  = (b3 + sq3) / (2 * a3)
    return min(r1, r2, r3)

def gaussian2D(shape, sigma=1):
    m, n = [(ss - 1.) / 2. for ss in shape]
    y, x = np.ogrid[-m:m+1,-n:n+1]

    h = np.exp(-(x * x + y * y) / (2 * sigma * sigma))
    h[h < np.finfo(h.dtype).eps * h.max()] = 0
    return h

def draw_gaussian(heatmap, center, radius, k=1):
    diameter = 2 * radius + 1
    gaussian = gaussian2D((diameter, diameter), sigma=diameter / 6)
    # 得到一个 diameter*diameter 的二维高斯图像 gaussian
    x, y = center

    height, width = heatmap.shape[0:2]

    left, right = min(x, radius), min(width - x, radius + 1)
    top, bottom = min(y, radius), min(height - y, radius + 1)

    masked_heatmap  = heatmap[y - top:y + bottom, x - left:x + right]
    masked_gaussian = gaussian[radius - top:radius + bottom, radius - left:radius + right]
    np.maximum(masked_heatmap, masked_gaussian * k, out=masked_heatmap)
我做了小测试,设定heatmap大小为100*100,有两个key points,位置分别为:[20,30] 和 [50,60],两个bounding boxes的 [w, h] 都是[25,35],则我们可得到target heat map 如下:
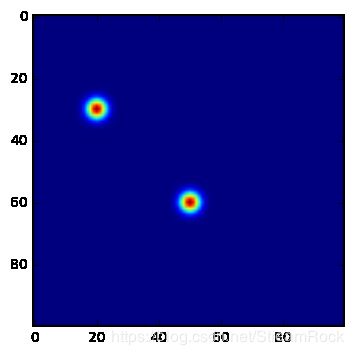
图4、经2D Gaussian 处理后的目标Heatmap
2.2.2 Offsets
一般而言,为了让网络处理节省一些内存,往往会使前面得到的Heatmaps的size 比原图(Image)小一些,在将原图位置映射到Heatmap上时,会丢失一些精度,因为向下取整,因而在逆映射时,会产生一定误差,这对于小物体而言是有很大影响的。让我们一起看看[2]原文的叙述:
Hence, a location (x,y) in the image is mapped to the locationin ( ⌊ x n ⌋ , ⌊ y n ⌋ ) (\lfloor\frac xn\rfloor, \lfloor\frac yn\rfloor) (⌊nx⌋,⌊ny⌋) the heatmaps, where n is the downsampling factor. When we remap the locations from the heatmaps to the input image, some precision may be lost, which can greatly affect the IoU of small bounding boxes with their ground truths.
为此,[2]定义了一个用于微调的Offset prediction,如下:
o k = ( x k n − ⌊ x k n ⌋ , y k n − ⌊ y k n ⌋ ) ( 4 ) \mathbf o_k=\left( \frac {x_k}n - \left \lfloor \frac{x_k}n \right\rfloor, \frac {y_k}n - \left \lfloor \frac{y_k}n \right\rfloor\right) \qquad(4) ok=(nxk−⌊nxk⌋,nyk−⌊nyk⌋)(4)
其中, ⌊ ⋅ ⌋ \left \lfloor \cdot \right\rfloor ⌊⋅⌋ 表示向下取整,公式(4)表示Heatmap上每一点需要调整的偏移量,由此,prediction与ground-truth偏移量差构成Loss。[2]采用 SmoothL1Loss,其定义如下:
L o f f = 1 N ∑ k = 1 N SmoothL1Loss ( o k , o ^ k ) ( 5 ) L_{off}=\frac 1N \sum_{k=1}^{N}\text{SmoothL1Loss}(\mathbf o_k,\mathbf {\hat o}_k)\qquad(5) Loff=N1k=1∑NSmoothL1Loss(ok,o^k)(5)
为什么不直接采用L2Loss而要采用SmoothL1Loss?
L2Loss的定义如下:
L 2 ( x ) = x 2 ( 6 ) L2(x)=x^2\qquad(6) L2(x)=x2(6)
SmoothL1Loss在[6]中给出:
S m o o t h L 1 ( x ) = { 0.5 x 2 if ∣ x ∣ < 1 ∣ x ∣ − 0.5 otherwise ( 7 ) SmoothL1(x)=\left\{\begin{array}{cc}\\ 0.5x^2 & \text{if} \ |x|<1 \\ |x|-0.5 & \text{otherwise} \end{array} \right. \qquad(7) SmoothL1(x)={0.5x2∣x∣−0.5if ∣x∣<1otherwise(7)
采用SmoothL1Loss的原因,[6]是这样说的:
A smoothed L1 loss that is less sensitive to outliers than the L2 loss used in R-CNN. When the regression targets are unbounded, training with L2 loss requires significant tuning of learning rates in order to prevent exploding gradients. Eq. 3 eliminates this sensitivity.
简译:SmoothL1对outliers(异常点)不如 L2 敏感,因为 the regression targets 是无界的,很容易造成梯度爆炸,需仔细调节 learning rates,而采用 SmoothL1 则可以有效消除这种敏感性。
为什么会这样呢?我们看看两者的函数图形,可能会有一个直观的感觉:
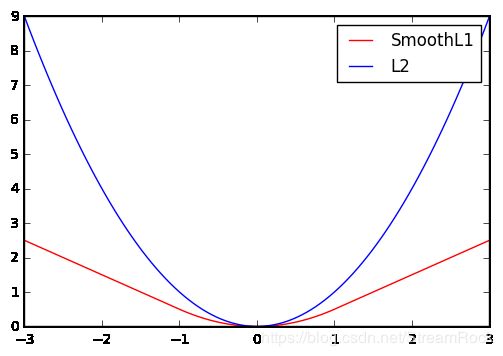
图5、SmoothL1与L2的比较
从图中可见,SmoothL1较为平缓,另外,其梯度在 ∣ x ∣ > 1 |x|>1 ∣x∣>1 的区域是恒定值,或许正是这样特性,使它对异常点不敏感吧。
SmoothL1 的实现是在:
## from [4] models/py_utils/kp_utils.py
def _regr_loss(regr, gt_regr, mask):
    num  = mask.float().sum()
    mask = mask.unsqueeze(2).expand_as(gt_regr)

    regr    = regr[mask]
    gt_regr = gt_regr[mask]

    regr_loss = nn.functional.smooth_l1_loss(regr, gt_regr, size_average=False)
    regr_loss = regr_loss / (num + 1e-4)
    return regr_loss
pytorch 已经帮我们实现了 smooth_l1_loss,直接调用就可以了。
2.2.3 Embedding
前面两个Loss都与独立的 key point 预测有关,但最终我们是希望得到的是bounding boxes,需要匹配 top-left 与 bottom-right,以形成完整的bounding box。
如何把相应的 top-left 和 bottom-right 点组合(group)起来的问题,原文是这样说的:
Multiple objects may appear in an image, and thus multiple top-left and bottom-right corners may be detected. We need to determine if a pair of the top-left corner and bottom-right corner is from the same bounding box.
[2]在这部分的叙述较为简单,只说与[7]的方法相似,即 Associative embedding 方法,[2] 和 [7] 的作者 Jia Deng 应该是同一人,不仅是在此应用了相同方法,还在backbone处用了相似的hourglass结构,可能是 Jia Deng 换了个大学,又发了一篇文章。[7] 原来是一个关于人体姿态估计的算法,如下图:
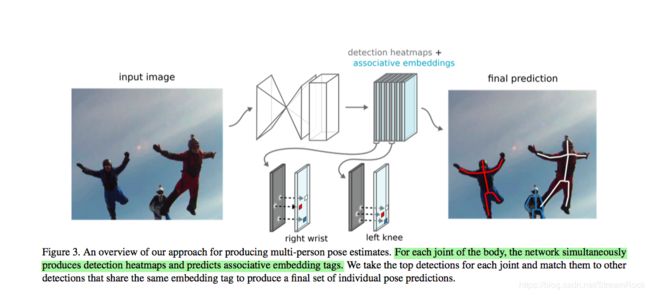
图6、[7]的Associative embedding方法
在人体姿势估计的任务中,一方面需要把人体的关键点(如:right wrist、left knee等)detect出来,另一方面还需要将它们按不同人joint起来,这就需要将这些点分组(group),[7]说 Associative embedding 是 fit 任何需要detect和group任务的方法,那么接下来我们就详细地看看这是怎样实现的 from [7]。
图6是 Associative embedding 的理解关键。在hourglass输出端,可以得到一组heatmaps,从图中可看到这组heatmaps分为两类,其中黑色layer表示关键点score,其中淡蓝色layer表示associative embedding tags。每层embedding的每个位置上的 embedding tag 其实是一个实数,该tag值是什么并不重要,只要同属一个人的关键点的tag值之间的差值小,不同人关键点之间tag值差大就可以。
在人体姿势估计中假设有K种不同的关键点,则每一种关键点对应两层layer,这样输出的heatmaps就是: 2 K ∗ W ∗ H 2K * W * H 2K∗W∗H,其中W和H对应于heatmap的宽和高。为什么把 embedding tags 要叫做 embedding 呢?我想可能是这样的:在heatmaps的某个位置 (i, j)上,都有一个由不同类型keypoint tags组成的矢量,因而如此称呼它。[7]给出的Loss计算方法如下:
令 h k ∈ R W ∗ H h_k\in \mathcal R^{W*H} hk∈RW∗H 是 the predicted tagging heatmap for 第k个关键点形成的tag scores 矢量。其实,它就是一个2维实数张量,即实数平面,即第k个heatmap。 h ( x ) h(x) h(x) 表示 a tag value at pixel location x, h k ( x ) h_k(x) hk(x) 表示x位置上 h k h_k hk 的值。
给定N个独立的人,每个人有K个关键点,ground-truth是: T = { ( x n k ) } , n = 1 , ⋯ , N ; k = 1 , ⋯ , K T=\{ (x_{nk})\},\ n=1,\cdots,N; \ k=1,\cdots,K T={(xnk)}, n=1,⋯,N; k=1,⋯,K, x n k x_{nk} xnk是该关键点的位置。我们为ground-truth中每个人定义一个变量—— reference embedding for the n-th person:
h ˉ n = 1 K ∑ h k ( x n k ) \bar h_n = \frac 1K \sum h_k(x_{nk}) hˉn=K1∑hk(xnk)
即第n个人关键点 ground-truth 位置对应的tag值的 mean,则总的损失函数为:
L g ( h , T ) = 1 N ∑ n ∑ k ( h ˉ n − h k ( x n k ) ) 2 + 1 N 2 ∑ n ∑ n ′ e x p { − 1 2 σ 2 ( h ˉ n − h ˉ n ′ ) 2 } ( 8 ) L_g(h,T)=\frac 1N\sum_n \sum_k(\bar h_n-h_k(x_{nk}))^2 + \frac 1{N^2}\sum_n \sum_{n'}exp \left\{-\frac 1{2\sigma^2}(\bar h_n-\bar h_{n'})^2 \right\} \qquad(8) Lg(h,T)=N1n∑k∑(hˉn−hk(xnk))2+N21n∑n′∑exp{−2σ21(hˉn−hˉn′)2}(8)
公式(8)中, h k ( x n k ) h_k(x_{nk}) hk(xnk) 表示ground-truth位置下,第n个人第k个关键点位置对应的tag值, ∑ ( h ˉ n − h k ( x n k ) ) 2 \sum (\bar h_n-h_k(x_{nk}))^2 ∑(hˉn−hk(xnk))2 其实就是该人关键点tag值的方差,注意:这里的 x n k x_{nk} xnk 对应的皆是ground-truth关键点的位置,与前面两个预测2.2.1 heatmap、2.2.2 offset结果无关,这也体现了one-stage原则。
L g L_g Lg 分为了两部分,第一部分表示的是同一个人内部不同关键点tag与tag mean的平方差的和,第二部分反映的是不同人tag mean分离的程度,当然是不同人分离程度越大越好,同一个tag差异越小越好,这个损失函数的设计逻辑上是没有问题的。
以下是经训练后,得到的一个分离,或group结果:
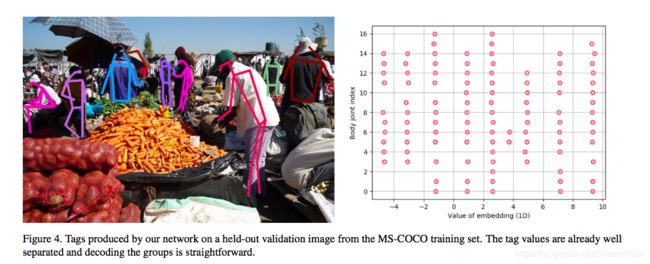
图7、embedding分组效果
图7如何看?纵坐标是关键点的index,横坐标表示tag值,从图上可以看到9列小圈,这表示9组,每1组的横坐标,也就是tag值是近似相等的,这是分组的依据。
从[7]到[2],公式(8)损失函数有了一些变化,[2]的损失函数变成了如下形式:
L p u l l = 1 N ∑ n = 1 N [ ( e t n − e n ) 2 + ( e b n − e n 2 ) ] ( 9 ) L p u s h = 1 N ( N − 1 ) ∑ n = 1 N ∑ n ′ = 1 , n ′ ≠ n N m a x ( 0 , Δ − ∣ e n − e n ′ ∣ ) ( 10 ) L_{pull} = \frac 1N \sum_{n=1}^N\left [(e_{tn}-e_n)^2 + (e_{bn}-e_n^2)\right]\qquad(9) \\ \ \\L_{push}=\frac 1{N(N-1)}\sum_{n=1}^N\sum_{n'=1,n'\neq n}^N max(0,\Delta - |e_n - e_{n'}|) \qquad(10) Lpull=N1n=1∑N[(etn−en)2+(ebn−en2)](9) Lpush=N(N−1)1n=1∑Nn′=1,n′̸=n∑Nmax(0,Δ−∣en−en′∣)(10)
其中,where e k e_k ek is the average of e t n e_{tn} etn and e b n e_{bn} ebn and we set Δ \Delta Δ to be 1 。
此处, L p u l l L_{pull} Lpull 相当于公式(8)的第一部分,除了采用符号不同外,没有什么其他的不同; L p u s h L_{push} Lpush 相当于公式(8)的第二部分,此处用 m a x ( 0 , Δ − ∣ e n − e n ′ ∣ ) max(0,\Delta-|e_n-e_{n'}|) max(0,Δ−∣en−en′∣) 代替了公式(8)的 e x p { ⋅ } exp\{\cdot\} exp{⋅},其目的是一样的。
以下是CornerNet的这部分实现代码,摘自[4],其过程很清晰:
## from [4] /models/py_utils/kp.py
class AELoss(nn.Module):
    def __init__(self, pull_weight=1, push_weight=1, regr_weight=1, focal_loss=_neg_loss):
        super(AELoss, self).__init__()

        self.pull_weight = pull_weight
        self.push_weight = push_weight
        self.regr_weight = regr_weight
        self.focal_loss  = focal_loss
        self.ae_loss     = _ae_loss
        self.regr_loss   = _regr_loss

    def forward(self, outs, targets):
        stride = 6

        tl_heats = outs[0::stride] # 表示0元素取后,隔stride个元素再取
        br_heats = outs[1::stride] # 表示1元素取后,隔stride个元素再取
        tl_tags  = outs[2::stride]
        br_tags  = outs[3::stride]
        tl_regrs = outs[4::stride]
        br_regrs = outs[5::stride]

        gt_tl_heat = targets[0]
        gt_br_heat = targets[1]
        gt_mask    = targets[2]
        gt_tl_regr = targets[3]
        gt_br_regr = targets[4]

        # focal loss
        focal_loss = 0

        tl_heats = [_sigmoid(t) for t in tl_heats]
        br_heats = [_sigmoid(b) for b in br_heats]

        focal_loss += self.focal_loss(tl_heats, gt_tl_heat)
        focal_loss += self.focal_loss(br_heats, gt_br_heat)

        # tag loss
        pull_loss = 0
        push_loss = 0

        for tl_tag, br_tag in zip(tl_tags, br_tags):
            pull, push = self.ae_loss(tl_tag, br_tag, gt_mask)
            pull_loss += pull
            push_loss += push
        pull_loss = self.pull_weight * pull_loss
        push_loss = self.push_weight * push_loss

        regr_loss = 0
        for tl_regr, br_regr in zip(tl_regrs, br_regrs):
            regr_loss += self.regr_loss(tl_regr, gt_tl_regr, gt_mask)
            regr_loss += self.regr_loss(br_regr, gt_br_regr, gt_mask)
        regr_loss = self.regr_weight * regr_loss

        loss = (focal_loss + pull_loss + push_loss + regr_loss) / len(tl_heats)
        return loss.unsqueeze(0)
L p u l l L_{pull} Lpull 和 L p u s h L_{push} Lpush 的实现如下:
def _ae_loss(tag0, tag1, mask):
    num  = mask.sum(dim=1, keepdim=True).float()
    tag0 = tag0.squeeze()
    tag1 = tag1.squeeze()

    tag_mean = (tag0 + tag1) / 2

    tag0 = torch.pow(tag0 - tag_mean, 2) / (num + 1e-4)
    tag0 = tag0[mask].sum()
    tag1 = torch.pow(tag1 - tag_mean, 2) / (num + 1e-4)
    tag1 = tag1[mask].sum()
    pull = tag0 + tag1

    mask = mask.unsqueeze(1) + mask.unsqueeze(2)
    mask = mask.eq(2)
    num  = num.unsqueeze(2)
    num2 = (num - 1) * num
    dist = tag_mean.unsqueeze(1) - tag_mean.unsqueeze(2)
    dist = 1 - torch.abs(dist)
    dist = nn.functional.relu(dist, inplace=True)
    dist = dist - 1 / (num + 1e-4)
    dist = dist / (num2 + 1e-4)
    dist = dist[mask]
    push = dist.sum()
    return pull, push
从以上代码可以看到,从predict出来的heatmap得到tag0、tag1,分别对应 e t n , e b n e_{tn},e_{bn} etn,ebn;(tag0+tag1)/2得到 e n e_n en,这是所有点都参与的,然后,
    tag0 = torch.pow(tag0 - tag_mean, 2) / (num + 1e-4)
    tag0 = tag0[mask].sum()
    tag1 = torch.pow(tag1 - tag_mean, 2) / (num + 1e-4)
    tag1 = tag1[mask].sum()
    pull = tag0 + tag1
因为mask是ground-truth的位置,在求Loss时,我们仅将ground-truth对应位置上的结果加总即可。
这个embedding的设计思路确实在之前不常见,很有启发。
2.3 Hourglass与Heatmap之间的Corner Pooling
在[2]中,还有一个作者引以为豪的是Corner Pooling的设计,其初衷是: Often there is no local evidence to determine the location of a bounding box corner. We address this issue by proposing a new type of pooling layer.

图7、通过pooling的方法获得top-left点和bottom-right点
corner pooling的结构在图10,原理可通过图8和图9来解释:

图8 获得top-left的pooling方法
从图10可见,backbone的输出被分支为两个部分: f t , f l f^t,f^l ft,fl,两者都是feature maps,图8上部分处理是从 f t f^t ft中max pooling表示top的相关信息,处理过程是:从bottom开始scan,到i结束,找到 f t f^t ft上找到该列的最大值,精确的数学表达为:
f i j t = m a x ( f k j t ) , k ∈ [ i , H ] f_{ij}^t=max(f_{kj}^t), k\in[i,H] fijt=max(fkjt),k∈[i,H]
同理,从 f l f^l fl中max pooling表示left的相关信息,可得到
f i j l = m a x ( f i k l ) , k ∈ [ j , W ] f_{ij}^l=max(f_{ik}^l), k\in[j,W] fijl=max(fikl),k∈[j,W]
然后,将它们加起来
f i j = f i j t + f i j l f_{ij} = f_{ij}^t+f_{ij}^l fij=fijt+fijl
其中,具体过程见如下例子:

图9 pooling处理过程的具体例子
此corner pooling位于 backbone 与 predict之间,如图10:
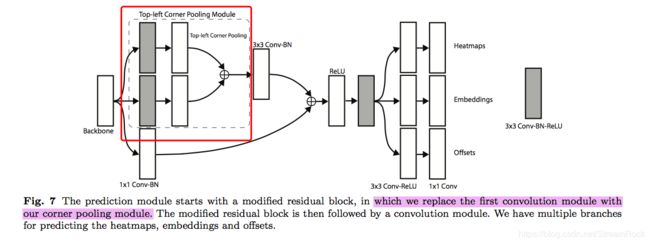
图10、corner pooling 所在位置
为了不让原有信息丢失,在图上还看到一条skip支路,构成Residual结构。其实,我认为residual结构,就是为了增强我们想增强的信息,而不丢失原有信息。
此corner pooling有什么作用呢?效果对比如下:
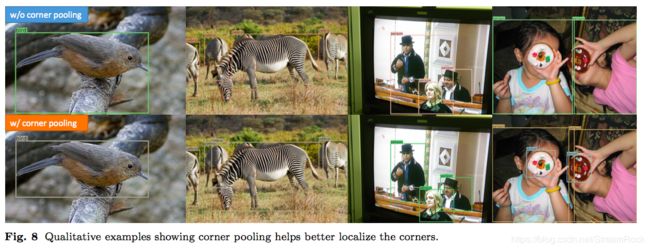
图11、第一行为没有corner pooling效果,第二行为有corner pooling的效果
从图11中,我们看到box更贴合目标,用作者自己的话来说就是:Corner pooling is a key component of CornerNet.
三、CornerNet 的升级版 CenterNet
3.1 CenterNet 简介
图1中最右边那根红线代表的就是 CenterNet [8],[8] 中写道CornerNet存在以下问题:Since each object is constructed by a pair of corners, the algorithm is sensitive to detect the boundary of objects, meanwhile not being aware of which pairs of keypoints should be grouped into objects. It often generates some incorrect bounding boxes, most of which could be easily filtered out with complementary information, e.g., the aspect ratio.
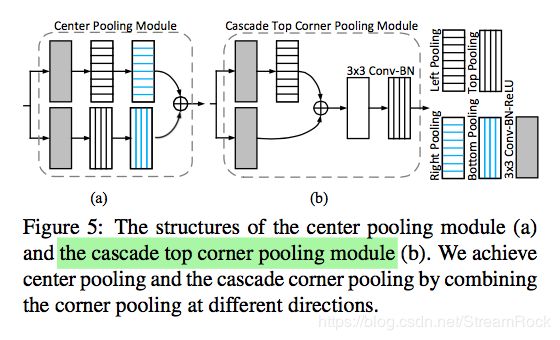
由此,[8]在[2]的基础上提出一种三点定位的算法,即:top-left, bottom-right and center,对比 CornerNet,它只有两个 key points。CenterNet 的网络结构与 CornerNet 相似,它比CornerNet 的预测输出多了一个 Center Heatmap 预测,如图12:
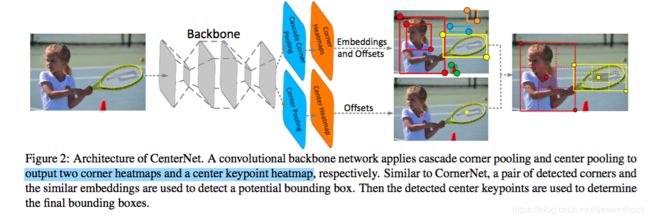
图12、CenterNet网络结构
多预测一个Center有什么好处呢?[8]是这样说的:
If a predicted bounding box has a high IoU with the ground-truth box, then the probability that the center keypoint in its central region is predicted as the same class is high, and vice versa. Thus, during inference, after a proposal is generated as a pair of corner keypoints, we determine if the proposal is indeed an object by checking if there is a center keypoint of the same class falling within its central region.
也就是,我们可以通过检查所生成的box中间区域是否包含其中心点,以此来确定此proposal是否真正是一个合理的box。
为了实现center的预测,CenterNet除了增加一个输出外,还设计了两个 pooling:
- Center pooling
- Cascade corner pooling
以下,我们就来看看这两个 pooling 高明在哪里?
3.2 两个pooling的实现
1、Center pooling
[8] 要预测center,碰到一个问题就是:The geometric centers of objects do not necessarily convey very recognizable visual patterns,也就是说目标的中心点并不是必然存在可识别的特征模式的。于是,[8]发明了center pooling来解决这个问题,方法是这样的:the backbone outputs a feature map, and to determine if a pixel in the feature map is a center keypoint, we need to find the maximum value in its both horizontal and vertical directions and add them together. By doing this, center pooling helps the better detection of center key points.
为什么这样会行呢?文章没写,我也不想深究了。
2、Cascade corner pooling
该方法表述如下:It first looks along a boundary to find a boundary maximum value, then looks inside along the location of the boundary maximum value to find an internal maximum value, and finally, add the two maximum values together. By doing this, the corners obtain both the the boundary information and the visual patterns of objects.
这个处理方法描述得不太清楚,或许要看看它的实现代码。
通过pooling将我们认为有用的效果增强,那能不能说pooling其实就是一种人工设计的feature提取方法呢?人工设计来自于人的直觉,这个直觉的模拟可能需要千万个参数去拟合,因此人工的干预和end-to-end的结合往往有奇效。
四、小结
通过CornerNet学习,我觉得至少有三个值得学习的地方:
1、由hourglass和prediction得到的heat maps,其实就是FCN(全卷积网络),这个FCN让我们得到了各个pixel作为corner的score。
2、embedding的获得,用ground-truth作为位置索引取出 tagging heat map值,计算相对距离
3、pooling其实就是手动设计feature,将pooling应用在神经网络中,提升了神经网络的效率。
[1] Recent Advances in Deep Learning for Object Detection, 8/2019, Xiongwei Wu, Doyen Sahoo, Steven C.H. Hoi, School of Information System, Singapore Management University Salesforce Research Asia
[2] CornerNet: Detecting Objects as Paired Keypoints, 8/2018, Hei Law , Jia Deng, Princeton University, Princeton, NJ, USA
[3] Stacked hourglass networks for human pose estimation, 3/2016, Alejandro Newell, Kaiyu Yang, and Jia Deng, University of Michigan
[4] https://github.com/princeton-vl/CornerNet
[5] Lin, T.-Y., Goyal, P., Girshick, R., He, K., and Doll ́ar, P. (2017). Focal loss for dense object detection. arXiv preprint arXiv:1708.02002
[6] Girshick, R. (2015). Fast r-cnn. arXiv preprint arXiv:1504.08083.
[7] Newell, A., Huang, Z., and Deng, J. (2017). Associative embedding: End-to-end learning for joint detection and grouping. In Advances in Neural Information Processing Systems, pages 2274–2284.
[8] K. Duan, S. Bai, L. Xie, H. Qi, Q. Huang, Q. Tian, Centernet: Keypoint
triplets for object detection, in: arXiv preprint arXiv:1904.08189, 2019
