使用TensorFlow生成对抗样本(类似于FGSM)
因为处于一个对抗样本入门学习的阶段,所以在大佬的帮助下完成了一个简单的生成对抗样本的程序。
这里是目标攻击,在目标标签的引导下,生成属于目标分类的的对抗样本。
然后分段讲解一下。
import tensorflow as tf
import tensorflow.contrib.slim as slim
import tensorflow.contrib.slim.nets as nets
import PIL
import numpy as np
import tempfile
from urllib.request import urlretrieve
import tarfile
import os
from PIL import Image
import json
import matplotlib.pyplot as plt
import matplotlib.image as mp

tf.logging.set_verbosity(tf.logging.ERROR)
sess = tf.InteractiveSession()
image = tf.Variable(tf.zeros((299, 299, 3)))

def inception(image, reuse):
    preprocessed = tf.multiply(tf.subtract(tf.expand_dims(image, 0), 0.5), 2.0)
    arg_scope = nets.inception.inception_v3_arg_scope(weight_decay=0.0)
    with slim.arg_scope(arg_scope):
        logits, _ = nets.inception.inception_v3(
            preprocessed, 1001, is_training=False, reuse=reuse)
        logits = logits[:,1:] # ignore background class
        probs = tf.nn.softmax(logits) # probabilities
    return logits, probs

logits, probs = inception(image, reuse=False)


data_dir = tempfile.mkdtemp()
inception_tarball, _ = urlretrieve(
    'http://download.tensorflow.org/models/inception_v3_2016_08_28.tar.gz')
tarfile.open(inception_tarball, 'r:gz').extractall(data_dir)
restore_vars = [
    var for var in tf.global_variables()
    if var.name.startswith('InceptionV3/')
]
saver = tf.train.Saver(restore_vars)
saver.restore(sess, os.path.join(data_dir, 'inception_v3.ckpt'))


imagenet_json, _ = urlretrieve(
    'http://www.anishathalye.com/media/2017/07/25/imagenet.json')
with open(imagenet_json) as f:
    imagenet_labels = json.load(f)


def classify(img, correct_class=None, target_class=None,label='o'):
    fig, (ax1,ax2) = plt.subplots(1, 2, figsize=(10, 8))
    fig.sca(ax1)
    p = sess.run(probs, feed_dict={image: img})[0]
    ax1.imshow(img)
    fig.sca(ax1)
    topk = list(p.argsort()[-10:][::-1])
    topprobs = p[topk]
    print(topprobs)
    barlist = ax2.bar(range(10), topprobs)
    for t in topk:
        print(topk.index(t))
        barlist[topk.index(t)].set_color('r')
    for i in topk:
        print(topk.index(i))
        barlist[topk.index(i)].set_color('g')
    plt.sca(ax2)
    plt.ylim([0, 1.1])
    plt.xticks(range(10),
               [imagenet_labels[i][:15] for i in topk],
               rotation='vertical')
    fig.subplots_adjust(bottom=0.2)
    plt.show()


img_path= 'D:\pppda.jpeg'
img_class = 388 #“大熊猫 giant panda”
img = PIL.Image.open(img_path)
big_dim = max(img.width, img.height)
wide = img.width > img.height
new_w = 299 if not wide else int(img.width * 299 / img.height)
new_h = 299 if wide else int(img.height * 299 / img.width)
img = img.resize((new_w, new_h)).crop((0, 0, 299, 299))
img = (np.asarray(img) / 255.0).astype(np.float32)
classify(img, correct_class=img_class,label = 'o')

x = tf.placeholder(tf.float32, (299, 299, 3))
x_hat = image # our trainable adversarial input
assign_op = tf.assign(x_hat, x)


learning_rate = tf.placeholder(tf.float32, ())
y_hat = tf.placeholder(tf.int32, ())

labels = tf.one_hot(y_hat, 1000)
loss = tf.nn.softmax_cross_entropy_with_logits(logits=logits, labels=[labels])
optim_step = tf.train.GradientDescentOptimizer(
    learning_rate).minimize(loss, var_list=[x_hat])

epsilon = tf.placeholder(tf.float32, ())

below = x - epsilon
above = x + epsilon
projected = tf.clip_by_value(tf.clip_by_value(x_hat, below, above), 0, 1)
with tf.control_dependencies([projected]):
    project_step = tf.assign(x_hat, projected)

demo_epsilon = 2.0 / 255.0  # a really small perturbation
demo_lr = 1e-2
demo_steps = 100
demo_target = 368  # "长臂猿gibbon"

# 初始化
# sess.run(assign_op, feed_dict={x: img})
sess.run(assign_op, feed_dict={x: img})

# projected gradient descent
for i in range(demo_steps):
    # 梯度下降
    _, loss_value = sess.run(
        [optim_step, loss],
        feed_dict={learning_rate: demo_lr, y_hat: demo_target})
    # project step
    sess.run(project_step, feed_dict={x: img, epsilon: demo_epsilon})
    if (i + 1) % 10 == 0:
        print('step %d, loss=%g' % (i + 1, loss_value))

adv = x_hat.eval()  # retrieve the adversarial example
mp.imsave('D:\padv.jpeg',adv)
classify(adv, correct_class=img_class, target_class=demo_target,label = 'a')
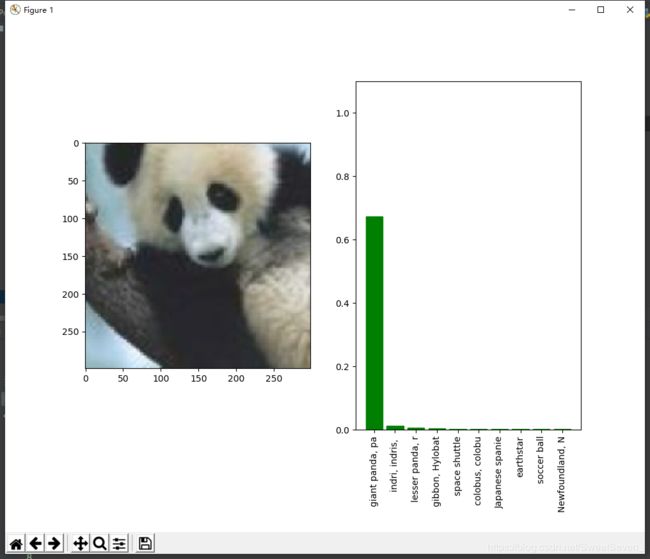
pppda.jpeg是imagenet数据库里面的图片
在训练好的Inception-V3的网络中,对原始图像分类权重如上图,大熊猫的权重远高于其他分类。
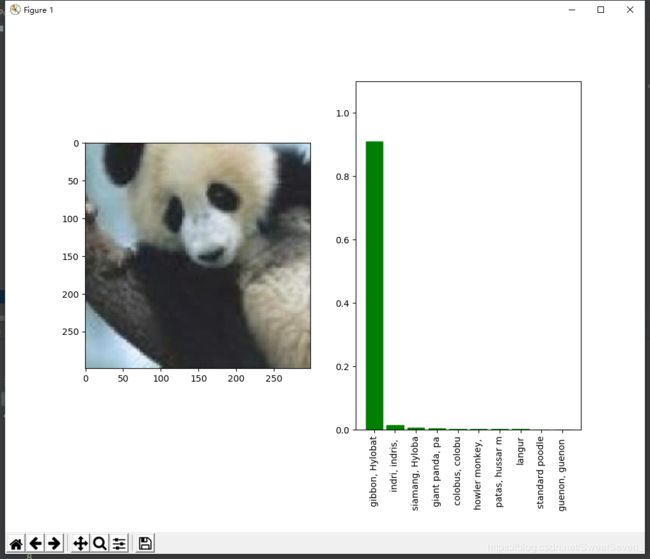
padv是我们生成的对抗样本
在训练好的Inception-V3的网络中,对对抗样本分类权重如上图,长臂猿的权重远高于其他分类。
但是这两张图片人肉眼来看并无区别。
下面分开为大家讲解一下这段简单的程序。
首先,设置输入图像。使用tf.Variable而不是使用tf.placeholder,这是因为要确保它是可训练的。当我们需要时,仍然可以输入它。
tf.logging.set_verbosity(tf.logging.ERROR)
sess = tf.InteractiveSession()
image = tf.Variable(tf.zeros((299, 299, 3)))
接下来,加载Inception v3模型。
def inception(image, reuse):
    preprocessed = tf.multiply(tf.subtract(tf.expand_dims(image, 0), 0.5), 2.0)
    arg_scope = nets.inception.inception_v3_arg_scope(weight_decay=0.0)
    with slim.arg_scope(arg_scope):
        logits, _ = nets.inception.inception_v3(
            preprocessed, 1001, is_training=False, reuse=reuse)
        logits = logits[:,1:] # ignore background class
        probs = tf.nn.softmax(logits) # probabilities
    return logits, probs

logits, probs = inception(image, reuse=False)接下来,加载预训练的权重。这个Inception v3的top-5的准确率为93.9%。
data_dir = tempfile.mkdtemp()
inception_tarball, _ = urlretrieve(
    'http://download.tensorflow.org/models/inception_v3_2016_08_28.tar.gz')
tarfile.open(inception_tarball, 'r:gz').extractall(data_dir)
restore_vars = [
    var for var in tf.global_variables()
    if var.name.startswith('InceptionV3/')
]
saver = tf.train.Saver(restore_vars)
saver.restore(sess, os.path.join(data_dir, 'inception_v3.ckpt'))接下来,编写一些代码来显示图像,并对它进行分类及显示分类结果.这里加载了一个大牛的网址,因为他的网页上包含imagenet的标签信息,我其实也是看了他的介绍,来写了下面的代码。
imagenet_json, _ = urlretrieve(
    'http://www.anishathalye.com/media/2017/07/25/imagenet.json')
with open(imagenet_json) as f:
    imagenet_labels = json.load(f)


def classify(img, correct_class=None, target_class=None,label='o'):
    fig, (ax1,ax2) = plt.subplots(1, 2, figsize=(10, 8))
    fig.sca(ax1)
    p = sess.run(probs, feed_dict={image: img})[0]
    ax1.imshow(img)
    fig.sca(ax1)
    topk = list(p.argsort()[-10:][::-1])
    topprobs = p[topk]
    print(topprobs)
    barlist = ax2.bar(range(10), topprobs)
    for t in topk:
        print(topk.index(t))
        barlist[topk.index(t)].set_color('r')
    for i in topk:
        print(topk.index(i))
        barlist[topk.index(i)].set_color('g')
    plt.sca(ax2)
    plt.ylim([0, 1.1])
    plt.xticks(range(10),
               [imagenet_labels[i][:15] for i in topk],
               rotation='vertical')
    fig.subplots_adjust(bottom=0.2)
plt.show()加载我的图像,并确保它已被正确分类
img_path= 'D:\pppda.jpeg'
img_class = 388
img = PIL.Image.open(img_path)
big_dim = max(img.width, img.height)
wide = img.width > img.height
new_w = 299 if not wide else int(img.width * 299 / img.height)
new_h = 299 if wide else int(img.height * 299 / img.width)
img = img.resize((new_w, new_h)).crop((0, 0, 299, 299))
img = (np.asarray(img) / 255.0).astype(np.float32)
classify(img, correct_class=img_class,label = 'o')
对抗样本
给定一个图像X,神经网络输出标签上的概率分布为P(y|X)。当手工制作对抗输入时,我们想要找到一个X',使得logP(y'|X')被最大化为目标标签y',即输入将被错误分类为目标类。通过约束一些ℓ∞半径为ε的箱,要求‖X- X'‖∞≤ε,我们可以确保X'与原始X看起来不太一样。
在这个框架中,对抗样本是解决一个约束优化的问题,可以使用反向传播和投影梯度下降来解决,基本上也是用与训练网络本身相同的技术。算法很简单:
首先将对抗样本初始化为X'←X。然后,重复以下过程直到收敛:
1. X'←X^+α⋅∇logP(y'|X')
2. X'←clip(X',X - ε,X+ε)
初始化
首先从最简单的部分开始:编写一个TensorFlow op进行相应的初始化。
x = tf.placeholder(tf.float32, (299, 299, 3))
x_hat = image # our trainable adversarial input
assign_op = tf.assign(x_hat, x)
接下来,编写梯度下降步骤以最大化目标类的对数概率。
learning_rate = tf.placeholder(tf.float32, ())
y_hat = tf.placeholder(tf.int32, ())

labels = tf.one_hot(y_hat, 1000)
loss = tf.nn.softmax_cross_entropy_with_logits(logits=logits, labels=[labels])
optim_step = tf.train.GradientDescentOptimizer(
learning_rate).minimize(loss, var_list=[x_hat])最后,编写投影步骤,使得对抗样本在视觉上与原始图像相似。另外,将其限定为[0,1]范围内保持有效的图像。
epsilon = tf.placeholder(tf.float32, ())

below = x - epsilon
above = x + epsilon
projected = tf.clip_by_value(tf.clip_by_value(x_hat, below, above), 0, 1)
with tf.control_dependencies([projected]):
project_step = tf.assign(x_hat, projected)最后,准备合成一个对抗样本。我们任意选择长臂猿作为我们的目标类。
demo_epsilon = 2.0 / 255.0  # 一个很小的扰动
demo_lr = 1e-2
demo_steps = 20
demo_target = 368  # "长臂猿gibbon"

# 初始化
sess.run(assign_op, feed_dict={x: img})

# PGD
for i in range(demo_steps):
    # 梯度下降
    _, loss_value = sess.run(
        [optim_step, loss],
        feed_dict={learning_rate: demo_lr, y_hat: demo_target})
    # project step
    sess.run(project_step, feed_dict={x: img, epsilon: demo_epsilon})
    if (i + 1) % 10 == 0:
        print('step %d, loss=%g' % (i + 1, loss_value))

adv = x_hat.eval()  # retrieve the adversarial example
mp.imsave('D:\padv.jpeg',adv)
classify(adv, correct_class=img_class, target_class=demo_target,label = 'a')
以上就是完整程序的讲解

