基于SpringBoot实现SpringSecurity前后分离
使用springSecurity已经有一段时间了,但是每次用还是感觉很茫然…这次我要把每个实现细节都记录一下。
带着问题找答案,先把问题记录一下,如果这些问题你也和我一样茫然,那希望后续能帮助到你,我的项目是SpringBoot + SpringSecurity + VUE 实现的
- 前后端分离如何自定义自己的请求路径?
- 如何返回JSON格式数据?
- 如何配置权限码来实现权限控制?
##自定义表单
SpringSecurity是基于一系列过滤器链来实现的权限验证功能,那这些过滤器链如何加载的呢?

UsernamePasswordAuthenticationFilter是拦截我们的用户登录请求,我们查看一下类结构,我看到了Filter、InitializingBean ,心里暗喜,这个我们应该很熟悉了,Servlet的过滤器,和Spring初始化加载,Servlet最主要的方法就是doFilter而实现Filter结构拦截所有请求,用于判定是否携带token,但是还是没有找到什么时候加载到所谓的过滤器链上的,按照道理,应该是在容器实例话的时候,把这些过滤器都加载到一个公共的集合里对吧,所以我找到了InitializingBean–>afterPropertiesSet方法
	@Override
	public void afterPropertiesSet() throws ServletException {
		initFilterBean();
	}

	/**
	 * Subclasses may override this to perform custom initialization.
	 * All bean properties of this filter will have been set before this
	 * method is invoked.
	 * Note: This method will be called from standard filter initialization
	 * as well as filter bean initialization in a Spring application context.
	 * Filter name and ServletContext will be available in both cases.
	 * This default implementation is empty.
	 * @throws ServletException if subclass initialization fails
	 * @see #getFilterName()
	 * @see #getServletContext()
	 */
	protected void initFilterBean() throws ServletException {
	}
这是一个空的方法,这段英文的大概意思是用户想要自定义就要重写这个方法,没有重写就抛异常。在去子类看一下~
@Override
	public void afterPropertiesSet() {
		Assert.notNull(authenticationManager, "authenticationManager must be specified");
	}
刺激,重写是重写了,但是啥也没干啊,就断言了一下是否是空,换一个思路,那也就是说只能在项目启动的时候,加载所有的过滤器,组成过滤器链。
我们在创建项目的时候,继承了一个WebSecurityConfigurerAdapter
 * Provides a convenient base class for creating a {@link WebSecurityConfigurer}
 * instance. The implementation allows customization by overriding methods.
点击查看一下该类,上面是部分截取,意思大概是提供一个方便的基类去创建一个实例,用户可以通过重写方法来实现自定义,事实上,我们重写config方法。也就是说在项目启动的时候先加载的这个类。

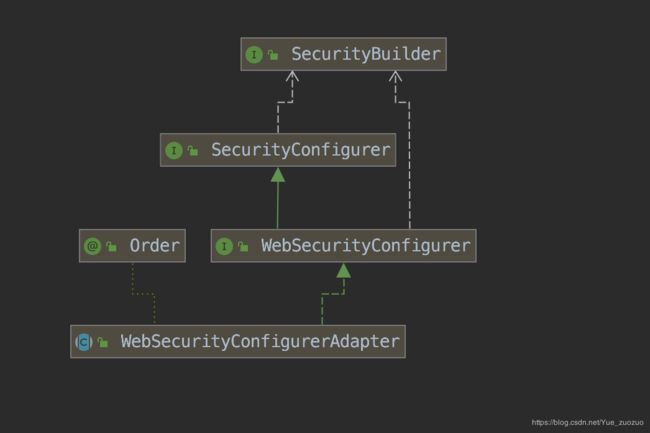
WebSecurityConfigurerAdapter–> WebSecurityConfigurer–> SecurityConfigurer
SecurityConfigurer 按照类的继承结构图,大概是这样的一个关系,所以找到最顶级的接口,里面只有俩个方法。
/**
	 * Initialize the {@link SecurityBuilder}. Here only shared state should be created
	 * and modified, but not properties on the {@link SecurityBuilder} used for building
	 * the object. This ensures that the {@link #configure(SecurityBuilder)} method uses
	 * the correct shared objects when building.
	 *
	 * @param builder
	 * @throws Exception
	 */
	void init(B builder) throws Exception;

	/**
	 * Configure the {@link SecurityBuilder} by setting the necessary properties on the
	 * {@link SecurityBuilder}.
	 *
	 * @param builder
	 * @throws Exception
	 */
	void configure(B builder) throws Exception;
找到该方法的实现类

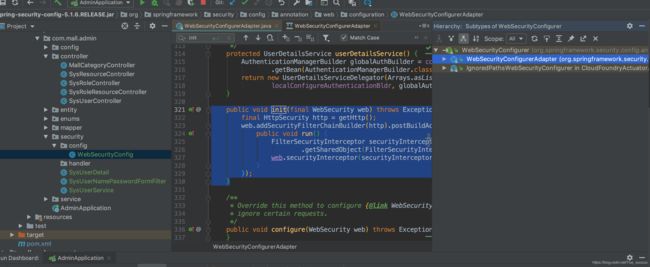
init 初始化方法第一行的getHttp()方法
protected final HttpSecurity getHttp() throws Exception {
		if (http != null) {
			return http;
		}

		DefaultAuthenticationEventPublisher eventPublisher = objectPostProcessor
				.postProcess(new DefaultAuthenticationEventPublisher());
		localConfigureAuthenticationBldr.authenticationEventPublisher(eventPublisher);

		AuthenticationManager authenticationManager = authenticationManager();
		authenticationBuilder.parentAuthenticationManager(authenticationManager);
		authenticationBuilder.authenticationEventPublisher(eventPublisher);
		Map<Class<? extends Object>, Object> sharedObjects = createSharedObjects();

		http = new HttpSecurity(objectPostProcessor, authenticationBuilder,
				sharedObjects);
		if (!disableDefaults) {
			// @formatter:off
			http
				.csrf().and()
				.addFilter(new WebAsyncManagerIntegrationFilter())
				.exceptionHandling().and()
				.headers().and()
				.sessionManagement().and()
				.securityContext().and()
				.requestCache().and()
				.anonymous().and()
				.servletApi().and()
				.apply(new DefaultLoginPageConfigurer<>()).and()
				.logout();
			// @formatter:on
			ClassLoader classLoader = this.context.getClassLoader();
			List<AbstractHttpConfigurer> defaultHttpConfigurers =
					SpringFactoriesLoader.loadFactories(AbstractHttpConfigurer.class, classLoader);

			for (AbstractHttpConfigurer configurer : defaultHttpConfigurers) {
				http.apply(configurer);
			}
		}
		configure(http);
		return http;
	}
最下面的http是不是感觉很熟悉,随便打开点开一个。
	public CsrfConfigurer<HttpSecurity> csrf() throws Exception {
		ApplicationContext context = getContext();
		return getOrApply(new CsrfConfigurer<>(context));
	}
getOrApply里面都放置一个配置类,等到最后一个加载完成一共11个配置
public final class HttpSecurity extends
		AbstractConfiguredSecurityBuilder<DefaultSecurityFilterChain, HttpSecurity>
		implements SecurityBuilder<DefaultSecurityFilterChain>,
		HttpSecurityBuilder<HttpSecurity> {
	private final RequestMatcherConfigurer requestMatcherConfigurer;
	private List<Filter> filters = new ArrayList<>();
	private RequestMatcher requestMatcher = AnyRequestMatcher.INSTANCE;
	private FilterComparator comparator = new FilterComparator();
到目前为止,已经找到放置过滤链的容器了,但是还差一个什么时候构造进去的

最重要的还是这个init 方法,在执行完getHttp()完成以后,可以看见filters中只有一个过滤器
而最后这个 web.addSecurityFilterChainBuilder(http).postBuildAction 就是构建其余的过滤器了,而起了一个异步线程是为了把最后一个FilterSecurityInterceptor 放置在最后一个位置。
OK,下一步就是如何串联起来了。
在这之前了解一下我们需要做的是什么
- 自定义请求路径 WebSecurityConfigurerAdapter ===》http.antMatchers("/login" ).permitAll()
- 判定用户登录用户名密码是否正确 UserDetailsService ===》loadUserByUsername
- 登录成功以及登录失败返回JSON格式数据
完成以上几部我们就完成基础登录请求的判定
前后端分离项目首先是以json格式交互的,而Security 最主要的作用是拦截请求,判定是否允许,而不允许则抛出异常,所以只需要在异常拦截上配置
public class MallAuthenticationEntryPoint implements AuthenticationEntryPoint {

    @Override
    public void commence(HttpServletRequest request, HttpServletResponse response, AuthenticationException authException) throws IOException, ServletException {
        AjaxResponseHandler.handle(response, HttpStatus.UNAUTHORIZED, authException.getMessage());
    }
}

http.exceptionHandling().authenticationEntryPoint(new MallAuthenticationEntryPoint())
最后就是权限,判定用户资源或者请求路径是否合法~
资源菜单 -->资源菜单角色中间表 -->角色表 -->角色用户中间表–> 用户表
这是WebSecurity的配置
    @Override
    protected void configure(HttpSecurity http) throws Exception {
        http.authorizeRequests()
                .antMatchers("/login" ).permitAll()
                .anyRequest().authenticated()
                .and()
                .formLogin()
                .loginProcessingUrl("/login" )
                .usernameParameter("username" )
                .successHandler(new LoginSuccessHandler())
                .failureHandler(new LoginFailHandler())
                .and()
                .exceptionHandling().authenticationEntryPoint(new MallAuthenticationEntryPoint())
                .accessDeniedHandler(new DeniceHandler())
                .and()
                .csrf().disable();
    }
通过用户名查询数据库是否存在
@Component
@Slf4j
public class SysUserService implements UserDetailsService {

    @Autowired
    private SysUserMapper sysUserMapper;

    @Override
    public UserDetails loadUserByUsername(String userName) throws UsernameNotFoundException {
        SysUserDetail sysUserDetail = getUserByUserName(userName);
        return sysUserDetail;
    }

    /**
     * 获取用户
     */
    public SysUserDetail getUserByUserName(String userName) {
        LambdaQueryWrapper<SysUser> eq =
                Wrappers.<SysUser>lambdaQuery()
                        .eq(SysUser::getUserName, userName);
        //TODO 查询合并 一对多
        SysUser sysUser = sysUserMapper.selectOne(eq);
        VerifyException.isNull(sysUser, "用户名或用户密码不正确" );
        List<SysRole> roleList = sysUserMapper.getRoleList(sysUser.getUserId());
        return new SysUserDetail(sysUser, roleList);
    }
}
构建统一返回体 UserDetails
public class SysUserDetail implements UserDetails {

    private SysUser sysUser;

    private List<SysRole> roleList;

    public SysUserDetail(SysUser sysUser, List<SysRole> roleList) {
        this.sysUser = sysUser;
        this.roleList = roleList;
    }

    @Override
    public Collection<? extends GrantedAuthority> getAuthorities() {
        if (CollUtil.isNotEmpty(roleList)) {
            List<SimpleGrantedAuthority> authorities = new ArrayList<>();
            roleList.forEach(s ->
                    authorities.add(new SimpleGrantedAuthority(s.getRoleCode()))
            );
            return authorities;
        }
        return null;
    }

    @Override
    public String getPassword() {
        return sysUser.getPassword();
    }

    @Override
    public String getUsername() {
        return sysUser.getUserName();
    }

    @Override
    public boolean isAccountNonExpired() {
        return true;
    }

    @Override
    public boolean isAccountNonLocked() {
        return SysUserStateEnum.NORMAL.getUserState().equals(sysUser.getLocked());
    }

    @Override
    public boolean isCredentialsNonExpired() {
        return true;
    }

    @Override
    public boolean isEnabled() {
        return true;
    }

}
通过权限名称查询权限对应的所有的资源路径,判定请求路径是否合法
这里要提一下SpringSecurity权限码
| 表达式 | 解释 |
|---|---|
| hasRole(String role) | 判定是存在这个角色,但是Security默认是以‘ROLE_’开头,hasRole(‘ADMIN’) 是以匹配 ROLE_ADMIN |
| hasAnyRole(String… roles) | 判定是否包含这个角色 |
| hasAuthority(String authority) | – 单纯的匹配,不添加前缀 |
| hasAnyAuthority(String… authorities) | –包含一些列权限 |
| principal | 允许直接访问 |
| authentication | 允许登录后直接访问 |
| permitAll | 允许随便访问 |
| denyAll | 不允许访问 |
| isAnonymous() | 允许匿名访问 |
| isRememberMe() | 允许‘记住我’访问 |
| isAuthenticated() | 允许用户登录成功后访问 |
| isFullyAuthenticated() | 用户不是匿名用户或“记住我”用户 |
| hasPermission(Object target, Object permission) | 用户有权访问给定权限所提供的目标 |
| hasPermission(Object targetId, String targetType, Object permission) | 用户有权访问给定权限所提供的目标 |
这些权限码需要自己理解一下,我没有都用到过
Method Security Expressions(基于方法级别的权限表达式)
@PreAuthorize("hasRole('USER')")
public void create(Contact contact);
- 全局配置允许全局方法拦截,以及基于那种方式拦截 @EnableGlobalMethodSecurity(securedEnabled = true, prePostEnabled = true)
- @PreAuthorize(“hasRole(‘ADMIN’)”)
securedEnabled允许使用 @Secured(“ROLE_TELLER”) 来判定权限
jsr250Enabled 允许使用 @RolesAllowed({“USER”,“ADMIN”})
prePostEnabled 这个是官方推荐的,可以使用权限表达式~
虽然这么简单,但是存在一个问题,就是没有加这个注解的方法登录以后就可以访问。还没有想到一个可以简化的配置,希望大牛能给出一定指点。