Docker-consul + Nginx反向代理群集搭建(转载)
https://blog.csdn.net/weixin_42953006/article/details/105671388
一、Consul概述
- Consul是HashiCorp公司推出的开源工具,用于实现分布式系统的服务发现和配置
- Consul支持健康检查,允许存储键值对
- 一致性协议采用Raft算法,用来保证服务的高可用
- 成员管理和消息广播采用GOSSIP协议,支持ACL访问控制
- 方便部署,与Docker等轻量级容器可无缝配合
二、Consul集群工作流程

- consul是微服务中的一个重要内容,在docker中有个服务的更新和发现机制
- consultemplate:主要用于更新,是一个守护进程,用于实时查询consul集群信息,并更新文件系统上任意数量的指定模板,生成配置文件。更新完成后,可以选择运行shell命令执行更新操作重新加载nginx服务。
- registrator:用于发现,可以检查容器运行状态自动注册,还可注销docker容器的服务到服务配置中心,目前支持Consul、Etcd和SKyDNS2
如上图:
nginx提供出nginx.conf配置文件,定义在consul template的模板中,在整个容器中增加内容时,
consultemplate会控制其中的配置文件进行自动更新,如反向代理的配置文件,后端的web上都安装
registrator工具,(registrator优先发现容器变动)用于自动发现web中的容器是否进行了变动从而带
动consul template进行更新。
三、Consul+nginx集群部署
3.1、建立Consul服务
- 每个提供服务的节点上都要部署和运行Consul的agent
- Consul agent有两种运行模式: Server和Client
- Server和Client只是Consul群集层面的划分,与搭建在cluster上的应用服务没有关系
3.2、实验环境
- 两台centos7服务器
- server端:192.168.5.233/24 ,安装软件:docker-ce、consul、consul-template、nginx反向代理
- 后端client:192.168.5.129/24,安装软件:docker-ce、registrator,构建nginx容器作为web
3.3、实验目的
- server端的nginx作为反向代理;
- 通过配置consul+nginx群集,能够实时监控后端的nginx容器,动态的自动添加或删除后端web到server端的nginx反向代理配置中。
3.4、Server端部署
- 关闭防火墙,编译安装nginx作为反向代理调度器
[root@consul ~]# [root@consul ~]# systemctl stop firewalld
[root@consul ~]# setenforce 0
[root@consul ~]# yum install gcc gcc-c++ pcre-devel zlib-devel -y
[root@consul ~]# wget http://nginx.org/download/nginx-1.12.2.tar.gz
[root@consul ~]# tar zxvf nginx-1.12.0.tar.gz -C /opt
[root@consul ~]# cd /opt/nginx-1.12.2/
[root@consul nginx-1.12.2]# ./configure --prefix=/usr/local/nginx
[root@consul nginx-1.12.2]# make && make install
- 1
- 2
- 3
- 4
- 5
- 6
- 7
- 8
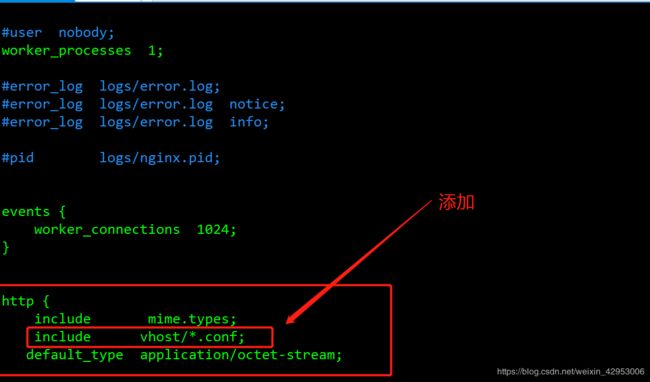
- 配置nginx服务
[root@consul nginx-1.12.2]# vim /usr/local/nginx/conf/nginx.conf
##在http字段中添加 “include  vhost/*.conf;”
http {
    include       mime.types;
    include      vhost/*.conf;
   default_type  application/octet-stream;
[root@consul nginx-1.12.2]# mkdir /var/log/nginx ##创建nginx日志目录
[root@consul nginx-1.12.2]# /usr/local/nginx/sbin/nginx ##启动服务
[root@consul nginx-1.12.2]# netstat -natp | grep 80
tcp 0 0 0.0.0.0:80 0.0.0.0:* LISTEN 48582/nginx: master
[root@consul nginx-1.12.2]# mkdir /usr/local/nginx/conf/vhost ##创建虚拟主机目录
[root@consul nginx-1.12.2]# mkdir /var/log/nginx ##创建日志文件目录
- 1
- 2
- 3
- 4
- 5
- 6
- 7
- 8
- 9
- 10
- 11
- 12
- 13
- 14
- 创建consul工作目录,上传consul软件包并解压
[root@consul ~]# mkdir /root/consul
[root@consul ~]# unzip consul_0.9.2_linux_amd64.zip
[root@consul ~]# mv consul /usr/bin                      ##移动工具到/usr/bin让系统能识别
- 1
- 2
- 3
- 4
- 配置consul agent
[root@consul ~]# consul agent \
> -server \
> -bootstrap \
> -ui \
> -data-dir=/var/lib/consul-data \
> -bind=192.168.5.233 \
> -client=0.0.0.0 \
> -node=consul-server01 &> /var/log/consul.log &
- 1
- 2
- 3
- 4
- 5
- 6
- 7
- 8
- 查看当前群集信息,查看consul8500端口是否开启
[root@consul ~]# consul members
Node             Address             Status  Type    Build  Protocol  DC
consul-server01  192.168.5.233:8301  alive   server  0.9.2  2         dc1
[root@consul ~]# consul info |grep leader
	leader = true
	leader_addr = 192.168.5.233:8300
[root@consul ~]# netstat -natp | grep 8500
tcp6       0      0 :::8500                 :::*                    LISTEN      45930/consul
- 1
- 2
- 3
- 4
- 5
- 6
- 7
- 8
- 配置template nginx模板文件
[root@consul ~]# vim /root/consul/nginx.ctmpl
##添加以下内容
upstream http_backend {
     {{range service "nginx"}}
       server  {{.Address}}:{{.Port}};
       {{end}}
}
server {
listen 1111;
server_name localhost 192.168.5.233;
access_log /var/log/nginx/ng.cn-access.log;
index index.html index.php;
location / {
proxy_set_header HOST $host;
proxy_set_header X-Real-IP $remote_addr;
proxy_set_header Client-IP $remote_addr;
proxy_set_header X-Forwarded-For $proxy_add_x_forwarded_for;
proxy_pass http://http_backend;
}
}
- 1
- 2
- 3
- 4
- 5
- 6
- 7
- 8
- 9
- 10
- 11
- 12
- 13
- 14
- 15
- 16
- 17
- 18
- 19
- 20
- 21
3.5、Client端部署
- 安装Gliderlabs/Registrator
[root@client ~]# docker run -d \
> --name=registrator \
> --net=host \
> -v /var/run/docker.sock:/tmp/docker.sock \
> --restart=always \
> gliderlabs/registrator:latest \
> -ip=192.168.5.129 \
> consul://192.168.5.233:8500
- 1
- 2
- 3
- 4
- 5
- 6
- 7
- 8
- 9
3.6、群集功能验证
3.6.1、验证自动发现和更新
- 在server端配置并启动template
[root@consul ~]# unzip consul-template_0.19.3_linux_amd64.zip
[root@consul ~]# mv consul-template /usr/bin
[root@consul ~]# consul-template -consul-addr 192.168.5.233:8500 -template "/root/consul/nginx.ctmpl:/usr/local/nginx/conf/vhost/ng.conf:/usr/local/nginx/sbin/nginx -s reload" --log-level=info
2020/04/22 16:58:18.987120 [INFO] consul-template v0.19.3 (ebf2d3d)
2020/04/22 16:58:18.987149 [INFO] (runner) creating new runner (dry: false, once: false)
2020/04/22 16:58:18.988963 [INFO] (runner) creating watcher
2020/04/22 16:58:18.989530 [INFO] (runner) starting
2020/04/22 16:58:18.989563 [INFO] (runner) initiating run
2020/04/22 16:58:19.002724 [INFO] (runner) initiating run
- 1
- 2
- 3
- 4
- 5
- 6
- 7
- 8
- 9
- 10
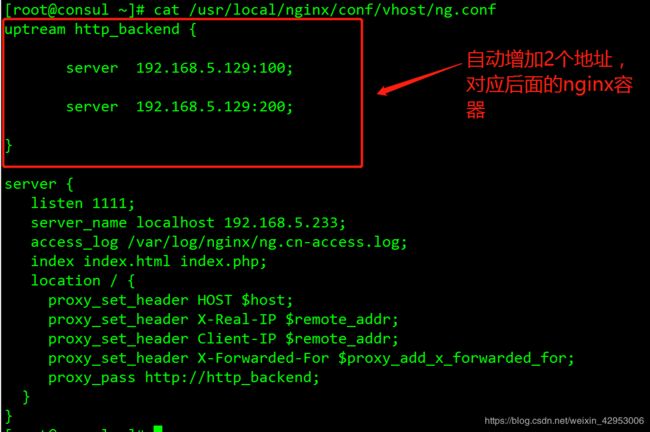
- 此时在本地的vhost目录中会自动生成ng.conf配置文件,此文件能够根据后端的容器情况,进行动态的更新
[root@consul ~]# ls /usr/local/nginx/conf/vhost/
ng.conf
[root@consul ~]# cat /usr/local/nginx/conf/vhost/ng.conf
uptream http_backend {
}
server {
listen 1111;
server_name localhost 192.168.5.233;
access_log /var/log/nginx/ng.cn-access.log;
index index.html index.php;
location / {
proxy_set_header HOST $host;
proxy_set_header X-Real-IP $remote_addr;
proxy_set_header Client-IP $remote_addr;
proxy_set_header X-Forwarded-For $proxy_add_x_forwarded_for;
proxy_pass http://http_backend;
}
}
- 1
- 2
- 3
- 4
- 5
- 6
- 7
- 8
- 9
- 10
- 11
- 12
- 13
- 14
- 15
- 16
- 17
- 18
- 19
- 20
- 21
- 22

- 在后端的client中创建2个nginx容器作为测试,发现nginx容器能够自动加入
[root@client ~]# docker run -itd -p:100:80 --name  test-01 -h test01 nginx
[root@client ~]# docker run -itd -p:200:80 --name  test-02 -h test02 nginx
- 1
- 2
- 3
- 再次查看vhost中的ng.conf文件
3.6.2、验证nginx反向代理
- 网页带1111端口访问server端nginx调度器地址192.168.5.129:1111,自动跳转到后端web

- 进入client端查看nginx容器的访问日志,发现源地址是server端的nginx调度器地址
[root@client ~]# docker logs -f test-01
- 1
- 2
