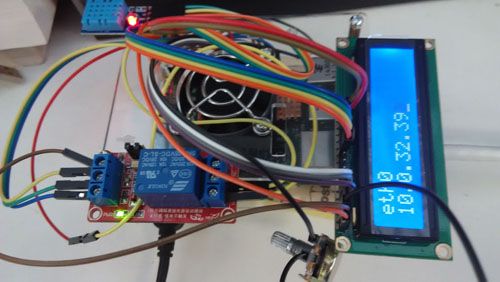
树莓派启动了,但是不知道ip地址无法通过ssh连接?很简单,使用LCD来显示ip地址不就好了。 下面介绍的应用中,使用了一路光耦继电器控制树莓派的风扇,然后使用LCD1602来显示ip等信息。 如果你还不太清楚您的树莓派的GPIO接口分布的话, 可以点这里查看。
红色——5V,黑色——GND 注意不可以接反了。
点击这里查看继电器的玉照 这里的IN接口可以连接随便一个树莓派的GPIO口,只要跟程序中的匹配即可。 COM连接5V,NO连接风扇的红色线。 DC+连接5,DC-连接GND。
我们下面的例子中,是使用4线接法,或者您也可以使用I2C的方式来连接。 因为树莓派的接口有限,也不能使用8线的接法。 接线的方法和Arduino的一样, 可以参考这里。
下面的代码是连接LCD1602的一个实现: [codesyntax lang="python" lines="normal"]
#!/usr/bin/python
# from http://surenpi.com
# lcd library
# created 2015/3/25

import RPi.GPIO as GPIO
import time

class LCD:
	RS = 12
	RW = 13
	EN = 10
	D4 = 14
	D5 = 16
	D6 = 17
	D7 = 18

	def __init__(self, rs = 13, rw = 19, en = 26, d4 = 12, d5 = 16, d6 = 20, d7 = 21):
		self.RS = rs;
		self.RW = rw
		self.EN = en
		self.D4 = d4
		self.D5 = d5
		self.D6 = d6
		self.D7 = d7

		GPIO.setmode(GPIO.BCM)
		GPIO.setup(self.RS, GPIO.OUT)
		GPIO.setup(self.RW, GPIO.OUT)
		GPIO.setup(self.EN, GPIO.OUT)
		GPIO.setup(self.D4, GPIO.OUT)
		GPIO.setup(self.D5, GPIO.OUT)
		GPIO.setup(self.D6, GPIO.OUT)
		GPIO.setup(self.D7, GPIO.OUT)

		time.sleep(0.01)
		self.CmdWrite(0x28)
		time.sleep(0.01)
		self.CmdWrite(0x06)
		time.sleep(0.01)
		self.CmdWrite(0x0c)
		time.sleep(0.01)
		self.CmdWrite(0x80)
		time.sleep(0.01)
		self.CmdWrite(0x01)
		time.sleep(0.01)

		pass

	def CmdWrite(self, cmd):
		GPIO.output(self.RS, GPIO.LOW)
		GPIO.output(self.RW, GPIO.LOW)
		GPIO.output(self.EN, GPIO.LOW)

		tmp = cmd & 0xf0
		GPIO.output(self.D7, tmp & 0x80)
		tmp <<= 1
		GPIO.output(self.D6, tmp & 0x80)
		tmp <<= 1
		GPIO.output(self.D5, tmp & 0x80)
		tmp <<= 1
		GPIO.output(self.D4, tmp & 0x80)
		tmp <<= 1

		GPIO.output(self.EN, GPIO.HIGH)
		time.sleep(0.001)
		GPIO.output(self.EN, GPIO.LOW)

		tmp = (cmd & 0x0f) << 4
		GPIO.output(self.D7, tmp & 0x80)
		tmp <<= 1
		GPIO.output(self.D6, tmp & 0x80)
		tmp <<= 1
		GPIO.output(self.D5, tmp & 0x80)
		tmp <<= 1
		GPIO.output(self.D4, tmp & 0x80)
		tmp <<= 1

		GPIO.output(self.EN, GPIO.HIGH)
		time.sleep(0.001)
		GPIO.output(self.EN, GPIO.LOW)
		pass

	def DataWrite(self, data):
		GPIO.output(self.RS, GPIO.HIGH)
		GPIO.output(self.RW, GPIO.LOW)
		GPIO.output(self.EN, GPIO.LOW)

		tmp = data & 0xf0
		GPIO.output(self.D7, tmp & 0x80)
		tmp <<= 1
		GPIO.output(self.D6, tmp & 0x80)
		tmp <<= 1
		GPIO.output(self.D5, tmp & 0x80)
		tmp <<= 1
		GPIO.output(self.D4, tmp & 0x80)
		tmp <<= 1

		GPIO.output(self.EN, GPIO.HIGH)
		time.sleep(0.001)
		GPIO.output(self.EN, GPIO.LOW)

		tmp = (data & 0x0f) << 4
		GPIO.output(self.D7, tmp & 0x80)
		tmp <<= 1
		GPIO.output(self.D6, tmp & 0x80)
		tmp <<= 1
		GPIO.output(self.D5, tmp & 0x80)
		tmp <<= 1
		GPIO.output(self.D4, tmp & 0x80)
		tmp <<= 1

		GPIO.output(self.EN, GPIO.HIGH)
		time.sleep(0.001)
		GPIO.output(self.EN, GPIO.LOW)
		pass

	def CleanScreen(self):
		self.CmdWrite(0x01)
		pass

	def SetXY(self, x, y):
		if(x == 0):
			self.CmdWrite(0x80 + y)
		else:
			self.CmdWrite(0xc0 + y)
		pass

	def WriteChar(self, x, y, data):
		self.SetXY(x, y)
		self.DataWrite(data)
		pass

	def WriteString(self, x, y, str, delay = 10):
		for index in range(min(16, len(str))):
			self.WriteChar(x, y, ord(str[index]))
			y += 1;
		pass

	def __del__(self):
		GPIO.cleanup()

lcd = LCD()

lcd.WriteChar(0, 0, ord("w"))
lcd.WriteChar(1, 0, ord("x"))
lcd.WriteString(0, 0, "www.surenpi.com")
[/codesyntax] 下面看看我是怎么用LCD1602的吧。。。 [caption id="attachment_1218" align="alignnone" width="500"]

raspberry_lcd[/caption]
[caption id="attachment_1195" align="alignnone" width="383"]

LCD1602/2004_I2C转接板[/caption]
http://www.6zou.net/works/raspberry-pi-lcd1602-system-monitor.html Arduino连接LCD1602
 raspberry_lcd[/caption]
 LCD1602/2004_I2C转接板[/caption]