SpringBoot--邮件发送(简单邮件、带附件邮件、带图片资源的邮件、使用邮件模板)
邮件发送
Spring中提供了JavaMailSender用来简化邮件配置,SpringBoot则提供了MailSenderAutoConfiguration对邮件的发送做了进一步简化。
发送前的准备
首先要申请开通POP3/SMTP服务或者IMAP/SMTP服务。SMTP全程为Simple Mail Transfer Protocol,译作简单邮件传输协议,它定义了邮件客户端与SMTP服务器之间,以及SMTP服务器与SMTP服务器之间的通信协议。
也就是,[email protected]用户先将邮件投递到腾讯的SMTP服务器,这个过程就使用了SMTP协议,然后腾讯的SMTP服务器将邮件投递到网易的SMTP服务器,这个过程依然使用了SMTP协议,SMTP服务器就是用来接收邮件的。
POP3全程为Postman Office Protocol3,译作邮局协议,它定义了邮件客户端与POP3服务器之间的通信规则。当邮件到达网易的SMTP服务器之后,[email protected]用户需要登录服务器查看邮件,是个时候就用上该协议了:邮件服务商会为每一个用户提供专门的邮件存储空间,SMTP服务器收到邮件之后,将邮件保存到相应用户的邮件存储空间中,如果用户需要读取邮件,就需要通过邮件服务商的POP3邮件服务器来完成。
发送
环境搭建:
创建项目,添加依赖:
		<dependency>
            <groupId>org.springframework.bootgroupId>
            <artifactId>spring-boot-starter-mailartifactId>
        dependency>
在application.properties中进行配置:
#邮件服务器
spring.mail.host=smtp.qq.com
#端口(465或者587)
spring.mail.port=465
# 邮箱
[email protected]
# 授权码
spring.mail.password=pykprwtujecoeddd
spring.mail.default-encoding=UTF-8
spring.mail.properties.mail.smtp.socketFactory.class=javax.net.ssl.SSLSocketFactory
spring.mail.properties..mail.debug=true
1. 发送简单邮件:
创建一个MailService用来封装邮件的发送:
@Component
public class MailService {

    @Autowired
    JavaMailSender javaMailSender;

    public void sendSimpleMail(String from, String to, String cc, String subject, String content){
        SimpleMailMessage simpMsg = new SimpleMailMessage();
        simpMsg.setFrom(from);//发送者
        simpMsg.setTo(to);//收件人
        simpMsg.setCc(cc);//抄送人
        simpMsg.setSubject(subject);//邮件主题
        simpMsg.setText(content);//邮件内容
        javaMailSender.send(simpMsg);
    }
}
- JavaMeailSender是SpringBoot在MailSenderPropertiesConfiguration类中配置好的,该类在mail自动配置类MailSenderAutoConfiguration中导入,所以直接注入JavaMailSender就可以使用了。
- 简单邮件可以直接构建一个SimpleMailMessage对象进行配置,配置完成后,通过JavaMailSender将邮件发送出去。
@RunWith(SpringRunner.class)
@SpringBootTest
class DemoApplicationTests {

    @Autowired
    MailService mailService;

    @Test
    void sendSimpleMail() {
        mailService.sendSimpleMail("[email protected]",
                "[email protected]",
                "[email protected]",
                "邮件测试主题",
                "邮件测试内容");
    }

}
2. 发送带附件的邮件:
要发送一个带附件的邮件也非常容易,通过调用Attachment方法即可添加附件,该方法调用多次即可添加多个附件。在MailService中添加如下方法:
public void sendAttachFileMail(String from, String to, String subject, String content, File file){
        try {
            MimeMessage message = javaMailSender.createMimeMessage();
            MimeMessageHelper helper = new MimeMessageHelper(message, true);
            helper.setFrom(from);
            helper.setTo(to);
            helper.setSubject(subject);
            helper.setText(content);
            helper.addAttachment(file.getName(), file);
            javaMailSender.send(message);
        }catch (MessagingException e){
            e.printStackTrace();
        }
    }
这里使用MimeMessageHelper简化了邮件配置,它的构造方法的第二个参数true表示构造一个multipart message类型的邮件。multipart message类型的邮件包含多个正文、附件以及内嵌资源。最后通过addAttachment方法添加附件。
@Test
    public void sendAttachFileMail(){
        String path = this.getClass().getClassLoader().getResource("application.properties").getPath();

        mailService.sendAttachFileMail("[email protected]",
                "[email protected]",
                "测试邮件主题",
                "测试邮件内容",
                new File(path));
    }
3. 发送带图片资源的邮件:
有的邮件正文中可能要插入图片,使用FileSystemResource可以实现这一功能:
public void sendMailWithImg(String from, String to, String subject, String content, String[] srcPath, String[] resIds){
        if(srcPath.length != resIds.length){
            System.out.println("发送失败!");
            return;
        }
        try{
            MimeMessage message = javaMailSender.createMimeMessage();
            MimeMessageHelper helper = new MimeMessageHelper(message, true);
            helper.setFrom(from);
            helper.setTo(to);
            helper.setSubject(subject);
            helper.setText(content, true);
            for(int i = 0; i < srcPath.length; i++){
                FileSystemResource res = new FileSystemResource(new File(srcPath[i]));
                helper.addInline(resIds[i], res);
            }
            javaMailSender.send(message);
        }catch (MessagingException e){
            System.out.println("发送失败!");
        }
    }
在发送邮件时分别传入图片资源路径和资源id,通过FileSystemResource构造静态资源,然后调用addInline方法将资源假如邮件对象中。
注意:在调用MimeMessageHelper中的setText方法时,第二个参数为true表示邮件正文是HTML格式的,该参数不传默认为false。
@Test
public void sendMailWithImg(){
String imgPaht1 = this.getClass().getClassLoader().getResource("img/2.jpg").getPath();
String imgPaht2 = this.getClass().getClassLoader().getResource("img/3.jpg").getPath();
mailService.sendMailWithImg("[email protected]",
"[email protected]",
"测试邮件主题(图片)",
"hello,这是一封带图片资源的邮件:" +
"这是图片1: " +
"这是图片2:
 " +
"",
new String[]{imgPaht1, imgPaht2},
new String[]{"p01", "p02"});
}
邮件的正文是一段HTML文本,用cid标注出两个静态资源,分别为p01和p02。执行方法,邮件发送结果如图:
4. 使用FreeMarker构建邮件模板:
对于格式复杂的邮件,如果采用字符串进行拼接,不但容易出错,而且不易维护,使用HTML模板可以很好的解决这一问题。使用FreeMarker构建邮件模板,首先加入FreeMarker依赖:
		<dependency>
            <groupId>org.springframework.bootgroupId>
            <artifactId>spring-boot-starter-freemarkerartifactId>
        dependency>
在MailService中添加如下方法:
public void sendHtmlMail(String from, String to, String subject, String content){
        try{
            MimeMessage message = javaMailSender.createMimeMessage();
            MimeMessageHelper helper = new MimeMessageHelper(message, true);
            helper.setFrom(from);
            helper.setTo(to);
            helper.setSubject(subject);
            helper.setText(content, true);
            javaMailSender.send(message);
        }catch (MessagingException e){
            System.out.println("发送失败!");
        }
    }
接下来在resources目录下创建ft1目录作为模板存放位置,在该目录下创建mailtemplate.ft1作为邮件模板:
<div>邮箱激活div>
<div>您的注册信息是:
<table border="1">
    <tr>
        <td>用户名td>
        <td>${username}td>
    tr>
    <tr>
        <td>用户性别td>
        <td>${gender}td>
    tr>
table>
div>
<div>
    <a href="http://www.baidu.com">核对无误请点击本链接激活邮箱a>
div>
创建一个User实体类:
public class User {
    private String username;
    private String gender;

    public String getUsername() {
        return username;
    }

    public void setUsername(String username) {
        this.username = username;
    }

    public String getGender() {
        return gender;
    }

    public void setGender(String gender) {
        this.gender = gender;
    }
}
测试:
@Test
    public void sendHtmlMail(){
        try{
            Configuration configuration = new Configuration(Configuration.VERSION_2_3_0);
            ClassLoader loader = DemoApplicationTests.class.getClassLoader();
            configuration.setClassLoaderForTemplateLoading(loader,"ft1");
            Template template = configuration.getTemplate("mailtemplate.ft1");
            StringWriter mail = new StringWriter();
            User user = new User();
            user.setUsername("测试用户");
            user.setGender("男");
            template.process(user, mail);
            mailService.sendHtmlMail("[email protected]",
                    "[email protected]",
                    "测试邮件主题(FreeMarker)",
                    mail.toString());
        }catch (Exception e){
            e.printStackTrace();
        }
    }
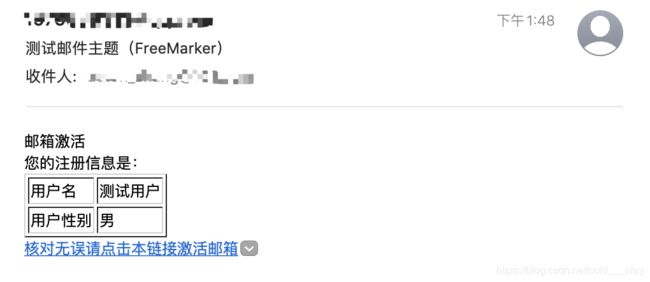
首先配置FreeMarker模板位置,配置模板文件,然后结合User对象渲染模板,将渲染结果发送出去,执行该方法,邮件发送结果如下:

5. 使用Thymeleaf构建邮件模板:
使用Thymeleaf构建邮件模板相对来说更加方便。使用Thymeleaf构建邮件模板,首先添加Thymeleaf依赖:
		<dependency>
            <groupId>org.springframework.bootgroupId>
            <artifactId>spring-boot-starter-thymeleafartifactId>
        dependency>
Thymeleaf邮件模板默认位置是在resources/templates目录下,创建相应目录,然后创建邮件模板mailtemplate.html:
<html lang="en" xmlns:th="http://www.thymeleaf.org">
<head>
    <meta charset="UTF-8">
    <title>邮件title>
head>
<body>
    <div>邮箱激活div>
    <div>您的注册信息是:
        <table border="1">
            <tr>
                <td>用户名td>
                <td th:text="${username}">td>
            tr>
            <tr>
                <td>用户性别td>
                <td th:text="${gender}">td>
            tr>
        table>
    div>
    <div>
        <a href="http:www.baidu.com">核对无误清点击本链接激活邮箱a>
    div>
body>
测试:
	@Autowired
    TemplateEngine templateEngine;

    @Test
    public void sendHtmlMailThymeleaf(){
        Context ctx = new Context();
        ctx.setVariable("username", "tom");
        ctx.setVariable("gender", "男");
        String mail = templateEngine.process("mailtemplate.html", ctx);
        mailService.sendHtmlMail("[email protected]",
                "[email protected]",
                "测试邮件主题(Thymeleaf)",
                mail);
    }
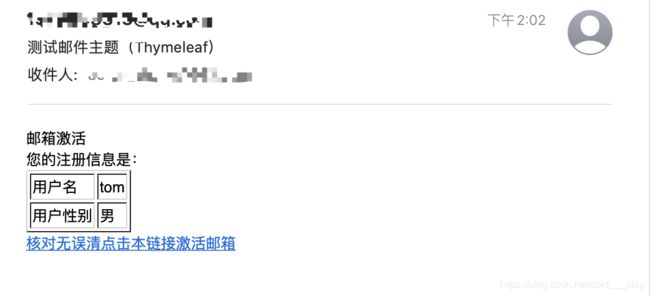
Thymeleaf提供了TemplateEngine来对模板进行渲染,通过Context构造模板中变量需要的值,这种方式比FreeMarker构建邮件模板更加方便。执行测试方法,发送邮件如图:


