如何使用Data Binding(基础篇)
Data Binding简介
Data Binding,出来也有几年了,随着Beta版本到Release版本,直到现在,Data Binding确实为我们带来了很多让人眼前一亮的东西。
首先来说,Data Binding是个什么?鉴名其意,数据绑定,是谷歌对MVVM(Model-View-ViewModel)在我们Android上贴心的实现~~~
优势
效率(性能)高。无侵入式,无反射;
节省大量代码,提高开发效率。例如频繁出现的findViewById;
功能强大,支持内容较为广泛,这点还是有待挖掘啊~
劣势
增加编译出的 apk 文件的类数量和方法数量;
。。。貌似还有点,但是问题不大。。。
使用前提了解
生成规则
Binding工具类生成规则:
默认以布局命名规则生成activity_main.xml,例如布局文件名为:activity_main,则对应生成则为:ActivityMainBinding。控件ID生成规则:
默认已驼峰命名法,例如控件ID为:user_id,则后续使用binding实例化点userId即可。
使用
使用之前,需要在Android Studio中build.gradle配置开启Data Binding,具体如下:
    dataBinding {
        enabled = true
    }
一、改造布局,使其支持Data Binding
Android Studio 3.0 之后默认布局如下:
<android.support.constraint.ConstraintLayout
    xmlns:android="http://schemas.android.com/apk/res/android" android:layout_width="match_parent"
    android:layout_height="match_parent">
android.support.constraint.ConstraintLayout>
而我们只需要将layout标签替换为根布局标签即可,剩下保持不变,如下:
<layout xmlns:android="http://schemas.android.com/apk/res/android">
    <android.support.constraint.ConstraintLayout
        android:layout_width="match_parent"
        android:layout_height="match_parent">
    android.support.constraint.ConstraintLayout>
layout>
Ok,到此完成改造第一步,下面进行具体操作过程:
二、数据绑定
一起来看下效果:
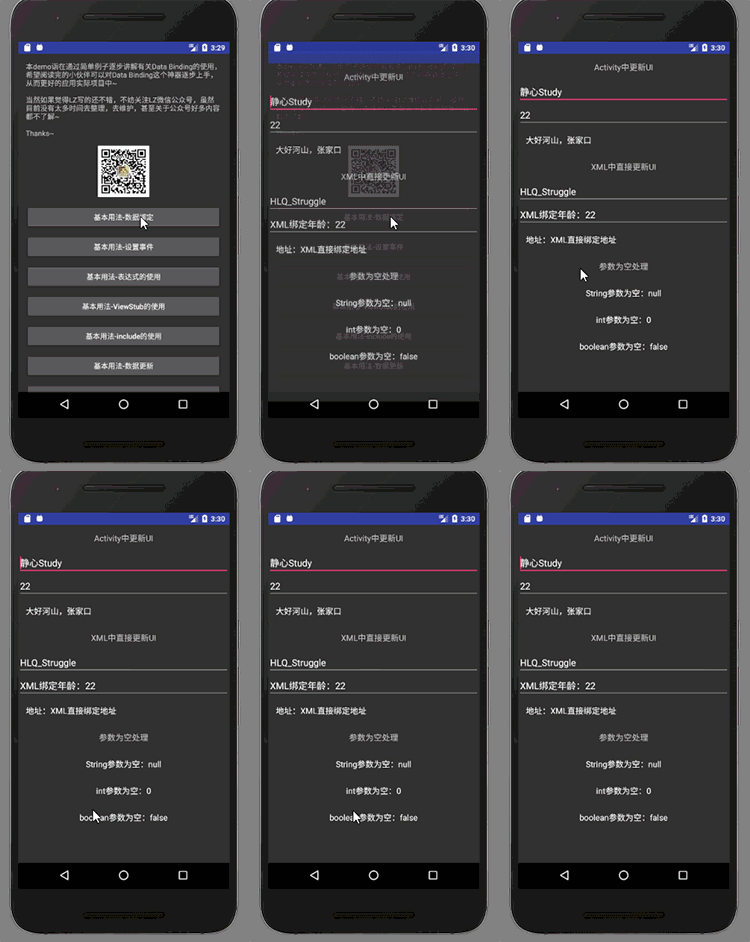
二一: Activity中更新UI
编写布局:
<layout xmlns:android="http://schemas.android.com/apk/res/android">
    <LinearLayout xmlns:tools="http://schemas.android.com/tools"
        android:layout_width="match_parent"
        android:layout_height="match_parent"
        android:orientation="vertical"
        tools:context="com.hlq.databindingdemo.activity.BasisUsageActivity">
        <TextView
            android:layout_width="match_parent"
            android:layout_height="wrap_content"
            android:gravity="center"
            android:padding="15dp"
            android:text="Activity中更新UI"
            android:textSize="16sp" />
        <EditText
            android:id="@+id/userName"
            android:layout_width="match_parent"
            android:layout_height="wrap_content"
            android:hint="请输入姓名" />
        <EditText
            android:id="@+id/userAge"
            android:layout_width="match_parent"
            android:layout_height="wrap_content"
            android:hint="请输入年龄" />
        <TextView
            android:id="@+id/userAddress"
            android:layout_width="match_parent"
            android:layout_height="wrap_content"
            android:padding="15dp"
            android:textColor="#fff"
            android:textSize="16sp" />
    LinearLayout>
layout>
Activity设置:
    // 实例化布局 初始化Binding
    ActivityBasisUsageBinding basisUsageBinding =
            DataBindingUtil.setContentView(this, R.layout.activity_basis_usage);
    // 设置值
    basisUsageBinding.userName.setText("静心Study");
    basisUsageBinding.userAge.setText("22");
    basisUsageBinding.userAddress.setText("大好河山,张家口");
显示结果为:
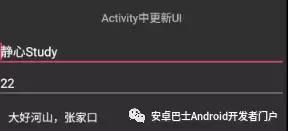
这里大家注意下:DataBindingUtil.setContentView(this, R.layout.activity_basis_usage);
我们通过拿到这个实例去操作后面的一些操作,具体关键待下一篇从源码角度分析查看。
二二: XML中直接更新UI
这里需要注意:
Data Binding中引入了命名空间
具体对应的操作应为:使用< data >块,假设现在你想使用UserBean,则需要使用< variable >标签引入UserBean实体即可,具体操作如下:
改造布局:
<layout xmlns:android="http://schemas.android.com/apk/res/android">
    <data>
        <variable
            name="user"
            type="com.hlq.databindingdemo.bean.UserBean" />
    data>
    <LinearLayout xmlns:tools="http://schemas.android.com/tools"
        android:layout_width="match_parent"
        android:layout_height="match_parent"
        android:orientation="vertical"
        tools:context="com.hlq.databindingdemo.activity.BasisUsageActivity">
        <TextView
            android:layout_width="match_parent"
            android:layout_height="wrap_content"
            android:gravity="center"
            android:padding="15dp"
            android:text="Activity中更新UI"
            android:textSize="16sp" />
        <EditText
            android:id="@+id/userName"
            android:layout_width="match_parent"
            android:layout_height="wrap_content"
            android:hint="请输入姓名" />
        <EditText
            android:id="@+id/userAge"
            android:layout_width="match_parent"
            android:layout_height="wrap_content"
            android:hint="请输入年龄" />
        <TextView
            android:id="@+id/userAddress"
            android:layout_width="match_parent"
            android:layout_height="wrap_content"
            android:padding="15dp"
            android:textColor="#fff"
            android:textSize="16sp" />
        <TextView
            android:layout_width="match_parent"
            android:layout_height="wrap_content"
            android:gravity="center"
            android:padding="15dp"
            android:text="XML中直接更新UI"
            android:textSize="16sp" />
        <EditText
            android:layout_width="match_parent"
            android:layout_height="wrap_content"
            android:hint="请输入姓名"
            android:text="@{user.userName}" />
        <EditText
            android:layout_width="match_parent"
            android:layout_height="wrap_content"
            android:hint="请输入年龄"
            android:text="@{user.userAge}" />
        <TextView
            android:layout_width="match_parent"
            android:layout_height="wrap_content"
            android:padding="15dp"
            android:text='@{"地址:"+user.userAddress}'
            android:textColor="#fff"
            android:textSize="16sp" />
    LinearLayout>
layout>
Activity中初始化实体类:
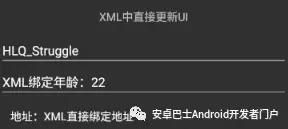
    UserBean userBean = new UserBean("HLQ_Struggle", "XML绑定年龄:22", "XML直接绑定地址");
    basisUsageBinding.setUser(userBean);
显示结果为:
二三: 参数为空处理
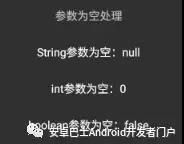
这里不得不提一嘴,还记得Android中接收后台返回实体类,多少难免会有一些空值,而我们在不注意的时候直接使用则会引发空指针这个异常,那么使用Data Binding后,我们则无需关注这块内容。
这时候小伙伴就会说了,那如果我的实体压根就是空,直接使用不会异常么?
如果使用Data Binding,如果数据出现空时,则默认显示当前类型的默认值。
引入布局:
<layout xmlns:android="http://schemas.android.com/apk/res/android">
    <data>
        <variable
            name="stu"
            type="com.hlq.databindingdemo.bean.StudentBean" />
    data>
    <LinearLayout xmlns:tools="http://schemas.android.com/tools"
        android:layout_width="match_parent"
        android:layout_height="match_parent"
        android:orientation="vertical"
        tools:context="com.hlq.databindingdemo.activity.BasisUsageActivity">
        <TextView
            android:layout_width="match_parent"
            android:layout_height="wrap_content"
            android:gravity="center"
            android:padding="15dp"
            android:text="参数为空处理"
            android:textSize="16sp" />
        <TextView
            android:layout_width="match_parent"
            android:layout_height="wrap_content"
            android:gravity="center"
            android:padding="15dp"
            android:text='@{"String参数为空:"+stu.stuName}'
            android:textColor="#fff"
            android:textSize="16sp" />
        <TextView
            android:layout_width="match_parent"
            android:layout_height="wrap_content"
            android:gravity="center"
            android:padding="15dp"
            android:text='@{"int参数为空:"+stu.stuAge}'
            android:textColor="#fff"
            android:textSize="16sp" />
        <TextView
            android:layout_width="match_parent"
            android:layout_height="wrap_content"
            android:gravity="center"
            android:padding="15dp"
            android:text='@{"boolean参数为空:"+stu.stuIsPer}'
            android:textColor="#fff"
            android:textSize="16sp" />
    LinearLayout>
layout>
Activity直接设置值:
basisUsageBinding.setStu(new StudentBean());
显示结果为:
三、设置事件
当配合使用Data Binding后,我们原有的一些设置事件与我们之前的使用方式有有一些出入,具体如下:
首先需要定义一个Presenter内部类(当然,如果你想抽取出去也无可厚非);
接着,bind提供我们如下几种方式使用事件:
复写原有系统提供事件,例如:onClick等;
直接绑定内部方法;
Lambda 表达式。
最后,我们需要给Bind设置setPersenter或者setVariable。
上面简单列举了下理论,下面着重说明一些关键:
首先需要在XML中引入命名空间,也就是我们定义的事件内部类:
            name="persenter"
        type="com.hlq.databindingdemo.activity.BindListenerActivity.Presenter" />
其中,调用事件的方式有俩种,分别如下:
android:onClick="@{persenter.onClick}"
android:onClick="@{persenter::onClick}" 官方更为推崇使用这种。
而Lambda 表达式使用方式如下:
android:onClick="@{() -> persenter.getUserClick()}"
android:onClick="@{() -> persenter.showUserName(user)}"
而最后,关于我们初始化我们这个事件内部类,方式同样有俩种,如下:
mBindListenerBinding.setPersenter(new Presenter());
mBindListenerBinding.setVariable(BR.persenter,new Persenter());
那么到此,开始我们愉快的撸码之旅吧~
首先,在我们的Activity中定义事件类以及进行初始化:
package com.hlq.databindingdemo.activity;
import android.databinding.DataBindingUtil;
import android.os.Bundle;
import android.support.v7.app.AppCompatActivity;
import android.view.View;
import android.widget.Toast;
import com.hlq.databindingdemo.R;
import com.hlq.databindingdemo.bean.UserBean;
import com.hlq.databindingdemo.databinding.ActivityBindListenerBinding;

public class BindListenerActivity extends AppCompatActivity {
    private BindListenerActivity selfActivity = BindListenerActivity.this;
    private ActivityBindListenerBinding mBindListenerBinding;
    @Override
    protected void onCreate(Bundle savedInstanceState) {
        super.onCreate(savedInstanceState);
        mBindListenerBinding =
                DataBindingUtil.setContentView(this, R.layout.activity_bind_listener);
        mBindListenerBinding.setPersenter(new Presenter());
//        mBindListenerBinding.setVariable(BR.persenter,new Persenter());
        mBindListenerBinding.setUser(new UserBean("贺大大", "22", "China"));
    }
    public class Presenter {
        public void onClick(View view) {
            Toast.makeText(selfActivity, "点到了哦~", Toast.LENGTH_SHORT).show();
        }
        public void getUserClick() {
            Toast.makeText(selfActivity, "有人在呼唤你~", Toast.LENGTH_SHORT).show();
        }
        public void showUserName(UserBean userBean) {
            Toast.makeText(selfActivity, "看看是谁:" + userBean.getUserName(), Toast.LENGTH_SHORT).show();
        }
    }
}
接着,布局文件引入命名空间,进行相关调用:
<layout xmlns:android="http://schemas.android.com/apk/res/android">
    <data>
        <variable
            name="user"
            type="com.hlq.databindingdemo.bean.UserBean" />
        <variable
            name="persenter"
            type="com.hlq.databindingdemo.activity.BindListenerActivity.Presenter" />
    data>
    <android.support.v7.widget.LinearLayoutCompat xmlns:tools="http://schemas.android.com/tools"
        android:layout_width="match_parent"
        android:layout_height="match_parent"
        android:orientation="vertical"
        android:padding="15dp"
        tools:context="com.hlq.databindingdemo.activity.BindListenerActivity">
        <Button
            android:layout_width="match_parent"
            android:layout_height="wrap_content"
            android:onClick="@{persenter.onClick}"
            android:text="测试监听器绑定." />
        <Button
            android:layout_width="match_parent"
            android:layout_height="wrap_content"
            android:onClick="@{persenter::onClick}"
            android:text="测试监听器绑定:" />
        <Button
            android:layout_width="match_parent"
            android:layout_height="wrap_content"
            android:onClick="@{() -> persenter.getUserClick()}"
            android:text="测试方法绑定" />
        <Button
            android:layout_width="match_parent"
            android:layout_height="wrap_content"
            android:onClick="@{() -> persenter.showUserName(user)}"
            android:text="测试方法绑定传值" />
    android.support.v7.widget.LinearLayoutCompat>
layout>
最后,一起来看结果如何?

四、一起来探表达式
表达式,在我们的Data Binding中也有所体现,下面简单描述一些常用的表达式。
| 表达式 | Desc |
|---|---|
| < > = | 小于 大于 等于 |
| ? : | 三元运算符 |
| ?? | 三元运算符 |
首先,我们实例化数据源:
    ActivityExpressionBinding binding =
            DataBindingUtil.setContentView(this, R.layout.activity_expression);
    binding.setUser(new UserBean("贺大大", "22", "河北", 0));
接下来,我们开始编写xml玩物:
<layout xmlns:android="http://schemas.android.com/apk/res/android"
    xmlns:tools="http://schemas.android.com/tools">
    <data>
        <variable
            name="user"
            type="com.hlq.databindingdemo.bean.UserBean" />
        <variable
            name="view"
            type="android.view.View" />
    data>
    <ScrollView
        android:layout_width="match_parent"
        android:layout_height="match_parent"
        tools:context="com.hlq.databindingdemo.activity.ExpressionActivity">
        <LinearLayout
            android:layout_width="match_parent"
            android:layout_height="match_parent"
            android:orientation="vertical">
            <TextView
                style="@style/contentStyle"
                android:text="一起来探表达式" />
            <TextView
                style="@style/titleStyle"
                android:text="模拟数据:姓名:贺大大 年龄:22 地址:河北 个数:0" />
            <TextView
                style="@style/titleStyle"
                android:text="一、三元运算符(用户名不等于空则正常显示,反之显示贺大宝)" />
            <TextView
                style="@style/contentStyle"
                android:text='@{user.userName!=null?user.userName:"贺大宝"}' />
            <TextView
                style="@style/titleStyle"
                android:text="二、三元运算符替代者(相比第一条,简单省事儿)" />
            <TextView
                style="@style/contentStyle"
                android:text='@{user.userName??"贺大宝"}' />
            <TextView
                style="@style/titleStyle"
                android:text="三、比较(例如比较个数等于0显示反之隐藏)" />
            <TextView
                style="@style/contentStyle"
                android:text="看看我是被隐藏还是显示呢"
                android:visibility="@{user.userCount==0?view.VISIBLE:view.GONE}" />
        LinearLayout>
    ScrollView>
layout>
这里需要注意一点,Data Binding中如果使用View,需要将View引入一下,这里作用类似引入命名空间一样。
            name="view"
        type="android.view.View" />
下面我们一起来看下效果:

五、ViewStub Study
ViewStub,这个小神器,这个在Data Binding也有所变换,如下:
首先编写一个简单的layout:
<LinearLayout xmlns:android="http://schemas.android.com/apk/res/android"
    android:layout_width="match_parent"
    android:layout_height="match_parent"
    android:orientation="vertical">
    <TextView
        style="@style/contentStyle"
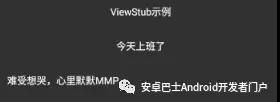
        android:text="今天上班了" />
    <TextView
        style="@style/titleStyle"
        android:text="难受想哭,心里默默MMP" />
LinearLayout>
效果如下:

编写布局:
<layout xmlns:android="http://schemas.android.com/apk/res/android">
    <LinearLayout xmlns:tools="http://schemas.android.com/tools"
        android:layout_width="match_parent"
        android:layout_height="match_parent"
        android:orientation="vertical"
        tools:context="com.hlq.databindingdemo.activity.ViewStubActivity">
        <TextView
            style="@style/contentStyle"
            android:text="ViewStub示例" />
        <ViewStub
            android:id="@+id/viewStub"
            android:layout_width="match_parent"
            android:layout_height="wrap_content"
            android:layout="@layout/layout_view_stub" />
    LinearLayout>
layout>
Activity进行初始化:
    ActivityViewStubBinding viewStubBinding =
            DataBindingUtil.setContentView(this, R.layout.activity_view_stub);
    viewStubBinding.viewStub.getViewStub().inflate();
一起来看效果:
六、include Study
include,使用时,与上面ViewStub引用类似,那么如果现在需要给include内容设置数据,又该如何操作呢?
简单过一遍代码,之后进行简单总结。
首先,编写一个layout,由于我们需要将数据源也传递过去,所以这里需要提前声明下实体。
<layout xmlns:android="http://schemas.android.com/apk/res/android">
    <data>
        <variable
            name="user"
            type="com.hlq.databindingdemo.bean.UserBean" />
    data>
    <LinearLayout
        android:layout_width="match_parent"
        android:layout_height="match_parent"
        android:orientation="vertical">
        <TextView
            style="@style/titleStyle"
            android:text='@{"姓名:"+user.userName}' />
        <TextView
            style="@style/titleStyle"
            android:text='@{"年龄:"+user.userAge}' />
        <TextView
            style="@style/titleStyle"
            android:text='@{"地址:"+user.userAddress}' />
    LinearLayout>
layout>
Activity中初始化数据源:
    ActivityIncludeBinding binding =
            DataBindingUtil.setContentView(this, R.layout.activity_include);
    binding.setUser(new UserBean("静心Study", "22", "帝都"));
在所对应的Activity layout中通过bind绑定数据源即可:
<layout xmlns:android="http://schemas.android.com/apk/res/android"
    xmlns:bind="http://schemas.android.com/apk/res-auto"
    xmlns:tools="http://schemas.android.com/tools">
    <data>
        <variable
            name="user"
            type="com.hlq.databindingdemo.bean.UserBean" />
    data>
    <LinearLayout
        android:layout_width="match_parent"
        android:layout_height="match_parent"
        android:orientation="vertical"
        tools:context="com.hlq.databindingdemo.activity.IncludeActivity">
        <TextView
            style="@style/contentStyle"
            android:text="include引用布局示例" />
        <include
            layout="@layout/include_item_layout"
            bind:user="@{user}" />
    LinearLayout>
layout>
那么我们来稍稍的总结一下吧:
首先,使用时,需要引用对应的实体类,也就是引入命名空间。其次,如果如有include内容需要传递数据源时,那么这个时候仅仅需要在include标签通过使用bind:数据源别名="@{数据源别名}"即可,那么如果需要多个include时,同理即可,下面举个例子:
            layout="@layout/include_item_layout"
        bind:user="@{user}"
        bind:bean="@{bean}"/>
实例化如下:
    ActivityIncludeBinding binding =
            DataBindingUtil.setContentView(this, R.layout.activity_include);
    binding.setUser(new UserBean("静心Study", "22", "帝都"));
    binding.setBean(new ClassBean("哇哈哈"));
效果如下:

到此为止,Data Binding基础篇截稿~
GitHub查看地址
https://github.com/HLQ-Struggle/DataBindingDemo