鱼眼摄像头的畸变矫正方法-python+opencv
鱼眼摄像头畸变校正的方法:
1. 棋盘矫正法
2. 经纬度矫正法。
相机为什么会出现畸变?
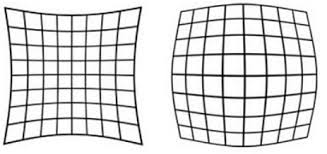
当前相机的畸变主要分为径向畸变和切向畸变两种。
径向畸变产生的原因:相机的光学镜头厚度不均匀,离镜头越远场景的光线就越弯曲从而产生径向畸变。
切向畸变产生的原因:镜头与图像传感器不完全平行造成的。
图一 径向畸变 图二 切向畸变
相机参数有哪些?
相机内参:主要包括相机矩阵(包括焦距,光学中心,这些都是相机本身属性)和畸变系数(畸变数学模型的5个参数 D = {K1,K2,K3,P1,P2})。
相机外参:通过旋转和平移将实际场景3D映射到相机的2D坐标过程中的旋转和平移就是外参。(他描述的是世界坐标转化成相机坐标的过程)
相机的标定流程
相机标定流程就是4个坐标系在转换过程中求出计算机的外参和内参的过程。四个坐标系分别是:世界坐标系(真实的实际场景),相机坐标系(摄像头镜头中心),图像坐标系(图像传感器成像中心,图片中心,影布中心),像素坐标系(图像左上角为原点)。如图三所示,O1是图像坐标系,O0 是像素坐标系,两者之间的区别只是原点发生了变化。
世界坐标系 -》相机坐标系 求解外参(旋转和平移)
相机坐标系 -》图像坐标系 求解内参(摄像头矩阵,畸变系数)
图像坐标系 -》像素坐标系 求解像素转化矩阵(可简单理解为原点从图片中心到左上角,单位厘米变行列)
图三 图像坐标系和像素坐标系
一、基于棋盘的相机畸变校正方法
打印棋盘并采集鱼眼摄像头下的棋盘图片:
1. 棋盘获取:链接: https://pan.baidu.com/s/14qB3kQ_MbWORay1i0GFm1A 提取码: ksqw 复制这段内容后打开百度网盘手机App,操作更方便哦
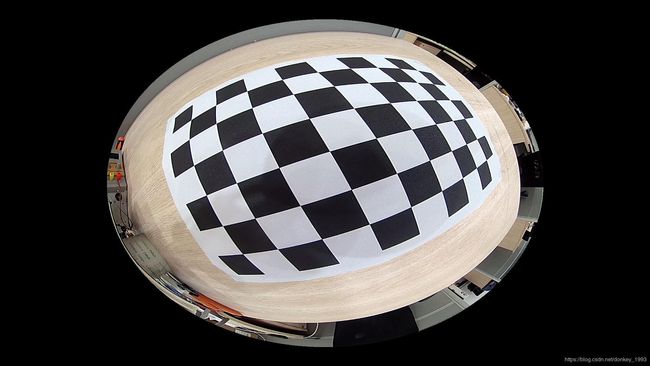
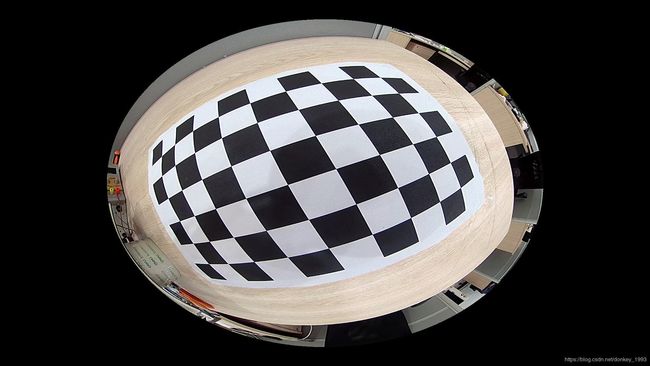
2. 采集图片,采集图片如下图所示,可以多采集一些,标注的会更加准确。
3. 使用采集的图片求出相机的内参和矫正系数(DIM, K, D),然后使用得到的(DIM, K, D)再进行测试,代码如下。
import cv2
import numpy as np
import glob


def get_K_and_D(checkerboard, imgsPath):

    CHECKERBOARD = checkerboard
    subpix_criteria = (cv2.TERM_CRITERIA_EPS+cv2.TERM_CRITERIA_MAX_ITER, 30, 0.1)
    calibration_flags = cv2.fisheye.CALIB_RECOMPUTE_EXTRINSIC+cv2.fisheye.CALIB_CHECK_COND+cv2.fisheye.CALIB_FIX_SKEW
    objp = np.zeros((1, CHECKERBOARD[0]*CHECKERBOARD[1], 3), np.float32)
    objp[0,:,:2] = np.mgrid[0:CHECKERBOARD[0], 0:CHECKERBOARD[1]].T.reshape(-1, 2)
    _img_shape = None
    objpoints = []
    imgpoints = []
    images = glob.glob(imgsPath + '/*.png')
    for fname in images:
        img = cv2.imread(fname)
        if _img_shape == None:
            _img_shape = img.shape[:2]
        else:
            assert _img_shape == img.shape[:2], "All images must share the same size."

        gray = cv2.cvtColor(img,cv2.COLOR_BGR2GRAY)
        ret, corners = cv2.findChessboardCorners(gray, CHECKERBOARD,cv2.CALIB_CB_ADAPTIVE_THRESH+cv2.CALIB_CB_FAST_CHECK+cv2.CALIB_CB_NORMALIZE_IMAGE)
        if ret == True:
            objpoints.append(objp)
            cv2.cornerSubPix(gray,corners,(3,3),(-1,-1),subpix_criteria)
            imgpoints.append(corners)
    N_OK = len(objpoints)
    K = np.zeros((3, 3))
    D = np.zeros((4, 1))
    rvecs = [np.zeros((1, 1, 3), dtype=np.float64) for i in range(N_OK)]
    tvecs = [np.zeros((1, 1, 3), dtype=np.float64) for i in range(N_OK)]
    rms, _, _, _, _ = cv2.fisheye.calibrate(
        objpoints,
        imgpoints,
        gray.shape[::-1],
        K,
        D,
        rvecs,
        tvecs,
        calibration_flags,
        (cv2.TERM_CRITERIA_EPS+cv2.TERM_CRITERIA_MAX_ITER, 30, 1e-6)
    )
    DIM = _img_shape[::-1]
    print("Found " + str(N_OK) + " valid images for calibration")
    print("DIM=" + str(_img_shape[::-1]))
    print("K=np.array(" + str(K.tolist()) + ")")
    print("D=np.array(" + str(D.tolist()) + ")")
    return DIM, K, D


def undistort(img_path,K,D,DIM,scale=0.6,imshow=False):
    img = cv2.imread(img_path)
    dim1 = img.shape[:2][::-1]  #dim1 is the dimension of input image to un-distort
    assert dim1[0]/dim1[1] == DIM[0]/DIM[1], "Image to undistort needs to have same aspect ratio as the ones used in calibration"
    if dim1[0]!=DIM[0]:
        img = cv2.resize(img,DIM,interpolation=cv2.INTER_AREA)
    Knew = K.copy()
    if scale:#change fov
        Knew[(0,1), (0,1)] = scale * Knew[(0,1), (0,1)]
    map1, map2 = cv2.fisheye.initUndistortRectifyMap(K, D, np.eye(3), Knew, DIM, cv2.CV_16SC2)
    undistorted_img = cv2.remap(img, map1, map2, interpolation=cv2.INTER_LINEAR, borderMode=cv2.BORDER_CONSTANT)
    if imshow:
        cv2.imshow("undistorted", undistorted_img)
    return undistorted_img

if __name__ == '__main__':

   # 开始使用图片来获取内参和畸变系数
    DIM, K, D = get_K_and_D((6,9), '')

   # 得到内参和畸变系数畸变矫正进行测试
    '''
    DIM=(2560, 1920)
    K=np.array([[652.8609862494474, 0.0, 1262.1021584894233], [0.0, 653.1909758659955, 928.0871455436396], [0.0, 0.0, 1.0]])
    D=np.array([[-0.024092199861108887], [0.002745976275100771], [0.002545415522352827], [-0.0014366825722748522]])

    img = undistort('../imgs/pig.jpg',K,D,DIM)
    cv2.imwrite('../imgs/pig_checkerboard.jpg', img)
    '''
二、基于经纬度的矫正方法
1. 算法原理:经纬度矫正法, 可以把鱼眼图想象成半个地球, 然后将地球展开成地图,经纬度矫正法主要是利用几何原理, 对图像进行展开矫正。(此算法操作简单不需要使用棋盘来进行数据采集)
2. 代码实现:
import cv2
import numpy as np
import time

# 鱼眼有效区域截取
def cut(img):
    img_gray = cv2.cvtColor(img, cv2.COLOR_BGR2GRAY)
    (_, thresh) = cv2.threshold(img_gray, 20, 255, cv2.THRESH_BINARY)
    contours, hierarchy = cv2.findContours(thresh, cv2.RETR_EXTERNAL, cv2.CHAIN_APPROX_SIMPLE)
    cnts = sorted(contours, key=cv2.contourArea, reverse=True)[0]
    x,y,w,h = cv2.boundingRect(cnts)
    r = max(w/ 2, h/ 2)
    # 提取有效区域
    img_valid = img[y:y+h, x:x+w]
    return img_valid, int(r)

# 鱼眼矫正
def undistort(src,r):
    # r: 半径, R: 直径
    R = 2*r
    # Pi: 圆周率
    Pi = np.pi
    # 存储映射结果
    dst = np.zeros((R, R, 3))
    src_h, src_w, _ = src.shape

    # 圆心
    x0, y0 = src_w//2, src_h//2

    # 数组, 循环每个点
    range_arr = np.array([range(R)])

    theta = Pi - (Pi/R)*(range_arr.T)
    temp_theta = np.tan(theta)**2

    phi = Pi - (Pi/R)*range_arr
    temp_phi = np.tan(phi)**2

    tempu = r/(temp_phi + 1 + temp_phi/temp_theta)**0.5
    tempv = r/(temp_theta + 1 + temp_theta/temp_phi)**0.5

    # 用于修正正负号
    flag = np.array([-1] * r + [1] * r)

    # 加0.5是为了四舍五入求最近点
    u = x0 + tempu * flag + 0.5
    v = y0 + tempv * np.array([flag]).T + 0.5

    # 防止数组溢出
    u[u<0]=0
    u[u>(src_w-1)] = src_w-1
    v[v<0]=0
    v[v>(src_h-1)] = src_h-1

    # 插值
    dst[:, :, :] = src[v.astype(int),u.astype(int)]
    return dst

if __name__ == "__main__":
    t = time.perf_counter()
    frame = cv2.imread('../imgs/pig.jpg')
    cut_img,R = cut(frame)
    t = time.perf_counter()
    result_img = undistort(cut_img,R)
    cv2.imwrite('../imgs/pig_vector_nearest.jpg',result_img)
    print(time.perf_counter()-t)
感谢一下几位大佬资源支持:
https://blog.csdn.net/hpuhjl/article/details/80899931
https://blog.csdn.net/waeceo/article/details/50580808
https://zhuanlan.zhihu.com/p/55648494
http://www.expoon.com/wenda/20180427218.html


