nuxt.js使用笔记
nuxt.js官网: https://zh.nuxtjs.org/guide/routing
Nuxt作用:
- 为什么要用 : 一个网站分为前台与后台, 现在的web前端开发都是进行组件化开发, 那么传统的vue-cli通过webpack来打包的项目就不利于网络爬虫的seo搜索, 那么网站就不利于推广. 因此可以通过服务端渲染来进行优化, 因此nuxt诞生了.
- 基本使用介绍 : nuxt是基于vue来编写的服务端渲染框架, 用法和vue-cli3.0有 70%一致
安装
-
准备工作 :
安装node.js
-
项目脚手架构建
- cmd执行下面的操作, 来启动项目
npx create-nuxt-app <项目名> //npx在NPM版本5.2.0默认安装了
- 运行项目结构
npm run dev
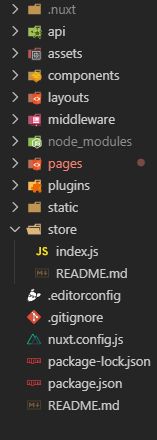
目录结构
.nuxt : 打包的项目
api : 自己封装的ajax文件夹
assets : 存放资源文件(图片, 默认css代码等)
components : 组件文件
layouts : 布局目录, 最好不操作
middleware : 中间件文件
pages : 自己写的路由文件
plugins : 插件配置文件
static : 静态文件
store : vuex文件
nuxt.config.js : 配置文件(vue.config.js相似)
路由
- 不需要配置route.js文件. 底层会根据pages的目录结构自动生成
目录结构:
pages/
--| users/
-----| _id.vue
-----| index.vue
--| users.vue
自动生成下面的路由配置
router: {
  routes: [
    {
      path: '/users',
      component: 'pages/users.vue',
      children: [
        {
          path: '',
          component: 'pages/users/index.vue',
          name: 'users'
        },
        {
          path: ':id',
          component: 'pages/users/_id.vue',
          name: 'users-id'
        }
      ]
    }
  ]
}
使用注意事项 :
- 当存在多级路由嵌套的时候, 不要使用index.vue文件, 如上在users.vue中使用this.$router.replace(’/main/_id’)界面, 因为index.vue文件就不能再嵌套路由了
- 注意name属性
-
路由api使用和vue一模一样 :
- this.$router.push / replace
- this.$route.query
- this.$route.path
嵌套CDN
- 如 : 在nuxt.config.js中添加了jquery
head: {
    title: process.env.npm_package_name || '',
    meta: [
      { charset: 'utf-8' },
      { name: 'viewport', content: 'width=device-width, initial-scale=1' },
      { hid: 'description', name: 'description', content: process.env.npm_package_description || '' }
    ],
    script:[
      {type: 'text/javascript'},
      {src: 'https://ss1.bdstatic.com/5eN1bjq8AAUYm2zgoY3K/r/www/cache/static/protocol/https/jquery/jquery-1.10.2.min_65682a2.js'}
    ],
    link: [
      { rel: 'icon', type: 'image/x-icon', href: '/favicon.ico' }
    ]
  },
第三方插件引用
nuxt项目和默认vue-cli3初始化的项目不太一样, 运用到第三方都需要在nuxt.config.js中注册
步骤 :
-
在plugins中创建文件 v-distpicker.js (vue省市联动选择器插件)
import Vue from 'vue' if (process.browser) { var Distpicker = require('v-distpicker') Vue.use(Distpicker) Vue.component('v-distpicker', Distpicker) } -
在nuxt.config.js中的plugins中使用
 plugins: [
    '@/plugins/element-ui',
    '@/plugins/v-distpicker',  // 这个是省市联动选择器
  ],
全局使用默认base.css文件
步骤 :
-
在根目录的assets文件夹下创建base.css文件
-
在nuxt.config.js中引入
 css: [
    'element-ui/lib/theme-chalk/index.css',
    '@assets/css/base.css'
  ],
img标签使用 src引入的为本地文件时 :
使用方法 :
- 在data中绑定 require字符串
- 在html中绑定直接使用
// data中 :
 data(){
     return : {
         lists : [{
          title: "学习中心",
          iconpath: require("@/assets/img/personal/index/xuexi.webp")}]
     }
 }

// html中 :
<div class="menu_sigle" v-for="(item, index) in leftmenu" :key="index">
   <div class="title">
     <img :src="item.iconpath" alt />
     <span>{{item.title}}</span>
   </div>
</div>
跨域 ==> 反向代理
-
在nuxt.config.js中
axios: { proxy: true, }, proxy: { '/api/aaa': { target: 'http://wthrcdn.etouch.cn/weather_mini', changeOrigin: true, pathRewrite: { '^/api/aaa': '' }, }, '/api': { target: 'https://lijun.space', changeOrigin: true, }, } -
在axios中使用
 http.get('/api/aaa',{params:{city : '深圳'}}).then((req)=>{
               console.log(req);
 })
axios拦截器
问题 : 默认情况下, 没有暴露的router文件, 所以不能直接导入router来进行路由跳转
解决问题方法 : 在nuxt中, 存在 n u x t 这 玩 意 可 以 直 接 通 过 V u e . p r o t o t y p e . nuxt这玩意可以直接通过 Vue.prototype. nuxt这玩意可以直接通过Vue.prototype.nuxt.$router.replace(’/login’)来进行路由跳转
import axios from 'axios'
import Vue from 'vue'

// 每次请求携带cookies信息
axios.defaults.withCredentials = true

export const http = axios.create({
    // baseURL: 'http://127.0.0.1:3000',
})

//  登录前请求头的设置
// 添加请求拦截器
http.interceptors.request.use(function (config) {
    // 在发送请求之前做些什么
    config.headers.Authorization = window.sessionStorage.getItem('token')||''
    return config
  });

// 添加响应拦截器
http.interceptors.response.use(function (response) {
    if(true){
        Vue.prototype.$message.warning('请重新登录哦!')
        Vue.prototype.$nuxt.$router.replace('/login')  // 这是重点
    }
    return response;
  });
middleware中间件
作用 : 在进入路由组件之前, 先执行选中的中间件文件去执行, 通常是路由跳转?
使用 :
-
在middleware文件夹下定义一个文件
gongliming.jsexport default function ({ store, redirect }) { // If the user is not authenticated if (!store.state.authenticated) { return redirect('/login') } } -
在组件中想执行上面的那个中间件的话, 需要在组件中定义 : middleware: ‘gongliming’
<template>
  <h1>Secret page</h1>
</template>

<script>
export default {
  middleware: 'gongliming'
}
</script>
使用好看的滚动条
在base.css中导入如下代码
/*定义滚动条高宽及背景 高宽分别对应横竖滚动条的尺寸*/
::-webkit-scrollbar{
  width: 7px;
  height: 7px;
  background-color: #F5F5F5;
  }

  /*定义滚动条轨道 内阴影+圆角*/
  ::-webkit-scrollbar-track {
  box-shadow: inset 0 0 6px rgba(0, 0, 0, 0.3);
  -webkit-box-shadow: inset 0 0 6px rgba(0, 0, 0, 0.3);
  border-radius: 10px;
  background-color: #F5F5F5;
  }

  /*定义滑块 内阴影+圆角*/
  ::-webkit-scrollbar-thumb{
  border-radius: 10px;
  box-shadow: inset 0 0 6px rgba(0, 0, 0, .1);
  -webkit-box-shadow: inset 0 0 6px rgba(0, 0, 0, .1);
  background-color: #c8c8c8;
  }
keep-alive的使用
bug说明 :
这是nuxt官网的原例子 : exclude或者include中包裹的是路由的name属性, 但是并起不到效果
官网 https://zh.nuxtjs.org/api/components-nuxt-child/
<template>
  <div>
    <nuxt-child keep-alive :keep-alive-props="{ exclude: ['modal'] }" />
  </div>
</template>

<!-- 将被转换成以下形式 -->
<div>
  <keep-alive :exclude="['modal']">
    <router-view />
  </keep-alive>
</div>
解决办法 : activated deactivated
- 模仿小程序, 让每个页面都存在页面栈一说, 第一次进入页面执行创建页面之后执行mounted生命周期钩子函数, 再次进入和离开这个页面分别只会执行activated 和deactivated两个钩子函数
工作中使用keep-alive遇到的问题
-
-
需求 : 主页面有个按钮,点击之后会跳转到新闻界面, 新闻界面可以点开进入详情界面,并且新闻界面存在分页效果, 详情界面有返回按钮, 点击返回按钮放回到新闻界面
-
bug出现的地方 : 主页面点击跳转到新闻界面, 主页面的scrollTop在哪里, 那么新闻界面就会在哪里
-
解决办法 :
在主页面进行路由跳转的时候自己手动增加传递的参数, 在新闻界面中, 通过钩子函数来判断是否是主页面跳转过来的链接
// 主页面 /main/home
this.$router.push('/main/news?from=home')  通过传递参数from

// 新闻界面 /main/news
 activated() {
    console.log("keep-alive");
    if (this.$route.query.from) {
      $("html,body").animate({scrollTop: 0},0);
    }
  }
-
父子路由之间加载的顺序
先加载子组件, 再加载父组件


