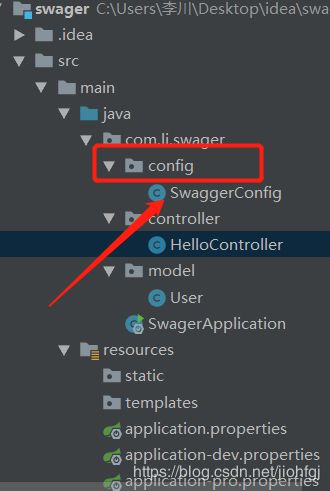
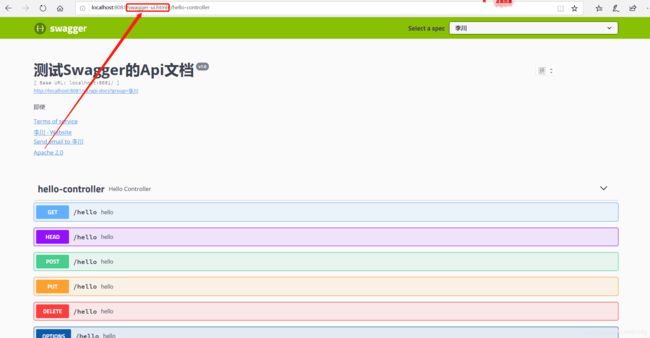
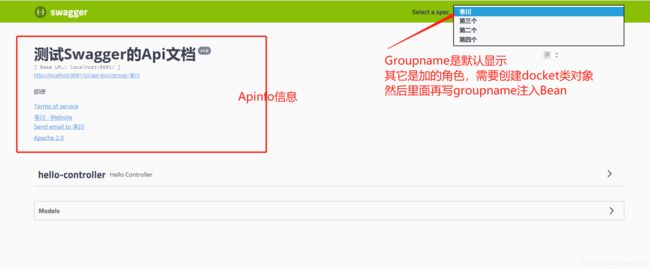
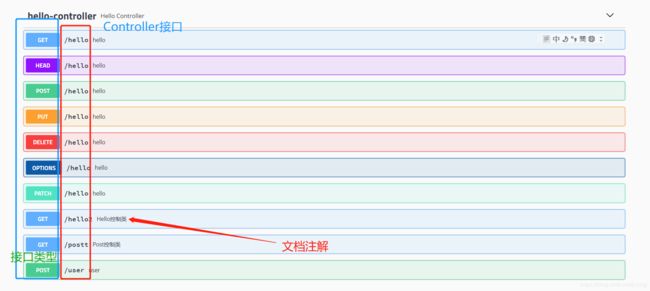
- Swagger
辄也
java开发语言后端
1.什么是Swagger?Swagger是一个规范和完整的框架,用于生成、描述、调用和可视化RESTful风格的Web服务。使用Swagger,就是把相关的信息存储在它定义的描述文件里面(yml或json格式),再通过维护这个描述文件可以去更新接口文档,以及生成各端代码。而Springfox-swagger,则可以通过扫描代码去生成这个描述文件,连描述文件都不需要再去维护了。所有的信息,都在代码里
- nestjs+mysql+prisma + swagger项目搭建
哆啦咪唏
mysqljavascriptprismanestjs
nestjs学习(一)项目地址1.基础操作安装nestyarnadd-g@nestjs/cli创建项目nestnewproject-name启动服务器yarnrunstartyarnstart:dev监听文件变化,自动重启服务使用nest-cli快速创建service/controller,会自动引入Module中nestg[文件类型][文件名][文件目录(src目录下)]详细过程可以参考nest
- java将文件流传给前端,JAVA基础知识之InputStreamReader流 和 将本地文件通过前端上传到服务器上...
GrapeDoor
java将文件流传给前端
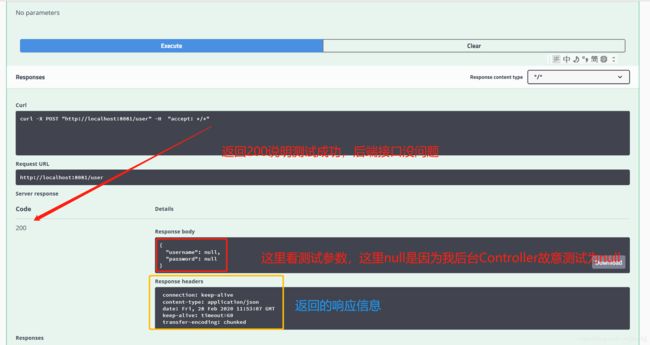
将本地文件通过前端上传到服务器上publicBaseResponseSwaggerresolveFile(@Valid@ApiParam(value="file")@RequestParam(name="file",required=true)MultipartFilefile){if(file.isEmpty()){thrownewSoftwareException(ComStatusCodeE
- 飘还是不飘?“`“引发的惨案。
dushky
java前端开发语言
Failedtoconvertvalueoftype'java.lang.String'torequiredtype'int';Forinputstring:"${page}"当您的后端服务报这个错误时?发生什么?乍一看,什么都没问题。后端服务正常启动,用swagger(Knife4j)测试好着呢。前端也没什么问题,该传的,都传了呀?特别是眼神不太好的,还看不出来'和`的区别。:-)注意前端传参的
- 【Java 常用注解学习笔记1】——Java 常用注解全解析:从基础到实战
猿享天开
Java开发从入门到精通java学习笔记
Java常用注解全解析:从基础到实战一、引言Java注解(Annotation)是现代化开发中提升代码简洁性、可维护性和与框架集成的重要工具。本文系统化梳理主流框架(Spring、MyBatis-Plus、Swagger等)的核心注解,通过分类解析、代码示例与最佳实践,帮助开发者精准掌握注解的应用场景与技巧。二、Lombok注解1.代码简化注解注解作用示例注意事项@Data生成getter/set
- 如何保证bug在改完之后不会引起新bug
賢843
bugbug
一、测试前:影响范围分析代码关联分析:依据开发代码关联性检查获取改动信息,聚焦影响范围,明确代码改动影响的业务功能、是否涉及公共组件或接口,检查Swagger文档更新情况。若开发无法明确影响范围,在测试计划中标注“需扩大回归范围”,并将明确的改动范围转化为测试用例。业务场景关联:对比需求文档,核对Bug修复是否涉及需求变更(如新增字段、逻辑分支),确定需要回归的上下游功能。制定回归清单:清单包含所
- 简化API 工作流程:Apipost整合了 Postman、Swagger 和 JMeter
绿色果酱
postmanjmeter测试工具
作为一名Java开发者,始终追求开发过程的高效性。使用IntelliJIDEA编写代码只是开始。一般来说,代码完成后,我们会切换到Postman进行API调试。在确保API表现符合预期后,我们会使用Swagger为前端团队生成文档。最后,再使用JMeter进行性能和负载测试,以确保API工作流顺畅且自动化。Apipost=Postman+Swagger+JMeter然而,这种多工具的方法存在诸多挑
- 关于工具软件:Apipost和Apifox哪个更好用看这篇就够了
一枚索隆
前端测试工具后端
很多人搞不清楚Apipost和Apifox到底有什么区别,以下为实际体验,各位能够依据本身状况参考一下,有什么不足之处还请各位大佬多多指教。一、产品定位这块能够间接看他们的官网,个人感觉两款产品从性能和定位上来说,没啥显著区别,国内API工具做的好的也就是Apipost和Apifox了,尽管像Eolink和Swagger之类也还能够,但角色定位比拟繁多,个人感觉不如这两款功能强大。Apipost:
- SpringBoot3+Springdoc:v3api-docs可以访问,html无法访问的解决方法
m0_74825746
面试学习路线阿里巴巴html前端
项目环境springboot3.3.4pom.xml引用如下(springdoc相关的只有这一个,理论上说,要跑springdoc或者叫它swagger3,除了springboot,加这个就可以了,不需要任何配置类配置、application.properties/yaml配置!!)(当然,你跑通了之后需要自定义配置了再配)org.springdocspringdoc-openapi-starte
- @ApiModel
weixin_51687565
python开发语言
@ApiModel是Swagger(现在通常被称为OpenAPI)中的一个注解,用于在RESTfulWeb服务中描述API的模型。Swagger允许开发人员为RESTfulWeb服务生成、描述、调用和可视化API文档。通过使用Swagger的注解(如@ApiModel),开发人员可以自动地生成这些文档,而无需手动编写和维护它们。@ApiModel注解通常用于Java类的顶部,这些类代表API响应或
- 前端与后端的对接事宜、注意事项
ZhooooYuChEnG
前端前后端对接
前端与后端的对接事宜、注意事项一、对接核心流程(完整生命周期)需求分析接口设计开发联调测试验证上线部署二、前端视角:对接方法与注意事项1.对接流程接口文档确认:阅读后端提供的OpenAPI/Swagger文档请求构造:处理参数、请求头、认证信息发送请求:通过AJAX/Fetch/Axios发起HTTP调用响应处理:解析数据、错误处理、状态管理数据渲染:将接口数据转换为UI可用的格式2.关键代码示例
- swagger使用指引
MA_Y_
swagger
1.swagger介绍在前后端分离开发中通常由后端程序员设计接口,完成后需要编写接口文档,最后将文档交给前端工程师,前端工程师参考文档进行开发。可以通过一些工具快速生成接口文档,本项目通过Swagger生成接口在线文档。什么是Swagger?OpenAPI规范(OpenAPISpecification简称OAS)是Linux基金会的一个项目,试图通过定义一种用来描述API格式或API定义的语言,来
- 架构设计(4)面向服务架构SOA与C++模拟实现
CoderIsArt
架构设计研究C++11架构面向服务架构SOA
SOA架构SOA(面向服务的架构)是一种架构风格,通过将系统划分为服务来提高灵活性和可维护性。每个服务是一个独立的功能模块,通过标准化接口进行交互。SOA架构涉及多种技术和组件,以下是关键技术和它们的作用:1.服务设计与接口-服务接口定义:通常使用标准接口描述语言,如WSDL(WebServicesDescriptionLanguage)或OpenAPI(Swagger)来定义服务的接口。接口描述
- Spring——Spring开发实战经验(1)
庄小焱
Spring框架后端spring系统实战
摘要文章主要介绍了Swagger作为API文档生成和测试工具的功能,包括自动生成API文档、提供可视化调试界面、促进前后端协作、支持OpenAPI规范等。同时,还提及了SpringBoot与Swagger3的实战应用,以及Spring开发中其他相关技术内容,如@Resource与@Autowired的区别、Druid监控配置、切面日志示例等。1.Swagger-API文档生成和测试工具Swagge
- Swagger、OpenAPI和springdoc-openapi-ui入门
Leo_Hu666
swaggerspringbootspring
统一的API接口平台有了统一的API接口平台,不管对内还是对外,都能更好做到:统一接口开发、统一接口管理、统一接口开放服务。统一接口开发:包括API接口的命名、分类、格式、接口文档、接口变更记录、接口发布、接口测试、接口日记等,都要统一风格、规范标准和约束。统一接口管理:包括API接口的升级、增加参数、部署、性能监控、错误日志,同时结合开发、测试、运维、文档等形成整套的研发体系和闭环。统一接口开放
- Swagger入门
六毛的毛
后端入门java
使用swagger规范定义接口及接口相关信息,可以生成接口文档及在线接口调试界面knife4j:为javamvc框架集成swagger的增强解决方案com.github.xiaoyminknife4j-spring-boot-starter使用方法:配置接口文档信息和适用范围:/***通过knife4j生成接口文档*@return*/@BeanpublicDocketdocket(){ApiInf
- Swagger中@ApiIgnore注解的使用详解
DN金猿
springboot组件专题开发语言java
目录一、Swagger@ApiIgnore注解的使用1、作用在类上时,整个类都会被忽略2、当作用在方法上时,方法将被忽略3、作用在参数上时,单个具体的参数会被忽略4、在实体类中忽略不需要字段的方式二、swagger注解的使用解析1.Swagger简介2.常用注解3.代码示例这篇文章主要介绍了Swagger中@ApiIgnore注解的使用,具有很好的参考价值,希望对大家有所帮助。如有错误或未考虑完全
- Java 进阶二知识--重拾者AIMING
AMING20220827
Javajunitjava开发语言
初级选手:Java基础知识--重拾者AIMING——【Aimin20210819】公号进阶一选手:Java进阶一知识--重拾者AIMING——【Aimin20210819】公号目录1.参数数组和参数列表,重复使用参数2.Java深浅拷贝3.Http进行Post接口json带参数自动化4.Java使用json转换xml5.创建SpringBoot步骤以及Swagger部署,并发布Linux6.使用J
- Netty HTTP2 示例-响应式编程-013
ApiHug
ApiHugintellij-ideajavaspringspringboot
ApiHug×{Postman|Swagger|Api...}=快↑准√省↓GitHub-apihug/apihug.com:AllaboutheApihugapihug.com:有爱,有温度,有质量,有信任ApiHug-APIdesignCopilot-IntelliJIDEsPlugin|MarketplaceTheNextGenerationAPIDevelopmentPlatform-Ap
- Reactor Netty TCP 服务器端-响应式编程-011
ApiHug
intellij-ideaspringspringbootApiHug
ApiHug×{Postman|Swagger|Api...}=快↑准√省↓GitHub-apihug/apihug.com:AllaboutheApihugapihug.com:有爱,有温度,有质量,有信任ApiHug-APIdesignCopilot-IntelliJIDEsPlugin|MarketplaceTheNextGenerationAPIDevelopmentPlatform-Ap
- Swagger:API文档化与自动化测试的利器
行动π技术博客
swagger
1.引言在当今快速发展的软件开发领域,API(应用程序编程接口)扮演着至关重要的角色。Swagger,作为一种流行的API文档生成工具,极大地提高了API的可维护性和开发效率。2.Swagger概述Swagger是一个开源的软件框架,用于帮助开发者设计、构建、文档化和使用RESTfulWeb服务。它最初由SmartBearSoftware的TonyTam创建,并以"SwaggerSpecifica
- Postman和ReadyAPI哪个更好?
朱公子的Note
测试工具PostmanReadyAPI
在当今软件开发中,API测试已成为保障系统稳定性的关键一环。面对众多工具,如何选择最适合自己的API测试工具?Postman和ReadyAPI便是其中最受欢迎的两款,二者各有千秋那么,Postman和ReadyAPI究竟哪个更好?在不同场景下,它们的优势和不足分别是什么?API测试可以使用像Testsigma、Postman、ReadyAPI、Swagger等工具来执行。在这篇文章中,我们将对比P
- 跟着deepseek学java
hyq0817__
java开发语言
Day11.学习了redisWindow下Redis的安装和部署详细图文教程(Redis的安装和可视化工具的使用)_redis安装-CSDN博客2.MD5文件指纹校验实现对前端传过来的明文密码进行md5加密处理直接在代码中加入也可password=DigestUtils.md5DigestAsHex(password.getBytes());3.swagger进行测试接口/***通过knife4j
- 如何在 FastAPI 中使用本地资源自定义 Swagger UI
gs80140
各种问题fastapiswagger_ui
要自定义FastAPI中的SwaggerUI,且使用本地资源来代替CDN。只是需要稍微修改一下。修改后的代码:步骤:挂载本地静态文件目录:我们将本地的SwaggerUI资源文件(如.js,.css,favicon.png等)放置在项目的一个目录中(例如:static/swagger-ui)。自定义SwaggerUI页面:您可以通过FastAPI的get_swagger_ui_html()方法来加载
- 【提示词】openapi-swagger规范API生成
姚瑞南
prompt实战应用案例promptchatgpt人工智能
根据提供的curl命令帮我写一段符合openapi-swagger规范的api文档,要包含serversURL,以json形式返回给我。注意:-有默认值的以默认值填充;-description添加具体英文描述并用中文翻译注释;
- 若依RuoYi框架浅析 基础篇③——Swagger接口文档 | SwaggerConfig、启用和禁用Swagger
小康师兄
若依RuoYi框架浅析Swagger接口文档808080若依
文章目录一、访问网址二、纠错排查三、SwaggerConfig一、访问网址http://localhost:8080/swagger-ui.html切记要加上端口号8080二、纠错排查我一开始没有加8080,是访问http://localhost/swagger-ui.html然后被重定向都登录界面,我就很纳闷,是因为没有token被拦截了吗。但是代码com.ruoyi.framework.con
- SpringBoot——》整合knife4j详细步骤
小仙。
SpringBootspringbootknife4jswaggerswagger2
推荐:总结——》【SpringBoot】SpringBoot——》整合knife4j详细步骤一、在maven项目的pom.xml中引入Knife4j的依赖包二、创建Swagger配置依赖三、启动SpringBoot工程四、新建TestController.java并测试一、在maven项目的pom.xml中引入Knife4j的依赖包1、Knife4j本身已经引入了springfox,不用再单独引入
- springboot整合knife4j,从此告别手写接口文档
棋了个怪啊_Rachel
Java进阶学习汇总java开发语言knife4j
关于knife4jKnife4j的前身是swagger-bootstrap-ui,前身swagger-bootstrap-ui是一个纯swagger-ui的ui皮肤项目一开始项目初衷是为了写一个增强版本的swagger的前端ui,但是随着项目的发展,面对越来越多的个性化需求,不得不编写后端Java代码以满足新的需求,在swagger-bootstrap-ui的1.8.5~1.9.6版本之间,采用的
- Spring Boot 基础开发:实现 RESTful API 开发
YY...yy
SpringBoot框架学习springbootrestful后端
前言在现代Web开发中,RESTfulAPI已经成为前后端分离架构的核心。SpringBoot提供了强大的支持,使得RESTfulAPI的开发变得高效且简洁。本文将从以下几个方面详细讲解如何在SpringBoot中实现RESTfulAPI开发:@RestController设计API:简化Controller的编写HTTP状态码与响应封装:了解常见状态码及其使用场景Swagger3集成:生成接口文
- 【Node.js】Koa2 整合接口文档
秀秀_heo
Node.js后端开发node.js
部分学习来源:https://blog.csdn.net/qq_38734862/article/details/107715579依赖//koa2-swagger-uiUI视图组件swagger-jsdoc识别写的/***/转jsonnpminstallkoa2-swagger-uiswagger-jsdoc--save配置config\swaggerConfig.jsconstRouter=r
- 项目中 枚举与注解的结合使用
飞翔的马甲
javaenumannotation
前言:版本兼容,一直是迭代开发头疼的事,最近新版本加上了支持新题型,如果新创建一份问卷包含了新题型,那旧版本客户端就不支持,如果新创建的问卷不包含新题型,那么新旧客户端都支持。这里面我们通过给问卷类型枚举增加自定义注解的方式完成。顺便巩固下枚举与注解。
一、枚举
1.在创建枚举类的时候,该类已继承java.lang.Enum类,所以自定义枚举类无法继承别的类,但可以实现接口。
- 【Scala十七】Scala核心十一:下划线_的用法
bit1129
scala
下划线_在Scala中广泛应用,_的基本含义是作为占位符使用。_在使用时是出问题非常多的地方,本文将不断完善_的使用场景以及所表达的含义
1. 在高阶函数中使用
scala> val list = List(-3,8,7,9)
list: List[Int] = List(-3, 8, 7, 9)
scala> list.filter(_ > 7)
r
- web缓存基础:术语、http报头和缓存策略
dalan_123
Web
对于很多人来说,去访问某一个站点,若是该站点能够提供智能化的内容缓存来提高用户体验,那么最终该站点的访问者将络绎不绝。缓存或者对之前的请求临时存储,是http协议实现中最核心的内容分发策略之一。分发路径中的组件均可以缓存内容来加速后续的请求,这是受控于对该内容所声明的缓存策略。接下来将讨web内容缓存策略的基本概念,具体包括如如何选择缓存策略以保证互联网范围内的缓存能够正确处理的您的内容,并谈论下
- crontab 问题
周凡杨
linuxcrontabunix
一: 0481-079 Reached a symbol that is not expected.
背景:
*/5 * * * * /usr/IBMIHS/rsync.sh
- 让tomcat支持2级域名共享session
g21121
session
tomcat默认情况下是不支持2级域名共享session的,所有有些情况下登陆后从主域名跳转到子域名会发生链接session不相同的情况,但是只需修改几处配置就可以了。
打开tomcat下conf下context.xml文件
找到Context标签,修改为如下内容
如果你的域名是www.test.com
<Context sessionCookiePath="/path&q
- web报表工具FineReport常用函数的用法总结(数学和三角函数)
老A不折腾
Webfinereport总结
ABS
ABS(number):返回指定数字的绝对值。绝对值是指没有正负符号的数值。
Number:需要求出绝对值的任意实数。
示例:
ABS(-1.5)等于1.5。
ABS(0)等于0。
ABS(2.5)等于2.5。
ACOS
ACOS(number):返回指定数值的反余弦值。反余弦值为一个角度,返回角度以弧度形式表示。
Number:需要返回角
- linux 启动java进程 sh文件
墙头上一根草
linuxshelljar
#!/bin/bash
#初始化服务器的进程PId变量
user_pid=0;
robot_pid=0;
loadlort_pid=0;
gateway_pid=0;
#########
#检查相关服务器是否启动成功
#说明:
#使用JDK自带的JPS命令及grep命令组合,准确查找pid
#jps 加 l 参数,表示显示java的完整包路径
#使用awk,分割出pid
- 我的spring学习笔记5-如何使用ApplicationContext替换BeanFactory
aijuans
Spring 3 系列
如何使用ApplicationContext替换BeanFactory?
package onlyfun.caterpillar.device;
import org.springframework.beans.factory.BeanFactory;
import org.springframework.beans.factory.xml.XmlBeanFactory;
import
- Linux 内存使用方法详细解析
annan211
linux内存Linux内存解析
来源 http://blog.jobbole.com/45748/
我是一名程序员,那么我在这里以一个程序员的角度来讲解Linux内存的使用。
一提到内存管理,我们头脑中闪出的两个概念,就是虚拟内存,与物理内存。这两个概念主要来自于linux内核的支持。
Linux在内存管理上份为两级,一级是线性区,类似于00c73000-00c88000,对应于虚拟内存,它实际上不占用
- 数据库的单表查询常用命令及使用方法(-)
百合不是茶
oracle函数单表查询
创建数据库;
--建表
create table bloguser(username varchar2(20),userage number(10),usersex char(2));
创建bloguser表,里面有三个字段
&nbs
- 多线程基础知识
bijian1013
java多线程threadjava多线程
一.进程和线程
进程就是一个在内存中独立运行的程序,有自己的地址空间。如正在运行的写字板程序就是一个进程。
“多任务”:指操作系统能同时运行多个进程(程序)。如WINDOWS系统可以同时运行写字板程序、画图程序、WORD、Eclipse等。
线程:是进程内部单一的一个顺序控制流。
线程和进程
a. 每个进程都有独立的
- fastjson简单使用实例
bijian1013
fastjson
一.简介
阿里巴巴fastjson是一个Java语言编写的高性能功能完善的JSON库。它采用一种“假定有序快速匹配”的算法,把JSON Parse的性能提升到极致,是目前Java语言中最快的JSON库;包括“序列化”和“反序列化”两部分,它具备如下特征:
- 【RPC框架Burlap】Spring集成Burlap
bit1129
spring
Burlap和Hessian同属于codehaus的RPC调用框架,但是Burlap已经几年不更新,所以Spring在4.0里已经将Burlap的支持置为Deprecated,所以在选择RPC框架时,不应该考虑Burlap了。
这篇文章还是记录下Burlap的用法吧,主要是复制粘贴了Hessian与Spring集成一文,【RPC框架Hessian四】Hessian与Spring集成
- 【Mahout一】基于Mahout 命令参数含义
bit1129
Mahout
1. mahout seqdirectory
$ mahout seqdirectory
--input (-i) input Path to job input directory(原始文本文件).
--output (-o) output The directory pathna
- linux使用flock文件锁解决脚本重复执行问题
ronin47
linux lock 重复执行
linux的crontab命令,可以定时执行操作,最小周期是每分钟执行一次。关于crontab实现每秒执行可参考我之前的文章《linux crontab 实现每秒执行》现在有个问题,如果设定了任务每分钟执行一次,但有可能一分钟内任务并没有执行完成,这时系统会再执行任务。导致两个相同的任务在执行。
例如:
<?
//
test
.php
- java-74-数组中有一个数字出现的次数超过了数组长度的一半,找出这个数字
bylijinnan
java
public class OcuppyMoreThanHalf {
/**
* Q74 数组中有一个数字出现的次数超过了数组长度的一半,找出这个数字
* two solutions:
* 1.O(n)
* see <beauty of coding>--每次删除两个不同的数字,不改变数组的特性
* 2.O(nlogn)
* 排序。中间
- linux 系统相关命令
candiio
linux
系统参数
cat /proc/cpuinfo cpu相关参数
cat /proc/meminfo 内存相关参数
cat /proc/loadavg 负载情况
性能参数
1)top
M:按内存使用排序
P:按CPU占用排序
1:显示各CPU的使用情况
k:kill进程
o:更多排序规则
回车:刷新数据
2)ulimit
ulimit -a:显示本用户的系统限制参
- [经营与资产]保持独立性和稳定性对于软件开发的重要意义
comsci
软件开发
一个软件的架构从诞生到成熟,中间要经过很多次的修正和改造
如果在这个过程中,外界的其它行业的资本不断的介入这种软件架构的升级过程中
那么软件开发者原有的设计思想和开发路线
- 在CentOS5.5上编译OpenJDK6
Cwind
linuxOpenJDK
几番周折终于在自己的CentOS5.5上编译成功了OpenJDK6,将编译过程和遇到的问题作一简要记录,备查。
0. OpenJDK介绍
OpenJDK是Sun(现Oracle)公司发布的基于GPL许可的Java平台的实现。其优点:
1、它的核心代码与同时期Sun(-> Oracle)的产品版基本上是一样的,血统纯正,不用担心性能问题,也基本上没什么兼容性问题;(代码上最主要的差异是
- java乱码问题
dashuaifu
java乱码问题js中文乱码
swfupload上传文件参数值为中文传递到后台接收中文乱码 在js中用setPostParams({"tag" : encodeURI( document.getElementByIdx_x("filetag").value,"utf-8")});
然后在servlet中String t
- cygwin很多命令显示command not found的解决办法
dcj3sjt126com
cygwin
cygwin很多命令显示command not found的解决办法
修改cygwin.BAT文件如下
@echo off
D:
set CYGWIN=tty notitle glob
set PATH=%PATH%;d:\cygwin\bin;d:\cygwin\sbin;d:\cygwin\usr\bin;d:\cygwin\usr\sbin;d:\cygwin\us
- [介绍]从 Yii 1.1 升级
dcj3sjt126com
PHPyii2
2.0 版框架是完全重写的,在 1.1 和 2.0 两个版本之间存在相当多差异。因此从 1.1 版升级并不像小版本间的跨越那么简单,通过本指南你将会了解两个版本间主要的不同之处。
如果你之前没有用过 Yii 1.1,可以跳过本章,直接从"入门篇"开始读起。
请注意,Yii 2.0 引入了很多本章并没有涉及到的新功能。强烈建议你通读整部权威指南来了解所有新特性。这样有可能会发
- Linux SSH免登录配置总结
eksliang
ssh-keygenLinux SSH免登录认证Linux SSH互信
转载请出自出处:http://eksliang.iteye.com/blog/2187265 一、原理
我们使用ssh-keygen在ServerA上生成私钥跟公钥,将生成的公钥拷贝到远程机器ServerB上后,就可以使用ssh命令无需密码登录到另外一台机器ServerB上。
生成公钥与私钥有两种加密方式,第一种是
- 手势滑动销毁Activity
gundumw100
android
老是效仿ios,做android的真悲催!
有需求:需要手势滑动销毁一个Activity
怎么办尼?自己写?
不用~,网上先问一下百度。
结果:
http://blog.csdn.net/xiaanming/article/details/20934541
首先将你需要的Activity继承SwipeBackActivity,它会在你的布局根目录新增一层SwipeBackLay
- JavaScript变换表格边框颜色
ini
JavaScripthtmlWebhtml5css
效果查看:http://hovertree.com/texiao/js/2.htm代码如下,保存到HTML文件也可以查看效果:
<html>
<head>
<meta charset="utf-8">
<title>表格边框变换颜色代码-何问起</title>
</head>
<body&
- Kafka Rest : Confluent
kane_xie
kafkaRESTconfluent
最近拿到一个kafka rest的需求,但kafka暂时还没有提供rest api(应该是有在开发中,毕竟rest这么火),上网搜了一下,找到一个Confluent Platform,本文简单介绍一下安装。
这里插一句,给大家推荐一个九尾搜索,原名叫谷粉SOSO,不想fanqiang谷歌的可以用这个。以前在外企用谷歌用习惯了,出来之后用度娘搜技术问题,那匹配度简直感人。
环境声明:Ubu
- Calender不是单例
men4661273
单例Calender
在我们使用Calender的时候,使用过Calendar.getInstance()来获取一个日期类的对象,这种方式跟单例的获取方式一样,那么它到底是不是单例呢,如果是单例的话,一个对象修改内容之后,另外一个线程中的数据不久乱套了吗?从试验以及源码中可以得出,Calendar不是单例。
测试:
Calendar c1 =
- 线程内存和主内存之间联系
qifeifei
java thread
1, java多线程共享主内存中变量的时候,一共会经过几个阶段,
lock:将主内存中的变量锁定,为一个线程所独占。
unclock:将lock加的锁定解除,此时其它的线程可以有机会访问此变量。
read:将主内存中的变量值读到工作内存当中。
load:将read读取的值保存到工作内存中的变量副本中。
- schedule和scheduleAtFixedRate
tangqi609567707
javatimerschedule
原文地址:http://blog.csdn.net/weidan1121/article/details/527307
import java.util.Timer;import java.util.TimerTask;import java.util.Date;
/** * @author vincent */public class TimerTest {
- erlang 部署
wudixiaotie
erlang
1.如果在启动节点的时候报这个错 :
{"init terminating in do_boot",{'cannot load',elf_format,get_files}}
则需要在reltool.config中加入
{app, hipe, [{incl_cond, exclude}]},
2.当generate时,遇到:
ERROR