Android单元测试
Android单元测试简介
关于单元测试,在维基百科中,给出了如下定义:
在计算机编程中,单元测试(英语:Unit Testing)又称为模块测试, 是针对程序模块(软件设计的最小单位)来进行正确性检验的测试工作。程序单元是应用的最小可测试部件。在过程化编程中,一个单元就是单个程序、函数、过程等;对于面向对象编程,最小单元就是方法,包括基类(超类)、抽象类、或者派生类(子类)中的方法。
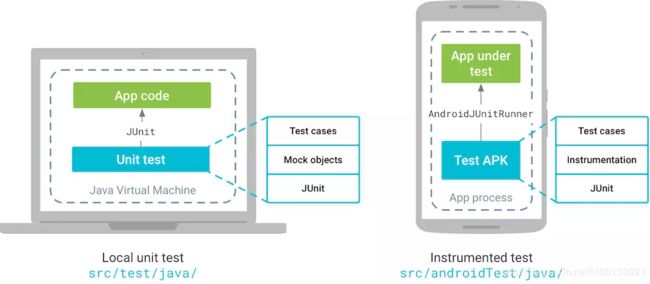
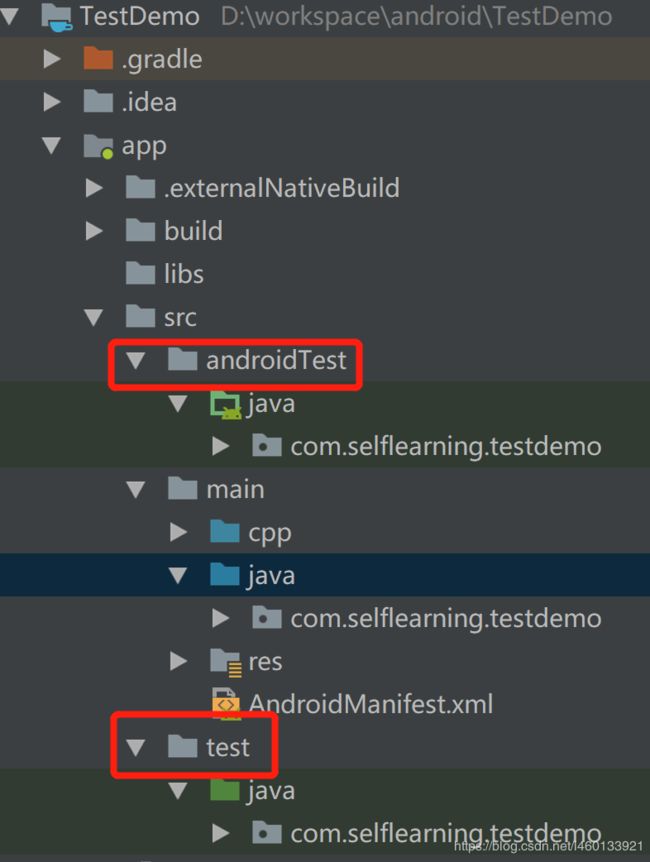
android中的单元测试基于JUnit,可分为本地测试和instrumented测试,在项目中对应
- module-name/src/test/java/.
该目录下的代码运行在本地JVM上,其优点是速度快,不需要设备或模拟器的支持,但是无法直接运行含有android系统API引用的测试代码。 - module-name/src/androidTest/java/.
该目录下的测试代码需要运行在android设备或模拟器下面,因此可以使用android系统的API,速度较慢。

以上分别执行在JUnit和AndroidJUnitRunner的测试运行环境,两者主要的区别在于是否需要android系统API的依赖。
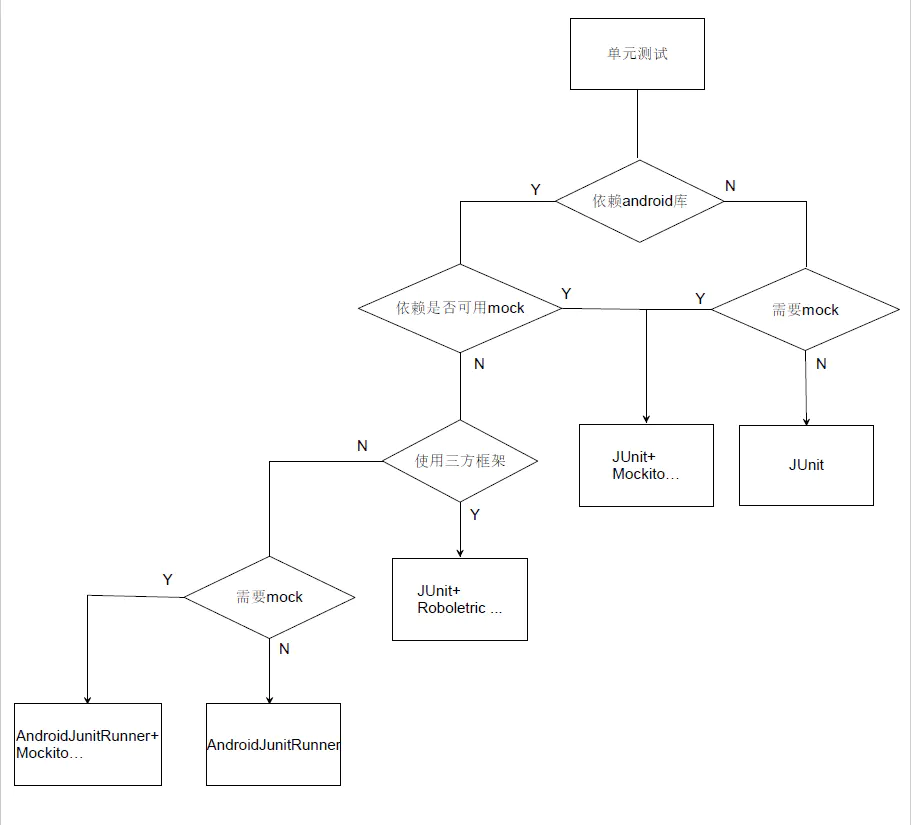
在实际开发过程中,我们应该尽量用JUnit实现本地JVM的单元测试,而项目中的代码大致可分为以下三类:
- 强依赖关系,如在Activity,Service等组件中的方法,其特点是大部分为private方法,并且与其生命周期相关,无法直接进行单元测试,可以进行Ecspreso等UI测试。
- 部分依赖,代码实现依赖注入,该类需要依赖Context等android对象的依赖,可以通过Mock或其它第三方框架实现JUnit单元测试或使用androidJunitRunner进行单元测试。
- 纯java代码,不存在对android库的依赖,可以进行JUnit单元测试
常用的测试框架
在android测试框架中,常用的有以下几个框架和工具类:
- JUnit4:Java最常用的单元测试框架
- AndroidJUnitRunner:适用于 Android 且与 JUnit 4 兼容的测试运行器
- Mockito:Mock测试框架
- Espresso:UI 测试框架;适合应用中的功能性 UI 测试
- UI Automator:UI 测试框架;适合跨系统和已安装应用的跨应用功能性 UI 测试
Junit4
JUnit4是一套基于注解的单元测试框架。在android studio中,编写在test目录下的测试类都是基于该框架实现,该目录下的测试代码运行在本地的JVM上,不需要设备(真机或模拟器)的支持。
JUnit4中常用的几个注解:
- @BeforeClass 测试类里所有用例运行之前,运行一次这个方法。方法必须是public static void
- @AfterClass 与BeforeClass对应
- @Before 在每个用测试例运行之前都运行一次。
- @After 与Before对应
- @Test 指定该方法为测试方法,方法必须是public void
- @RunWith 测试类名之前,用来确定这个类的测试运行器
对于其它的注解,可以通过查看junit4官网来进一步学习。
在test下添加测试类,对于需要进行测试的方法添加@Test注解,在该方法中使用assert进行判断,示例如下。
package com.selflearning.testdemo;

import org.junit.AfterClass;
import org.junit.BeforeClass;
import org.junit.Test;
import static org.junit.Assert.*;
public class SMSUtilTest {
    private static SMSUtil smsUtil;

    @BeforeClass
    public static void initSMSUtil() {
        smsUtil = new SMSUtil();
    }

    @Test
    public void testGetOTPFromSMS() {
        String otp = smsUtil.getOTPFromSMS("verification code:123456", 6);
        assertEquals("123456", otp);
    }

    @AfterClass public static void quitTest() {
        smsUtil = null;
    }
}
当需要传入多个参数进行条件覆盖时,可以使用@Parameters来进行单个方法的多次不同参数的测试,使用该方法需要如下步骤:
- 在测试类上添加@RunWith(Parameterized.class)注解。
- 添加构造方法,并将测试的参数作为其构造参数。
- 添加获取参数集合的static方法,并在该方法上添加@Parameters注解。
- 在需要测试的方法中直接使用成员变量,该变量由JUnit通过构造方法生成。
package com.selflearning.testdemo;

import org.junit.AfterClass;
import org.junit.BeforeClass;
import org.junit.Test;
import org.junit.runner.RunWith;
import org.junit.runners.Parameterized;

import java.util.Arrays;

import static org.junit.Assert.assertEquals;

@RunWith(Parameterized.class)//1.在测试类上添加@RunWith(Parameterized.class)注解。
public class SMSUtilWithParametersTest {
    private String sms;
    private String expectResult;
    private static SMSUtil smsUtil;

    //2.添加构造方法,并将测试的参数作为其构造参数
    public SMSUtilWithParametersTest(String sms, String expectResult) {
        this.sms = sms;
        this.expectResult = expectResult;
    }

    //3.添加获取参数集合的static方法,并在该方法上添加@Parameters注解
    @Parameterized.Parameters
    public static Iterable data() {
        return Arrays.asList(new Object[][] {
                { "test123456", "123456" },
                { "test111111haha", "111111" },
                { "verfication code is:122", null },
                { "verifcation code is:123456789, from myimy", null }});
    }

    @BeforeClass public static void initSMSUtil() {
        smsUtil = new SMSUtil();
    }

    @Test public void testGetOTPFromSMS() {
        //4.在需要测试的方法中直接使用成员变量,该变量由JUnit通过构造方法生成
        String otp = smsUtil.getOTPFromSMS(sms, 6);
        assertEquals(expectResult, otp);
    }

    @AfterClass public static void quitTest() {
        smsUtil = null;
    }
}
当然也可以通过注解的方式初始化变量,代码如下:
@RunWith(Parameterized.class)//1.在测试类上添加@RunWith(Parameterized.class)注解。
public class SMSUtilWithParametersTest {
    @Parameterized.Parameter(0)
    public String sms; //sms用data()中索引为0的数据初始化,注意变量访问控制权限必须为public
    @Parameterized.Parameter(1)
    public String expectResult;
    private static SMSUtil smsUtil;

    //3.添加获取参数集合的static方法,并在该方法上添加@Parameters注解
    @Parameterized.Parameters
    public static Iterable data() {
        return Arrays.asList(new Object[][] {
                { "test123456", "123456" },
                { "test111111haha", "111111" },
                { "verfication code is:122", null },
                { "verifcation code is:123456789, from myimy", null }});
    }

    @BeforeClass public static void initSMSUtil() {
        smsUtil = new SMSUtil();
    }

    @Test public void testGetOTPFromSMS() {
        //4.在需要测试的方法中直接使用成员变量,该变量由JUnit通过构造方法生成
        String otp = smsUtil.getOTPFromSMS(sms, 6);
        assertEquals(expectResult, otp);
    }

    @AfterClass public static void quitTest() {
        smsUtil = null;
    }
}
如果我们只想同时运行几个测试类,如某一类功能的测试代码,该如何办呢?没问题,JUnit提供了Suite注解,在对应的测试目录下创建一个空Test类,并该类上添加如下注解:
- @RunWith(Suite.class):配置Runner运行环境
- @Suite.SuiteClasses({A.class, B.class}):添加需要一起运行的测试类
示例如下:
package com.selflearning.testdemo;

import org.junit.runner.RunWith;
import org.junit.runners.Suite;

@RunWith(Suite.class)
@Suite.SuiteClasses({SMSUtilWithParametersTest.class, SMSUtilTest.class})
public class SuitTest {
}
AndroidJUnitRunner
在android开发中,方法中经常使用android系统api,比如Context,Parcelable,SharedPreferences等等。而在本地JVM中(JUnit4)无法调用这些接口,因此,我们就需要使用AndroidJUnitRunner来完成这些方法的测试。使用方法是在androidTest目录下创建测试类,在该类上添加@RunWith(AndroidJUnit4.class)注解。示例如下:
package com.selflearning.testdemo;

import android.content.Context;
import android.support.test.InstrumentationRegistry;
import android.support.test.runner.AndroidJUnit4;

import org.junit.Assert;
import org.junit.BeforeClass;
import org.junit.Test;
import org.junit.runner.RunWith;

@RunWith(AndroidJUnit4.class)
public class SMSUtilWithContextTest {

    private static Context context;
    private static SMSUtil smsUtil;

    @BeforeClass public static void setup(){
        context = InstrumentationRegistry.getContext();
        smsUtil = new SMSUtil();
    }

    @Test public void testHasSMSReceivePermission() {
        Assert.assertFalse(smsUtil.hasSMSReceivePermission(context));
    }
}
使用AndroidJUnitRunner最大的缺点在于无法在本地JVM运行,直接的结果就是测试速度慢,同时无法执行覆盖测试,因此在实际工作中很少使用到该种测试。因此出现了很多替代方案,比如在设计合理,依赖注入实现的代码,可以使用Mockito来进行本地测试。
Mockito
Mockito是一个Mock框架,也是Java中使用比较广泛的一个Mock框架。关于Mock的概念,其实很简单:所谓的mock就是创建一个类的虚假的对象,在测试环境中,用来替换掉真实的对象,以达到以下目的:
- 验证这个对象的某些方法的调用情况,调用了多少次,参数是什么等等
- 指定这个对象的某些方法的行为,返回特定的值,或者是执行特定的动作
- 可以在开发机上测试,而不用在Android模拟器或物理机上测试(At runtime, tests will be executed against a modified version of android.jar where all final modifiers have been stripped off.)
关于Mock的使用需要注意以下两点:
- Mockito最终mock出来的是一个类的对象,而类本身并不会改变。如下代码:
Context context;
private Context mockContext() {
    when(context.checkPermission(eq("android.permission.RECEIVE_SMS"), anyInt(), anyInt())).thenReturn(0);
    return context;
}
如果这里我们在mockContext()中直接返回一个new Context();在实际测试中依然会报错。
- mock出来的对象并不会自动替换掉正式代码里面的对象,你必须要有某种方式把mock对象应用到正式代码里面,如构造注入或setter注入。
Mockito的测试需要在build.gradle做如下修改:
dependencies {
  testCompile 'junit:junit:4.12'
  testCompile "org.mockito:mockito-core:1.9.5"
}
对于一些不想mock的类和方法,Mockito也提供了方法,官方文档是这样说的:
“Method … not mocked.”
The android.jar file that is used to run unit tests does not contain any actual code - that is provided by the Android system image on real devices. Instead, all methods throw exceptions (by default). This is to make sure your unit tests only test your code and do not depend on any particular behaviour of the Android platform (that you have not explicitly mocked e.g. using Mockito). If that proves problematic, you can add the snippet below to your build.gradle to change this behavior:
android {
  // ...
  testOptions {
    unitTests.returnDefaultValues = true
  }
}
We are aware that the default behavior is problematic when using classes like Log or TextUtils and will evaluate possible solutions in future releases.
如下是我个人写的完整的测试用例,由于在我们的代码中依赖Android的Context类,因此需要用Mockito mock一个Context类的对象。
package com.selflearning.testdemo;

import android.content.Context;

import static org.junit.Assert.*;
import org.junit.BeforeClass;
import org.junit.Test;
import org.junit.runner.RunWith;
import org.mockito.Mock;
import org.mockito.Mockito;
import org.mockito.runners.MockitoJUnitRunner;

import static org.mockito.Matchers.anyInt;
import static org.mockito.Mockito.when;
import static org.mockito.Matchers.eq;

@RunWith(MockitoJUnitRunner.class)
public class SMSUtilWithMockitTest {
    @Mock
    private static Context context;
    private static SMSUtil smsUtil;

    @BeforeClass
    public static void setup() {
        smsUtil = new SMSUtil();
    }

    @Test
    public void testHasSMSReceivePermission() {
        assertTrue(smsUtil.hasSMSReceivePermission(mockContext()));
    }

    private Context mockContext() {
        when(context.checkPermission(eq("android.permission.RECEIVE_SMS"), anyInt(), anyInt())).thenReturn(0);
        return context;
    }
}
Espresso
Espresso 测试框架提供了一组 API 来构建 UI 测试,用于测试应用中的用户流(要求 Android 2.2(API 级别 8)或更高版本)。利用这些 API,可以编写简洁、运行可靠的自动化 UI 测试。Espresso 非常适合编写白盒自动化测试,其中测试代码将利用所测试应用的实现代码。
Espresso 测试框架的主要功能包括:
- 灵活的 API,用于目标应用中的视图和适配器匹配。
- 一组丰富的操作 API,用于自动化 UI 交互。
- UI 线程同步,用于提升测试可靠性。
视图匹配
利用 Espresso.onView() 方法,您可以访问目标应用中的 UI 组件并与之交互。此方法接受 Matcher 参数并搜索视图层次结构,以找到符合给定条件的相应 View 实例。您可以通过指定以下条件来优化搜索:
- 视图的类名称
- 视图的内容描述
- 视图的 R.id
- 在视图中显示的文本
例如,要找到 ID 值为 my_button 的按钮,可以指定如下匹配器:
onView(withId(R.id.my_button));
如果搜索成功,onView() 方法将返回一个引用,让您可以执行用户操作并基于目标视图对断言进行测试。
适配器匹配
在 AdapterView 布局中,布局在运行时由子视图动态填充。如果目标视图位于某个布局内部,而该布局是从 AdapterView(例如 ListView 或 GridView)派生出的子类,则 onView() 方法可能无法工作,因为只有布局视图的子集会加载到当前视图层次结构中。因此,请使用 Espresso.onData() 方法访问目标视图元素。Espresso.onData() 方法将返回一个引用,让您可以执行用户操作并根据 AdapterView 中的元素对断言进行测试。
操作 API
通常情况下,可以通过根据应用的用户界面执行某些用户交互来测试应用。借助 ViewActions API,可以轻松地实现这些操作的自动化。您可以执行多种 UI 交互,例如:
- 视图点击
- 滑动
- 按下按键和按钮
- 键入文本
- 打开链接
例如,要模拟输入字符串值并按下按钮以提交该值,可以像下面一样编写自动化测试脚本。ViewInteraction.perform() 和 DataInteraction.perform() 方法采用一个或多个 ViewAction 参数,并以提供的顺序运行操作。
// Type text into an EditText view, then close the soft keyboard
onView(withId(R.id.editTextUserInput))
    .perform(typeText(STRING_TO_BE_TYPED), closeSoftKeyboard());

// Press the button to submit the text change
onView(withId(R.id.changeTextBt)).perform(click());
UI 线程同步
由于计时问题,Android 设备上的测试可能随机失败。此测试问题称为测试不稳定。在 Espresso 之前,解决方法是在测试中插入足够长的休眠或超时期或添加代码,以便重试失败的操作。Espresso 测试框架可以处理 Instrumentation 与 UI 线程之间的同步;这就消除了对之前的计时解决方法的需求,并确保测试操作与断言更可靠地运行。
注意
在Android5.0及以下,使用Espresso启动Activity时或都代码中使用到support包中的其他组件时都会报java.lang.NoClassDefFoundError错误,如下。
java.lang.NoClassDefFoundError: com.selflearning.testdemo.MainActivity
at com.selflearning.testdemo.MainActivityTest.(MainActivityTest.java:24)
......
原因是你的Activity继承了support包里的Activity,如android.support.v7.app.AppCompatActivity。
解决办法是在build.gradle里面加入:
configurations {
    androidTestCompile.exclude group: 'com.android.support', module: 'support-v4'
}
UI Automator
uiautomatorviewer 工具提供了一个方便的 GUI,可以扫描和分析 Android 设备上当前显示的 UI 组件。您可以使用此工具检查布局层次结构,并查看在设备前台显示的 UI 组件属性。利用此信息,您可以使用 UI Automator(例如,通过创建与特定可见属性匹配的 UI 选择器)创建控制更加精确的测试。
uiautomatorviewer 工具位于 /tools/ 目录中。
访问设备状态
UI Automator 测试框架提供了一个 UiDevice 类,用于在目标应用运行的设备上访问和执行操作。您可以调用其方法来访问设备属性,如当前屏幕方向或显示尺寸。UiDevice 类还可用于执行以下操作:
- 更改设备旋转
- 按 D-pad 按钮
- 按“返回”、“主屏幕”或“菜单”按钮
- 打开通知栏
- 对当前窗口进行屏幕截图
例如,要模拟按下“主屏幕”按钮,请调用 UiDevice.pressHome() 方法。
UI Automator API
利用 UI Automator API,可以编写稳健可靠的测试,而无需了解目标应用的实现详情,可以使用这些 API 在多个应用中捕获和操作 UI 组件:
- UiCollection:枚举容器的 UI 元素以便计算子元素个数,或者通过可见的文本或内容描述属性来指代子元素。
- UiObject:表示设备上可见的 UI 元素。
- UiScrollable:为在可滚动 UI 容器中搜索项目提供支持。
- UiSelector:表示在设备上查询一个或多个目标 UI 元素。
- Configurator:允许您设置运行 UI Automator 测试所需的关键参数。
示例
package com.selflearning.testdemo;

import android.content.Context;
import android.content.Intent;
import android.support.test.InstrumentationRegistry;
import android.support.test.filters.SdkSuppress;
import android.support.test.runner.AndroidJUnit4;
import android.support.test.uiautomator.By;
import android.support.test.uiautomator.UiDevice;
import android.support.test.uiautomator.UiObject;
import android.support.test.uiautomator.UiObjectNotFoundException;
import android.support.test.uiautomator.UiSelector;
import android.support.test.uiautomator.Until;
import android.widget.Button;

import static org.junit.Assert.*;

import org.junit.Before;
import org.junit.Test;
import org.junit.runner.RunWith;

@RunWith(AndroidJUnit4.class)
@SdkSuppress(minSdkVersion = 18)
public class MainActivityWithUIAutomatorTest {
    private static String APP_NAME = "com.selflearning.testdemo";
    private static final int LAUNCH_TIMEOUT = 5000;

    private UiDevice mUiDevice;

    @Before
    public void startApp() {
        // Initialize UiDevice instance
        mUiDevice = UiDevice.getInstance(InstrumentationRegistry.getInstrumentation());

        // Start from the home screen
        mUiDevice.pressHome();

        // Wait for launcher
        String launcherPkg = mUiDevice.getLauncherPackageName();
        assertNotNull(launcherPkg);
        mUiDevice.wait(Until.hasObject(By.pkg(launcherPkg).depth(0)), LAUNCH_TIMEOUT);

        // Launch the app
        Context context = InstrumentationRegistry.getContext();
        assertNotNull("context is null", context);
        Intent intent = context.getPackageManager().getLaunchIntentForPackage(APP_NAME);
        // Clear out any previous instances
        assertNotNull("intent is null", context);
        intent.addFlags(Intent.FLAG_ACTIVITY_CLEAR_TASK);
        context.startActivity(intent);

        // Wait for the app to appear
        mUiDevice.wait(Until.hasObject(By.pkg(APP_NAME).depth(0)),
                LAUNCH_TIMEOUT);
    }

    @Test
    public void clickButtonTest() throws InterruptedException {
        UiObject editText = mUiDevice.findObject(new UiSelector().resourceId("com.selflearning.testdemo:id/sample_text"));
        if (editText.exists()) {
            try {
                editText.setText("UI Automator");
            } catch (UiObjectNotFoundException e) {
                fail("not found edit text");
            }
        }

        // sleep to see setText result
        Thread.sleep(10000);

        UiObject btn = mUiDevice.findObject(new UiSelector().text("Content").className(Button.class));
        if (btn.exists()) {
            try {
                btn.click();
            } catch (UiObjectNotFoundException e) {
                fail("btn not found");
            }
        }
    }
}
build.gradle设置
Android 测试支持库的类位于 android.support.test 软件包中。要在 Gradle 项目中使用 Android 测试支持库,请在 build.gradle 文件中添加这些依赖关系:
dependencies {
    testImplementation 'junit:junit:4.12'
    testImplementation 'org.mockito:mockito-core:1.+'
    // Set this dependency to use JUnit 4 rules
    androidTestImplementation 'com.android.support.test:rules:0.3'
    androidTestImplementation 'com.android.support.test.espresso:espresso-contrib:2.2'
    androidTestImplementation "com.android.support:support-annotations:23.3.0"
    androidTestImplementation 'com.android.support.test:runner:1.0.2'
    // Set this dependency to build and run Espresso tests
    androidTestImplementation 'com.android.support.test.espresso:espresso-core:3.0.2'
    androidTestImplementation "org.hamcrest:hamcrest-library:1.3"
    // Set this dependency to build and run UI Automator tests
    androidTestImplementation 'com.android.support.test.uiautomator:uiautomator-v18:2.1.2'
}
要将 AndroidJUnitRunner 设置为 Gradle 项目中的默认测试仪器运行器,请在 build.gradle 文件中指定此依赖关系:
android {
    defaultConfig {
        testInstrumentationRunner "android.support.test.runner.AndroidJUnitRunner"
    }
}
参考
- Android测试支持库. https://developer.android.google.cn/topic/libraries/testing-support-library/#AndroidJUnitRunner
- https://www.jianshu.com/p/925191464389
- 测试应用。https://developer.android.com/studio/test/
- Unit tests with Mockito - Tutorial. http://www.vogella.com/tutorials/Mockito/article.html
- uiautomator-testing. https://developer.android.google.cn/training/testing/ui-testing/uiautomator-testing

