CAS4.0.3服务的搭建实战二【自定义登陆界面、登陆验证、返回用户信息】
一切技术框架都会有一个用户自定义的入口文件,cas中自定义配置文件在deployerConfigContext.xml中。
一、自定义登陆验证
- Tips:本项目使用mysql数据库,因此已经在pom中导入mysql的驱动。
打开deployerConfigContext.xml,找到如下代码:
    <bean id="authenticationManager" class="org.jasig.cas.authentication.PolicyBasedAuthenticationManager">
        <constructor-arg>
            <map>

                <entry key-ref="proxyAuthenticationHandler" value-ref="proxyPrincipalResolver" />
                <entry key-ref="primaryAuthenticationHandler" value-ref="primaryPrincipalResolver" />
            map>
        constructor-arg>
其中primaryAuthenticationHandler为自定义登陆验证,primaryPrincipalResolver为定义的返回属性。
找到primaryAuthenticationHandler的定义位置,发现账号密码:casuser/Mellon是写死在里面的:
    <bean id="primaryAuthenticationHandler"
          class="org.jasig.cas.authentication.AcceptUsersAuthenticationHandler">
        <property name="users">
            <map>
                <entry key="casuser" value="Mellon"/>
            map>
        property>
    bean>
进入AcceptUsersAuthenticationHandler这个类,发现只需要继承改抽象类实现抽象方法authenticateUsernamePasswordInternal即可,如图:
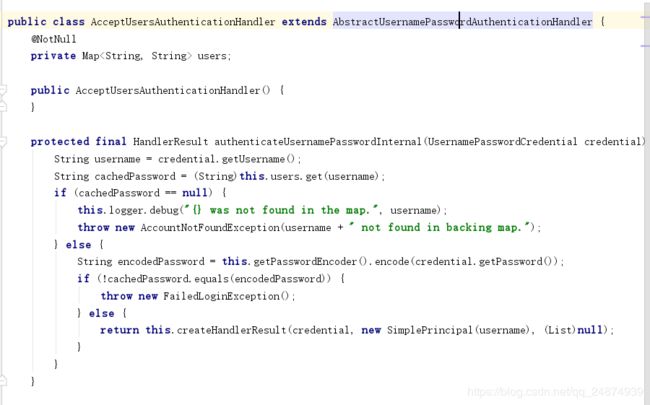
创建自己的UsersAuthenticationHandler类,实现抽象方法:
protected HandlerResult authenticateUsernamePasswordInternal(UsernamePasswordCredential credential) throws GeneralSecurityException, PreventedException {
        String username=credential.getUsername();
        String password=credential.getPassword();

        System.out.println("username=["+username+"]  password=["+password+"]");
        //自定义jdbc验证
        DriverManagerDataSource dataSource=new DriverManagerDataSource();
        dataSource.setDriverClassName("com.mysql.jdbc.Driver");
        dataSource.setUrl("jdbc:mysql://localhost:3306/sso_user?useUnicode=true&characterEncoding=UTF-8&autoReconnect=true&useSSL=false&serverTimezone=UTC");
        dataSource.setUsername("root");
        dataSource.setPassword("123456");
        JdbcTemplate jdbcTemplate = new JdbcTemplate();
        jdbcTemplate.setDataSource(dataSource);

        String sql="SELECT * FROM user WHERE username = ?";
        System.out.println(sql);
        User info = (User) jdbcTemplate.queryForObject(sql, new Object[]{username}, new BeanPropertyRowMapper(User.class));
        System.out.println("database username : "+ info.getUsername());
        System.out.println("database password : "+ info.getPassword());
        if (info==null){
            throw new AccountException("用户不存在");
        }else {
            System.out.println(info);
        }

        if (!info.getPassword().equals(password)){

            System.out.println("dateSourcePassword=["+info.getPassword()+"]");
            throw  new FailedLoginException("密码错误");
        }else{
               return  createHandlerResult(credential,new SimplePrincipal(username),null);
        }
    }
最后将该bean注入在deployerConfigContext.xml中,并注释掉原来的proxyPrincipalResolver:
    <bean id="proxyPrincipalResolver"
          class="org.jasig.cas.authentication.principal.BasicPrincipalResolver" />
当然这是最原始的方式,你也可以在spring-configuration/applicationContext.xml配置包扫描package-scan,以注解形式注入自定义的bean,或者数据源等等。
打开web.xml,可以看到:
满足上述要求的配置文件都会被spring加载进去
查询AbstractUsernamePasswordAuthenticationHandler的子类发现有很多类可以继承,如图:
推荐去继承第一个AbstractJdbcUsernamePasswordAuthenticationHandler,初始化时候将对应数据源注入进来即可。
二、自定义返回用户信息
在deployerConfigContext.xml找到primaryPrincipalResolver这个bean的定义:
<bean id="primaryPrincipalResolver"
          class="org.jasig.cas.authentication.principal.PersonDirectoryPrincipalResolver" >
        <property name="attributeRepository" ref="attributeRepository" />
    bean>


    <bean id="attributeRepository" class="org.jasig.services.persondir.support.StubPersonAttributeDao"
            p:backingMap-ref="attrRepoBackingMap" />

    <util:map id="attrRepoBackingMap">
        <entry key="uid" value="uid" />
        <entry key="eduPersonAffiliation" value="eduPersonAffiliation" />
        <entry key="groupMembership" value="groupMembership" />
    util:map>
其中attributeRepository用来返回用户私有信息的bean,同样的进入该类:
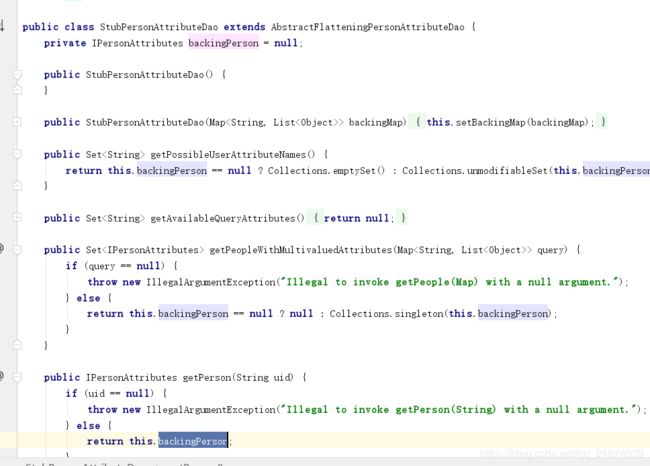
通过debug模式可以发现是通过getPerson方法返回的用户私有信息。因此可以通过创建自己的类去继承StubPersonAttributeDao重写getPerson方法,来返回自定义用户信息的目的:
public class UserStubPersonAttributeDao extends StubPersonAttributeDao {
    @Override
    public IPersonAttributes getPerson(String uid) {
        Map<String, List<Object>> attributes=new HashMap<String, List<Object>>();
        attributes.put("userId", Collections.singletonList((Object) uid));
        attributes.put("ServerTime", Collections.singletonList((Object) new Date()));
        attributes.put("defuatName", Collections.singletonList((Object) "siwash"));
        return new AttributeNamedPersonImpl(attributes);
    }
}
同时注释掉deployerConfigContext.xml中原来的attributeRepositoryben,替换为自定义的bean:
<bean id="attributeRepository" class="rpf.authentication.UserStubPersonAttributeDao"/>
最后进入:WEB-INF/view/jsp/protocol/2.0/casServiceValidationSuccess.jsp,做如下修改:
<cas:serviceResponse xmlns:cas='http://www.yale.edu/tp/cas'>
	<cas:authenticationSuccess>
		<cas:user>${fn:escapeXml(assertion.primaryAuthentication.principal.id)}cas:user>
        <c:if test="${not empty pgtIou}">
        		<cas:proxyGrantingTicket>${pgtIou}cas:proxyGrantingTicket>
        c:if>
        <c:if test="${fn:length(assertion.chainedAuthentications) > 1}">
		  <cas:proxies>
            <c:forEach var="proxy" items="${assertion.chainedAuthentications}" varStatus="loopStatus" begin="0" end="${fn:length(assertion.chainedAuthentications)-2}" step="1">
			     <cas:proxy>${fn:escapeXml(proxy.principal.id)}cas:proxy>
            c:forEach>
		  cas:proxies>
        c:if>

		<c:if test="${fn:length(assertion.chainedAuthentications[fn:length(assertion.chainedAuthentications)-1].principal.attributes) > 0}">
			<cas:attributes>
				<c:forEach var="attr" items="${assertion.chainedAuthentications[fn:length(assertion.chainedAuthentications)-1].principal.attributes}">
					${fn:escapeXml(attr.value)}
				c:forEach>
			cas:attributes>
		c:if>
	cas:authenticationSuccess>
cas:serviceResponse>
说明:
- 2.0文件夹代表validation后,返回的报文协议用的是protocol 2.0。
- 添加部分只是让默认只显示用户id变为显示用户所有信息。
cas简易客户端下载地址:https://github.com/cas-projects/cas-sample-java-webapp
客户端配置
将下载的cas-sample-java-webapp导入idea,打开webapp下的web.xml:
<web-app version="2.4" xmlns="http://java.sun.com/xml/ns/j2ee" xmlns:xsi="http://www.w3.org/2001/XMLSchema-instance"
         xsi:schemaLocation="http://java.sun.com/xml/ns/j2ee http://java.sun.com/xml/ns/j2ee/web-app_2_4.xsd">


    <filter>
        <filter-name>CAS Single Sign Out Filterfilter-name>
        <filter-class>org.jasig.cas.client.session.SingleSignOutFilterfilter-class>
        <init-param>
            <param-name>casServerUrlPrefixparam-name>
            <param-value>https://sso.siwash.net:8443/siwash-authparam-value>
        init-param>
    filter>

    <listener>
        <listener-class>org.jasig.cas.client.session.SingleSignOutHttpSessionListenerlistener-class>
    listener>

    <filter>
        <filter-name>CAS Authentication Filterfilter-name>

        <filter-class>org.jasig.cas.client.authentication.AuthenticationFilterfilter-class>
        <init-param>
            <param-name>casServerLoginUrlparam-name>
            <param-value>https://sso.siwash.net:8443/siwash-authparam-value>
        init-param>
        <init-param>
            <param-name>serverNameparam-name>
            <param-value>http://client.siwash.net:8082param-value>
        init-param>
    filter>

    <filter>
        <filter-name>CAS Validation Filterfilter-name>

        <filter-class>org.jasig.cas.client.validation.Cas20ProxyReceivingTicketValidationFilterfilter-class>
        <init-param>
            <param-name>casServerUrlPrefixparam-name>
            <param-value>https://sso.siwash.net:8443/siwash-authparam-value>
        init-param>
        <init-param>
            <param-name>serverNameparam-name>
            <param-value>http://client.siwash.net:8082param-value>
        init-param>

    filter>

    <filter>
        <filter-name>CAS HttpServletRequest Wrapper Filterfilter-name>
        <filter-class>org.jasig.cas.client.util.HttpServletRequestWrapperFilterfilter-class>
    filter>

    <filter-mapping>
        <filter-name>CAS Single Sign Out Filterfilter-name>
        <url-pattern>/*url-pattern>
    filter-mapping>

    <filter-mapping>
        <filter-name>CAS Validation Filterfilter-name>
        <url-pattern>/*url-pattern>
    filter-mapping>

    <filter-mapping>
        <filter-name>CAS Authentication Filterfilter-name>
        <url-pattern>/*url-pattern>
    filter-mapping>

    <filter-mapping>
        <filter-name>CAS HttpServletRequest Wrapper Filterfilter-name>
        <url-pattern>/*url-pattern>
    filter-mapping>

    <welcome-file-list>
        <welcome-file>
            index.jsp
        welcome-file>
    welcome-file-list>
web-app>
修改地方:
- CAS Single Sign Out Filter【单点登出filter】:用户退出cas的filter,需要将
casServerUrlPrefix的value修改为cas服务端的地址。 - CAS Authentication Filter【单点登陆filter】:用户登陆认证到cas的filter,需要将
casServerUrlPrefix设置为cas服务端启动地址,serverName设置为cas客户端的启动地址。 - CAS Validation Filter【校验filter】:用户登陆成功或者已经登陆后会在浏览器cookie中保存一个ticket,客户端首先会向cas服务中心发送一个类似的请求:
https://sso.siwash.net:8443/cas/serviceValidate?ticket=xxxx&service=客户端地址
cas认证后发现无效或客户端读取不到ticket则会被重定向到登陆界面进行登陆。因此这部分也需要同CAS Authentication Filter置为cas服务端启动地址,serverName设置为cas客户端的启动地址。
同时根据该filter指定的类名:
我为什么说是报文协议?
首先进入Cas20ProxyReceivingTicketValidationFilter中找到doFilter方法,定位到如下代码:

打上断点运行后,进入validate方法,运行到如下位置:

将serverResponse的值copy出来,格式化一下就是:
<cas:serviceResponse xmlns:cas='http://www.yale.edu/tp/cas'>
	<cas:authenticationSuccess>
		<cas:user>mrfoxcas:user>
			<cas:attributes>
					<cas:defuatName>siwashcas:defuatName>
					<cas:ServerTime>Fri Nov 23 16:47:22 CST 2018cas:ServerTime>
					<cas:userId>mrfoxcas:userId>
			cas:attributes>
	cas:authenticationSuccess>
cas:serviceResponse>
结合前面casServiceValidationSuccess.jsp中的修改来看,确实是利用jsp的语法生成xml节点作为返回数据的报文。
成功登陆后,客户端获取到的用户属性,也就是在UserStubPersonAttributeDao 中设置的返回值:

对应到代码中:

三、自定义登陆界面
自定义登陆界面有两种方式:
- 替换默认的页面
- 创建主题目录
方式一直接修改默认webapp\WEB-INF\view\jsp\default下的casLoginView.jsp文件
方式二稍微麻烦点:首先打开WEB-INF下的cas.properties,修改cas.viewResolver.basename为自己的主题视图
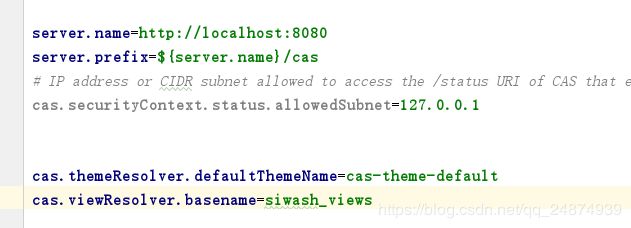
在resources下复制一份default_views.properties改名为自己的主题.properties:

然后进入WEB-INF下的view/jsp/default,将default文件拷贝一份,并取个好听的名字如下:
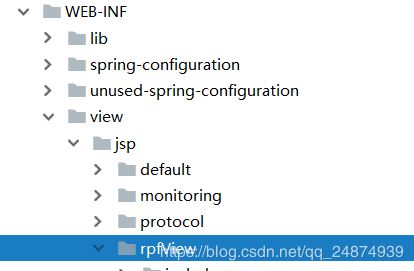
接下来,进入刚才创建的主题配置文件,将所有的jsp路径,改成你自己的:

最后再到自己的主题view下修改一个叫casLoginView.jsp的文件,你也可以在自己的主题配置文件中把casLoginView.url修改成你自己的:
    casLoginView.(class)=org.springframework.web.servlet.view.JstlView
    casLoginView.url=/WEB-INF/view/jsp/rpfView/login.jsp
具体修改内容如下:
<div class="container">
		<div class="row">
			<div class="col-md-offset-3 col-md-6">
				<form:form method="post"  cssClass="form-horizontal" id="fm1" commandName="${commandName}" htmlEscape="true">
				<%--<form class="form-horizontal" action="/login" method="post">--%>
					<span class="heading">用户登录span>
					<div class="form-group">
						<input type="text" name="username" class="form-control" id="inputEmail3"
							   placeholder="用户名或电子邮件"> <i class="fa fa-user">i>
					div>
					<div class="form-group help">
						<input type="password" name="password" class="form-control" id="inputPassword3"
							   placeholder="密 码"> <i class="fa fa-lock">i> <a href="#"
																				class="fa fa-question-circle">a>
					div>
					<div class="form-group">
						<div class="main-checkbox">
							<input type="checkbox" value="None" id="checkbox1" name="check" />
							<label for="checkbox1">label>
						div>
						<span class="text">Remember mespan>
						<input type="hidden" name="lt" value="${loginTicket}" />
						<input type="hidden" name="execution" value="${flowExecutionKey}" />
						<input type="hidden" name="_eventId" value="submit" />
						<button type="submit" class="btn btn-default">登录button>
					div>
				<%--form>--%>
				form:form>
			div>
		div>
	div>
说明:
- 由于使用了springmvc的表单做了对象的绑定,因此form最好用他原来的,form里面的内容可以任意修改。
- 必须加入三个隐藏的input框,里面保存了一些attribute,认证时会用到,否则会报错。
修改好之后登陆界面,就变成你自己定义的样子了:
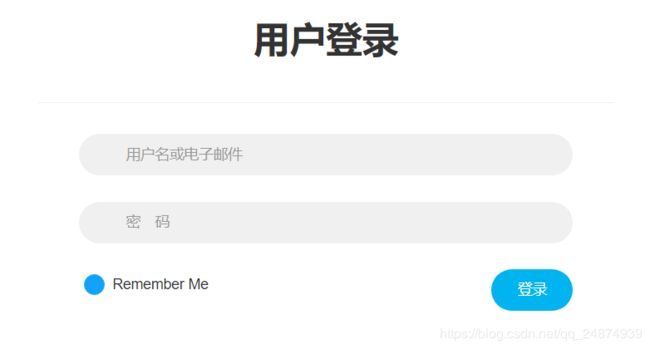
四、开启http认证
1.修改WEB-INF/spring-configuration/ticketGrantingTicketCookieGenerator.xml

2.修改WEB-INF/spring-configuration/warnCookieGenerator.xml

3.修改WEB-INF/deployerConfigContext.xml

至此使用http+8080端口即可做cas认证
五、去除浏览器的安全警告
当使用https协议认证的时候,由于浏览器不信任证书,所以会一直弹出安全警告提示:
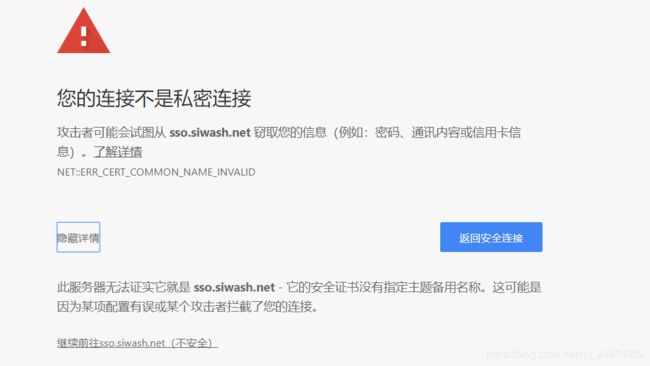
忍受不了的可以给浏览器安装前面生成数字证书:
1.打开浏览器设置,找到证书选择导入证书


