我所了解的Recyclerview绘制流程
前言
本文会结合思维导图+源码分析的形式去介绍Recyclerview的绘制流程.。
如果写有什么不对的请大牛指出,十分感谢!
版本
com.android.support:recyclerview-v7:27.1.0
原本选择的是28.0.0版本的,无奈这个版本没有注释,看的脑阔疼,所以最后选择27.1.0
主线介绍
- 红色:代表主线:recyclerview绘制流程中相比较核心的方法
- 主线方法标题都会有红色
- 讲解选择的是LayoutManager的子类:LinearLayoutManager
建议在浏览器中装个可以自动生成目录的插件,这样看起来就不会乱。如图:

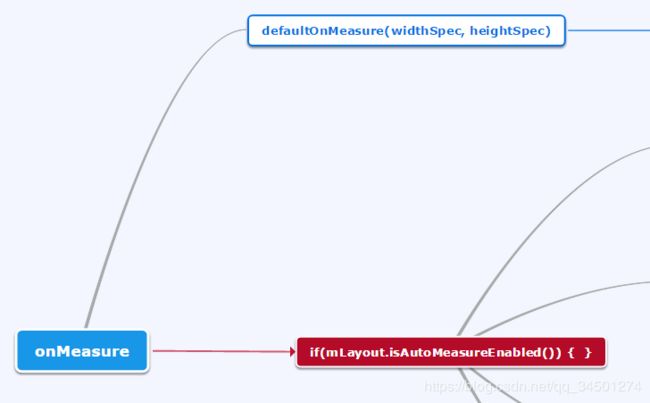
onMeasure源码查看思维导图
本文会按照下图思维导图逐次进行分析Recyclerview的绘制流程,建议看官先过下思维导图,有个印象。
 @Override
    protected void onMeasure(int widthSpec, int heightSpec) {
        if (mLayout == null) {
        // 第一种情况:LayoutManager对象为空,RecyclerView不能显示任何的数据。
            defaultOnMeasure(widthSpec, heightSpec);
            return;
        }
        if (mLayout.isAutoMeasureEnabled()) { //第二种情况:LayoutManager对象为空,RecyclerView不能显示任何的数据。
            final int widthMode = MeasureSpec.getMode(widthSpec);
            final int heightMode = MeasureSpec.getMode(heightSpec);
			// 省略N行代码...........
            final boolean measureSpecModeIsExactly =
                    widthMode == MeasureSpec.EXACTLY && heightMode == MeasureSpec.EXACTLY;
            if (measureSpecModeIsExactly || mAdapter == null) {
                return;
            }

            if (mState.mLayoutStep == State.STEP_START) {
                dispatchLayoutStep1();
            }
          // 省略N行代码...........
            dispatchLayoutStep2();
          // 省略N行代码...........

            // if RecyclerView has non-exact width and height and if there is at least one child
            // which also has non-exact width & height, we have to re-measure.
            // 如果rclerview没有精确的宽度和高度,并且至少有一个子View
            // 子View也没有精确的宽度和高度,我们必须重新测量。
            if (mLayout.shouldMeasureTwice()) {
               // 省略N行代码...........
                dispatchLayoutStep2();
               // 省略N行代码...........
            }
        } else {
       // 第三种情况:LayoutManager没有开启自动测量的情况
           // 省略N行代码...........
        }
    }
根据源码onMeasure可分为三种情况:
- LayoutManager对象为空,RecyclerView不能显示任何的数据。
- LayoutManager开启了自动测量时,在这种情况下,有可能会测量两次。
- LayoutManager没有开启自动测量的情况,这种情况比较少,因为为了RecyclerView支持warp_content属性,系统提供的LayoutManager都开启自动测量的
这里简单介绍下第三种情况,后面不做详细分析:
//第三种情况的源码:
else {
            if (mHasFixedSize) {
                mLayout.onMeasure(mRecycler, mState, widthSpec, heightSpec);
                return;
            }
            // 省略N行代码。。。。
            mLayout.onMeasure(mRecycler, mState, widthSpec, heightSpec);
             // 省略N行代码。。。。
        }
如果mHasFixedSize为true,直接调用LayoutManager的onMeasure方法进行测量,并返回return结束onMeasure
//mHasFixedSize为true 是通过调用此方法进行设置的
   public void setHasFixedSize(boolean hasFixedSize) {
        mHasFixedSize = hasFixedSize;
    }
如果为false,发现最后还是调用LayoutManager的onMeasure方法进行测量。
onMeasure
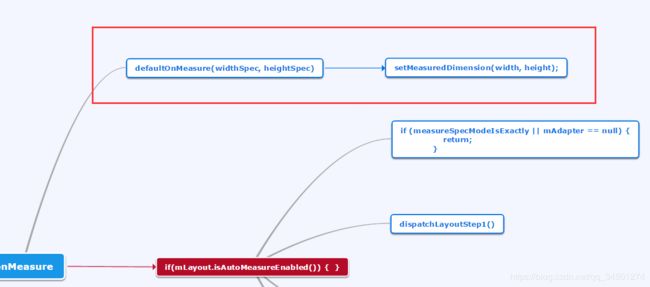
defaultOnMeasure(widthSpec, heightSpec);
// 源码:
  if (mLayout == null) {
            defaultOnMeasure(widthSpec, heightSpec);
            return;
        }
如果Recyclerview没有调用 setLayoutManager();进行设置 LayoutManager,默认执行 defaultOnMeasure(widthSpec, heightSpec);这个方法,后面直接调用 return结束onMeasure方法的执行。
我们看下 defaultOnMeasure,做了什么:
 /**
     * An implementation of {@link View#onMeasure(int, int)} to fall back to in various scenarios
     * where this RecyclerView is otherwise lacking better information.
     */
    void defaultOnMeasure(int widthSpec, int heightSpec) {
        // calling LayoutManager here is not pretty but that API is already public and it is better
        // than creating another method since this is internal.
        final int width = LayoutManager.chooseSize(widthSpec,
                getPaddingLeft() + getPaddingRight(),
                ViewCompat.getMinimumWidth(this));
        final int height = LayoutManager.chooseSize(heightSpec,
                getPaddingTop() + getPaddingBottom(),
                ViewCompat.getMinimumHeight(this));

        // 这里直接进行设置宽高了
        setMeasuredDimension(width, height);
    }
发现内部直接调用 setMeasuredDimension()进行宽高设置了,没用进行子view的测量,所以界面是空白的。
主线:if (mLayout.isAutoMeasureEnabled()) { }
 public boolean isAutoMeasureEnabled() {
            return mAutoMeasure;
        }

 //27.1.0版本中此方法已经废弃
@Deprecated
public void setAutoMeasureEnabled(boolean enabled) {
       mAutoMeasure = enabled;
}

//LayoutManager子类LinearLayoutManager中有此方法:
 @Override
 public boolean isAutoMeasureEnabled() {
        return true;
    }
源码中可以看到, isAutoMeasureEnabled()是直接默认返回 true的
提醒:
mLayout.isAutoMeasureEnabled(),因为Recyclerview中mLayout声明的是 LayoutManager mLayout;
所以点击进去看到的是Recyclerview中的:
      public boolean isAutoMeasureEnabled() {
            return mAutoMeasure;
        }

因为
 //27.1.0版本中此方法已经废弃
@Deprecated
public void setAutoMeasureEnabled(boolean enabled) {
       mAutoMeasure = enabled;
}


所以查看时要去LayoutManager子类LinearLayoutManager中查看:
//LayoutManager子类LinearLayoutManager中有此方法:
 @Override
 public boolean isAutoMeasureEnabled() {
        return true;
    }
if (measureSpecModeIsExactly || mAdapter == null) { return; }
   final boolean measureSpecModeIsExactly = widthMode == MeasureSpec.EXACTLY && heightMode == MeasureSpec.EXACTLY;
           // 如果测量是绝对值,则跳过measure过程直接走layout
            if (measureSpecModeIsExactly || mAdapter == null) {
                return;
            }
如果宽和高的测量值是绝对值时,直接调用 return 跳过onMeasure 方法。
Measure 的三种模式:
        /**
         * Measure specification mode: The child can be as large as it wants up
         * to the specified size.
         * 父控件为子元素指定最大参考尺寸,希望子View的尺寸不要超过这个尺寸
         */
        public static final int AT_MOST     = 2 << MODE_SHIFT;
         /**
         * Measure specification mode: The parent has not imposed any constraint
         * on the child. It can be whatever size it wants.
         * 父控件对子控件不加任何束缚,子元素可以得到任意想要的大小
         */
        public static final int UNSPECIFIED = 0 << MODE_SHIFT;

        /**
         * Measure specification mode: The parent has determined an exact size
         * for the child. The child is going to be given those bounds regardless
         * of how big it wants to be.
         * 父控件为子View指定确切大小,希望子View完全按照自己给定尺寸来处理
         */
        public static final int EXACTLY     = 1 << MODE_SHIFT;
dispatchLayoutStep1();
 //mLayoutStep默认值是 State.STEP_START
    if (mState.mLayoutStep == State.STEP_START) {
                dispatchLayoutStep1();
            }

// RecyclerView.State:
 @LayoutState
 int mLayoutStep = STEP_START;
源码中可以看出: mLayoutStep 的默认值为 State.STEP_START (State为RecyclerView的静态内部类)
 /**
     * The first step of a layout where we;
     * - process adapter updates
     * - decide which animation should run
     * - save information about current views
     * - If necessary, run predictive layout and save its information
     * 布局的第一步;
     * -进程适配器更新
     * -决定应该运行哪个动画
     * -保存有关当前视图的信息
     * -如有必要,运行预测布局并保存其信息
     */
    private void dispatchLayoutStep1() {
    // 省略N多行代码........
     mState.mLayoutStep = State.STEP_LAYOUT;
    }
dispatchLayoutStep1 的作用官方注释已经很清楚了。
执行完 dispatchLayoutStep1 后, mLayoutStep 的值设为 State.STEP_LAYOUT
那这个标识到底是做什么用的呢?
- State.STEP_START
 mState.mLayoutStep的默认值,还未执行到dispatchLayoutStep1  ,
 执行dispatchLayoutStep1  后 会设置为 State.STEP_LAYOUT
- State.STEP_LAYOUT
 mState.mLayoutStep = State.STEP_LAYOUT时,表示当前处于layout阶段,
 这个阶段会调用dispatchLayoutStep2方法(调用 onLayoutChildren())。
 调用dispatchLayoutStep2方法之后,此时mState.mLayoutStep变为了State.STEP_ANIMATIONS。
- State.STEP_ANIMATIONS
 mState.mLayoutStep = State.STEP_LAYOUT,此时处于第三阶段调用动画阶段,会调用dispatchLayoutStep3();
 dispatchLayoutStep3();执行完, mState.mLayoutStep会恢复默认值State.STEP_START
主线:dispatchLayoutStep2()
 /**
     * The second layout step where we do the actual layout of the views for the final state.
     * This step might be run multiple times if necessary (e.g. measure).
     * 布局的第二步,我们为最终状态实际布局视图。
      *如有需要,此步骤可能会执行多次(例如测量)
     */
    private void dispatchLayoutStep2() {
     // 省略N行代码...........
     // 平时写adaptre时,重写的getItemCount方法这里用到了
      mState.mItemCount = mAdapter.getItemCount();
      // 省略N行代码...........
        // Step 2: Run layout 开始布局
        mState.mInPreLayout = false;
        // 点进去我们会发现LayoutManager实现的是一个空方法
        mLayout.onLayoutChildren(mRecycler, mState);

     // 省略N行代码...........

      // 更改mLayoutStep 的值
        mState.mLayoutStep = State.STEP_ANIMATIONS;
      // 省略N行代码...........
    }
源码可以看出dispatchLayoutStep2主要做了那些操作:
1. 平时写adaptre时,重写的getItemCount方法这里用到了
2. mLayout.onLayoutChildren:View的绘制交给LayoutManager进行绘制
3. 修改mLayoutStep 的状态 值
4. LayoutManager实现onLayoutChildren是一个空方法,这里需要子类去实现。
这样该怎么布局完全由子类去实现控制,这样就体现了Recycleview的灵活性。
继续往下看:onLayoutChildren
主线:onLayoutChildren()
    @Override
    public void onLayoutChildren(RecyclerView.Recycler recycler, RecyclerView.State state) {
        // layout algorithm:
        // 1) by checking children and other variables, find an anchor coordinate and an anchor item position.
        // 2) fill towards start, stacking from bottom
        // 3) fill towards end, stacking from top
        // 4) scroll to fulfill requirements like stack from bottom.create layout state
        //布局算法规则:
       // 1)通过检查子变量和其他变量,找到一个锚坐标和一个锚物品的位置。
       // 2)开始填充,从底部开始堆叠
       // 3)向底填充,从上往下堆叠
       // 4)从底部滚动以满足堆栈等需求。创建布局状态

       //省略N行代码.............
        // resolve layout direction 解决布局方向
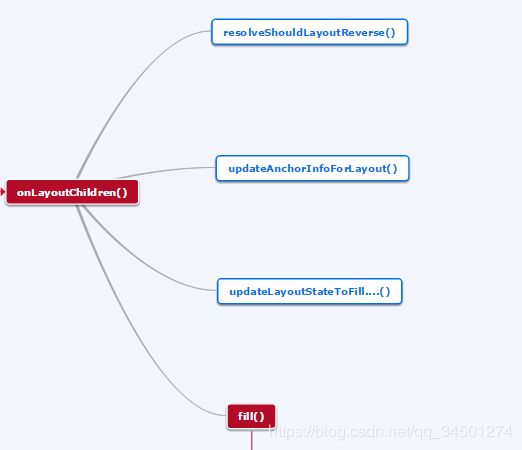
        resolveShouldLayoutReverse();

         final View focused = getFocusedChild();
        if (!mAnchorInfo.mValid || mPendingScrollPosition != NO_POSITION
                || mPendingSavedState != null) {
            mAnchorInfo.reset();
            mAnchorInfo.mLayoutFromEnd = mShouldReverseLayout ^ mStackFromEnd;
            // calculate anchor position and coordinate  计算锚点位置和坐标
            updateAnchorInfoForLayout(recycler, state, mAnchorInfo);
            mAnchorInfo.mValid = true;
        }
        if (mAnchorInfo.mLayoutFromEnd) {
         //省略N行代码............
          fill(recycler, mLayoutState, state, false);
          //省略N行代码............
          fill(recycler, mLayoutState, state, false);
        //省略N行代码............
           } else {
          //省略N行代码............
           fill(recycler, mLayoutState, state, false);
           //省略N行代码............
          fill(recycler, mLayoutState, state, false);
           //省略N行代码............

           }
        }
resolveShouldLayoutReverse: 解决布局方向(从方法名来理解是否需要倒着绘制)
updateAnchorInfoForLayout(recycler, state, mAnchorInfo); 计算锚点位置和坐标
//AnchorInfo:重用变量,以保存重新布局的锚信息。为LLM在布局时的参考点提供锚点位置和坐标
if (!mAnchorInfo.mValid || mPendingScrollPosition != NO_POSITION
                || mPendingSavedState != null) {
            mAnchorInfo.reset();
            mAnchorInfo.mLayoutFromEnd = mShouldReverseLayout ^ mStackFromEnd;
            // calculate anchor position and coordinate  计算锚点位置和坐标
            updateAnchorInfoForLayout(recycler, state, mAnchorInfo);
            //置为true
            mAnchorInfo.mValid = true;
        }
//AnchorInfo 的构造方法中调用了:
   AnchorInfo() {
            reset();
        }

   void reset() {
       mPosition = NO_POSITION;
       mCoordinate = INVALID_OFFSET;
       mLayoutFromEnd = false;
       mValid = false;
     }
 // 所以mValid 的默认值得是false
 // 执行完后updateAnchorInfoForLayout后,置为true
updateLayoutStateToFill…()
同步当前方向上锚点的相关的状态信息。
主线:调用fill()进行Children的填充
void layoutChunk(RecyclerView.Recycler recycler, RecyclerView.State state,
            LayoutState layoutState, LayoutChunkResult result) {
            // 获取View
        View view = layoutState.next(recycler);
       //省略N行代码......
        LayoutParams params = (LayoutParams) view.getLayoutParams();
        if (layoutState.mScrapList == null) {
            if (mShouldReverseLayout == (layoutState.mLayoutDirection
                    == LayoutState.LAYOUT_START)) {
                addView(view);
            } else {
                addView(view, 0);
            }
        } else {
            if (mShouldReverseLayout == (layoutState.mLayoutDirection
                    == LayoutState.LAYOUT_START)) {
                addDisappearingView(view);
            } else {
                addDisappearingView(view, 0);
            }
        }
        // 测量view
        measureChildWithMargins(view, 0, 0);
              //省略N行代码......

    }
layoutChunk()主要体现体现的功能:
1. 调用layoutState.next(recycler)获取View
2. addView
3. measureChildWithMargins进行子View测量
主线:layoutState.next(recycler)
 View next(RecyclerView.Recycler recycler) {
            if (mScrapList != null) {
                return nextViewFromScrapList();
            }
            // 根据当前pos 获取View
            final View view = recycler.getViewForPosition(mCurrentPosition);
            mCurrentPosition += mItemDirection;
            return view;
        }
主线:measureChildWithMargins();
public void measureChildWithMargins(View child, int widthUsed, int heightUsed) {
           //省略N行代码......
            if (shouldMeasureChild(child, widthSpec, heightSpec, lp)) {
            // 进行子view的测量
                child.measure(widthSpec, heightSpec);
            }
        }
到这里dispatchLayoutStep2()的一条主线已经分析完毕
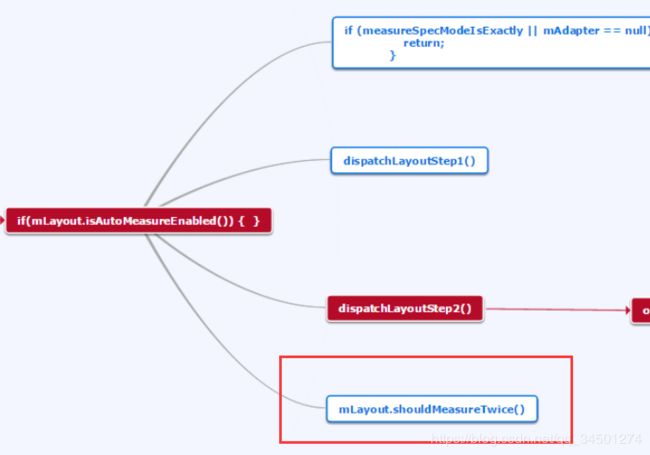
mLayout.shouldMeasureTwice()
 // if RecyclerView has non-exact width and height and if there is at least one child
 // which also has non-exact width & height, we have to re-measure.
 // 如果rclerview没有精确的宽度和高度,并且至少有一个子View
 // 子View也没有精确的宽度和高度,我们必须重新测量。
            if (mLayout.shouldMeasureTwice()) {//会绘制两次
                mLayout.setMeasureSpecs(
                        MeasureSpec.makeMeasureSpec(getMeasuredWidth(), MeasureSpec.EXACTLY),
                        MeasureSpec.makeMeasureSpec(getMeasuredHeight(), MeasureSpec.EXACTLY));
                mState.mIsMeasuring = true;
                dispatchLayoutStep2();
                // now we can get the width and height from the children.
                //现在我们可以从子元素中得到宽度和高度
                mLayout.setMeasuredDimensionFromChildren(widthSpec, heightSpec);
            }
到这里onMeasure的分析就结束了。
注: 以上分析是按照思维导图的顺序依次进行分析的,请结合思维导图进行浏览。
onLayout
    @Override
    protected void onLayout(boolean changed, int l, int t, int r, int b) {
       //省略N行代碼.......
        dispatchLayout();
      //省略N行代碼.......
    }
dispatchLayout();
 void dispatchLayout() {
     //省略N行代碼.......
        mState.mIsMeasuring = false;
        if (mState.mLayoutStep == State.STEP_START) {
        // 这里可以看到当onMeasure没有执行时,因为mLayoutStep 的默认值是State.STEP_START,
        //这里依然会执行dispatchLayoutStep1(),
        //执行完dispatchLayoutStep1(),会继续执行dispatchLayoutStep2();
            dispatchLayoutStep1();
            mLayout.setExactMeasureSpecsFrom(this);
            dispatchLayoutStep2();
        } else if (mAdapterHelper.hasUpdates() || mLayout.getWidth() != getWidth()
                || mLayout.getHeight() != getHeight()) {
            // First 2 steps are done in onMeasure but looks like we have to run again due to
            // changed size.
            // 前两步是在onMeasure中执行,但是之后size又有变化的情况
            mLayout.setExactMeasureSpecsFrom(this);
            dispatchLayoutStep2();
        } else {
            // always make sure we sync them (to ensure mode is exact)
           //始终确保同步(确保模式是精确的)
            mLayout.setExactMeasureSpecsFrom(this);
        }
        //
        dispatchLayoutStep3();
    }
dispatchLayoutStep3
 /**
     * The final step of the layout where we save the information about views for animations,
     * trigger animations and do any necessary cleanup.
     * 布局的最后一步,我们保存关于视图的动画信息,
     * 触发动画并进行必要的清理。
     */
    private void dispatchLayoutStep3() {
       //省略N行代码.......
       // 执行到最后一步 mLayoutStep恢复默认值
        mState.mLayoutStep = State.STEP_START;
        if (mState.mRunSimpleAnimations) {
            // Step 3: Find out where things are now, and process change animations.
            // traverse list in reverse because we may call animateChange in the loop which may
            // remove the target view holder.
             // 需要动画的情况。找出ViewHolder现在的位置,并且处理改变动画。最后触发动画。
            for (int i = mChildHelper.getChildCount() - 1; i >= 0; i--) {
            // 获取Holder
              ViewHolder holder = getChildViewHolderInt(mChildHelper.getChildAt(i));
            }
            //省略N行代码.......
            // Step 4: Process view info lists and trigger animations
            //进程视图信息列表和触发动画
            mViewInfoStore.process(mViewInfoProcessCallback);
        }


       //省略N行代码.......
       // 完成回调
        mLayout.onLayoutCompleted(mState);
      //省略N行代码.......
    }
onLayoutCompleted();
   @Override
    public void onLayoutCompleted(RecyclerView.State state) {
        super.onLayoutCompleted(state);
        mPendingSavedState = null; // we don't need this anymore
        mPendingScrollPosition = NO_POSITION;
        mPendingScrollPositionOffset = INVALID_OFFSET;
        mAnchorInfo.reset();
    }
最后在回调里重置一些状态信息
onDraw
public void onDraw(Canvas c) {
    super.onDraw(c);
    final int count = mItemDecorations.size();
    for (int i = 0; i < count; i++) {
        mItemDecorations.get(i).onDraw(c, this, mState);
    }
}
到这recyclerview的绘制流程就分析完了。有什么不对的地方麻烦大佬指出,谢谢!


