原生html页面使用lib-flexible,原生html借用less使用lib-flexible,不用框架使用lib-flexible
首先,要了解一个事情,使用 lib-flexible的时候,怎么 rem 是怎么分配的
最简单的算法就是 750px 分成 10rem 也就是说,750px的标准下,每个rem代表75px,同理,比如 610px 的屏幕,同样是分 10rem,每个rem代表的就是61px,就记得,不同宽度的屏幕下边分的都是 10rem 就完了,当然,你手写 rem 也没人说啥,这里用的是 less 带计算属性的 less,生成的 css
编辑器:vsCode(其他编辑器同理,装一个 less to css 插件就行,css让自动生成)
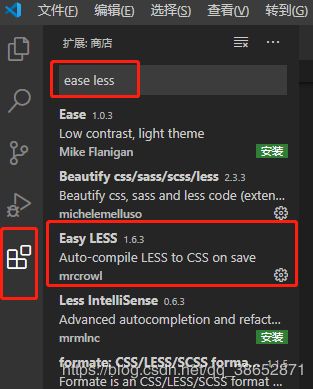
vsCode 在不使用框架(vue,angular,react…)编译的时候,使用 less 可以找一个 叫 ease less 的插件,这样你创建的 less 文件在保存的时候可以生成一个编译之后的 css 文件,直接使用生成 的 css 文件就行
安装插件:

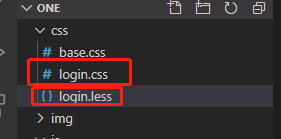
创建文件:

下载 lib-flexible.js
下边是 lib-flexible 源码,可以直接 copy 走,也可以【去下载】,我的已经下载好了
(function flexible (window, document) {
    var docEl = document.documentElement
    var dpr = window.devicePixelRatio || 1

    // adjust body font size
    function setBodyFontSize () {
      if (document.body) {
        document.body.style.fontSize = (12 * dpr) + 'px'
      }
      else {
        document.addEventListener('DOMContentLoaded', setBodyFontSize)
      }
    }
    setBodyFontSize();

    // set 1rem = viewWidth / 10
    function setRemUnit () {
      var rem = docEl.clientWidth / 10
      docEl.style.fontSize = rem + 'px'
    }

    setRemUnit()

    // reset rem unit on page resize
    window.addEventListener('resize', setRemUnit)
    window.addEventListener('pageshow', function (e) {
      if (e.persisted) {
        setRemUnit()
      }
    })

    // detect 0.5px supports
    if (dpr >= 2) {
      var fakeBody = document.createElement('body')
      var testElement = document.createElement('div')
      testElement.style.border = '.5px solid transparent'
      fakeBody.appendChild(testElement)
      docEl.appendChild(fakeBody)
      if (testElement.offsetHeight === 1) {
        docEl.classList.add('hairlines')
      }
      docEl.removeChild(fakeBody)
    }
  }(window, document))
编写 html 页面
<html lang="zh">

<head>
    <meta charset="UTF-8">
    <meta name="viewport" content="width=device-width, initial-scale=1.0,maximum-scale=1.0,
    user-scalable=no">
    <title>Documenttitle>
    <link rel="stylesheet" href="./css/base.css">
    <link rel="stylesheet" href="./css/login.css">
    <script src="./js/lib-flexible.js">script>
head>
<body>
    <div class="out">
        <div class="logo">
            <img class="logo-img" src="./img/logo.jpg">
        div>
        <div class="form">
            <div class="f-line">
                <input class="f-uname" type="text" placeholder="用户名/电话">
            div>
            <div class="f-line">
                <input class="f-pwd" type="password" placeholder="密码">
            div>
            <div class="f-btns">
                <button class="f-btn">登  录button>
            div>
        div>
        <div class="third">
            <div class="wx">
                <img class="wx-img" src="./img/wx.jpg">
            div>
            <div class="wb">
                <img class="wb-img" src="./img/wb.jpg">
            div>
            <div class="gt">
                <img class="gt-img" src="./img/gt.jpg">
            div>
        div>
        <div class="operate">
            <span class="recover">找回密码span> <span class="c-line">|span> <span class="register">注册账号span>
        div>
    div>
body>

html>
编辑 login.less文件,点击保存,会生成一个同样名字的 login.css 文件,这个就是我们需要引入的 css 文件

在 less 文件内部事先定义了一个变量 @font-size-base: 75; 来保存基准字体大小,淘宝 flexible.js 是基于750px设计稿来的
比如说你测量 height: 98px; 那么就使用 height: 98rem / @font-size-base; 进行换算
@font-size-base: 75;
.out{
    width:750rem / @font-size-base;
    padding-left:48rem / @font-size-base;
    padding-right:48rem / @font-size-base;
    box-sizing: border-box;
    font-size:24rem / @font-size-base;
    color:#333333;
    .logo{
        text-align:center;
        margin-top:98rem / @font-size-base;
        margin-bottom:80rem / @font-size-base;

        .logo-img{
            width:200rem / @font-size-base;
            height:200rem / @font-size-base;
            border-radius: 50%;
        }
    }
    .form{
        margin-bottom:180rem / @font-size-base;
        .f-line{
            text-align: center;
            margin-bottom:60rem / @font-size-base;
            .f-uname,.f-pwd{
                box-sizing: border-box;
                border:none;
                outline:none;
                padding-left:48rem / @font-size-base;
                padding-right:48rem / @font-size-base;
                box-shadow:0 0px 28rem / @font-size-base 0 rgba(0,0,0,0.13);
                border-radius:69rem / @font-size-base;
                height:84rem / @font-size-base;
                width:540rem / @font-size-base;
            }
        }
        .f-btns{
            text-align: center;
            padding-top:48rem / @font-size-base;
            .f-btn{
                display:inline-block;
                box-shadow:0 0px 28rem / @font-size-base 0 rgba(0,0,0,0.15);
                border-radius:69rem / @font-size-base;
                height:84rem / @font-size-base;
                width:540rem / @font-size-base;
                color:#FFFFFF;
                background:#666666;
                border:none;
                outline:none;
            }
        }
    }
    .third{
        display:flex;
        justify-content: space-around;
        align-items: center;
        margin-bottom:48rem / @font-size-base;
        .wx,.wb,.gt{
            width:30%;
            text-align:center;
            .wx-img,.wb-img,.gt-img{
                width:48rem / @font-size-base;
                height:48rem / @font-size-base;
            }
        }
    }
    .operate{
        text-align:center;
        .recover,.register,.c-line{
            display:inline-block;
            vertical-align: middle;
            height:48rem / @font-size-base;
            line-height:48rem / @font-size-base;
        }
    }
}
生成的 css 文件:
.out {
  width: 10rem;
  padding-left: 0.64rem;
  padding-right: 0.64rem;
  box-sizing: border-box;
  font-size: 0.32rem;
  color: #333333;
}
.out .logo {
  text-align: center;
  margin-top: 1.30666667rem;
  margin-bottom: 1.06666667rem;
}
.out .logo .logo-img {
  width: 2.66666667rem;
  height: 2.66666667rem;
  border-radius: 50%;
}
.out .form {
  margin-bottom: 2.4rem;
}
.out .form .f-line {
  text-align: center;
  margin-bottom: 0.8rem;
}
.out .form .f-line .f-uname,
.out .form .f-line .f-pwd {
  box-sizing: border-box;
  border: none;
  outline: none;
  padding-left: 0.64rem;
  padding-right: 0.64rem;
  box-shadow: 0 0px 0.37333333rem 0 rgba(0, 0, 0, 0.13);
  border-radius: 0.92rem;
  height: 1.12rem;
  width: 7.2rem;
}
.out .form .f-btns {
  text-align: center;
  padding-top: 0.64rem;
}
.out .form .f-btns .f-btn {
  display: inline-block;
  box-shadow: 0 0px 0.37333333rem 0 rgba(0, 0, 0, 0.15);
  border-radius: 0.92rem;
  height: 1.12rem;
  width: 7.2rem;
  color: #FFFFFF;
  background: #666666;
  border: none;
  outline: none;
}
.out .third {
  display: flex;
  justify-content: space-around;
  align-items: center;
  margin-bottom: 0.64rem;
}
.out .third .wx,
.out .third .wb,
.out .third .gt {
  width: 30%;
  text-align: center;
}
.out .third .wx .wx-img,
.out .third .wb .wx-img,
.out .third .gt .wx-img,
.out .third .wx .wb-img,
.out .third .wb .wb-img,
.out .third .gt .wb-img,
.out .third .wx .gt-img,
.out .third .wb .gt-img,
.out .third .gt .gt-img {
  width: 0.64rem;
  height: 0.64rem;
}
.out .operate {
  text-align: center;
}
.out .operate .recover,
.out .operate .register,
.out .operate .c-line {
  display: inline-block;
  vertical-align: middle;
  height: 0.64rem;
  line-height: 0.64rem;
}
base.css 文件里面啥都没有,就统一了一个内外边距
*{
    margin:0;
    padding:0;
}
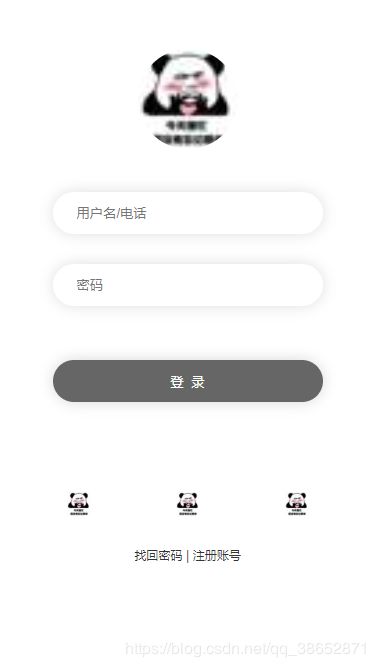
移动端:

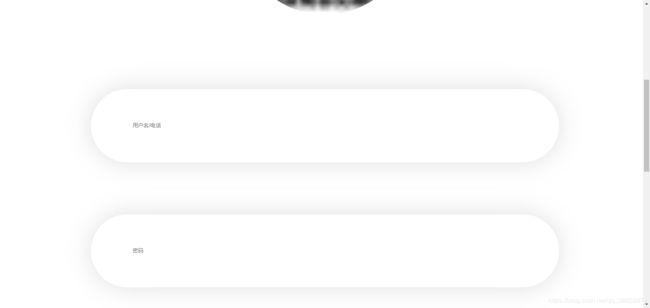
PC端:算了,PC端太高了,没装那个截长图的工具,随便截个图瞅瞅吧,使用 rem 写的样式,布局方面都是统一的

参考:【原文】https://www.pianshen.com/article/2060318017/