使用virtualbox创建的虚拟机遇到磁盘容量不足的解决方法
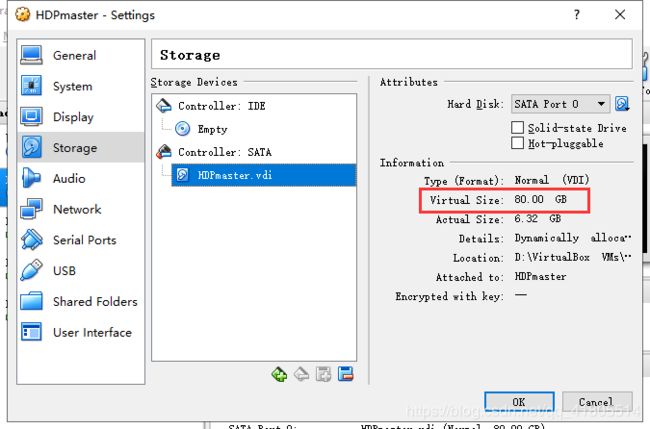
在搭建HDP大数据平台,向虚拟机上传ambari相关组件时,由于之前创建的主节点是默认的硬盘容量8GB,已经满足不了其组件的需求,需要更改该虚拟机的硬盘容量。
方法参考:https://www.cnblogs.com/zhcncn/articles/2948508.html
默认创建的虚拟机使用的是可动态扩展的硬盘,可以在宿主机的终端(CMD)中进入到virtualbox目录下
在该目录下操作,找到需要更改的虚拟机存储位置,可以右击该虚拟机点击文件管理器查看。
接下来进行如下命令,将存储量改为80GB
VBoxManage modifyhd "D:\VirtualBox VMs\HDPmaster\HDPmaster.vdi" --resize 81920但这里仅仅增加了虚拟内存的大小,还需要在终端进行操作增加实际分区的内存大小。
参考:https://blog.csdn.net/felcon/article/details/52931882
https://blog.csdn.net/qq_27657429/article/details/70807099
对新增加的硬盘进行分区、格式化
(1)查看一下调整后的磁盘状态
[root@HDPmaster cy]# fdisk -l /dev/sda

磁盘 /dev/sda:85.9 GB, 85899345920 字节,167772160 个扇区
Units = 扇区 of 1 * 512 = 512 bytes
扇区大小(逻辑/物理):512 字节 / 512 字节
I/O 大小(最小/最佳):512 字节 / 512 字节
磁盘标签类型:dos
磁盘标识符:0x000b7d23

   设备 Boot      Start         End      Blocks   Id  System
/dev/sda1   *        2048     2099199     1048576   83  Linux
/dev/sda2         2099200    16777215     7339008   8e  Linux LVM
/dev/sda3        16777216   167772159    75497472   8e  Linux LVM
说明增加了空间的磁盘是/dev/sda
(2)磁盘分区
[root@HDPmaster ~]# fdisk /dev/sda
欢迎使用 fdisk (util-linux 2.23.2)。

更改将停留在内存中,直到您决定将更改写入磁盘。
使用写入命令前请三思。


命令(输入 m 获取帮助):m
命令操作
   a   toggle a bootable flag
   b   edit bsd disklabel
   c   toggle the dos compatibility flag
   d   delete a partition
   g   create a new empty GPT partition table
   G   create an IRIX (SGI) partition table
   l   list known partition types
   m   print this menu
   n   add a new partition
   o   create a new empty DOS partition table
   p   print the partition table
   q   quit without saving changes
   s   create a new empty Sun disklabel
   t   change a partition's system id
   u   change display/entry units
   v   verify the partition table
   w   write table to disk and exit
   x   extra functionality (experts only)

命令(输入 m 获取帮助):n
Partition type:
   p   primary (2 primary, 0 extended, 2 free)
   e   extended
Select (default p): p
分区号 (3,4,默认 3):3
起始 扇区 (16777216-167772159,默认为 16777216):
将使用默认值 16777216
Last 扇区, +扇区 or +size{K,M,G} (16777216-167772159,默认为 167772159):
将使用默认值 167772159
分区 3 已设置为 Linux 类型,大小设为 72 GiB

命令(输入 m 获取帮助):t
分区号 (1-3,默认 3):3
Hex 代码(输入 L 列出所有代码):8e
已将分区“Linux”的类型更改为“Linux LVM”

命令(输入 m 获取帮助):w
The partition table has been altered!
分别键入以下参数:
p 查看已分区数量(我看到有两个 /dev/sda1 和/dev/sda2)
n 新增加一个分区
p 分区类型,选择主分区
分区号选3(1和2已占用,见上)
回车 默认选择(起始扇区)
回车 默认选择(结束扇区)
t 修改分区类型
选分区3
8e 修改为LVM(8e就是LVM)
w 写分区表,完成后退出fdisk命令
使用partprobe重新读取分区表,或者重启机器。(我这里使用了reboot)
[root@localhost]# partprobe
格式化分区
[root@HDPmaster cy]# mkfs.ext3 /dev/sda3
mke2fs 1.42.9 (28-Dec-2013)
文件系统标签=
OS type: Linux
块大小=4096 (log=2)
分块大小=4096 (log=2)
Stride=0 blocks, Stripe width=0 blocks
4718592 inodes, 18874368 blocks
943718 blocks (5.00%) reserved for the super user
第一个数据块=0
Maximum filesystem blocks=4294967296
576 block groups
32768 blocks per group, 32768 fragments per group
8192 inodes per group
Superblock backups stored on blocks:
	32768, 98304, 163840, 229376, 294912, 819200, 884736, 1605632, 2654208,
	4096000, 7962624, 11239424

Allocating group tables: 完成
正在写入inode表: 完成
Creating journal (32768 blocks): 完成
Writing superblocks and filesystem accounting information: 完成
4. 添加新LVM到已有的LVM组,实现扩容
进入lvm管理
[root@localhost]# lvm
关于lvm的一些基础知识可以参考这里:http://blog.csdn.net/wuweilong/article/details/7565530
以下命令都是在lvm>下
(1)初始化刚才的分区
[root@HDPmaster cy]# lvm
lvm> pvcreate /dev/sda3
WARNING: ext3 signature detected on /dev/sda3 at offset 1080. Wipe it? [y/n]: y
  Wiping ext3 signature on /dev/sda3.
  Physical volume "/dev/sda3" successfully created.
(2)查看卷和卷组
lvm> vgdisplay
--- Volume group ---
VG Name centos
System ID
Format lvm2
Metadata Areas 1
Metadata Sequence No 3
VG Access read/write
VG Status resizable
MAX LV 0
Cur LV 2
Open LV 2
Max PV 0
Cur PV 1
Act PV 1
VG Size <7.00 GiB
PE Size 4.00 MiB
Total PE 1791
Alloc PE / Size 1791 / <7.00 GiB
Free PE / Size 0 / 0
VG UUID xqAa3r-6mEm-gKkV-XQrn-0pZs-my4Y-adndfW
要记下”VG Name”,这里为centos;再记下”Free PE/Size”的大小,这里为0,但后面添加的时候系统告知为18431
(3)将初始化过的分区加入到虚拟卷组
vgextend centos /dev/sda3
刚才记下的”VG Name”就在这里使用。但是执行到这一步时报错了:
Couldn't create temporary archive name.
Volume group "centos" metadata archive failed.
Internal error: Attempt to unlock unlocked VG #orphans.
查看了下,因为磁盘实在太小了,无法执行,删除一些数据就行。
(4)扩展已有卷的容量
lvm> lvextend -l +81920 /dev/mapper/centos-root
  Insufficient free space: 81920 extents needed, but only 18431 available
lvm> lvextend -l +18431 /dev/mapper/centos-root
  Size of logical volume centos/root changed from <6.20 GiB (1586 extents) to 78.19 GiB (20017 extents).
  Logical volume centos/root successfully resized.
lvextend指令用于在线扩展逻辑卷的空间大小,而不中断应用程序对逻辑卷的访问。其后有两个选项
选项 说明
-L 指定逻辑卷的大小,单位为“kKmMgGtT”字节,也就是Size
-l 指定逻辑卷的大小,单位为PE数
其余两个参数:18431 是上边通过vgdisplay查看的free的大小,后边的目录参数/dev/mapper/centos-root可以通过df命令查看
(5)查看卷容量
lvm> pvdisplay
  --- Physical volume ---
  PV Name               /dev/sda2
  VG Name               centos
  PV Size               <7.00 GiB / not usable 3.00 MiB
  Allocatable           yes (but full)
  PE Size               4.00 MiB
  Total PE              1791
  Free PE               0
  Allocated PE          1791
  PV UUID               coKFcy-6xew-T4ey-WTW9-PgpE-6Wec-idggcP

  --- Physical volume ---
  PV Name               /dev/sda3
  VG Name               centos
  PV Size               72.00 GiB / not usable 4.00 MiB
  Allocatable           yes (but full)
  PE Size               4.00 MiB
  Total PE              18431
  Free PE               0
  Allocated PE          18431
  PV UUID               USfDcG-gtfV-yCy1-45kV-9c3n-F0Wr-a4mpky
(6)退出
quit
5. 文件系统扩容
以上只是卷扩容了,还要对文件系统实现真正扩容
CentOS 7 下面 由于使用的是 XFS,所以要用
[root@HDPmaster html]# xfs_growfs /dev/mapper/centos-root
meta-data=/dev/mapper/centos-root isize=512    agcount=4, agsize=406016 blks
         =                       sectsz=512   attr=2, projid32bit=1
         =                       crc=1        finobt=0 spinodes=0
data     =                       bsize=4096   blocks=1624064, imaxpct=25
         =                       sunit=0      swidth=0 blks
naming   =version 2              bsize=4096   ascii-ci=0 ftype=1
log      =internal               bsize=4096   blocks=2560, version=2
         =                       sectsz=512   sunit=0 blks, lazy-count=1
realtime =none                   extsz=4096   blocks=0, rtextents=0
data blocks changed from 1624064 to 20497408
CentOS 6 下面 要用
resize2fs /dev/mapper/centos-root
6. 查看新的磁盘空间
[root@HDPmaster html]# df -h
文件系统                 容量  已用  可用 已用% 挂载点
/dev/mapper/centos-root   79G  1.7G   77G    3% /
devtmpfs                 484M     0  484M    0% /dev
tmpfs                    496M  4.0K  496M    1% /dev/shm
tmpfs                    496M  6.8M  489M    2% /run
tmpfs                    496M     0  496M    0% /sys/fs/cgroup
/dev/sda1               1014M  132M  883M   13% /boot
tmpfs                    100M     0  100M    0% /run/user/0
tmpfs                    100M     0  100M    0% /run/user/1000


