android进程保活的三个方案
目前我所学到的进程保活或者拉活的手段主要有三种,第一就是在屏幕息屏的时候启动一个一像素透明没有布局文件的activity来降低进程的oom_adj值,使之不容易被系统杀死
这里说明下Android系统的五种进程
顺便贴下google进程的介绍 链接官方地址
## 前台进程

用户当前操作所必需的进程。如果一个进程满足以下任一条件,即视为前台进程:

托管用户正在交互的 Activity(已调用 Activity 的 onResume() 方法)
托管某个 Service,后者绑定到用户正在交互的 Activity
托管正在“前台”运行的 Service(服务已调用 startForeground())
托管正执行一个生命周期回调的 Service(onCreate()、onStart() 或 onDestroy())
托管正执行其 onReceive() 方法的 BroadcastReceiver
通常,在任意给定时间前台进程都为数不多。只有在内存不足以支持它们同时继续运行这一万不得已的情况下,系统才会终止它们。 此时,设备往往已达到内存分页状态,因此需要终止一些前台进程来确保用户界面正常响应。


## 可见进程

没有任何前台组件、但仍会影响用户在屏幕上所见内容的进程。 如果一个进程满足以下任一条件,即视为可见进程:

托管不在前台、但仍对用户可见的 Activity(已调用其 onPause() 方法)。例如,如果前台 Activity 启动了一个对话框,允许在其后显示上一 Activity,则有可能会发生这种情况。
托管绑定到可见(或前台)Activity 的 Service。
可见进程被视为是极其重要的进程,除非为了维持所有前台进程同时运行而必须终止,否则系统不会终止这些进程。

## 服务进程

正在运行已使用 startService() 方法启动的服务且不属于上述两个更高类别进程的进程。尽管服务进程与用户所见内容没有直接关联,但是它们通常在执行一些用户关心的操作(例如,在后台播放音乐或从网络下载数据)。因此,除非内存不足以维持所有前台进程和可见进程同时运行,否则系统会让服务进程保持运行状态。

## 后台进程

包含目前对用户不可见的 Activity 的进程(已调用 Activity 的 onStop() 方法)。这些进程对用户体验没有直接影响,系统可能随时终止它们,以回收内存供前台进程、可见进程或服务进程使用。 通常会有很多后台进程在运行,因此它们会保存在 LRU (最近最少使用)列表中,以确保包含用户最近查看的 Activity 的进程最后一个被终止。如果某个 Activity 正确实现了生命周期方法,并保存了其当前状态,则终止其进程不会对用户体验产生明显影响,因为当用户导航回该 Activity 时,Activity 会恢复其所有可见状态。 有关保存和恢复状态的信息,请参阅 Activity文档。

## 空进程

不含任何活动应用组件的进程。保留这种进程的的唯一目的是用作缓存,以缩短下次在其中运行组件所需的启动时间。 为使总体系统资源在进程缓存和底层内核缓存之间保持平衡,系统往往会终止这些进程。

根据进程中当前活动组件的重要程度,Android 会将进程评定为它可能达到的最高级别。例如,如果某进程托管着服务和可见 Activity,则会将此进程评定为可见进程,而不是服务进程。

此外,一个进程的级别可能会因其他进程对它的依赖而有所提高,即服务于另一进程的进程其级别永远不会低于其所服务的进程。 例如,如果进程 A 中的内容提供程序为进程 B 中的客户端提供服务,或者如果进程 A 中的服务绑定到进程 B 中的组件,则进程 A 始终被视为至少与进程 B 同样重要。

由于运行服务的进程其级别高于托管后台 Activity 的进程,因此启动长时间运行操作的 Activity 最好为该操作启动服务,而不是简单地创建工作线程,当操作有可能比 Activity 更加持久时尤要如此。例如,正在将图片上传到网站的 Activity 应该启动服务来执行上传,这样一来,即使用户退出 Activity,仍可在后台继续执行上传操作。使用服务可以保证,无论 Activity 发生什么情况,该操作至少具备“服务进程”优先级。 同理,广播接收器也应使用服务,而不是简单地将耗时冗长的操作放入线程中。
了解了这五种进程后,我们知道前台进程是最不容易被系统杀死的,所以我们的保活手段出来了,就是尽量使我们的app所在的进程变为前台进程(当我们的app不在前台的时候)
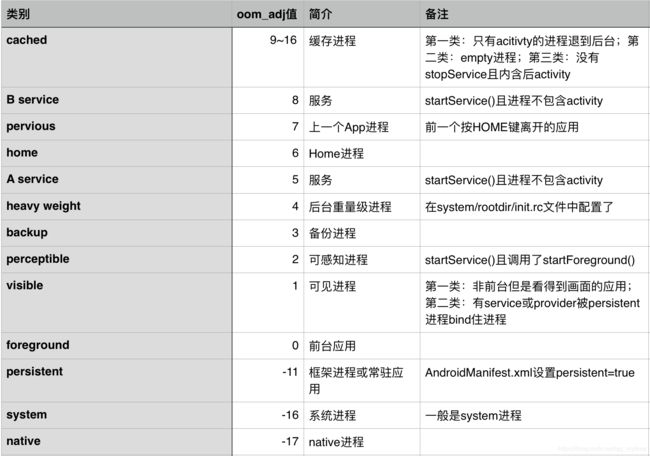
这里我们先看下进程的adj值相关的表

丛表中可以看出,当我们的进程处于前台的时候,它的oom_adj值是为0的,下面我们代码来实现一像素activity保活进程的方案
保活一
保活activity的代码
public class KeepAliceActivity extends AppCompatActivity {

    @Override
    protected void onCreate(Bundle savedInstanceState) {
        super.onCreate(savedInstanceState);
        //设置window的大小和位置
        WindowManager.LayoutParams windowManagerAttr=getWindow().getAttributes();
        windowManagerAttr.width=1;
        windowManagerAttr.height=1;;
        windowManagerAttr.x=0;
        windowManagerAttr.y=0;
        windowManagerAttr.gravity=Gravity.TOP| Gravity.START;
        getWindow().setAttributes(windowManagerAttr);
        if(Build.VERSION.SDK_INT >= 21) {
            Window window = getWindow();
            window.getDecorView().setSystemUiVisibility(View.SYSTEM_UI_FLAG_LAYOUT_FULLSCREEN
                    | View.SYSTEM_UI_FLAG_LAYOUT_STABLE);
            window.setStatusBarColor(Color.TRANSPARENT);
        }
        //收集保活activity的实例,方便后面把它结束掉
      KeepAliveManager.getInstance().collectActivity(this);
    }
}
可以看到我们的保活activity并没有做什么骚操作,只是把它的视图大小缩小为一像素并且显示在左上方,因为activity真正显示视图的地方就是window,activity中的view都是依附在window中而显示的,不了解window相关的这里推荐一篇好文,写得挺不错的window相关
然后设置下我们保活activity的主题
之后我们要让屏幕熄灭的时候,使我们的进程变为前台进程,变为前台进程的方法有好多种,这里我们主要使用的就是当我们监听到屏幕熄灭的广播,启动我们的保活activity,然后屏幕变亮的时候结束掉我们的保活activity。本来监听屏幕熄灭变亮的广播的最佳实现是使用静态注册广播的方式,这样就算我们的应用被杀死了也能接收到广播,从而实现应用拉活,但是google在8.0系统中取消了很多广播的静态组成监听,这里面就包括屏幕熄灭与变亮的广播,因此我们也就只能使用动态注册来监听了,代码如下
public class MyBroadCastReceiver extends BroadcastReceiver {
    @Override
    public void onReceive(Context context, Intent intent) {
        if(intent.getAction().equals(Intent.ACTION_SCREEN_OFF)){
            //监听到屏幕熄灭的广播
            Log.e("onReceive","ACTION_SCREEN_OFF");
          KeepAliveManager.getInstance().startActivity(context);
        }else if(intent.getAction().equals(Intent.ACTION_SCREEN_ON)){
             //监听到屏幕打开的广播
            Log.e("onReceive","ACTION_SCREEN_On");
            KeepAliveManager.getInstance().finishActivity();
        }
    }
}
public class KeepAliveManager {
    MyBroadCastReceiver receiver;
    //这里使用弱引用来保存我们的keepaliveactivity,以防止内存泄漏
    private WeakReference weakReference;

    private static final KeepAliveManager ourInstance = new KeepAliveManager();

    public static KeepAliveManager getInstance() {
        return ourInstance;
    }

    private KeepAliveManager() {
    }

    public void collectActivity(Activity activity){
            weakReference=new WeakReference<>(activity);
    }

	//结束掉keepaliveactivity
    public void finishActivity(){
        if(weakReference!=null && weakReference.get()!=null){
            weakReference.get().finish();
        }
    }

    public void startActivity(Context context){
        Intent intent=new Intent(context, KeepAliceActivity.class);
        //这里因为非activity的context没有任务栈,所以我们要加上这一行,这样在启动activity的时候就会创建一个任务栈,不加这行就会报错
        intent.addFlags(Intent.FLAG_ACTIVITY_NEW_TASK);
        intent.resolveActivity(context.getPackageManager());
        context.startActivity(intent);
    }

	//注册广播
    public void regist(Activity context){
        IntentFilter intentFilter=new IntentFilter();
        //添加屏幕变亮的动作
        intentFilter.addAction(Intent.ACTION_SCREEN_ON);
        //添加拼命熄灭的动作
        intentFilter.addAction(Intent.ACTION_SCREEN_OFF);
         receiver=new MyBroadCastReceiver();
        context.registerReceiver(receiver,intentFilter);
    }

	//取消掉广播
    public void unRegist(Activity context){
        if(receiver!=null)
    context.unregisterReceiver(receiver);
    }

}
接下来找一个合适的时机去注册广播,我们就在mainActivity中去注册吧,在入口注册时比较好的,这个类时kotlin,不懂得的也没关系,很简单,一看就明
class MainActivity : AppCompatActivity() {

    @RequiresApi(Build.VERSION_CODES.LOLLIPOP)
    override fun onCreate(savedInstanceState: Bundle?) {
        super.onCreate(savedInstanceState)
        KeepAliveManager.getInstance().regist(this)

    }
    override fun onDestroy() {
        super.onDestroy()
        KeepAliveManager.getInstance().unRegist(this)
    }

}
可以看到,我们在主页面启动的时候就去注册广播,然后在activity销毁的时候去取消注册,接下来我们运行看下结果
首先打开studio下方的terminal,然后输入adb shell

如果没有配置好adb的环境的话,是执行不了adb命令的,需要自行百度配置下,其实很简单的。
配置好adb环境后,如果我们是运行在模拟器上的话我们还要执行输入su然后回车

然后输入 # cat proc/2834/oom_adj 回车
注意,这里的2834是我们app所在的进程的id,可以在logcat中查看

下面我们看下运行的结果

从gif图中看到,当我们的app去到后台的时候,oom_adj的值为11,然后屏幕熄灭的时候,oom_adj的值为0,屏幕变亮的时候为11。因为oom_adj的值为0的时候,我们app的进程就变为了前台,这种等级的进程系统是最不愿意杀死的,而如果我们不做这种处理的话,屏幕熄灭不久后,我们的app就被系统给砍掉了
保活二
前台服务
使用前台服务来实现保活的思路跟一像素activity是一样的,都是通过降低进程的adj值,使之不容易被系统杀死,我们来看下代码
public class ForegroundService extends Service {
    public static final int SERVICE_ID=1001;


    @Override
    public IBinder onBind(Intent intent) {
        return null;
    }

    @Override
    public int onStartCommand(Intent intent, int flags, int startId) {
        if(Build.VERSION.SDK_INT<18){
            //在系统是4.3之前,开启前台服务是不会在状态栏显示通知图片的
            startForeground(SERVICE_ID,new Notification());
        }else if(Build.VERSION.SDK_INT<26){
            //系统是4.3-7.x时会显示通知消息图标,需要自己移除通知栏消息
            startForeground(SERVICE_ID,new Notification());
            //这里通过启动一个内部的service
            startService(new Intent(this,InnerService.class));
        }else {
            //8.0之后,通知需要有一个channal绑定
            NotificationManager manager= (NotificationManager) getSystemService(Context.NOTIFICATION_SERVICE);
            if(manager!=null){
                NotificationChannel channel=new NotificationChannel("channal","notify",NotificationManager.IMPORTANCE_NONE);
                manager.createNotificationChannel(channel);
                NotificationCompat.Builder notificationCompat= new NotificationCompat.Builder(this,"channal");
                startForeground(SERVICE_ID,notificationCompat.build());
            }
              }

        return super.onStartCommand(intent, flags, startId);
    }
	//用于隐藏前台服务通知图标
    static class InnerService extends Service{


        @Override
        public IBinder onBind(Intent intent) {
            return null;
        }

        @Override
        public int onStartCommand(Intent intent, int flags, int startId) {
            startForeground(SERVICE_ID,new Notification());
            //把通知取消掉
            stopForeground(true);
            stopSelf();
            return super.onStartCommand(intent, flags, startId);
        }
    }
}
前台服务的代码很简单,就是在启动的时候,在onstartcommad方法中调用startforeground方法来设为前台服务,而且适配了不同版本的通知启动方式。接下来只要在某个地方启动这个服务,一般可以是mainActivity中,然后我们看下运行结果
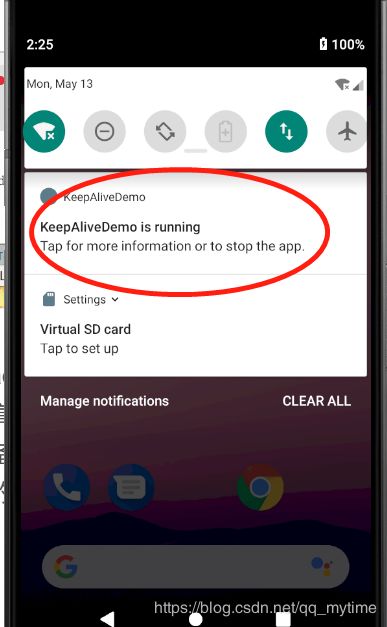
看到,当我按返回的时候,adj值是3,屏幕熄灭的时候,adj值也是3,adj值在3这个级别的进程优先级也是挺高的了,这里我们参考前面的进程优先级的表格可以发现,在这个级别的进程属于备份进程,也是系统不太愿意杀死的一种进程。但是使用这种保活手段有一个很大的弊端,那就是在8.0以上会在通知栏显示通知图标,下拉之后会显示前台服务的详情

保活三
双进程守护
双进程守护指的是开启两个进程,一个进程被杀死了,另一个就去把它拉活。具体的实现是,在主进程中开启一个本地的service,另外又开启一个远程的service,这个service运行在独立的进程单中,通过process指定运行进程的名称,然后在本地service中绑定远程service,远程service中也绑定本地service,形成相互绑定,最后在ServiceConnection的onServiceDisconnected方法中又绑定和启动,具体来看代码
public class LocalService extends ForegroundService {


    @Override
    public int onStartCommand(Intent intent, int flags, int startId) {
    //在本地服务被启动的时候,绑定远程服务
        bindService(new Intent(LocalService.this,RemoteService.class),serviceConnection, Service.BIND_IMPORTANT);
        return super.onStartCommand(intent, flags, startId);
    }

    ServiceConnection serviceConnection=new ServiceConnection() {
        @Override
        public void onServiceConnected(ComponentName name, IBinder service) {

        }

        @Override
        public void onServiceDisconnected(ComponentName name) {
        	//在绑定断开的时候,重新绑定远程服务
            startService(new Intent(LocalService.this,RemoteService.class));
            bindService(new Intent(LocalService.this,RemoteService.class),serviceConnection, Service.BIND_IMPORTANT);
        }
    };
}
上面的继承的ForegroundService是前面的前台服务,这里添加了一个binder类,看下代码
public class ForegroundService extends Service {
    public static final int SERVICE_ID=1001;


    @Override
    public IBinder onBind(Intent intent) {

        return new MyBinder();
    }


  static class MyBinder extends Binder{}

    @Override
    public int onStartCommand(Intent intent, int flags, int startId) {

        return super.onStartCommand(intent, flags, startId);
    }


}
接下来是远程服务的代码
public class RemoteService extends ForegroundService {


    @Override
    public int onStartCommand(Intent intent, int flags, int startId) {
        bindService(new Intent(RemoteService.this,LocalService.class),serviceConnection, Service.BIND_IMPORTANT);
        return super.onStartCommand(intent, flags, startId);
    }

    ServiceConnection serviceConnection=new ServiceConnection() {
        @Override
        public void onServiceConnected(ComponentName name, IBinder service) {

        }

        @Override
        public void onServiceDisconnected(ComponentName name) {
            startService(new Intent(RemoteService.this,LocalService.class));
            bindService(new Intent(RemoteService.this,LocalService.class),serviceConnection, Service.BIND_IMPORTANT);
        }
    };
}
跟本地服务的代码几乎是一样的,只是稍微改变了下绑定的对象而已,然后在清单文件中配置下远程服务的进程
接下来就是在mainActivity中应用下,
class MainActivity : AppCompatActivity() {


    override fun onCreate(savedInstanceState: Bundle?) {
        super.onCreate(savedInstanceState)
        setContentView(R.layout.activity_main)
     //   KeepAliveManager.getInstance().regist(this)
     //   startService(Intent(this,ForegroundService::class.java))
        startService(Intent(this,LocalService::class.java))
        startService(Intent(this,RemoteService::class.java))

    }
    override fun onDestroy() {
        super.onDestroy()
      //  KeepAliveManager.getInstance().unRegist(this)
    }

}
这样我们就实现了双进程守护了,只要我们不是手动清理或用手机卫士来清理内存,我们的进程就很大程度不会被杀死了