Spark Streaming(二)Flume
现状分析
如何解决我们的数据从其他的server上移动到Hadoop之上
- 脚本shell cp到Hadoop集群的机器上,然后使用
hadoop fs -put命令传到hadoop上【问题:1.这种方法如何做监控,2.文本数据的传输对于磁盘的开销非常大 3. 必须要指定一个间隔的时间,比如每隔1分钟拷贝一次,这样时效性不好 4. 如何做容错和负载均衡】 - 使用Flume。容错、负载均衡、高延迟、压缩在flume中都有很好的解决。只需要写config就可以了

Flume概述
Flume is a distributed, reliable, and available service for efficiently collecting, aggregating, and moving large amounts of log data.
主要包括收集(collecting)、聚合(aggregating)、移动(moving)功能。
也就是说webserver(源端)可以通过Flume移动到HDFS(目的端)中。
Flume架构
- source 收集
- channel 聚集
- sink 输出
业界同类产品对比
(常用)Flume:Apache项目,采用java进行开发
Scribe:Facebook项目,采用C/C++开发,负载均衡与容错不是很好。目前不再维护。
Chukwa:Yahoo/Apache项目,采用java开发,不再维护
Fluentd:与Flume类似,采用Ruby开发
(常用)Logstash:ELK(Elasticsearch+Logstash+Kibana)
安装Flume
前置条件
- java1.8以上
- 足够内存,供source,channel,sink使用
- 磁盘空间足够
- 文件目录权限
下载安装Flume
- 下载Flume:下载CDH5.15.1版本,这里
- 解压:
tar -xvf flume-ng-1.6.0-cdh5.15.1.tar.gz -C ~/app/
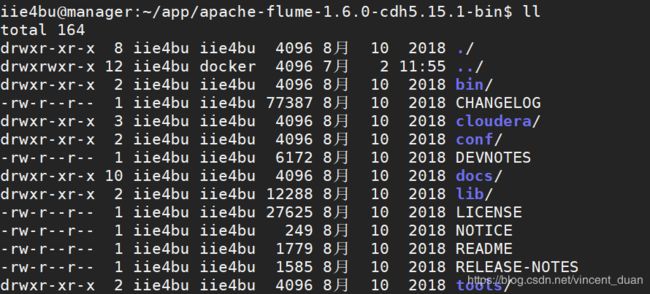
目录结构:

- 添加环境变量,
~/.bashrc内容如下:
# FLUME_HOME 1.6.0
FLUME_HOME=/home/iie4bu/app/apache-flume-1.6.0-cdh5.15.1-bin

PATH=$JAVA_HOME/bin:$HADOOP_HOME/bin:$HIVE_HOME/bin:$SPARK_HOME/bin:$FLUME_HOME/bin:$PATH

export PATH=$PATH
- 然后执行
source ~/.bashrc使得环境变量生效
配置Flume
在conf目录下执行cp flume-env.sh.template flume-env.sh
添加export JAVA_HOME=/home/iie4bu/app/jdk1.8.0_101
检查运行情况,在bin目录下执行:./flume-ng version

Flume实战
需求1
从指定网络端口采集数据输出到控制台。
配置
使用Flume的关键就是写配置文件
A) 配置Source
B) 配置Channel
C) 配置Sink
D) 把以上三个组件串起来
a1: agent名称
r1: source的名称
k1: sink的名称
c1: channel的名称
在conf目录下新建一个example.conf, 内容如下:
# Name the components on this agent
a1.sources = r1
a1.sinks = k1
a1.channels = c1

# Describe/configure the source
a1.sources.r1.type = netcat
a1.sources.r1.bind = localhost
a1.sources.r1.port = 44444

# Describe the sink
a1.sinks.k1.type = logger

# Use a channel which buffers events in memory
a1.channels.c1.type = memory
a1.channels.c1.capacity = 1000
a1.channels.c1.transactionCapacity = 100

# Bind the source and sink to the channel
a1.sources.r1.channels = c1
a1.sinks.k1.channel = c1
启动agent
bin/flume-ng agent --name a1 --conf $FLUME_HOME/conf --conf-file $FLUME_HOME/conf/example.conf -Dflume.root.logger=INFO,console
其中:
- --name: 表示agent的名称
- –conf: 表示 $FLUME_HOME/conf
- –conf-file: 指定自己写的配置文件
- -D 表示JDK的一些参数。-Dflume.root.logger=INFO,console
使用nc进行测试
重新开一个窗口,使用nc命令在本地测试44444端口

在Flume中可以看到输出结果:
![]()
在输出的日志中可以看到Event:
Event: { headers:{} body: 61 62 63 abc }
这个Event就是Flume中数据传输的基本单元。
需求2
监控一个文件实时采集新增的数据输出到控制台
配置
Agent选型:exec source + memory channel + logger sink
在$FLUME_HOME/conf目录下新建exec-memory-logger.conf配置文件,内容如下:
 # Name the components on this agent
a1.sources = r1
a1.sinks = k1
a1.channels = c1

# Describe/configure the source
a1.sources.r1.type = exec
a1.sources.r1.command = tail  -F /home/iie4bu/data/hello.txt
a1.sources.r1.shell = /bin/sh -c

# Describe the sink
a1.sinks.k1.type = logger

# Use a channel which buffers events in memory
a1.channels.c1.type = memory
a1.channels.c1.capacity = 1000
a1.channels.c1.transactionCapacity = 100

# Bind the source and sink to the channel
a1.sources.r1.channels = c1
a1.sinks.k1.channel = c1
启动agent
bin/flume-ng agent --name a1 --conf $FLUME_HOME/conf --conf-file /home/iie4bu/app/apache-flume-1.6.0-cdh5.15.1-bin/conf/exec-memory-logger.conf -Dflume.root.logger=INFO,console
这样就实现了监听/home/iie4bu/data/hello.txt文件,并把里面的内容输出到控制台。
需求3
将A服务器上的日志实时采集到B服务器。
Agent选型
机器A上的agent选型:exec source + memory channel + avro sink
机器B上的agent选型:avro source + memory channel + logger sink
配置Agent
新建exec-memory-avro.conf,内容如下:
exec-memory-avro.sources = exec-source
exec-memory-avro.sinks = avro-sink
exec-memory-avro.channels = memory-channel

# Describe/configure the source
exec-memory-avro.sources.exec-source.type = exec
exec-memory-avro.sources.exec-source.command = tail  -F /home/iie4bu/data/hello.txt
exec-memory-avro.sources.exec-source.shell = /bin/sh -c

# Describe the sink
exec-memory-avro.sinks.avro-sink.type = avro
exec-memory-avro.sinks.avro-sink.hostname = localhost
exec-memory-avro.sinks.avro-sink.port = 44444

# Use a channel which buffers events in memory
exec-memory-avro.channels.memory-channel.type = memory
exec-memory-avro.channels.memory-channel.capacity = 1000
exec-memory-avro.channels.memory-channel.transactionCapacity = 100

# Bind the source and sink to the channel
exec-memory-avro.sources.exec-source.channels = memory-channel
exec-memory-avro.sinks.avro-sink.channel = memory-channel
新建avro-memory-logger.conf,内容如下:
avro-memory-logger.sources = avro-source
avro-memory-logger.sinks = logger-sink
avro-memory-logger.channels = memory-channel

# Describe/configure the source
avro-memory-logger.sources.avro-source.type = avro
avro-memory-logger.sources.avro-source.bind = localhost
avro-memory-logger.sources.avro-source.port = 44444

# Describe the sink
avro-memory-logger.sinks.logger-sink.type = logger

# Use a channel which buffers events in memory
avro-memory-logger.channels.memory-channel.type = memory
avro-memory-logger.channels.memory-channel.capacity = 1000
avro-memory-logger.channels.memory-channel.transactionCapacity = 100

# Bind the source and sink to the channel
avro-memory-logger.sources.avro-source.channels = memory-channel
avro-memory-logger.sinks.logger-sink.channel = memory-channel
启动agent
这里要注意启动顺序。
首先启动avro-memory-logger.conf:bin/flume-ng agent --name avro-memory-logger --conf $FLUME_HOME/conf --conf-file /home/iie4bu/app/apache-flume-1.6.0-cdh5.15.1-bin/conf/avro-memory-logger.conf -Dflume.root.logger=INFO,console

然后再启动exec-memory-avro.conf:bin/flume-ng agent --name exec-memory-avro --conf $FLUME_HOME/conf --conf-file /home/iie4bu/app/apache-flume-1.6.0-cdh5.15.1-bin/conf/exec-memory-avro.conf -Dflume.root.logger=INFO,console

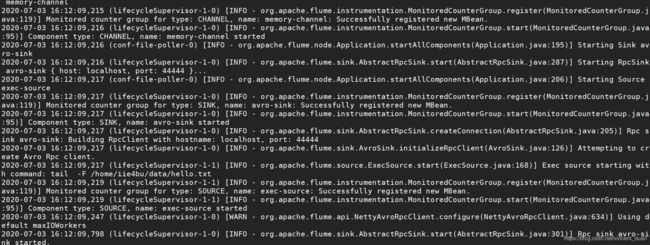
当我们给/home/iie4bu/data/hello.txt文件添加内容时,在avro-memory-logger.conf就会打印输出响应:

延时
这里两个Agent之间会有一定的延时,因为channel是基于内存,有大小设置,到了一定的时间才会进行相应的操作。
总结日志收集过程
- 机器A上监控一个文件,当我们访问主站时会有用户行为日志记录到
access.log中 - avro sink把新产生的日志输出到对应的机器B的hostname和port上
- 通过机器B上的avro source对应的agent将我们的日志输出到控制台(Kafka)

