Nginx 是一个高性能的 HTTP 和反向代理服务器,本节以实际实例介绍如何实现Nginx
反向代理。
1. 安装Nginx
安装Nginx之前,首先安装相关模块的依赖库:
这里安装Pcre和Openssl,分别用来支持http Rewrite模块的正则表达式和http ssl模块.
所有软件都由官网获取最新版本.
[root@localhost nginx]# tar zxvf pcre-8.35.tar.gz
[root@localhost nginx]# cd pcre-8.35
[root@localhost pcre-8.35]# ./configure
[root@localhost pcre-8.35]# make
[root@localhost pcre-8.35]# make install
[root@localhost pcre-8.35]# ln -s /usr/local/lib/libpcre.so.1 /lib64/
#openssl安装
[root@localhost nginx]# tar zxvf openssl-1.0.1g.tar.gz
[root@localhost nginx]# cd  openssl-1.0.1g
[root@localhost openssl-1.0.1g]# ./config --prefix=/usr/local/openssl
[root@localhost openssl-1.0.1g]# make && make install
开始安装Nginx服务器软件:
[root@localhost nginx]# tar zxvf nginx-1.7.1.tar.gz
[root@localhost nginx]# cd nginx-1.7.1
[root@localhost nginx-1.7.1]# ./configure --prefix=/usr/local/nginx  --with-select_module --with-poll_module  --with-http_ssl_module  --with-http_stub_status_module  --with-http_gunzip_module --with-openssl=/usr/local/src/nginx/openssl-1.0.1g
#配置摘要
Configuration summary
  + using system PCRE library
  + using OpenSSL library: /usr/local/src/nginx/openssl-1.0.1g
  + md5: using OpenSSL library
  + sha1: using OpenSSL library
  + using system zlib library
  nginx path prefix: "/usr/local/nginx"
  nginx binary file: "/usr/local/nginx/sbin/nginx"
  nginx configuration prefix: "/usr/local/nginx/conf"
  nginx configuration file: "/usr/local/nginx/conf/nginx.conf"
  nginx pid file: "/usr/local/nginx/logs/nginx.pid"
  nginx error log file: "/usr/local/nginx/logs/error.log"
  nginx http access log file: "/usr/local/nginx/logs/access.log"
  nginx http client request body temporary files: "client_body_temp"
  nginx http proxy temporary files: "proxy_temp"
  nginx http fastcgi temporary files: "fastcgi_temp"
  nginx http uwsgi temporary files: "uwsgi_temp"
  nginx http scgi temporary files: "scgi_temp"
[root@localhost nginx-1.7.1]# make && make install
过程无误,完成安装。
启动Nginx服务:
[root@localhost nginx-1.7.1]# /usr/local/nginx/sbin/nginx
#查看nginx服务进程
[root@localhost openssl-1.0.1g]# ps -aux|grep nginx
Warning: bad syntax, perhaps a bogus '-'? See /usr/share/doc/procps-3.2.7/FAQ
root     26592  0.0  0.1  19288   812 ?        Ss   17:46   0:00 nginx: master process /usr/local/nginx/sbin/nginx
nobody   26593  0.0  0.3  19724  1672 ?        S    17:46   0:00 nginx: worker process
root     26610  0.0  0.1  61232   736 pts/2    R+   17:50   0:00 grep nginx
服务启动后,在IE浏览器输入nginx服务器IP地址,可以看到如下界面:
说明Nginx服务已经安装完毕,下面就是根据需求进行配置了.
2. 配置Nginx
在配置反向代理之前,我们先介绍如何创建一个Web站点(以http://123.fengdian.info为例):
本例将Web站点的文件目录设置为: /opt/data (里面含有一个index.html文件);
Web Server 可以在nginx.conf里面通过"server"指令配置,但是为了管理方便,通常我们单独
建立一个目录来放置所有的管理员配置的server指令文件. 这里我们在/usr/local/nginx/conf目录下
新建目录sites,来存放管理员自定义的server配置文件:
在sites目录中,我们新建一个名为123的文件,内容主要包含server指令要配置的内容,如下:
#站点123配置
[root@localhost sites]# cat 123
server {
   listen       80;
   server_name  123.fengdian.info;
   access_log   logs/123/access.log;
   error_log    logs/123/error.log  info;
   location / {
       root /opt/data;
       index  index.html;
   }
}
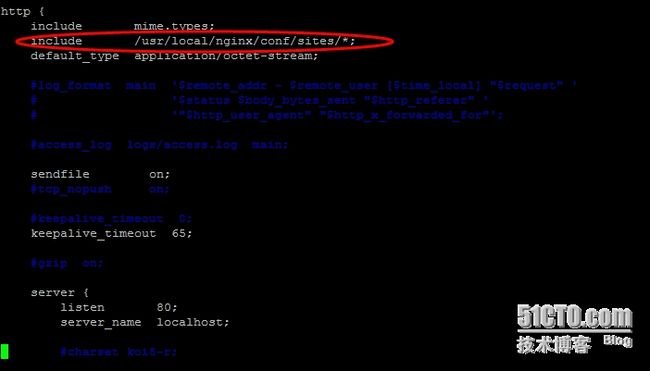
server 指令文件建立好后,我们就需要去配置 nginx主配置文件nginx.conf了.在主配置文件中
的http指令块中我们增加一行,如下图标注部分
保存退出后,我们再创建日志存放目录:
#server指令中单独指定了日志存放目录,该目录需要手动创建,不然启动nginx服务会出错
[root@localhost sites]# mkdir -p /usr/local/nginx/logs/123

#检查是否创建成功
[root@localhost nginx]# ll /usr/local/nginx/logs/
总计 20
drwxr-xr-x 2 root root 4096 06-06 23:51 123
-rw-r--r-- 1 root root 3856 06-06 23:05 access.log
-rw-r--r-- 1 root root 4777 06-06 23:49 error.log
-rw-r--r-- 1 root root    6 06-06 23:51 nginx.pid
全部准备完毕后,就可以启动Nginx服务了,当然这里是重启.
3.控制Nginx
Nginx启动的语法: nginx -s signal
signal 常用的值可以是一下之一:
stop 立即关闭服务
quit 优雅的关闭,也可称为平滑关闭
reload 重载配置文件
reopen 重新启用配置文件
stop和quit的区别: 提到区别,就不得不提"master process"和"worker process". 当nginx收到发来的、
signal信号时,如果是quit,"master process"会等到"worker process"处理完当前已
连接的请求在关闭worker process,而如果是stop则立即关闭.
我们开始重载配置文件:
#配置文件有误的话,会发出提示,并回滚使用旧的配置文件,如果无误,则会启动新的工作进程,而像旧的工作进程发送关闭请求
[root@localhost nginx]# /usr/local/nginx/sbin/nginx -s reload
[root@localhost nginx]#
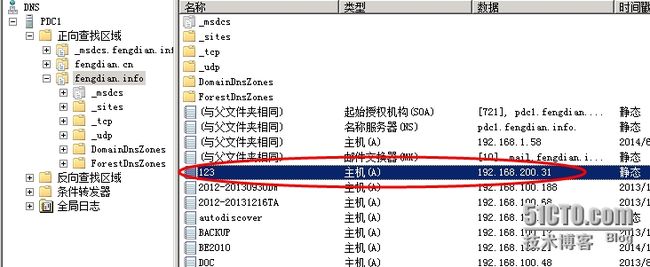
正式访问之前,我们在DNS中做解析:
打开浏览器,访问web站点,如图示:
这样我们的web站点就配置完成了.下面我们开始配置反向代理.
4. 反向代理配置
本例 192.168.1.100 主机的8080端提供视频会议web访问, 要求http://vc.fengdian.info:8080
访问该主机.
在sites目录下,新建vc文件,内容如下:
#vc文件内容
[root@localhost sites]# cat vc
server {
    listen 8080;
    server_name vc.fengdian.info;
    access_log  logs/vc/access.log;
    error_log   logs/vc/error.log;
    location / {
         proxy_pass http://192.168.1.100:8080;
    }
}
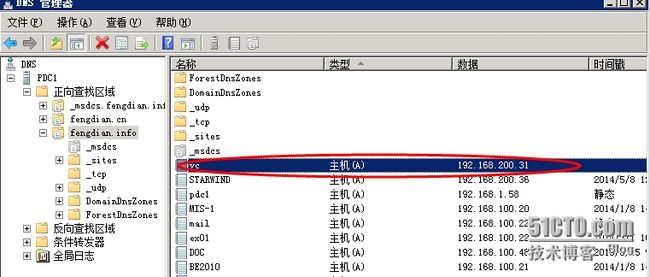
DNS新建主机A记录:
打开浏览器,访问http://vc.fengdian.info:8080,效果如图:
可见,反向代理配置正确,已经生效.
本文仅以最简单的实例来讲解基础配置,详细配置介绍请参见官方文档:http://nginx.org/en/docs/


