JeeSite 4.x 环境搭建,部署运行 IDEA
开发环境要求
1,Java SDK 1.8 下载
2,Apache Maven 3.3.0,3.6.0 下载
3,Eclipse IDE for Java EE Mars 2(4.5.2)下载,或IntelliJ IDEA 下载
4,MySql 5.7.11+ 下载(Oracle,PostgreSQL,Sql Server操作类似)
1.导入到IDEA
检出JeeSite4.x源代码
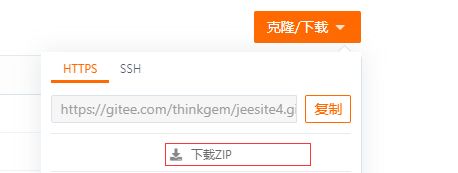
https://gitee.com/thinkgem/jeesite4.git访问网页
1>.选择 克隆/下载
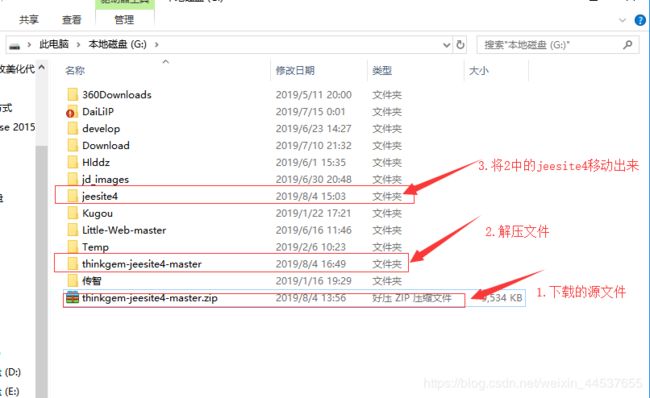
2>.解压文件-移动文件
3>.打开IDEA,
File->Open...->选择刚才解压的jeesite4 文件->点击OK
2.初始化数据库
1,以MySql为例
1)打开 my.ini 给 [mysqld] 增加如下配置:

sql_mode="ONLY_FULL_GROUP_BY,STRICT_TRANS_TABLES,ERROR_FOR_DIVISION_BY_ZERO,NO_AUTO_CREATE_USER,NO_ENGINE_SUBSTITUTION"

2)如果遇到 ERROR 1709 (HY000): Index column size too large. The maximum column size is 767 bytes. 错误

  a)打开 my.ini 给 [mysqld] 增加如下配置:

innodb_large_prefix = ON
innodb_file_format = Barracuda
innodb_file_per_table = ON

  b)并修改报错的建表语句后面加上:ENGINE=InnoDB row_format=DYNAMIC;

# 若没有修改my.ini的权限也可以使用命令查看参数和设置参数:
show global variables like "innodb_large_prefix";
show global variables like "innodb_file_format";
show global variables like "innodb_file_per_table";
set global innodb_large_prefix=ON;
set global innodb_file_format=Barracuda;
set global innodb_file_per_table=ON;
2,创建用户和授权
set global read_only=0;
set global optimizer_switch='derived_merge=off';
create user 'jeesite'@'%' identified by 'jeesite';
create database jeesite DEFAULT CHARSET 'utf8' COLLATE 'utf8_unicode_ci';
grant all privileges on jeesite.* to 'jeesite'@'%' identified by 'jeesite';
flush privileges;3,打开文件/src/main/resources/config/application.yml配置产品和项目名称及JDBC连接
# 产品或项目名称、软件开发公司名称
productName: JeeSite Demo
companyName: ThinkGem

# 产品版本、版权年份
productVersion: V4.1
copyrightYear: 2018

# 数据库连接
jdbc:

  # Mysql 数据库配置
  type: mysql
  driver: com.mysql.jdbc.Driver
  url: jdbc:mysql://127.0.0.1:3306/jeesite?useSSL=false&useUnicode=true&characterEncoding=utf-8&zeroDateTimeBehavior=convertToNull
  username: jeesite
  password: jeesite
  testSql: SELECT 1
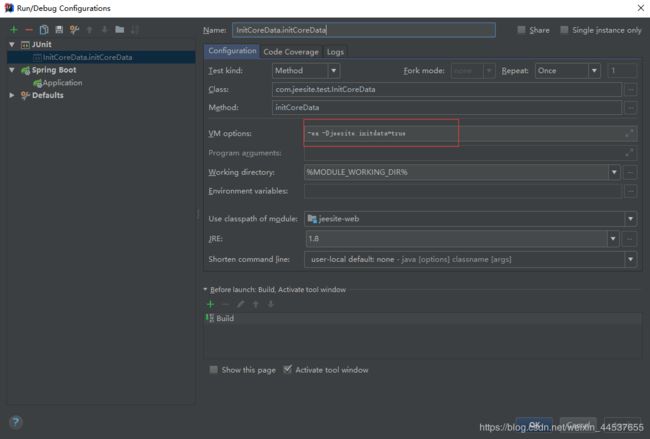
3.用idea运行InitCoreData.java之前需要设置一个参数否则会报异常 -Djeesite.initdata=true
可以先运行,会报错,将报错语句复制即可。
4.Application运行之前要配置 web项目下的pom.xml
			org.springframework.boot
			spring-boot-starter-tomcat

			compile
5.浏览器访问
1,地址:http://127.0.0.1:8980/js
2,默认最高管理员账号:system 密码:admin
3,这时已经配置完成,开启你的开发之旅吧
总结一下:
1.首先需要先下载;
2.初始化数据库
3.运行InitCoreData 初始化核心表数据;
4.运行Application,开启项目。
5.访问,开启开发之路。
附上jeeSite 4.x 下载
附上官网jeeSite 4.x 在线开发文档
附上免费教学视频
所学即所用,不做不用功。。。


