Linux运维之docker(五)私有仓库的构建及添加UI
Linux运维之docker(五)私有仓库的构建及添加UI
- 什么是registry私有仓库
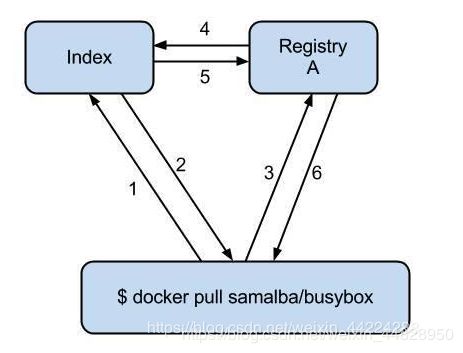
Docker Registry有三个角色,分别是index、registry和registry client
index:
负责并维护有关用户帐户、镜像的校验以及公共命名空间的信息。
Web UI
元数据存储
认证服务
符号化
registry:
是镜像和图表的仓库,它不具有本地数据库以及不提供用户认证,通过Index Auth service的Token的方式进行认证。
Registry Client:
Docker充当registry客户端来维护推送和拉取,以及客户端的授权。
工作原理:

index服务主要提供镜像索引以及用户认证的功能。当下载一个镜像的时候,首先会去index服务上做认证,然后查找镜像所在的registry的地址并放回给docker客户端,docker客户端再从registry下载镜像,在下载过程中 registry会去index校验客户端token的合法性,不同镜像可以保存在不同的registry服务上,其索引信息都放在index服务上。
- 私有仓库的部署
docker私有库的创建需要下载registry.tar的镜像,并且本地导入公共仓库的镜像,docker官方已经把仓库封装为镜像,直接通过启动容器就可以部署完成仓库
//本地下载镜像
[root@server1 ~]# docker load -i registry2.tar

//使用registry镜像运行容器
[root@server1 ~]# docker run -d --name registry -p 5000:5000 -v /opt/registry:/var/lib/registry registry:2
[root@server1 ~]# cd /opt/registry/
[root@server1 registry]# ls
docker
[root@server1 registry]# cd docker/
[root@server1 docker]# ls
registry

//查看私有仓库下的docker进程树
[root@server1 registry]# cd /opt/registry/
[root@server1 registry]# ls
docker
[root@server1 registry]# yum insatll -y tree
[root@server1 registry]# tree docker/

//对本地镜像重命名并且上传本地镜像到仓库
[root@server1 ~]# docker tag nginx:latest localhost:5000/nginx
[root@server1 ~]# docker images localhost:5000/nginx

//拉取上传的镜像到本地,因为本地已经有该镜像,为了实验效果可以将本地有的镜像删除然后再进行拉取
[root@server1 registry]# docker rmi localhost:5000/nginx:latest
[root@server1 registry]# docker rmi nginx:latest
[root@server1 registry]# docker pull localhost:5000/nginx
[root@server1 registry]# curl localhost:5000/v2/_catalog  ##核实是否上传成功
- 给私有仓库添加证书(TLS加密)
以上创建的私有仓库任何人都可以访问,这是不安全的,因此需要添加证书来增加私有仓库的安全性
创建服务端私有仓库的key及其证书
[root@server1 docker]# pwd
/tmp/docker
[root@server1 docker]# mkdir - p certs
[root@server1 docker]# openssl req -newkey rsa:4096 -nodes -sha256 -keyout certs/westos.org.key -x509 -days 365 -out certs/westos.org.crt

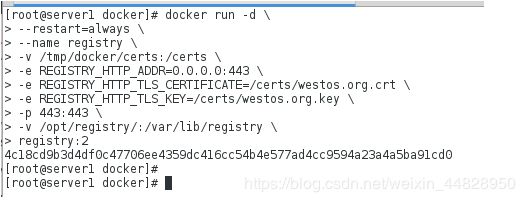
删除已经使用私有仓库运行的容器,重新运行容器使用私有仓库镜像,添加认证方式
[root@server1 docker]# docker rm -f registry

[root@server1 docker]# pwd
/tmp/docker
[root@server1 docker]# docker run -d \
> --restart=always \
> --name registry \
> -v /tmp/docker/certs:/certs \
> -e REGISTRY_HTTP_ADDR=0.0.0.0:443 \
> -e REGISTRY_HTTP_TLS_CERTIFICATE=/certs/westos.org.crt \
> -e REGISTRY_HTTP_TLS_KEY=/certs/westos.org.key \
> -p 443:443 \
> -v /opt/registry/:/var/lib/registry \
> registry:2
[root@server1 docker]# docker ps

创建证书存放目录(/etc/docker)并且将生成的证书(/tpm/docker)导入该目录
[root@server1 docker]# pwd
/etc/docker
[root@server1 docker]# ls
daemon.json  key.json
[root@server1 docker]# mkdir certs.d/
[root@server1 docker]# cd certs.d/
[root@server1 certs.d]# ls
[root@server1 certs.d]# mkdir westos.org
[root@server1 certs.d]# cd westos.org/
[root@server1 westos.org]# cp /tmp/docker/certs/westos.org.crt .
[root@server1 westos.org]# ls
westos.org.crt
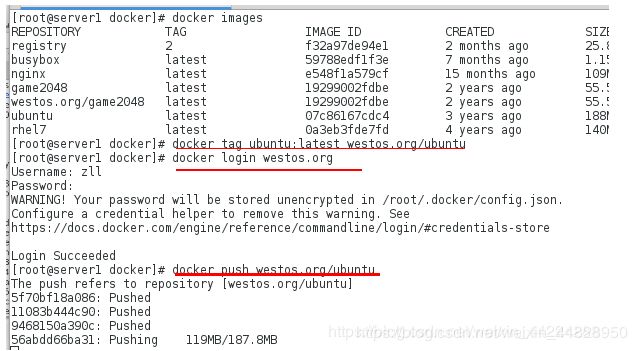
对已有镜像使用私有仓库名重命名并且进行导入到私有仓库,再导入镜像时注意要添加私有仓库的域名解析

上传本地镜像到私有仓库

使用虚拟机server2作为客户端来进行验证,需要安装docker并且开启docker,并且添加私有仓库解析
[root@server2 docker]# ls
container-selinux-2.21-1.el7.noarch.rpm  pigz-2.3.4-1.el7.x86_64.rpm
docker-ce-18.06.1.ce-3.el7.x86_64.rpm    policycoreutils-2.5-17.1.el7.x86_64.rpm
libsemanage-2.5-8.el7.x86_64.rpm         policycoreutils-python-2.5-17.1.el7.x86_64.rpm
libsemanage-python-2.5-8.el7.x86_64.rpm
[root@server2 docker]# yum insta -y *
[root@server2 docker]# systemctl start docker

[root@server2 docker]# vim /etc/hosts
172.25.254.1   server1 westos.org
创建同样的证书目录并且将私有仓库的证书上传到该目录下面
[root@server2 docker]# cd /etc/docker/
[root@server2 docker]# ls
key.json
[root@server2 docker]# mkdir certs.d/westos.org -p
[root@server2 docker]# cd certs.d/westos.org/
[root@server2 westos.org]# scp server1:/etc/docker/certs.d/westos.org/westos.org.crt  .
[root@server2 westos.org]# ls
westos.org.crt
再客户端拉取私有仓库的镜像
[root@server2 westos.org]# docker pull wetos.org/game2048
- 创建用户名,密码方式登陆私有库
创建用户名和密码的认证目录,并且运行容器添加用户和密码
注意:在创建时需要使用追加的方式,否则新创建的用户名和密码会覆盖已经创建的
[root@server1 docker]# docker run --rm --entrypoint htpasswd registry:2 -Bbn zll westos > auth/htpasswd
[root@server1 docker]# docker run --rm --entrypoint htpasswd registry:2 -Bbn student student >> auth/htpasswd
[root@server1 docker]# cat auth/htpasswd
zll:$2y$05$GpOObbcFjD3bg115clAoGulPoH8mlYyBw6CeEQkMtw67S..JwLydG

student:$2y$05$9oYnSJjn8nQXVIfI.MKYbeRPCtz1vwKv3RyFbz29CcR4FtznxZQDq
删除已有的私有仓库镜像正在运行的容器,并且运行新的容器添加用户名和密码的认证方式
[root@server1 docker]# docker run -d \
> --restart=always \
> --name registry \
> -v /tmp/docker/certs:/certs \
> -e REGISTRY_HTTP_ADDR=0.0.0.0:443 \
> -e REGISTRY_HTTP_TLS_CERTIFICATE=/certs/westos.org.crt \
> -e REGISTRY_HTTP_TLS_KEY=/certs/westos.org.key \
> -p 443:443 \
> -v /opt/registry/:/var/lib/registry \
> -v /tmp/docker/auth/:/auth \
> -e "REGISTRY_AUTH=htpasswd" \
> -e "REGISTRY_AUTH_HTPASSWD_REALM=Registry Realm" \
> -e REGISTRY_AUTH_HTPASSWD_PATH=/auth/htpasswd \
> registry:2
- 为私有仓库添加webUI
获取registry官方webui
[root@server1 ~]# docker pull hyper/docker-registry-web
登录查看认证信息
[root@server1 ~]# cd .docker/
[root@server1 .docker]# vim config.json

{
        "auths": {
                "westos.org": {
                        "auth": MDUxNjYwMjN6bQw6MTUxOTE30Dg4OTB6bGw="
                }
        },
        "HttpHeaders": {
                "User-Agent": "Docker-Client/18.09.7 (linux)"
        }
}
运行容器:
[root@server1 ~]# docker run -it -p 8080:8080 \
--name registry-web\
 --link registry:westos.org\
  -e REGISTRY_URL=https://westos.org/v2 \
  -e REGISTRY_TRUST_ANY_SSL=true\
   -e REGISTRY_BASIC_AUTH="dG90bzpyZWRoYXQ=" \
   -e REGISTRY_NAME=westos.org \
   hyper/docker-registry-web


