Vue基础
VUE开发基础
- 01-Vue初体验
- 01-HelloVuejs
- 02-Vue列表展示(v-for循环遍历)
- 03-Vue计数器效果(v-on绑定)
- 02-插值操作与常用指令
- 01-Mustache语法({})
- 02-v-once指令的使用
- 03-v-html指令的使用
- 04-v-text指令的使用
- 05-v-pre指令的使用
- 06-v-cloak指令的使用
- 03-动态绑定属性
- 01-v-bind指令的基本使用
- 02-v-bind动态绑定class(对象语法)
- 03-v-bind动态绑定class(数组语法)
- 04-v-bind动态绑定style(对象语法)
- 05-v-bind动态绑定style(数组语法)
- 04-计算属性
- 01-计算属性的基本使用
- 02-计算属性的复杂使用
- 03-计算属性和methods的区别
- 05-事件监听(v-on)
- 01-v-on的基本使用
- 02-v-on的参数传递问题
- 03-v-on修饰符的使用
- 06-条件判断
- 01-v-if的使用
- 02-v-if和v-else的使用
- 03-v-if和v-else-if和v-else的使用
- 04-v-show的使用
- 07-循环遍历(v-for)
- 01-v-for遍历数组
- 02-v-for遍历对象
- 03-v-for使用过程添加key
- 03-数组的响应式方法
- 08-购物车案例分享
- 09-v-model的使用(双向绑定)
- 01-v-model的基本使用
- 02-v-model的原理
01-Vue初体验
01-HelloVuejs
1.引入vue.js
<script src="../js/vue.js"></script>
2.定义Vue实例
const app =  new Vue({
	el: '#app',  //用于挂载要管理的元素,决定Vue对象挂载到哪一个元素上
	data: { //定义一些数据
	    message:'信息',
	    name:'名字'
            }
        })
el:挂载要管理的元素,决定Vue对象具体挂载到哪一个元素上
data:定义一些用于可以动态更改的数据
3.创建id为el挂载元素的div
<div id="app">{{message}}</div> <!--挂载后显示-->
02-Vue列表展示(v-for循环遍历)
1.引入vue.js
<script src="../js/vue.js"></script>
2.定义Vue实例
<script>
  const app = new Vue({
      el:'#app',
      data: {
        message:'你好啊',
        movies:['海王','星际穿越','大话西游','盗梦空间']
      }
  })
</script>
data下的movies定义了四个对象。
3.3.创建id为el挂载元素的div
<div id="app">
  <ul>
      <!-- v-for指令 -->
      <li v-for="items in movies">{{items}}</li>
   </ul>
</div>
显示效果如下:

03-Vue计数器效果(v-on绑定)
1.引入vue.js
<script src="../js/vue.js"></script>
2.定义Vue实例
const app = new Vue({
    el: '#app',  //string|HTMLElement 决定之后Vue管理哪一个DOM
    data: { //组件当中data必须是一个函数
        counter: '0'
    },
    methods:{ //Vue对象中定义方法,新的属性
        add: function(){
            this.counter++  //当前对象里的counter
        },
        sub: function(){
            this.counter--
        }
    },
    created:function(){
    },
    mounted: function(){
    }
})
methods:属性内定义方法:方法名:function() {this.counter++}
this指向当前data对象内的counter
3.创建id为el挂载元素的div
<div id="app">
        <h2>当前计数:{{counter}}</h2>
        <!-- <button v-on:click="counter++">+</button> -->
        <!-- <button v-on:click="counter--">-</button> -->

        <button v-on:click="add">+</button>
        <button @click="sub">-</button>  <!--语法糖 新的指令:监听某个元素的点击事件-->
    </div>
v-on:click可以简化为**@click**(语法糖写法)
显示效果如下:数字会随着button点击而改变

02-插值操作与常用指令
01-Mustache语法({})
1.引入vue.js
<script src="../js/vue.js"></script>
2.定义Vue实例
const vm = new Vue({
    el: '#app',
    data: {
      message:'你好啊',
      firstName:'kobe',
      lastName:'bryant',
      counter: 100
    },
    methods: {

    }
  });
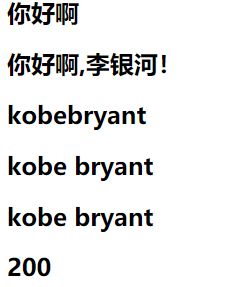
3.创建id为el挂载元素的div
<div id="app">
  <h2>{{message}}</h2>
  <h2>{{message}},李银河!</h2>
  <!-- 在mustache语法中,不仅仅可以直接写变量也可以写一些表达式 -->
  <h2>{{firstName + lastName}}</h2>
  <h2>{{firstName + ' ' + lastName}}</h2>
  <h2>{{firstName}} {{lastName}}</h2>
  <h2>{{counter * 2}}</h2>
</div>
显示效果如下:
02-v-once指令的使用
作用:·
对容器使用v-once指令进行修饰之后,对数据进行修改,界面不更新
3.创建id为el挂载元素的div
<div id="app">
  <h2 v-for="">{{message}}</h2>
  <h2 v-once>{{message}}</h2>
</div>
03-v-html指令的使用
作用:·
将HTML字符串解析为HTML标签
2.定义Vue实例
const vm = new Vue({
    el: '#app',
    data: {
      message:'你好啊',
      url:'百度一下'
    },
    methods: {}
  });
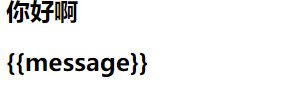
3.创建id为el挂载元素的div
<div id="app">
  <h2>{{url}}</h2>
  <h2 v-html="url"></h2>
</div>
显示效果如下:注意使用{}以及使用v-html所带来的区别。

04-v-text指令的使用
作用:
v-text和Mustache语法作用不尽相同。
2.定义Vue实例
const vm = new Vue({
    el: '#app',
    data: {
      message:'你好'
    },
    methods: {}
  });
3.创建id为el挂载元素的div
<div id="app">
  <h2>{{message}}123</h2>
  <h2 v-text="message">123</h2>
</div>
05-v-pre指令的使用
作用:
使内容不根据插值语法进行显示,而显示他原本的语句。
3.创建id为el挂载元素的div
<div id="app">
  <h2>{{message}}</h2>
  <h2 v-pre>{{message}}</h2>
</div>
显示效果如下:
06-v-cloak指令的使用
作用:
页面加载需要时间,使用此指令相当于穿上一层斗篷,在页面未完全加载前,可以阻止页面显示。
该属性,在vue解析前,会存在于属性,在vue解析后,会消失。
2.定义Vue实例
setTimeout(function(){
    const vm = new Vue({
    el: '#app',
    data: {
      message:'你好'
    },
    methods: {}
  });
  },1000)
3.创建id为el挂载元素的div
<div id="app" v-cloak>
  <h2>{{message}}</h2>
  <h2>{{message}}</h2>
</div>
03-动态绑定属性
01-v-bind指令的基本使用
2.定义Vue实例
 const vm = new Vue({
    el: '#app',
    data: {
      message:'你好啊',
      imgURL:'https://www.baidu.com/img/PC-pad_6d2362fef025ffd42a538cfab26ec26c.png',
      aHref:'https://www.baidu.com/'
    },
    methods: {}
  });
3.创建id为el挂载元素的div
<div id="app">
  <!-- 错误做法 -->
  <!-- <img src="{{imgURL}}" alt=""> -->

  <img v-bind:src="imgURL" alt="">

  <!-- v-bind语法糖-->
  <a :href="aHref">百度一下</a>
</div>
v-bind的语法糖写法为 :
显示效果如下:

02-v-bind动态绑定class(对象语法)
用法:
<h2 v-bind:class="{key1:value1,key2: value2}">{{message}}</h2>
2.定义Vue实例
const vm = new Vue({
    el: '#app',
    data: {
      message:'你好',
      isActive:true,
      isLine:true
    },
3.创建id为el挂载元素的div
<div id="app">
  <h2  class="title" v-bind:class="{active: isActive, line: isLine}">{{message}}</h2>
</div>
4.写上style样式
  <style>
    .active{
      color: red;
    }
  </style>
显示效果如下:

03-v-bind动态绑定class(数组语法)
2.定义Vue实例
const vm = new Vue({
    el: '#app',
    data: {
      message:'你好啊',
      active:'aaaaa',
      line:'bbbbbb'
    },
    methods: {}
  });
3.创建id为el挂载元素的div
  <!-- 字符串 -->
  <h2 :class="['active', 'line']">message</h2>
  <!-- 变量 -->
  <h2 :class="[active, line]">message</h2>
效果如下:

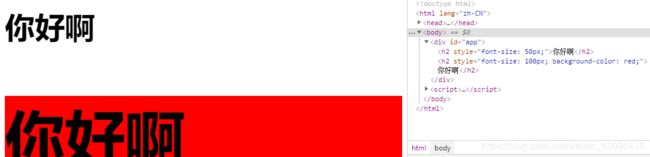
04-v-bind动态绑定style(对象语法)
用法:
<h2 :style="{key(属性名):value(属性值)}"></h2>
2.定义Vue实例
const vm = new Vue({
    el: '#app',
    data: {
      message:'你好啊',
      finalSize: '100px',
      finalColor:'red'
    },
    methods: {}
  });
3.创建id为el挂载元素的div
  <h2 :style="{fontSize: '50px'}">{{message}}</h2>
  <!-- finalSize当成变量来使用 -->
  <h2 :style="{fontSize: finalSize, backgroundColor: finalColor}">{{message}}</h2>
显示效果如下:
05-v-bind动态绑定style(数组语法)
2.定义Vue实例
const vm = new Vue({
    el: '#app',
    data: {
      message: '你好啊',
      baseStyle:{backgroundColor: 'red' },
    },
    methods: {}
  });
3.创建id为el挂载元素的div
<div id="app">
  <h2 :style="[baseStyle]">{{message}}</h2>
</div>
04-计算属性
01-计算属性的基本使用
2.定义Vue实例
const vm = new Vue({
    el: '#app',
    data: {
      firstName:'Lebron',
      lastName:'James'
    },
    // 计算属性:起名字尽可能按属性的名字起
    computed: {
      fullName: function(){
        return this.firstName + ' ' + this.lastName
      }
    },
    methods: {}
  });
3.创建id为el挂载元素的div
 <h2>{{firstName + '' +lastName}}</h2>
 <h2>{{firstName}} {{lastName}}</h2>
 <h2>{{fullName}}</h2>
显示效果如下:

02-计算属性的复杂使用
2.定义Vue实例
const vm = new Vue({
    el: '#app',
    data: {
      books:[
        {id: 110,name: 'Unix编程艺术' ,price: 119},
        {id: 111,name: '代码大全' ,price: 105},
        {id: 112,name: '深入理解计算机原理' ,price: 98},
        {id: 113,name: '现代操作系统' ,price: 87},
      ]
    },
    computed: {
      totalPrice: function(){
        // filter/map/reduce
        // return this.books.reduce()
        let result = 0
        for(let i=0; i<this.books.length; i++) {
          result += this.books[i].price
        }
        return result
        // ES6
        //  for (let i in this.books) {
        //    this.books[i]
        //  }
        //  for (let book of this.books) {

        //  }
      }
    },
    methods: {}
  });
3.创建id为el挂载元素的div
<div id="app">
  <h2>总价格:{{totalPrice}}</h2>
</div>
03-计算属性和methods的区别
区别:
计算属性是由缓存的。
2.定义Vue实例
 const vm = new Vue({
    el: '#app',
    data: {
      firstName:'Kobe',
      lastName:'Bryant'
    },
    // 计算属性是有缓存的
    computed: {
      fullName:function(){
        console.log('fullName')
        return this.firstName + " " + this.lastName
      }
    },
    methods: {
      getFullName: function(){
        console.log('getFullName');
        return this.firstName + ' ' + this.lastName
      }
    }
  });
3.创建id为el挂载元素的div
<div id="app">
  <!-- 通过computed -->
  <h2>{{fullName}}</h2>
  <h2>{{fullName}}</h2>
  <!-- 通过methods -->
  <h2>{{getFullName()}}</h2>
  <h2>{{getFullName()}}</h2>
</div>
两者在缓存中的区别如下所示:

05-事件监听(v-on)
01-v-on的基本使用
写法:
v-on:click/@click(语法糖写法)
2.定义Vue实例
 const vm = new Vue({
    el: '#app',
    data: {
      counter: '0'
    },
    methods: {
      increment() {
        this.counter++
      },
      decrement() {
        this.counter--
      }
    }
  });
3.创建id为el挂载元素的div
<div id="app">
  <h2>{{counter}}</h2>
  <!-- <button v-on:click="counter++">+</button>
  <button v-on:click="counter--">-</button> -->
  <button v-on:click="increment">+</button>
  <button v-on:click="decrement">-</button>
  <!-- 语法糖 -->
  <button @click="increment">+</button>
  <button @click="decrement">-</button>
</div>
02-v-on的参数传递问题
2.定义Vue实例
 const vm = new Vue({
    el: '#app',
    data: {
      counter: '0'
    },
    methods: {
      btn1Click() {
        console.log('btn1Click');
      },
      btn2Click(abc) {
        console.log('-------' , abc);
      },
      btn3Click(abc , event) {
        console.log('+++++', abc, event);
      }
    }
  });
3.创建id为el挂载元素的div
<div id="app">
  <!-- 事件调用的方法没有参数 -->
  <button @clock="btn1Click">按钮1</button>
  <button @clock="btn1Click()">按钮1</button>

  <!-- 在事件定义时,写函数时省略了小括号,但是事件本身需要参数 -->
  <button @click="btn2Click(123)">按钮2</button>
  <!-- 没有传参数,会变成undefined -->
  <button @click="btn2Click()">按钮2</button>
  <!-- 没有加(),这个时候Vue默认会将浏览器生产的event对象作为参数传入进来 -->
  <button @click="btn2Click">按钮2</button>

  <!-- 在方法定义时,我们需要event对象,同时又需要其他参数 -->
  <!-- 在调用方式时,如何手动获取到浏览器产生的event对象:$event -->
  <button @click="btn3Click('abc', $event)">按钮3</button>

  <!--  -->
  <button>按钮4</button>

</div>
03-v-on修饰符的使用
.stop修饰符的使用:阻止事件冒泡
.prevent:阻止默认事件
.监听某个键盘的键的点击
2.定义Vue实例
const vm = new Vue({
    el: '#app',
    data: {},
    methods: {
      btnClick() {
        console.log("btnClick");
      },
      btn2Click(){
        console.log("btn2Click")
      },
      divClick() {
        console.log("divClick");
      },
      submitClick() {
        console.log("submitClick");
      },
      keyUp() {
        console.log("keyUp")
      }
    }
  });
3.创建id为el挂载元素的div
<div id="app">
  <div @click="divClick">
  aaaaaa
  <button @click.stop="btnClick">按钮</button>
</div>

<!-- .prevent:阻止默认事件 -->
<br>
<form action="baidu">
  <input type="submit" value="提交" @click.prevent="submitClick">
</form>

<!-- 3 .监听某个键盘的键的点击 -->
<input type="text" @keyup.enter="keyUp">

<!-- 4 .监听某个键盘的键的点击 -->
<button @click.once="btn2Click">按钮2</button>
</div>
06-条件判断
01-v-if的使用
2.定义Vue实例
  const vm = new Vue({
    el: '#app',
    data: {
      message:'你好啊',
      isShow:true
    },
    methods: {}
  });
3.创建id为el挂载元素的div
<div id="app">
  <h2 v-if="isShow">{{message}}</h2>
</div>
02-v-if和v-else的使用
2.定义Vue实例
  const vm = new Vue({
    el: '#app',
    data: {
      message:'你好啊',
      isShow:true
    },
    methods: {}
  });
3.创建id为el挂载元素的div
<div id="app">
  <h2 v-if="isShow">
    <div>abc</div>
    {{message}}
  </h2>
  <h1 v-else>isShow为false时,显示我{{}}</h1>
</div>
03-v-if和v-else-if和v-else的使用
2.定义Vue实例
  const vm = new Vue({
    el: '#app',
    data: {
      score: 99
    },
    computed: {
      result() {
        let showMessage = '';
        if(this.score>= 90) {
          showMessage = '优秀'
        } else if (this.score >= 80){
          showMessage = '良好'
        }
        return showMessage
      }
    },
    methods: {}
  });
3.创建id为el挂载元素的div
<div id="app">
  <h2 v-if="score>=90">优秀</h2>
  <h2 v-else-if="score>=80">良好</h2>
  <h2 v-else-if="score>=60">及格</h2>
  <h2 v-else>不及格</h2>

  <h1>{{result}}</h1>
</div>
04-v-show的使用
v-if和v-show的区别:
使用v-if当条件为false时,包含v-if指令的元素根本就不会存在dom中
使用v-show当条件为false时,只是给我们的元素添加一个行内样式。
2.定义Vue实例
  const vm = new Vue({
    el: '#app',
    data: {
      message: '你好啊',
      isShow : true
    },
    methods: {}
  });
3.创建id为el挂载元素的div
<div id="app">
  <!--
  v-if: 当条件为false时,包含v-if指令的元素根本就不会存在dom中
   -->
  <h2 v-if="isShow" id="aaa">{{message}}</h2>

  <!-- v-show:当条件为false时,v-show只是给我们的元素添加一个行内样式:display:none -->
  <h2 v-show="isShow" id="bbb">{{message}}</h2>
</div>
07-循环遍历(v-for)
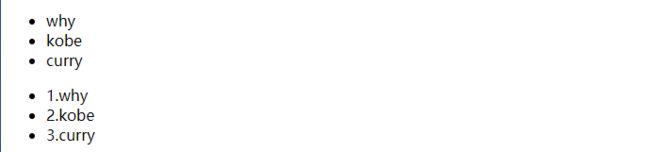
01-v-for遍历数组
2.定义Vue实例
  const vm = new Vue({
    el: '#app',
    data: {
      names:['why' , 'kobe' , 'curry']
    },
    methods: {
    }
  });
3.创建id为el挂载元素的div
<div id="app">
  <!-- 在遍历的过程中,没有使用索引值(下标值) -->
  <ul>
    <li v-for="items in names">{{items}}</li>
  </ul>

  <!-- 2.在遍历的过程中,获取索引值 -->
  <ul>
    <li v-for="(items, index) in names">
      {{index+1}}.{{items}}
    </li>
  </ul>
</div>
显示效果如下:
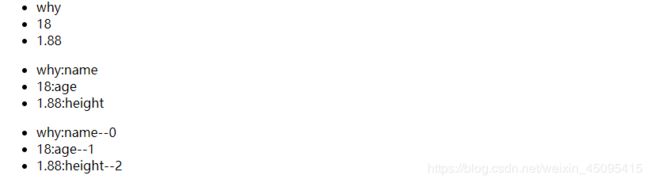
02-v-for遍历对象
2.定义Vue实例
1.在遍历对象的过程中,如果只是获取一个值,那么获取到的是value
2.获取key,value
3.获取key,value,index
 const vm = new Vue({
    el: '#app',
    data: {
      info : {
        name : 'why',
        age: 18,
        height: 1.88
      }
    },
    methods: {}
  });
3.创建id为el挂载元素的div

```javascript
<div id="app">
  <!-- 1.在遍历对象的过程中,如果只是获取一个值,那么获取到的是value -->
  <ul>
    <li v-for="items in info">{{items}}</li>
  </ul>

    <!-- 2.获取key,value -->
    <ul>
      <li v-for="(items , key) in info">{{items}}:{{key}}</li>
    </ul>

    <!-- 3.获取key,value,index -->
    <ul>
      <li v-for="(items , key , index) in info">{{items}}:{{key}}--{{index}}</li>
    </ul>
</div>
显示效果如下:
03-v-for使用过程添加key
2.定义Vue实例
const vm = new Vue({
    el: '#app',
    data: {
      letters: ['a' , 'b' , 'c' , 'd' , 'e']
    },
    methods: {}
  });
3.创建id为el挂载元素的div
<div id="app">
  <ul>
    <!-- 组件的key属性:key的作用主要是为了高效的更新虚拟DOM -->
    <!-- 有key之后会之前有的会一一绑定,不让他发生变换 -->
    <li v-for="items in letters" :key="items">{{items}}</li>
  </ul>
</div>
03-数组的响应式方法
1.push方法:在数组后添加元素
this.letters.push('aaa' , 'bbb' , 'ccccc')
2.pop():删除数组中的最后一个元素
this.letters.pop();
3.shift():删除数组中的第一个元素
this.letters.shift();
4.unshift():在数组最前面添加元素
this.letters.unshift('aaa');
5.splice(,) :删除元素/插入元素/替换元素
index:必需。整数,规定添加/删除项目的位置,使用负数可从数组结尾处规定位置。 howmany:必需。要删除的项目数量。如果设置为0,则不会删除项目。
item1, …, itemX:可选。向数组添加的新项目。
arrayObject.splice(index,howmany,item1,.....,itemX)
6.sort():排序
this.letters.sort()
7.reverse():反转
this.letters.reverse()
08-购物车案例分享
index.html:
<!DOCTYPE html>
<html lang="en">
<head>
  <meta charset="UTF-8">
  <meta name="viewport" content="width=device-width, initial-scale=1.0">
  <title>Document</title>
  <link rel="stylesheet" href="style.css">
</head>
<body>

<div id="app">
  <div v-if="books.length">
  <table>
    <thead>
      <tr>
        <th></th>
        <th>书籍名称</th>
        <th>出版日期</th>
        <th>价格</th>
        <th>购买数量</th>
        <th>操作</th>
      </tr>
    </thead>

    <tbody>

      <!-- 遍历得到四个object(四行)-->
      <tr v-for="(item, index) in books">
        <!--对每一个对象进行遍历,获取每一个对象中所对应的属性 1.id 2.name ... -->
        <!-- <td v-for="value in item">{{value}}</td> -->
        <td>{{item.id}}</td>
        <td>{{item.name}}</td>
        <td>{{item.date}}</td>
        <!-- 过滤器 -->
        <td>{{item.price | showPrice}}</td>
        <!-- <td>{{getFinalPrice(item.price)}}</td> -->
        <td>
          <button @click="decrement(index)" v-bind:disabled="item.count <= 1">-</button>
          {{item.count}}
          <button @click="increment(index)">+</button>
        </td>
        <td><button @click="removeClick(index)">移除</button></td>
      </tr>

    </tbody>
  </table>
  <h2>总价格:{{totalPrice | showPrice}}</h2>
  </div>
  <h2 v-else>购物车为空</h2>
</div>

<script src="../js/vue.js"></script>
<script src="main.js"></script>
</body>
</html>
main.js:
const app = new Vue({
  el: '#app',
  data: {
    books: [
      {
        id:1,
        name:'《算法导论》',
        date: '2006-9',
        price: 85.00,
        count: 1
      },
      {
        id:2,
        name:'《UNIX编程艺术》',
        date: '2006-2',
        price: 50.00,
        count: 1
      },
      {
        id:3,
        name:'《编程珠玑》',
        date: '2008-10',
        price: 39.00,
        count: 1
      },
      {
        id:4,
        name:'《代码大全》',
        date: '2006-3',
        price: 128.00,
        count: 1
      },
    ]
  },
  computed:{
    //  book[0]的总价+ book[1]的总价+ book[2]的总价+ book[3]的总价
    totalPrice() {
      // 1.普通的for循环
      // let totalPrice = 0
      // for (let i = 0; i
      //   totalPrice += this.books[i].price * this.books[i].count
      // }
      // return totalPrice

      // 2.for (let i in/of this.books) : 得到i是索引值
      // let totalPrice = 0
      // for (let i in this.books) {
      //   totalPrice += this.books[i].price * this.books[i].count
      // }
      // return totalPrice

      // 3.reduce
      return this.books.reduce(function (preValue , books){
        return preValue + books.count * books.price
      },0)
  }
},
  methods: {
    // getFinalPrice(price){
    //   return '$' + price.toFixed(2)
    // }
    increment(index) {
      // console.log('increment' ,index);
      this.books[index].count++
    },
    decrement(index) {
      this.books[index].count--
    },
    removeClick(index) {
      this.books.splice(index,1)
    }
  },
  // 过滤器
  filters: {
    showPrice(price) {
      return '$' + price.toFixed(2)
    }
  }
})
style.css
table {
  border: 1px solid #e9e9e9;
  /* 表格两边框合并为一条 */
  border-collapse: collapse;
  border-spacing: 0;
}

th,td {
  padding: 8px 16px;
  border: 1px solid #e9e9e9;
  text-align: left;
}

th {
  background-color: #f7f7f7;
  color: #5c6b77;
  /* 字体粗细 */
  font-weight: 600;
}
09-v-model的使用(双向绑定)
01-v-model的基本使用
2.定义Vue实例
const vm = new Vue({
    el: '#app',
    data: {
      message:'你好啊'
    },
    methods: {}
  });
3.创建id为el挂载元素的div
<div id="app">
  <!-- 双向绑定 -->
  <input type="text" v-model="message">
  {{message}}
</div>
02-v-model的原理
<div id="app">
  <!-- 双向绑定 -->
  <!-- <input type="text" v-model="message"> -->

  <!-- input事件,监听用户输出东西 -->
  <!-- <input type="text" v-bind:value="message" v-on:input="valueChange"> -->

  <!--$event.target.value:获取当前元素的最新值  -->
  <input type="text" :value="message" @input="message = $event.target.value">

  <h2>{{message}}</h2>
</div>