使用uni app实现H5微信分享功能
一、描述
要实现自定义微信分享功能,需要使用到微信官方提供的 js-sdk,微信JS-SDK是微信公众平台 面向网页开发者提供的基于微信内的网页开发工具包,通过使用微信JS-SDK,网页开发者可借助微信高效地使用拍照、选图、语音、位置等手机系统的能力,同时可以直接使用微信分享、扫一扫、卡券、支付等微信特有的能力,为微信用户提供更优质的网页体验。
二、准备工作
下载 HBuilderX 并安装
js-sdk官方开发文档 《官方文档》
三、JS-SDK使用步骤
步骤一:绑定域名
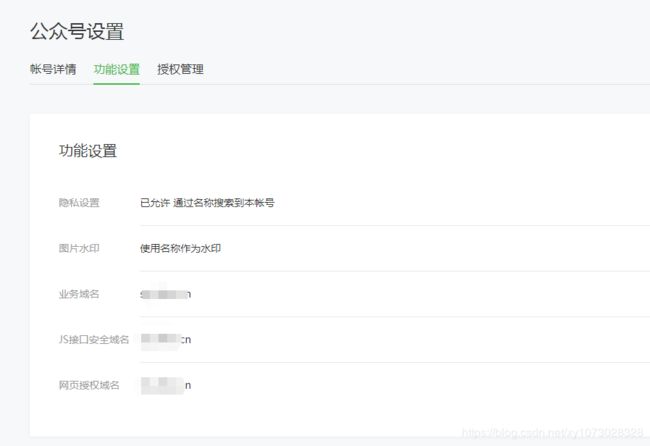
先登录微信公众平台进入“公众号设置”的“功能设置”里填写“JS接口安全域名”。
注意:该公众号必须通过微信认证,没有微信公众号需要注册一个 点击注册公众号
 这里业务域名、js接口安全域名以及网页授权域名设置成一样的(分享可以不用配置网页授权域名),根据自己的业务需求来设置.
注意:前端页面必须在js接口安全域名下,获取token时是需要配置ip白名单(服务器的公网ip即可)。

步骤二:引入JS文件
在需要调用JS接口的页面引入如下JS文件,(支持https):http://res.wx.qq.com/open/js/jweixin-1.6.0.js
如需进一步提升服务稳定性,当上述资源不可访问时,可改访问:http://res2.wx.qq.com/open/js/jweixin-1.6.0.js (支持https)。
备注:支持使用 AMD/CMD 标准模块加载方法加载
步骤三:通过config接口注入权限验证配置
所有需要使用JS-SDK的页面必须先注入配置信息,否则将无法调用(同一个url仅需调用一次,对于变化url的SPA的web app可在每次url变化时进行调用,目前Android微信客户端不支持pushState的H5新特性,所以使用pushState来实现web app的页面会导致签名失败,此问题会在Android6.2中修复)。
wx.config({
  debug: true, // 开启调试模式,调用的所有api的返回值会在客户端alert出来,若要查看传入的参数,可以在pc端打开,参数信息会通过log打出,仅在pc端时才会打印。
  appId: '', // 必填,公众号的唯一标识
  timestamp: , // 必填,生成签名的时间戳
  nonceStr: '', // 必填,生成签名的随机串
  signature: '',// 必填,签名
  jsApiList: [] // 必填,需要使用的JS接口列表
});
步骤四:通过ready接口处理成功验证
wx.ready(function(){
  // config信息验证后会执行ready方法,所有接口调用都必须在config接口获得结果之后,config是一个客户端的异步操作,所以如果需要在页面加载时就调用相关接口,则须把相关接口放在ready函数中调用来确保正确执行。对于用户触发时才调用的接口,则可以直接调用,不需要放在ready函数中。
});
四、业务逻辑
以上js-sdk需要的配置以及介绍完毕,开始上代码部分。
1、后端代码
调用微信sdk是需要后端进行签名的,签名代码:
1)、获取token
// 获取token
    private static String getAccessToken() {
        String access_token = "";
        String grant_type = "client_credential";//获取access_token填写client_credential
        String AppId="你自己的公众号appid";//第三方用户唯一凭证
        String secret="公众号 秘钥";//第三方用户唯一凭证密钥,即appsecret
        //这个url链接地址和参数皆不能变  这个token是需要进行缓存的,因为它的调用次数每日是有限的。

        String url = "https://api.weixin.qq.com/cgi-bin/token?grant_type="+grant_type+"&appid="+AppId+"&secret="+secret;  //访问链接

        try {
            URL urlGet = new URL(url);
            HttpURLConnection http = (HttpURLConnection) urlGet.openConnection();
            http.setRequestMethod("GET"); // 必须是get方式请求
            http.setRequestProperty("Content-Type","application/x-www-form-urlencoded");
            http.setDoOutput(true);
            http.setDoInput(true);
            http.connect();
            InputStream is = http.getInputStream();
            int size = is.available();
            byte[] jsonBytes = new byte[size];
            is.read(jsonBytes);
            String message = new String(jsonBytes);
            JSONObject demoJson = JSONObject.fromObject(message);
            access_token = demoJson.getString("access_token");
            is.close();
        } catch (Exception e) {
            e.printStackTrace();
        }
        logger.info("access_token:"+access_token);
        return access_token;
    }
2)、获取ticket (需要缓存)
  // 获取ticket
    private static String getTicket(String access_token) {
        String ticket = null;
        String url = "https://api.weixin.qq.com/cgi-bin/ticket/getticket?access_token=" + access_token + "&type=jsapi";// 这个url链接和参数不能变
        try {
            URL urlGet = new URL(url);
            HttpURLConnection http = (HttpURLConnection) urlGet.openConnection();
            http.setRequestMethod("GET"); // 必须是get方式请求
            http.setRequestProperty("Content-Type", "application/x-www-form-urlencoded");
            http.setDoOutput(true);
            http.setDoInput(true);
            System.setProperty("sun.net.client.defaultConnectTimeout", "30000");// 连接超时30秒
            System.setProperty("sun.net.client.defaultReadTimeout", "30000"); // 读取超时30秒
            http.connect();
            InputStream is = http.getInputStream();
            int size = is.available();
            byte[] jsonBytes = new byte[size];
            is.read(jsonBytes);
            String message = new String(jsonBytes, "UTF-8");
            JSONObject demoJson = JSONObject.fromObject(message);
            ticket = demoJson.getString("ticket");
            is.close();
        } catch (Exception e) {
            e.printStackTrace();
        }
        System.out.println("ticket:"+ticket);
        return ticket;
    }
3)、签名类
public class Sign {
    public static Map<String, String> sign(String jsapi_ticket, String url) {
        Map<String, String> ret = new HashMap<String, String>();
        String nonce_str = create_nonce_str();  //生成随机串
        String timestamp = create_timestamp();   //生成当前时间戳
        String string1;
        String signature = "";

        // 注意这里参数名必须全部小写,且必须有序
        string1 = "jsapi_ticket=" + jsapi_ticket + "&noncestr=" + nonce_str + "×tamp=" + timestamp + "&url=" + url;
        System.out.println("string1:"+string1);

        try {
            MessageDigest crypt = MessageDigest.getInstance("SHA-1");
            crypt.reset();
            crypt.update(string1.getBytes("UTF-8"));
            signature=	WXUnitl.getSignature(jsapi_ticket, nonce_str, timestamp, url);
        } catch (NoSuchAlgorithmException e) {
            e.printStackTrace();
        } catch (UnsupportedEncodingException e) {
            e.printStackTrace();
        }

        ret.put("url", url);
        ret.put("jsapi_ticket", jsapi_ticket);
        ret.put("nonceStr", nonce_str);
        ret.put("timestamp", timestamp);
        ret.put("signature", signature);

        return ret;
    }

    // 生成签名
    private static String byteToHex(final byte[] hash) {
        Formatter formatter = new Formatter();
        for (byte b : hash) {
            formatter.format("%02x", b);
        }
        String result = formatter.toString();
        formatter.close();
        return result;
    }

    // 生成nonce_str
    private static String create_nonce_str() {
        return UUID.randomUUID().toString();
    }

    // 生成timestamp
    private static String create_timestamp() {
        return Long.toString(System.currentTimeMillis() / 1000);
    }
}
4)、将需要的参数封装成实体类
public class WinXinEntity {
    private String access_token;
    private String ticket;
    private String noncestr;
    private String timestamp;
    private String str;
    private String signature;
    ...省略set()和get()
}
5)、封装签名串参数
public static WinXinEntity getWinXinEntity(String url) {
        WinXinEntity wx = new WinXinEntity();
        String access_token = getAccessToken();  //同类的  上面的获取token的方法
        String ticket = getTicket(access_token);  //同类的  上面的获取ticket的方法
        Map<String, String> ret = Sign.sign(ticket, url);
        wx.setTicket(ret.get("jsapi_ticket"));
        wx.setSignature(ret.get("signature"));
        wx.setNoncestr(ret.get("nonceStr"));
        wx.setTimestamp(ret.get("timestamp"));
        return wx;
    }
6)、签名
public class WXUnitl {
    public static String getSignature(String jsapi_ticket, String nonce_str, String timestamp, String url) {
        // 注意这里参数名必须全部小写,且必须有序
        String string1 = "jsapi_ticket=" + jsapi_ticket + "&noncestr=" + nonce_str + "×tamp=" + timestamp + "&url="
                + url;

        String signature = "";
        try {
            MessageDigest crypt = MessageDigest.getInstance("SHA-1");
            crypt.reset();
            crypt.update(string1.getBytes("UTF-8"));
            signature = byteToHex(crypt.digest());
        } catch (NoSuchAlgorithmException e) {
            e.printStackTrace();
        } catch (UnsupportedEncodingException e) {
            e.printStackTrace();
        }
        return signature;
    }

    private static String byteToHex(final byte[] hash) {
        Formatter formatter = new Formatter();
        for (byte b : hash) {
            formatter.format("%02x", b);
        }
        String result = formatter.toString();
        formatter.close();
        return result;
    }
}
7)、Controller调用签名
  public Map<String, Object> sgture(HttpServletRequest request) {
        String strUrl=request.getParameter("url");
        logger.info("===前====url========="+strUrl);
        WinXinEntity wx = WeiXinUnitl.getWinXinEntity(strUrl);
        // 将wx的信息到给页面
        Map<String, Object> map = new HashMap<String, Object>();
        String sgture = WXUnitl.getSignature(wx.getTicket(), wx.getNoncestr(),             wx.getTimestamp(), strUrl);
        map.put("sgture", sgture.trim());//签名
        map.put("timestamp", wx.getTimestamp().trim());//时间戳
        map.put("noncestr",  wx.getNoncestr().trim());//随即串
        map.put("appid","写你自己的appid");//你的公众号APPID
        return map;
    }
后端代码完毕!!
五、前端部分 前端使用uni app
import wxj from "../wxj/index.js"    //这是wx js-sdk的js文件
	//点击邀请投票分享到朋友圈
	/*
	*参数根据自己的业务需求
	 url:是当前页面的路径,let url=location.href.split("#")[0];
	*desc:分享描述
	imgUrl:分享小图标的连接,这里的连接必须在js接口安全域名下可以访问的。否者小图标不生效
	shareUserName与shareDesignName 进行拼接做tittle
	*/
	  function myshare (url,desc,imgUrl,shareUserName,shareDesignName){
		   //分享功能
	  		 uni.request({
				url:"http://***/vote/wx/wx",    //后端接口,返回微信签名串的接口,即上面的Controller
	   			method:'GET',
				data:{
					'url':url
				},
	   			success(res) {
	   						console.log(res.data)
	   						//转换为json对象
	   						var result =res.data;
							let param=window.location.href.split("#")[1];
										//设置分享的标题
							var title="我是:"+shareUserName+",我为***命名为:"+shareDesignName+",请为我投票";
							let host=window.location.href.split("?")[0];
							console.log("========host======"+host)
	   						wxj.config({
	   							debug: true, // 开启调试模式,调用的所有api的返回值会在客户端alert出来,若要查看传入的参数,可以在pc端打开,参数信息会通过log打出,仅在pc端时才会打印。
	   							appId:result.appid, // 必填,公众号的唯一标识
	   							timestamp: result.timestamp, // 必填,生成签名的时间戳
	   							nonceStr: result.noncestr, // 必填,生成签名的随机串
	   							signature: result.sgture,// 必填,签名
	   							jsApiList: ["updateAppMessageShareData","updateTimelineShareData"] // 必填,需要使用的JS接口列表
	   						/* 即将废弃	jsApiList: ["onMenuShareAppMessage","onMenuShareTimeline"] // 必填,需要使用的JS接口列表 */
							});
							wxj.ready(function () {   //需在用户可能点击分享按钮前就先调用
							  wxj.updateAppMessageShareData({
							    title:title, // 分享标题
							    desc: desc, // 分享描述
							    link:"http://***/wxShare/redirect?host="+encodeURIComponent(host)+"¶m="+encodeURIComponent(param), // 分享链接,该链接域名或路径必须与当前页面对应的公众号JS安全域名一致
							    imgUrl:imgUrl, // 分享图标
							    success: function () {

									//alert("分享成功")
							      // 设置成功
							    },
								fail: function (res) {
									//alert("分享失败")
								},
								cancel : function() {
								 // 用户取消分享后执行的回调函数

								}
							  });
							 wxj.updateTimelineShareData({
								 title:title, // 分享标题
								 desc: desc, // 分享描述
								 link:"http://***/wxShare/redirect?host="+encodeURIComponent(host)+"¶m="+encodeURIComponent(param), // 分享链接,该链接域名或路径必须与当前页面对应的公众号JS安全域名一致
								 imgUrl: imgUrl, // 分享图标
								success: function (res) {
											console.log(res.data)

								  // 设置成功
								},
								fail: function (res) {
									//alert("分享失败")
								},
								cancel : function() {
								 // 用户取消分享后执行的回调函数
								}
							 })
							});
	   				}
	   })
	}

export default{
	myshare
}
说明:前端分享接口中 link参数,可以写成windows.location.href 但是这种情况 在前端路由hash模式下会被微信截取(#后面被截取),使得每次分享出去的链接都会进入首页。
如何解决分享进入首页问题:
1、修改路由模式为history,但是分享出去链接不能打开,这个需要去nginx去配置一下。
2、使用hash模式,我是在后端做了一次重定向,参数通过get方式进行拼接起来。
link:"http://***/wxShare/redirect?host="+encodeURIComponent(host)+"¶m="+encodeURIComponent(param), // 分享链接,该链接域名或路径必须与当前页面对应的公众号JS安全域名一致
后端接收参数并处理:
   public String shareUrl(String host,String param){
        logger.info("==========param===================="+param);
        logger.info("==========host===================="+host);
        String href=host+"#"+param;
        logger.info("==========href===================="+href);

        return "redirect:"+href;
    }
这样就可以实现了hash模式下微信分享功能。
总结:实现微信分享自定义功能并不难,我们一定要认真读官方文档,避免入坑。