Ubuntu16.04+GTX1050ti+CUDA8.0+TensorFlow-gpu+Keras+Pycharm配置深度学习环境
硬件环境:CPU i5-6400; 显卡 GTX1050ti
系统环境:Ubuntu16.04
一、安装Ubuntu16.04双系统
1、利用UltraISO制作安装启动U盘《见 Ubuntu 16.04 安装基础入门教程 启动U盘制作部分》
2、Windows磁盘分区给Ubuntu《见 Windows下安装Ubuntu 16.04双系统 》
3、重启电脑,按住F11<我的是七彩虹主板,不同主板设置不同>,
选择没有UEFI的 U盘启动方式《见Windows下安装Ubuntu 16.04双系统 中的讲解》
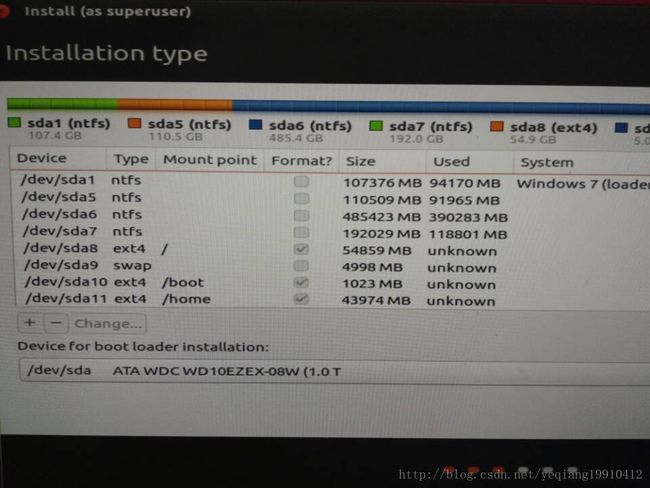
4、后续安装步骤参见《Ubuntu 16.04 安装基础入门教程 》,包括其中的分区情况,我的分区情况如下:
5、安装结束
二、安装显卡驱动
步骤1、我的系统安装完后重启,屏幕一直在闪,Ctrl+Alt+F1进入命令行无效
解决办法:《参见 深度学习主机环境配置: Ubuntu16.04 + GeForce GTX 1070 + CUDA8.0 + cuDNN5.1 + TensorFlow中的安装GTX1070驱动部分》
- 重启电脑,在开机启动项(GRUB菜单选择处)画面按e进入启动项编辑模式,在Linux那一行最后面空一格然后加入“acpi_osi=linux nomodeset”,然后按F10使用编辑好的启动项启动(nomodest参数是告诉内核不要加载显卡驱动而用BIOS模式,直到图形界面运行,详细介绍看这里)。
- 再次开机后发现还是在不停的闪,但是这次tty1-6可以用了
- 按Ctrl+Alt+F1切换到控制台界面,输入用户名密码登录
步骤2、禁用nouveau驱动
此处参见《Ubuntu16.04 + 1080Ti深度学习环境配置教程中的 一、安装Ubuntu16.04及显卡驱动 部分》
步骤3、禁用X桌面服务
sudo service lightdm stop
步骤4、安装NVIDIA显卡驱动,命令如下:《参见 深度学习主机环境配置: Ubuntu16.04 + GeForce GTX 1070 + CUDA8.0 + cuDNN5.1 + TensorFlow中的安装GTX1070驱动部分》,输入完后重启
sudo add-apt-repository ppa:graphics-drivers/ppa
sudo apt-get update
sudo apt-get install nvidia-367
sudo apt-get install mesa-common-dev
sudo apt-get install freeglut3-dev
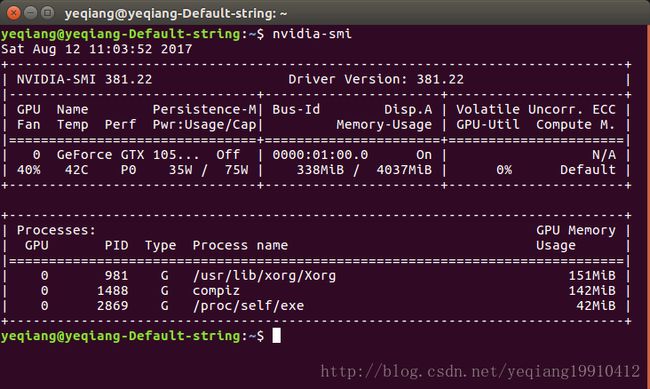
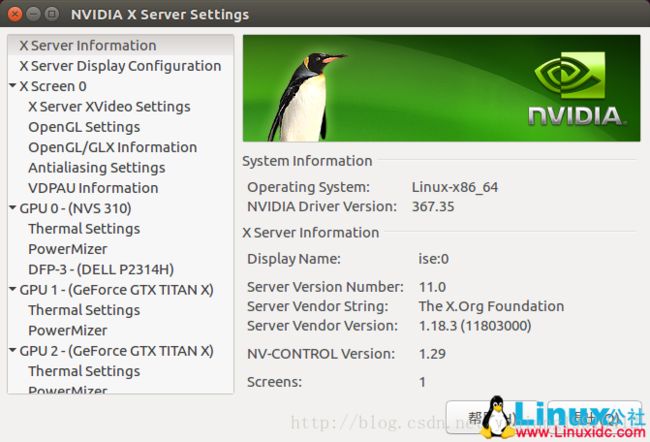
步骤5、输入nvidia-smi,如出现下图则是显卡驱动成功,也可输入nvidia-settings
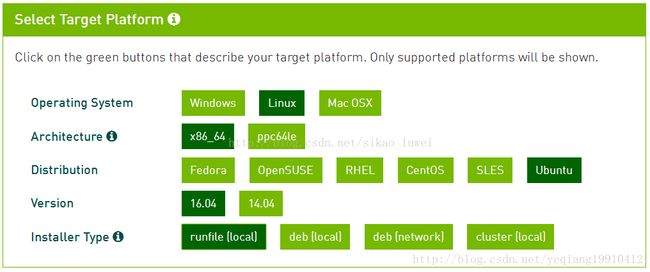
三、安装CUDA 8.0:cuda_8.0.44_linux.run
因为下载很慢,特贴上百度网盘地址。
- 安装过程如下:<继续禁用X桌面服务>
sudo service lightdm stop
sudo sh cuda_8.0.44_linux.run注意:执行后会有一系列提示让你确认,但是注意,有个让你选择是否安装nvidia361(针对不同安装版本会有不同)驱动时,一定要选择否:
Install NVIDIA Accelerated Graphics Driver for Linux-x86_64 361.62?因为前面我们已经安装了更加新的nvidia367,所以这里不要选择安装。其余的都直接默认或者选择是即可。 《此处参考Ubuntu16.04+CUDA8.0+caffe配置 中的(2)安装CUDA》
- 安装成功后会出现如下界面:《参见Ubuntu 16.04+CUDA8.0+Caffe安装教程 中2、安装CUDA》
===========
= Summary =
===========
Driver: Not Selected
Toolkit: Installed in /usr/local/cuda-8.0
Samples: Installed in /home/textminer
Please make sure that
– PATH includes /usr/local/cuda-8.0/bin
– LD_LIBRARY_PATH includes /usr/local/cuda-8.0/lib64, or, add /usr/local/cuda-8.0/lib64 to /etc/ld.so.conf and run ldconfig as root
To uninstall the CUDA Toolkit, run the uninstall script in /usr/local/cuda-8.0/bin
Please see CUDA_Installation_Guide_Linux.pdf in /usr/local/cuda-8.0/doc/pdf for detailed information on setting up CUDA.
***WARNING: Incomplete installation! This installation did not install the CUDA Driver. A driver of version at least 361.00 is required for CUDA 8.0 functionality to work.
To install the driver using this installer, run the following command, replacing with the name of this run file:
sudo .run -silent -driver
Logfile is /opt/temp//cuda_install_6583.log- 环境变量配置(也可以直接到/home目录下修改, .bashrc文件隐藏了,Ctrl+h可以显示出来)
打开~/.bashrc文件:
sudo vi ~/.bashrc将以下内容写入到~/.bashrc尾部:
export PATH=/usr/local/cuda-8.0/bin${PATH:+:${PATH}}
export LD_LIBRARY_PATH=/usr/local/cuda-8.0/lib64${LD_LIBRARY_PATH:+:${LD_LIBRARY_PATH}}
然后执行 sudo ldconfig,使链接立即生效。
- 安装完成后,家目录下会生成一个NVIDIA_CUDA-8.0_Samples的文件夹,这里可以测试一下CUDA 8.0。
输入:
cd ~/NVIDIA_CUDA-8.0_Samples/1_Utilities/deviceQuery
make
sudo ./deviceQuery结果:(针对不同安装版本会有不同)
./deviceQuery Starting...

 CUDA Device Query (Runtime API) version (CUDART static linking)

Detected 1 CUDA Capable device(s)

Device 0: "GeForce GTX 1070"
  CUDA Driver Version / Runtime Version          8.0 / 8.0
  CUDA Capability Major/Minor version number:    6.1
  Total amount of global memory:                 8105 MBytes (8499167232 bytes)
  (15) Multiprocessors, (128) CUDA Cores/MP:     1920 CUDA Cores
  GPU Max Clock rate:                            1759 MHz (1.76 GHz)
  Memory Clock rate:                             4004 Mhz
  Memory Bus Width:                              256-bit
  L2 Cache Size:                                 2097152 bytes
  Maximum Texture Dimension Size (x,y,z)         1D=(131072), 2D=(131072, 65536), 3D=(16384, 16384, 16384)
  Maximum Layered 1D Texture Size, (num) layers  1D=(32768), 2048 layers
  Maximum Layered 2D Texture Size, (num) layers  2D=(32768, 32768), 2048 layers
  Total amount of constant memory:               65536 bytes
  Total amount of shared memory per block:       49152 bytes
  Total number of registers available per block: 65536
  Warp size:                                     32
  Maximum number of threads per multiprocessor:  2048
  Maximum number of threads per block:           1024
  Max dimension size of a thread block (x,y,z): (1024, 1024, 64)
  Max dimension size of a grid size    (x,y,z): (2147483647, 65535, 65535)
  Maximum memory pitch:                          2147483647 bytes
  Texture alignment:                             512 bytes
  Concurrent copy and kernel execution:          Yes with 2 copy engine(s)
  Run time limit on kernels:                     Yes
  Integrated GPU sharing Host Memory:            No
  Support host page-locked memory mapping:       Yes
  Alignment requirement for Surfaces:            Yes
  Device has ECC support:                        Disabled
  Device supports Unified Addressing (UVA):      Yes
  Device PCI Domain ID / Bus ID / location ID:   0 / 1 / 0
  Compute Mode:
     < Default (multiple host threads can use ::cudaSetDevice() with device simultaneously) >

deviceQuery, CUDA Driver = CUDART, CUDA Driver Version = 8.0, CUDA Runtime Version = 8.0, NumDevs = 1, Device0 = GeForce GTX 1070
Result = PASS
还可以输入nvcc –version ,测试CUDA Toolkit安装是否正确,输出类似以下信息即可认为安装正确
四、下载 cuDNN: cudnn-8.0-linux-x64-v5.1.tgz
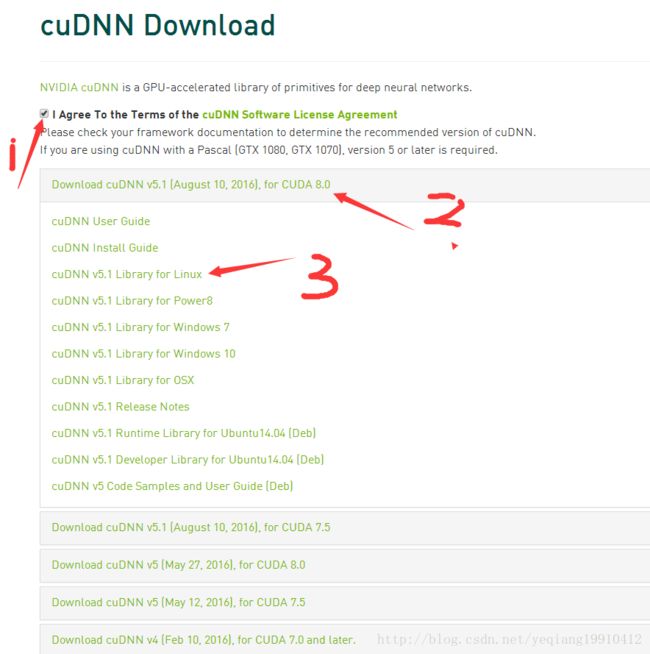
cuDNN是NVIDIA用于加速深度学习的模块,注意要先注册NVIDIA账号,按确认条款后才能下载。cuDNN官方地址;百度网盘地址。
安装cuDNN非常简单:
进入cuDNN存放的文件夹,输入:
tar -zxvf cudnn-8.0-linux-x64-v5.1.tgz解压安装包以后在当前目录会出现cuda的文件夹,把其中的文件拷贝到系统相应目录
sudo cp -a cuda/include/cudnn.h /usr/local/cuda/include/
sudo cp -a cuda/lib64/libcudnn* /usr/local/cuda/lib64/
3.安装keras和TensorFlow-gpu
pip install keras
pip install tensorflow-gpu
4.安装Pycharm
- 下载最新版PyCharm,选择下载免费的Community。
- 下载完之后,将安装包放到Downloads目录下,进入Downloads后解压。
cd Downloads/
tar xfz pycharm-*.tar.gz- 运行解压后的文件夹中的bin目录下的pycharm.sh文件即可打开Pycharm。
./pycharm.sh注意:
在继续安装了Pycharm后,可能会出现在无法import模块的问题,解决办法为在.bashrc文件中添加如下路径。
export LD_LIBRARY_PATH=/usr/local/cuda/lib64/最后执行
source ~/.bashrc参考文献:
- Ubuntu16.04+GTX1050+CUDA8.0配置深度学习环境
- Ubuntu 安装 tensorflow-gpu + keras
- 深度学习主机环境配置: Ubuntu16.04 + GeForce GTX 1070 + CUDA8.0 + cuDNN5.1 + TensorFlow
- [深度学习]Ubuntu16.04 + GTX 1050 + cuda8.0 + cuDNN5.1 + caffe安装详解
- Ubuntu16.04 + 1080Ti深度学习环境配置教程
- Ubuntu16.04+Pycharm+Anaconda配置
- After building TensorFlow from source, seeing libcudart.so and libcudnn errors
- DQN实战篇1 从零开始安装Ubuntu, Cuda, Cudnn, Tensorflow, OpenAI Gym
- ubuntu 16.04+cudn 百度搜索

