好用的java爬虫框架webmagic爬取CSDN
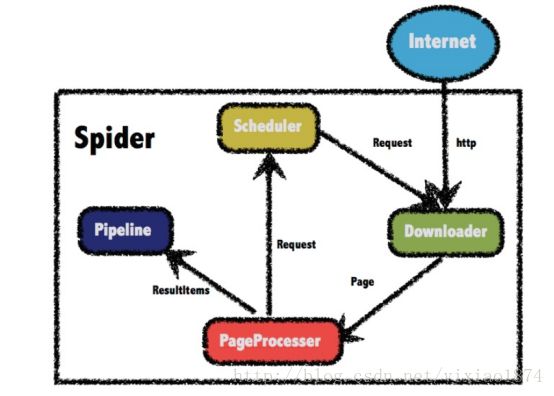
WebMagic的结构分为Downloader、PageProcessor、Scheduler、Pipeline四大组件,并由Spider将它们彼此组织起来。这四大组件对应爬虫生命周期中的下载、处理、管理和持久化等功能。在这四个组件中我们需要做的就是在PageProcessor中写自己的业务逻辑,比如如何解析当前页面,抽取有用信息,以及发现新的链接。
下面是官方给出的架构图
1.Downloader
Downloader负责从互联网上下载页面,以便后续处理。WebMagic默认使用了Apache HttpClient作为下载工具。
2.PageProcessor
PageProcessor负责解析页面,抽取有用信息,以及发现新的链接。WebMagic使用Jsoup作为HTML解析工具,并基于其开发了解析XPath的工具Xsoup。
在这四个组件中,PageProcessor对于每个站点每个页面都不一样,是需要使用者定制的部分。
3.Scheduler
Scheduler负责管理待抓取的URL,以及一些去重的工作。WebMagic默认提供了JDK的内存队列来管理URL,并用集合来进行去重。也支持使用Redis进行分布式管理。
除非项目有一些特殊的分布式需求,否则无需自己定制Scheduler。
4.Pipeline
Pipeline负责抽取结果的处理,包括计算、持久化到文件、数据库等。WebMagic默认提供了“输出到控制台”和“保存到文件”两种结果处理方案。
Pipeline定义了结果保存的方式,如果你要保存到指定数据库,则需要编写对应的Pipeline。对于一类需求一般只需编写一个Pipeline。
webmagic来爬取CSDN上某一个博主的文章信息
下面我们通过一个简单的例子来观察webmagic的使用方法以及执行流程。需求:输入作者的用户名,得到该作者文章总数(最简单的办法是直接从首页拿到,我们是爬到一篇文章记录一次),得到所有文章信息(文章名称,发布日期,阅读量,评论数.....)
首先加入webmagic依赖,然后写一个Processor就搞定了:修改不同的username可以爬取不同的作者。
public class CsdnBlogProcessor implements PageProcessor {

    private static String username = "yixiao1874";// 设置csdn用户名
    private static int size = 0;// 共抓取到的文章数量

    // 抓取网站的相关配置,包括:编码、抓取间隔、重试次数等
    private Site site = Site.me().setRetryTimes(3).setSleepTime(1000);

    @Override
    public void process(Page page) {
        if (!page.getUrl().regex("http://blog.csdn.net/" + username + "/article/details/\\d+").match()) {
            //获取当前页码
            String number = page.getHtml().xpath("//li[@class='page-item active']//a[@class='page-link']/text()").toString();
            //匹配当前页码+1的页码也就是下一页,加入爬取列表中
            String targetUrls = page.getHtml().links()
                    .regex("http://blog.csdn.net/"+username+"/article/list/"+(Integer.parseInt(number)+1)).get();
            page.addTargetRequest(targetUrls);

            List detailUrls = page.getHtml().xpath("//li[@class='blog-unit']//a/@href").all();
            for(String list :detailUrls){
                System.out.println(list);
            }
            page.addTargetRequests(detailUrls);
        }else {
            size++;// 文章数量加1
            CsdnBlog csdnBlog = new CsdnBlog();
            String path = page.getUrl().get();
            int id = Integer.parseInt(path.substring(path.lastIndexOf("/")+1));
            String title = page.getHtml().xpath("//h1[@class='csdn_top']/text()").get();
            String date = page.getHtml().xpath("//div[@class='artical_tag']//span[@class='time']/text()").get();
            String copyright = page.getHtml().xpath("//div[@class='artical_tag']//span[@class='original']/text()").get();
            int view = Integer.parseInt(page.getHtml().xpath("//button[@class='btn-noborder']//span[@class='txt']/text()").get());
            csdnBlog.id(id).title(title).date(date).copyright(copyright).view(view);
            System.out.println(csdnBlog);
        }
    }

    public Site getSite() {
        return site;
    }

    public static void main(String[] args) {
        // 从用户博客首页开始抓,开启5个线程,启动爬虫
        Spider.create(new CsdnBlogProcessor())
                .addUrl("http://blog.csdn.net/" + username)
                .thread(5).run();
        System.out.println("文章总数为"+size);
    }
}
public class CsdnBlog {
private int id;// 编号
private String title;// 标题
private String date;// 日期
private String category;// 分类
private int view;// 阅读人数
private int comments;// 评论人数
private String copyright;// 是否原创
public CsdnBlog id(int id){
this.id = id;
return this;
}
public CsdnBlog date(String date){
this.date = date;
return this;
}
public CsdnBlog title(String title){
this.title = title;
return this;
}
public CsdnBlog category(String category){
this.category = category;
return this;
}
public CsdnBlog view(int view){
this.view = view;
return this;
}
public CsdnBlog comments(int comments){
this.comments = comments;
return this;
}
public CsdnBlog copyright(String copyright){
this.copyright = copyright;
return this;
}
@Override
public String toString() {
return "CsdnBlog{" +
"id=" + id +
", title='" + title + '\'' +
", date='" + date + '\'' +
", category='" + category + '\'' +
", view=" + view +
", comments=" + comments +
", copyright='" + copyright + '\'' +
'}';
}
}
结果:
首先是抓取网页的配置信息包括编码、抓取间隔、超时时间、重试次数等,也包括一些模拟的参数,例如User Agent、cookie,以及代理的设置。
然后是页面元素的抽取以及新链接的发现,都在process()方法中,WebMagic里主要使用了三种抽取技术:XPath、正则表达式和CSS选择器。我们主要是用XPath和正则表达式。下面是几个简单的例子:
获取所有P标签内容
正则:
(?<= ).*(?=
XPATH:
精确路径定位:
//div[@class='detail-wrapper']//div[@class='upload-txt no-mb']//h1/p/text()
简单定位:
//h1[@class='title']/p/text()
获取所有href内容
正则:
(?<=href=").*(?=/")
XPATH:
精确路径定位:
//div[@class='detail-wrapper']//a/@href
简单定位:
//a[@class='image share_url']/@href
链接的发现使用page.addTargetRequest(targetUrls);
和page.addTargetRequests(detailUrls);一个参数是String一个是List
最后是程序的启动以及结果的处理:
所有的组件都是由Spider管理,我们只写了一个processor其余的组件可以自己配置,或者Spider会加载默认的组件,比如加载HttpClientDownloader,QueueScheduler
以及ConsolePipeline。下面是程序的启动程序
在这里我们只配置了自己的CsdnBlogProcessor,所以会默认HttpClientDownloader,QueueScheduler以及ConsolePipeline。thread()是启动的线程数,addUrl()爬取的地址,可以有多个参数,也就是多个地址。
public Spider thread(int threadNum) {
    this.checkIfRunning();
    this.threadNum = threadNum;
    if (threadNum <= 0) {
        throw new IllegalArgumentException("threadNum should be more than one!");
    } else {
        return this;
    }
}
run()方法会启动线程,其中checkRunningState()检查状态,initComponent()初始化组件
public void run() {
    this.checkRunningStat();
    this.initComponent();
    this.logger.info("Spider {} started!", this.getUUID());

    while(!Thread.currentThread().isInterrupted() && this.stat.get() == 1) {
        final Request request = this.scheduler.poll(this);
        if (request == null) {
            if (this.threadPool.getThreadAlive() == 0 && this.exitWhenComplete) {
                break;
            }

            this.waitNewUrl();
        } else {
            this.threadPool.execute(new Runnable() {
                public void run() {
                    try {
                        Spider.this.processRequest(request);
                        Spider.this.onSuccess(request);
                    } catch (Exception var5) {
                        Spider.this.onError(request);
                        Spider.this.logger.error("process request " + request + " error", var5);
                    } finally {
                        Spider.this.pageCount.incrementAndGet();
                        Spider.this.signalNewUrl();
                    }

                }
            });
        }
    }

    this.stat.set(2);
    if (this.destroyWhenExit) {
        this.close();
    }

    this.logger.info("Spider {} closed! {} pages downloaded.", this.getUUID(), this.pageCount.get());
}


