邮件服务器安装配置
DNS服务器安装配置
环境:CentOS 7.1
域名:easted.com
邮件服务器:mail.easted.com
DNS IP与邮件服务器IP:10.10.3.153
前期准备:
新建两个测试用户
# useradd reese
# useradd finch
并将密码都设为password
配置域名
domain
1. 安装bind
# yum install bind
版本BIND 9.9.4-RedHat-9.9.4-50.el7_3.1 (Extended Support Version)
2. 修改主区域配置文件 /etc/named.conf
options {
listen-on port 53 { any; }; # 监听端口及地址
...
allow-query { localhost;10.0.0.0/8;192.168.0.0/16; }; # 允许查询的网段,分号隔开
allow-transfer { none; };
...
}
...
# 添加正向及反向区域
zone "easted.com" IN {
type master;
file "easted.com.zone";
allow-transfer { 10.10.3.153; };
};
zone "3.10.10.in-addr.arpa" IN {
type master;
file "10.10.3.zone";
allow-transfer { 10.10.3.153; };
};
...
3. 新建解析文件
主区域正向解析文件 /var/named/easted.com.zone
$TTL 3H
@ IN SOA ns1.easted.com. admin.easted.com. (
2017081701 ; serial
1D ; refresh
1H ; retry
1W ; expire
3H ) ; minimum
IN NS ns1.easted.com.
IN MX 10 mail.easted.com.
ns1 IN A 10.10.3.153
mail IN A 10.10.3.153
www IN A 10.10.3.153
主区域反向解析文件 /var/named/10.10.3.zone
$TTL 3H
@ IN SOA ns1.easted.com. admin.easted.com. (
2017081702 ; serial
1D ; refresh
1H ; retry
1W ; expire
3H ) ; minimum
@ IN NS ns1.easted.com.
153 IN PTR ns1.easted.com.
153 IN PTR www.easted.com.
153 IN PTR mail.easted.com.
4. 检查解析文件
# named-checkconf -z (没有报错)
# named-checkzone easted.com easted.com.zone (显示OK)
# named-checkzone 3.10.10.in-addr.arpa 10.10.3.zone
5. 修改解析文件权限
# chmod 640 easted.com.zone 10.10.3.zone
# chown root:named easted.com.zone 10.10.3.zone
6. root模式运行
# cd /var/named # mkdir chroot/var/named/data # chown named:named chroot/var/named/data
# systemctl start named.service
# systemctl enable named.service
# systemctl status named.service
7. 验证DNS
(1) # host -t MX easted.com
(2) 修改 /etc/resolv.conf,注释掉其他DNS并添加 nameserver 10.10.3.153
# nslookup
> mail.easted.com
Server: 10.10.3.153
Address: 10.10.3.153#53
Name: mail.easted.com
Address: 10.10.3.153
(3) 在windows系统验证:
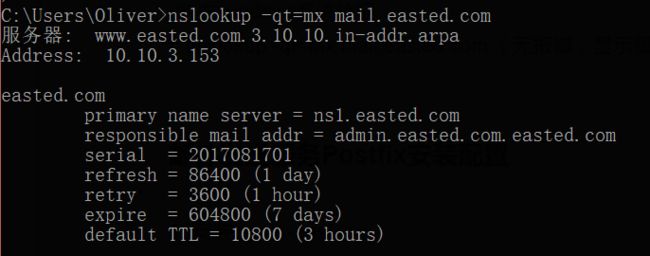
# nslookup -qt=mx mail.easted.com (无报错,显示服务器及地址)
邮件发送服务Postfix安装配置
1. 安装cyrus-sasl
# yum install cyrus-sasl openssl-devel
2. 修改配置
查看版本
# saslauthd -v
修改/etc/sasl2/smtpd.conf 文件内容如下
pwcheck_method: saslauthd
mech_list: plain login
修改/etc/sysconfig/saslauthd
MECH=shadow
3. 启动sasl
# systemctl start saslauthd.service
# systemctl enable saslauthd.service
# systemctl status saslauthd.service
# testsaslauthd -u finch -p password
# testsaslauthd -u reese -p password
4. 安装postfix
# yum install postfix
5. 修改配置文件 /etc/postfix/main.cf
myhostname = mail.easted.com
mydomain = easted.com
myorigin = $mydomain
inet_interfaces = all
mydestination = $myhostname, localhost.$mydomain, localhost, $mydomain
mynetworks = 10.0.0.0/8, 192.168.0.0/16 (信任网络,客户端所在网络,根据需要删减)
home_mailbox = Maildir/
smtpd_sasl_type = dovecot
smtpd_sasl_path = private/auth
smtpd_sasl_auth_enable = yes
smtpd_sasl_security_options = noanonymous
smtpd_sasl_local_domain = $myhostname
smtpd_recipient_restrictions = permit_mynetworks,permit_auth_destination,permit_sasl_authenticated,reject
6. 启动服务
# systemctl start postfix.service
# systemctl enable postfix.service
# systemctl status postfix.service
7. 验证
# telnet mail.easted.com 25
> mail from: finch
> rcpt to: reese
data
Subject: Hello
Good day!
.
quit
无报错则正常,
如无法通过继续安装dovecot并在完成后重启postfix
邮件接收服务Dovecot安装配置
1. 安装
# yum install dovecot
2. 配置
修改conf.d下文件
(1) /etc/dovecot/conf.d/10-auth.conf
disable_plaintext_auth = no
auth_mechanisms = plain login
login_trusted_networks = 0.0.0.0/0
(2) /etc/dovecot/conf.d/10-mail.conf
mail_location = maildir:~/Maildir
(3) /etc/dovecot/conf.d/10-master.conf
service auth {
...
unix_listener /var/spool/postfix/private/auth {
mode = 0666
user = postfix
group = postfix
}
...
}
生成新配置文件
# cd /etc/dovecot
# doveconf -n > dovecot-new.conf
备份原有配置
# cp dovecot.conf dovecot.conf.bak
替换
# cp dovecot-new.conf dovecot.conf
最终/etc/dovecot.conf配置如下:
# 2.2.10: /etc/dovecot/dovecot.conf
# OS: Linux 3.10.0-229.el7.x86_64 x86_64 CentOS Linux release 7.1.1503 (Core)
auth_mechanisms = plain login
disable_plaintext_auth = no
first_valid_uid = 1000
login_trusted_networks = 0.0.0.0/0
mail_location = maildir:~/Maildir
mbox_write_locks = fcntl
namespace inbox {
inbox = yes
location =
mailbox Drafts {
special_use = \Drafts
}
mailbox Junk {
special_use = \Junk
}
mailbox Sent {
special_use = \Sent
}
mailbox "Sent Messages" {
special_use = \Sent
}
mailbox Trash {
special_use = \Trash
}
prefix =
}
passdb {
driver = pam
}
service auth {
unix_listener /var/spool/postfix/private/auth {
group = postfix
mode = 0666
user = postfix
}
}
ssl = required
ssl_cert =
ssl_key =
userdb {
driver = passwd
}
3. 启动服务
# systemctl start dovecot.service
# systemctl enable dovecot.service
# systemctl status dovecot.service
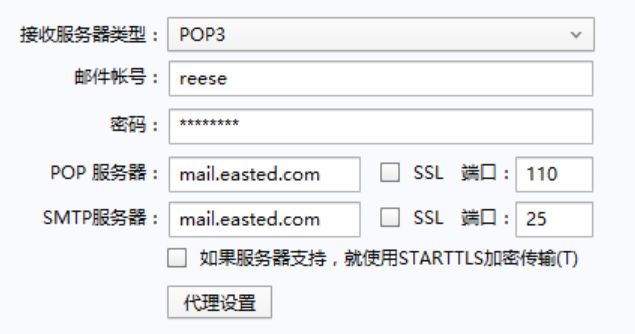
4. 配置windows邮件客户端
(1) 安装客户端如Foxmail
(2) 配置本地网卡的DNS为10.10.3.153(配置好的DNS地址)
(3) 新建账户,选手动配置
可在两台PC上分别登陆两个账号,互发邮件测试。

