网络请求框架AsyncHttpclient的简单使用
转载说明出处:http://blog.csdn.net/ddxxii/article/details/50831695
之所以使用asynchttpclient呢,我个人认为
一:是因为它很小100K左右。
二:它非常简单,使用非常容易上手。
- 简要
在介绍使用之前先来看看本框架的特性吧。
Async的网址点这里
主要说的就是呢:
替代了android自带提供的httpclient,支持Api23及以上,异步请求,请求是在UIThread之外,请求是使用线程池去请求的,可以上传和下载文件,保存cookies等。
引入库,在android studio里添加
dependencies {
  compile 'com.loopj.android:android-async-http:1.4.9'
}
2.请求
每个应用必用的,那就是请求了,再更具需求也可能会用到上传和下载文件。所以今天我学习的这几个。
1:请求:1)Get:
AsyncHttpClient asyncHttpClient = new SyncHttpClient();
asyncHttpClient.get(BASE_URL, AsyncHttpClientRespenseHandler);
这样就完成了Get请求,BASE_URL是地址,AsyncHttpClientRespenseHandler是请求回调。
比如
new AsyncHttpClientRespenseHandler() {

                                                       @Override
    public void onSuccess(int statusCode, Header[] headers, byte[] responseBody) {
        //请求成功
    }

    @Override
    public void onFailure(int statusCode, Header[] headers, byte[] responseBody, Throwable error) {
         //请求失败
    }
  }
2)Post:
asyncHttpClient.post(BASE_URL, AsyncHttpClientRespenseHandler);
或者
asyncHttpClient.post(BASE_URL, RequestParams, AsyncHttpClientRespenseHandler);RequestParams是我们写进去的参数。
RequestParams的用法有必要先说一下:
       RequestParams requestParams=new RequestParams();
       requestParams.put("key", what);
这里是以键值对的方式存进去的。
好了,现在写出了带参数和不带参数的post,get也可以有带参数的
获取一般的数据就这样,有没有觉得很简单呢?当然在应用里,自己用这样是不够的,我们需要自己封装一下。
3.自我封装
咱们先封装一个请求类(可以用来放所有请求方法):
import android.content.Context;
import android.os.Looper;

import com.loopj.android.http.AsyncHttpClient;
import com.loopj.android.http.BinaryHttpResponseHandler;
import com.loopj.android.http.FileAsyncHttpResponseHandler;
import com.loopj.android.http.RequestParams;
import com.loopj.android.http.SyncHttpClient;


public class nHttpClient {

    private static String BASE_URL = "www.google.com";

    private static AsyncHttpClient asyncHttpClient = new SyncHttpClient();
    private static AsyncHttpClient syncHttpClient = new AsyncHttpClient();

    /**
     * post请求带参数
     * @param myHttpClientRespenseHandler
     */
    private static void post(RequestParams requestParams, MyHttpClientRespenseHandler myHttpClientRespenseHandler) {
        getClient().setTimeout(20000);
        getClient().post(BASE_URL, requestParams, myHttpClientRespenseHandler);
    }

    /**
     * post请求不带参数
     * @param myHttpClientRespenseHandler
     */
    private static void post(MyHttpClientRespenseHandler myHttpClientRespenseHandler) {
        syncHttpClient.setTimeout(20000);
        syncHttpClient.post(BASE_URL, myHttpClientRespenseHandler);
    }

    /**
     * get请求
     * @param myHttpClientRespenseHandler
     */
    private static void get( MyHttpClientRespenseHandler myHttpClientRespenseHandler) {
        getClient().setTimeout(20000);
        getClient().get(BASE_URL, myHttpClientRespenseHandler);
    }

    /**
     *
     * @return
     */
    private static AsyncHttpClient getClient() {
        if (Looper.myLooper() == null) {
            return syncHttpClient;
        } else {
            return asyncHttpClient;
        }
    }

    /**
     * 取消请求(根据context)
     */
    public static void cancelRequest(Context context) {
        getClient().cancelRequests(context, true);
    }

    /**
     * 获取数据
     */
    public static void getAll(String what ,MyHttpClientRespenseHandler myHttpClientRespenseHandler ) {
        RequestParams requestParams=new RequestParams();
        requestParams.put("key", what);

        post(myHttpClientRespenseHandler);
    }

    /**
     * 下载文件方式1
     *
     * @param url
     */
    public static void downloadFile(Context context, String url,
                                   BinaryHttpResponseHandler response) {
        getClient().get(context, url, response);
    }

  /**
     * 下载文件方式2
     *
     * @param url
     */
    public static void downLoadFile2(Context context,String url,FileAsyncHttpResponseHandler fileAsyncHttpResponseHandler) {
        getClient().get(context, url, fileAsyncHttpResponseHandler);
    }
}
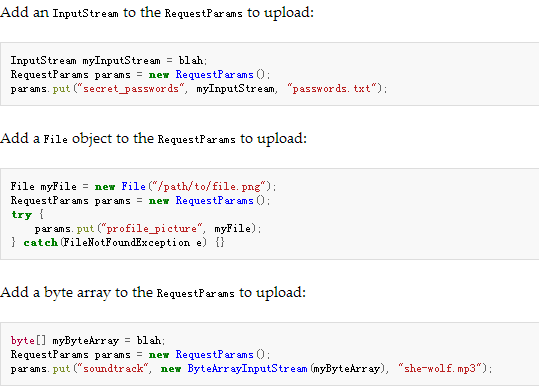
上传的操作,官网的描述也很清晰了,其实就是把文件封装到RequestParams里去,再进行请求。三种方式,1:接受inputStream的,第三个参数指定文件名。2:接受File的,直接put进去。3:接受byte[]类型,第三个参数制定文件名。
自己建的这个请求类的前面几个就是请求方式方法和取消请求的方法,我们请求的时候带上Activity类型的Context,这样有利于请求的取消,比如在onDestry里面我们需要取消当前页面还未完成的请求。
接下来我们要封装的就是RespenseHandler类了,先介绍一下它:
1.AsyncHttpResponseHandler
接收请求结果,一般重写onSuccess及onFailure接收请求成功或失败的消息,还有onStart,onFinish等消息
2.TextHttpResponseHandler
继承自AsyncHttpResponseHandler,只是重写了AsyncHttpResponseHandler的onSuccess和onFailure方法,将请求结果由byte数组转换为String
3.JsonHttpResponseHandler
也是继承自TextHttpResponseHandler,同样是重写onSuccess和onFailure方法,将请求结果由String转换为JSONObject或JSONArray
4.BaseJsonHttpResponseHandler
也是继承自TextHttpResponseHandler,是一个泛型类,提供了parseResponse方法,子类需要提供实现,将请求结果解析成需要的类型,子类可以灵活地使用解析方法,可以直接原始解析,使用gson等。
好了,相比大家也知道了这几个的用法了,我了解这个的时候最先了解的是AsyncHttpResponseHandler,但是在实际使用当中一般用的TextHttpResponseHandler。直接上代码:
import android.app.Activity;
import android.util.Log;

import com.loopj.android.http.TextHttpResponseHandler;

import org.json.JSONException;
import org.json.JSONObject;

public abstract class MyHttpClientRespenseHandler extends TextHttpResponseHandler {
    private String TAG = "respensehandler";

    private Activity context;

    public MyHttpClientRespenseHandler(Activity context) {
        this.context = context;
    }


    @Override
    public void onSuccess(int i, cz.msebera.android.httpclient.Header[] headers, String s) {
        Log.i(TAG, "请求成功");
        try {
            JSONObject jsonObject = new JSONObject(s);
            success(jsonObject);
        } catch (JSONException e) {
            e.printStackTrace();
        }
    }

    @Override
    public void onFailure(int i, cz.msebera.android.httpclient.Header[] headers, String s, Throwable throwable) {
        Log.i(TAG, "请求失败");
        faile();
    }


    public abstract  void success(JSONObject json);
    public abstract  void faile();
}
这样就把RespenseHandler给封装好了,相当于是以后请求的时候用我自己这个Handler去做回调了就更好了不是吗?得到结果在这里自行转换为了json。使用的时候,我就直接得到json了。
看下使用的代码:
//请求json数据
nHttpClient.getAll(MyApplication.Key, new MyHttpClientRespenseHandler(getActivity()) {
      @Override
      public void success(JSONObject json) {
              Toast.makeText(getActivity(),                       json.toString(), Toast.LENGTH_SHORT).show();
      }

      @Override
      public void faile() {
       Toast.makeText(getActivity(), "请求失败",  Toast.LENGTH_SHORT).show();
        }
      });

//下载文件1
   String[] allowedTypes = new String[]{".*"};            nHttpClient.downloadFile(getActivity(), "https://example.com/file.png", new BinaryHttpResponseHandler(allowedTypes) {
              @Override
               public void onStart() {
                super.onStart();
               //这里执行下载开始进程的dialog
                }

                @Override
                public void onSuccess(int statusCode, Header[] headers, byte[] binaryData) {
                 //下载完成操作
                 }

                @Override
                public void onProgress(long bytesWritten,       long totalSize) {
super.onProgress(bytesWritten, totalSize);
               //下载过程(可以设置progressbar)
                 }

                @Override
                public void onFailure(int statusCode, Header[] headers, byte[] binaryData, Throwable error) {
                 //下载失败
                  }
                 });


//下载文件2                        nHttpClient.downLoadFile2(getActivity(), "https://example.com/file.png", new FileAsyncHttpResponseHandler(getActivity()) {
                            @Override
                            public void onStart() {
                                super.onStart();
                            }

                            @Override
                            public void onProgress(long bytesWritten, long totalSize) {
                                super.onProgress(bytesWritten, totalSize);
                            }

                            @Override
                            public void onFailure(int statusCode, Header[] headers, Throwable throwable, File file) {

                            }

                            @Override
                            public void onSuccess(int statusCode, Header[] headers, File file) {

                            }
                        });
好了,讲到这里。
