深度学习8:Cats vs. Dogs实例学习
今天学习了油管up主KevinRush的教程Cats vs. Dogs(只找到油管地址),还找到了Maples丶丶的博客,感谢这位大神,写的很详细,这里参考大神的博客记录一下学习笔记。
数据集可以从Kaggle官网上下载:https://www.kaggle.com/c/dogs-vs-cats
代码见:http://blog.csdn.net/c20081052/article/details/76376688
工程分为input_data.py,model.py和training.py三部分。其中重点介绍第一部分。
1. input_data.py
分为三部分:获取数据集划分标签get_files(),分批次get_batch()和测试Test。
1.1 get_files()
Kaggle提供的数据集包含了猫和狗图片各12500幅,都是以cat.<数字>.jpg或dog.<数字>.jpg命名,因此可以根据文件名分类打标签。get_files()就是用于读取数据集,根据文件名,对数据集打标签,以列表形式返回图片和标签。
主要流程:
1.读取数据集,根据文件名,分成cat和dog两类图片和标签。这里cat和dog各有12500幅图片。
2.使用np.hstack()将cat和dog的图片和标签整合为列表image_list和label_list,image_list和label_list的大小均为25000。
3.将image_list和label_list合并,存放在temp中,此时temp的大小为2x25000。对temp进行转置,temp的大小变为25000x2。
4.使用np.random.shuffle()打乱图片和标签。
5.从temp中取出乱序后的image_list和label_list列向量并返回。
代码如下:
#读取数据和标签
def get_files(file_dir):
    cats = []
    label_cats = []
    dogs = []
    label_dogs = []
    for file in os.listdir(file_dir):   #返回文件名
        name = file.split(sep='.')      #文件名按.分割
        if name[0]=='cat':              #如果是cat,标签为0,dog为1
            cats.append(file_dir + file)
            label_cats.append(0)
        else:
            dogs.append(file_dir + file)
            label_dogs.append(1)
    print('There are %d cats\nThere are %d dogs' %(len(cats), len(dogs)))   #打印猫和狗的数量

    image_list = np.hstack((cats, dogs))
    label_list = np.hstack((label_cats, label_dogs))

    temp = np.array([image_list, label_list])
    temp = temp.transpose()
    np.random.shuffle(temp)             #打乱图片

    image_list = list(temp[:, 0])
    label_list = list(temp[:, 1])
    label_list = [int(i) for i in label_list]          #将label_list中的数据类型转为int型

    return image_list, label_list
1.2 get_batch()
由于数据集较大,需要分批次通过网络。get_batch()就是用于将图片划分批次。
主要流程:
1.image和label为list类型,转换为TensorFlow可以识别的tensor格式。
2.使用tf.train.slice_input_producer()将image和label合并生成一个队列,然后从队列中分别取出image和label。其中image需要使用tf.image.decode_jpeg()进行解码,由于图片大小不统一,使用tf.image.resize_image_with_crop_or_pad()进行裁剪/扩充,最后使用tf.image.per_image_standardization()进行标准化,此时的image的shape为[208 208 3]。
3.因为之前已经进行了乱序,使用tf.train.batch()生成批次,最后得到的image_batch和label_batch的shape分别为[1 208 208 3]和[1]。
4.这里原作者代码中对label_batch又进行reshape,是多余的,删除后无影响。最终返回image_batch和label_batch。
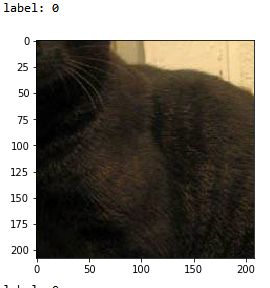
Maples丶丶的博客提到,原代码的get_batch()中使用tf.image.resize_image_with_crop_or_pad效果欠佳,这种方法是从图像中心向四周裁剪,当图片超过规定尺寸时,只保留规定尺寸的中心区域,就会造成裁剪后的图片中只有狗或猫的一部分躯干,如下图,影响最终的训练结果。
因此Maples丶丶提出的使用tf.image.resize_images直接对图片进行缩放来解决这个问题,但缩放后图片没有保持纵横比,造成了比例失调如下图。

我这里使用的还是KevinRush的代码。由于现在不知道对比方法的优劣,待学习之后会对两种情况进行对比测试,在做具体分析。
代码如下:
#将图片分批次
def get_batch(image, label, image_W, image_H, batch_size, capacity):
    '''''
    Args:
        image: list type
        label: list type
        image_W: image width
        image_H: image height
        batch_size: batch size
        capacity: the maximum elements in queue
    Returns:
        image_batch: 4D tensor [batch_size, width, height, 3], dtype=tf.float32
        label_batch: 1D tensor [batch_size], dtype=tf.int32
    '''
    #image和label为list类型,需要进行数据类型转换
    image = tf.cast(image, tf.string)
    label = tf.cast(label, tf.int32)


    # make an input queue 把image和label合并生成一个队列
    input_queue = tf.train.slice_input_producer([image, label])

    label = input_queue[1]      #读取label
    image_contents = tf.read_file(input_queue[0])               #读取图片
    image = tf.image.decode_jpeg(image_contents, channels=3)    #解码图片

    ######################################
    # data argumentation should go to here
    ######################################

    # 因为图片大小不一致,需要进行裁剪/扩充
    image = tf.image.resize_image_with_crop_or_pad(image, image_W, image_H)

    # 按照原代码使用标准化报错,注释掉运行正常
    # image = tf.image.per_image_standardization(image)   #标准化

    image_batch, label_batch = tf.train.batch([image, label],   #生成批次
                                                batch_size= batch_size,
                                                num_threads= 64,
                                                capacity = capacity)

    #you can also use shuffle_batch
#    image_batch, label_batch = tf.train.shuffle_batch([image,label],
#                                                      batch_size=BATCH_SIZE,
#                                                      num_threads=64,
#                                                      capacity=CAPACITY,
#                                                      min_after_dequeue=CAPACITY-1)

    # 这一步多余,删除无影响
    # label_batch = tf.reshape(label_batch, [batch_size])

    return image_batch, label_batch
1.3 Test
这部分代码就是调用测试get_files()和get_batch(),看是否能正常读取图片和分批次。
import matplotlib.pyplot as plt

BATCH_SIZE = 2
CAPACITY = 256
IMG_W = 208
IMG_H = 208

train_dir = 'D:/Test/Cats_vs_Dogs/data/train/'
image_list, label_list = get_files(train_dir)   #读取数据和标签
image_batch, label_batch = get_batch(image_list, label_list, IMG_W, IMG_H, BATCH_SIZE, CAPACITY)    #将图片分批次

with tf.Session() as sess:
    i = 0
    coord = tf.train.Coordinator()
    threads = tf.train.start_queue_runners(coord=coord)

    try:
        while not coord.should_stop() and i<1:

            img, label = sess.run([image_batch, label_batch])

            # just test one batch
            for j in np.arange(BATCH_SIZE):
                print('label: %d' %label[j])  #j-index of quene of Batch_size
                plt.imshow(img[j,:,:,:])
                plt.show()
            i+=1

    except tf.errors.OutOfRangeError:
        print('done!')
    finally:
        coord.request_stop()
coord.join(threads)input_data.py到这就结束了,下面将对后边的两个部分进行学习。
2. model.py
在model.py中构造卷积神经网络模型结构。其中定义了四个函数:inference()(构造CNN模型),losses()(loss损失值优化),trainning()(训练),evaluation(评价/准确率计算 )。
其中重点是inference,仿照TensorFlow官网例程cifar-10构造了一个简单模型,包含卷积+池化层x2,全连接层x2,1个softmax层。这种简单的卷积神经网络在之前已经学习过了,这里不具体分析代码了,详细可参考http://blog.csdn.net/xinyu3307/article/details/74943033。
3. training.py
这一部分主要用于训练和单图测试。其中定义了三个函数:run_training()(训练),get_one_image()(获取单张图片),evaluate_one_image(对单张图片进行分类)。
3.1 run_training()
用于训练模型,其中用到了Tensorboard相关的函数,记录训练模型数据。
考虑到训练中意外中断,我在这里加入了一个可选的恢复模型继续训练的操作,用到的就是模型的保存和恢复。
推荐阅读
https://mp.weixin.qq.com/s?__biz=MzI2NzI2OTExNA%3D%3D&mid=2247483960&idx=1&sn=a01fb83443c1a6537f3c9aa5801085f2&chksm=ea8024adddf7adbb66de772f394eaec1fcdf6a81598ae6a8798c060e8938361a387d35d8a103
模型的保存是通过tf.train.Saver()实现的:
1.首先需要创建一个Saver对象:saver = tf.train.Saver(),详细学习推荐阅读https://www.cnblogs.com/denny402/p/6940134.html。
2.保存模型或checkpoint:saver.save(sess, checkpoint_path, global_step=step)。
模型的恢复是通过restore()实现的:
            ckpt = tf.train.get_checkpoint_state(logs_train_dir) #检查checkpoint
            if ckpt and ckpt.model_checkpoint_path:
                global_step = ckpt.model_checkpoint_path.split('/')[-1].split('-')[-1]  #获取已训练step数
                saver.restore(sess, ckpt.model_checkpoint_path)  #恢复模型
print('Loading success, global_step is %s' % global_step)这里由于是每2000步保存一次,checkpoint名字中会带有已训练步数,因此可以直接提取出来赋给global_step,当global_step小于MAX_STEP时,会继续训练直到MAX_STEP。
#%%
def run_training():

    # you need to change the directories to yours.
    # 训练数据集路径
    train_dir = 'D:/Test/Cats_vs_Dogs/data/train/'
    # 训练模型存储路径
    logs_train_dir = 'D:/Test/Cats_vs_Dogs/logs/train'
    train, train_label = input_data.get_files(train_dir)

    # 分批次
    train_batch, train_label_batch = input_data.get_batch(train,
                                                          train_label,
                                                          IMG_W,
                                                          IMG_H,
                                                          BATCH_SIZE,
                                                          CAPACITY)
    # 设置训练模型参数
    train_logits = model.inference(train_batch, BATCH_SIZE, N_CLASSES)
    train_loss = model.losses(train_logits, train_label_batch)
    train_op = model.trainning(train_loss, learning_rate)
    train__acc = model.evaluation(train_logits, train_label_batch)

    summary_op = tf.summary.merge_all()
    sess = tf.Session()
    train_writer = tf.summary.FileWriter(logs_train_dir, sess.graph)
    saver = tf.train.Saver()

    sess.run(tf.global_variables_initializer())
    coord = tf.train.Coordinator()
    threads = tf.train.start_queue_runners(sess=sess, coord=coord)

    # 训练
    try:
        if istrain == 1:
            for step in np.arange(MAX_STEP):
                if coord.should_stop():
                        break
                _, tra_loss,tra_acc= sess.run([train_op, train_loss, train__acc])

                #每50步打印失真和准确率
                if step % 50 == 0:
                    print('Step %d, train loss = %.2f, train accuracy = %.2f%%' %(step, tra_loss, tra_acc*100.0))
                    summary_str = sess.run(summary_op)
                    train_writer.add_summary(summary_str, step)

                #每2000步保存一下model
                if step % 2000 == 0 or (step + 1) == MAX_STEP:
                    checkpoint_path = os.path.join(logs_train_dir, 'model.ckpt')
                    saver.save(sess, checkpoint_path, global_step=step)

        else:
            #读取checkpoint恢复模型
            print("Reading checkpoints...")
            ckpt = tf.train.get_checkpoint_state(logs_train_dir)
            if ckpt and ckpt.model_checkpoint_path:
                global_step = ckpt.model_checkpoint_path.split('/')[-1].split('-')[-1]
                saver.restore(sess, ckpt.model_checkpoint_path)
                print('Loading success, global_step is %s' % global_step)
                flag = 1
            else:
                print('No checkpoint file found')
            #继续训练
            if flag == 1:
                for step in np.arange(int(global_step),int(global_step)+MAX_STEP):
                    if coord.should_stop():
                       break
                    _, tra_loss,tra_acc= sess.run([train_op, train_loss, train__acc])
                    if step % 50 == 0:
                        print('Step %d, train loss = %.2f, train accuracy = %.2f%%' %(step, tra_loss, tra_acc*100.0))
                        summary_str = sess.run(summary_op)
                        train_writer.add_summary(summary_str,step)

                    if (step+1) % 2000 == 0 or (step+ 1) == MAX_STEP:
                         checkpoint_path = os.path.join(logs_train_dir, 'model.ckpt')
                         saver.save(sess, checkpoint_path, global_step=step+1)

    except tf.errors.OutOfRangeError:
        print('Done training -- epoch limit reached')
    finally:
        coord.request_stop()

    coord.join(threads)
    sess.close()
3.2 get_one_image()
用于在训练集中随机选取一张图片并展示。
代码如下:
def get_one_image(train):
    '''Randomly pick one image from training data
    Return: ndarray
    '''
    n = len(train)      #训练集长度
    ind = np.random.randint(0, n)   #生成随机数
    img_dir = train[ind]    #从训练集中提取选中的图片


    image = Image.open(img_dir)
    plt.imshow(image)   #显示图片
    image = image.resize([208, 208])
    image = np.array(image)
    return image
3.3 evaluate_one_image()
调用get_one_image从训练集中随机选取一张图片进行分类测试。
注意之前在inference()中最后的softmax层没有加激活函数,logit = tf.nn.softmax(logit)用于增加激活函数。
代码如下:
def evaluate_one_image():
'''Test one image against the saved models and parameters
'''
# you need to change the directories to yours.
# 数据集路径
train_dir = 'D:/Test/Cats_vs_Dogs/data/train/'
train, train_label = input_data.get_files(train_dir)
image_array = get_one_image(train) #调用get_one_image随机选取一幅图片并显示
with tf.Graph().as_default():
BATCH_SIZE = 1
N_CLASSES = 2
image = tf.cast(image_array, tf.float32)
image = tf.image.per_image_standardization(image)
image = tf.reshape(image, [1, 208, 208, 3]) #inference输入数据需要是4维数据,需要对image进行resize
logit = model.inference(image, BATCH_SIZE, N_CLASSES)
logit = tf.nn.softmax(logit) #inference的softmax层没有激活函数,这里增加激活函数
#因为只有一副图,数据量小,所以用placeholder
x = tf.placeholder(tf.float32, shape=[208, 208, 3])
# you need to change the directories to yours.
# 训练模型路径
logs_train_dir = 'D:/Test/Cats_vs_Dogs/logs/train'
saver = tf.train.Saver()
with tf.Session() as sess:
# 从指定路径下载模型
print("Reading checkpoints...")
ckpt = tf.train.get_checkpoint_state(logs_train_dir)
if ckpt and ckpt.model_checkpoint_path:
global_step = ckpt.model_checkpoint_path.split('/')[-1].split('-')[-1]
saver.restore(sess, ckpt.model_checkpoint_path)
print('Loading success, global_step is %s' % global_step)
else:
print('No checkpoint file found')
prediction = sess.run(logit, feed_dict={x: image_array})
# 得到概率最大的索引
max_index = np.argmax(prediction)
if max_index==0:
print('This is a cat with possibility %.6f' %prediction[:, 0])
else:
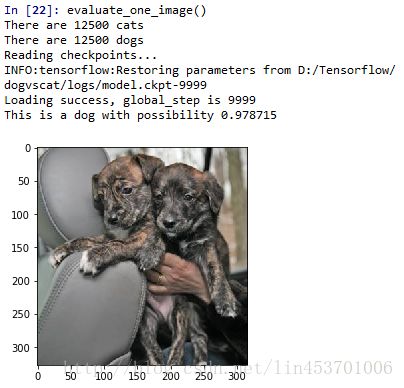
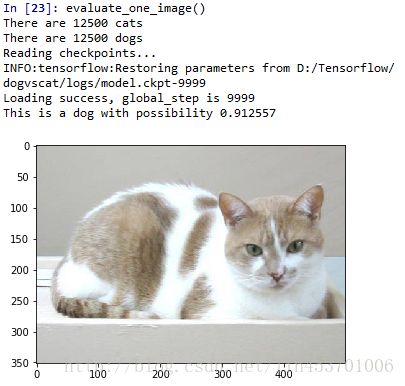
print('This is a dog with possibility %.6f' %prediction[:, 1])在训练结束后就可以用evaluate_one_image()来测试一下了。运行training.py,然后输入evaluate_one_image(),会显示如下:
当然也有很多判错的情况:
好了,到这里Cats vs. Dogs实例学习就结束了。通过这个学习,算是真正上手自己尝试了一下从读取图片划分批次,到搭建网络,再到训练网络和测试的整体过程,收获不小。