How To Send SMS Text Message in iPhone Apps
This is a quick follow-up to the previous post on email attachment. Some of you mentioned if we can write a short tutorial about sending SMS text messages within iOS apps. So here we go.
Not only designed for email, the Message UI framework also provides specialized view controller for developers to present standard interface for composing SMS text message within apps. While you use MFMailComposeViewController class for email, the framework provides another class namedMFMessageComposeViewController for handling text message.
Basically the usage of MFMessageComposeViewController is very similar to the mail composer class. If you’ve read the tutorials about sending email or creating email with attachment, you shouldn’t have any problem with the class. Anyway, we’ll go through the MFMessageComposeViewController class and demonstrate its usage using a simple app.
Demo App
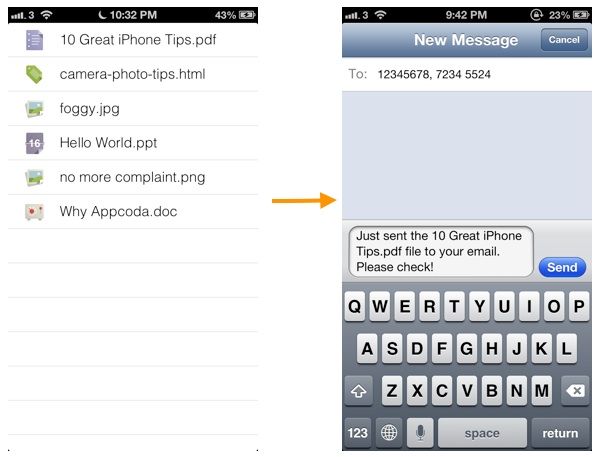
We’ll reuse the previous demo app but tweak it a bit. The app still displays a list of files in table format. However, instead of showing up the mail composer, the app will bring up the message interface with pre-populated message content when user taps any of the table rows.
Getting Started
To save your time from creating the Xcode project, you can download the project template to begin the coding. We’ve pre-built the Storyboard and already loaded the table view for you.
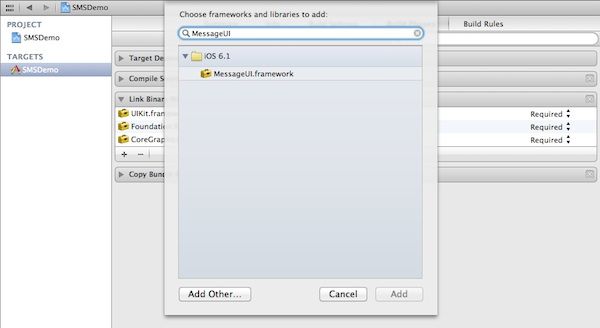
Importing the MessageUI Framework
First, import the MessageUI framework into the project.
Implementing the Delegate
Go to the “AttachmentTableViewController.m”. Add the following code to import the MessageUI header and implement the MFMessageComposeViewControllerDelegate:
|
1
2 3 |
#import @interface AttachmentTableViewController ( ) |
The MFMessageComposeViewControllerDelegate protocol defines a single method which will be called when user finishes composing an SMS message. We have to provide the implementation of the method and handle various situations:
- User cancels the editing of SMS
- User taps send button and the SMS is sent successfully
- User taps send button but the SMS is failed to send
Add the below code in the “AttachmentTableViewController.m”. Here, we displays an alert message when the situation 3. For other cases, we simply dismiss the message composer.
|
1
2 3 4 5 6 7 8 9 10 11 12 13 14 15 16 17 18 19 20 21 22 |
-
(
void
)messageComposeViewController
:
(MFMessageComposeViewController
*
)controller didFinishWithResult
:
(MessageComposeResult
) result
{ switch (result ) { case MessageComposeResultCancelled : break; case MessageComposeResultFailed : { UIAlertView *warningAlert = [ [UIAlertView alloc ] initWithTitle : @ "Error" message : @ "Failed to send SMS!" delegate : nil cancelButtonTitle : @ "OK" otherButtonTitles : nil ]; [warningAlert show ]; break; } case MessageComposeResultSent : break; default : break; } [self dismissViewControllerAnimated : YES completion : nil ]; } |
Bring Up the Message Composer
When user selects any of the rows, we’ll retrieve the selected file and call up a custom method to bring up the message composer. Update the “didSelectRowAtIndexPath:” method with the below code:
|
1
2 3 4 5 |
-
(
void
)tableView
:
(UITableView
*
)tableView didSelectRowAtIndexPath
:
(
NSIndexPath
*
)indexPath
{ NSString *selectedFile = [_files objectAtIndex :indexPath.row ]; [self showSMS :selectedFile ]; } |
The “showSMS:” method is the core code to initialize and populate the default content of the SMS text message. Add the following code:
|
1
2 3 4 5 6 7 8 9 10 11 12 13 14 15 16 17 18 19 |
-
(
void
)showSMS
:
(
NSString
*
)file
{
if ( ! [MFMessageComposeViewController canSendText ] ) { UIAlertView *warningAlert = [ [UIAlertView alloc ] initWithTitle : @ "Error" message : @ "Your device doesn't support SMS!" delegate : nil cancelButtonTitle : @ "OK" otherButtonTitles : nil ]; [warningAlert show ]; return; } NSArray *recipents = @ [ @ "12345678", @ "72345524" ]; NSString *message = [ NSString stringWithFormat : @ "Just sent the %@ file to your email. Please check!", file ]; MFMessageComposeViewController *messageController = [ [MFMessageComposeViewController alloc ] init ]; messageController.messageComposeDelegate = self; [messageController setRecipients :recipents ]; [messageController setBody :message ]; // Present message view controller on screen [self presentViewController :messageController animated : YES completion : nil ]; } |
Though most of the iOS devices should be capable of sending text message, as a programmer, you should cater for the exception. What if your app is used by an iPod touch with iMessages disabled? In this case, it’s obvious the device can’t send text message. So at the very beginning of the code, we verify if the device is allowed to send text message by using the “canSendText” method of the MFMessageComposeViewController.
The rest of the code is very straightforward and similar to the one you did in the email tutorial. You can pre-populate multiple recipients (i.e. the phone numbers) in the text message. For the message body, it supports textual content only.
With the content ready, simply invoke “presentModalViewController:” to bring up the message composer.
Compile and Run the App
That’s it! Simple and easy. You can now run the app and test it out. But please note you have to test the app on a real iOS device. The Simulator doesn’t allow you to send SMS.
What if You Don’t Want In-App SMS
The above implementation provides a seamless integration of SMS feature in your app. But what if you just want to redirect to the default Messages app and send text message? It’s even simpler. You can do that by a single line of code:
|
1
|
[
[UIApplication sharedApplication
] openURL
:
@
"sms:98765432"
];
|
In iOS, you’re allowed to communicate with other apps by using URL. The mobile OS already comes with built-in support of the http, mailto, tel, and sms URL schemes. When you open a HTTP URL, iOS by default launches the URL via Safari. If you want to open the Messages app, you can use the sms URL schedule and specify the recipient. However, such URL scheme doesn’t allow you to put default content.
Wrap Up
In this tutorial, we show you a simple way to send text message within your app. For your complete reference, you can download the full source code here.
As always, we love to hear your feedback. Feel free to leave us comment and share your thought about the tutorial.


