(一)实验简介
如图所示,企业有三台FTP服务器Server1、Server2、Server3,且这三台服务器的硬件性能不同,通过配置负载均衡,让这三台服务器联合对外提供FTP服务,服务器承载业务的多少与服务器硬件性能的高低匹配。服务器的性能如下,Server1性能是Server2的两倍,Server2与Server3性能一样。
- 要求根据性能来负载均衡,选择合适的负载均衡算法;
- 通过配置健康检测实时监控这三台服务器是否可达。
(二)实验目的
- 掌握配置服务器负载均衡;
- 掌握维护服务器负载均衡;
(三)实验条件
- 一台CPU支持VT技术,内存4GB以上的计算机;
- 安装eNSP模拟器B510版,导入USG6000V镜像;
- 终端工具:SecuretyCRT,Putty,Psftp,XShell等。
(四)网络拓朴图
打开ENSP软件,按如下拓朴图创建实验环境,设置地址:
- LAN地址:10.1.1.0/24;
- WAN地址:10.2.2.0/24;
- DMZ地址:10.21.21.0/24;
(五)配置思路
- 配置服务器的地址,启动FTP服务,配置DMZ网络;
- 配置LAN/WAN客户机地址,交换机;
- 配置防火墙的接口,安全域;
- 配置SLB,VIP。
(六)配置步骤
(1)配置DMZ服务器及交换机
以下为DMZ所在网络的FTPserver1的网络配置及FTP服务状态,FTPserver2和FTPserver2配置相似
交换机LSW1配置
The device is running!

system-view     //进入系统配置视图
Enter system view, return user view with Ctrl+Z.
[Huawei]sysname LSW1    //修改交换机名为LSW1
[LSW1]
[LSW1]undo info-center enable   //关闭信息提示
Info: Information center is disabled.
[LSW1]interface Vlanif 1    //进入vlan接口配置视图
[LSW1-Vlanif1]ip address 10.21.21.254 24    //配置vlan的IP地址
[LSW1-Vlanif1]quit      //退出vlan接口配置,返回系统配置视图
[LSW1]
[LSW1]ip route-static 0.0.0.0 0.0.0.0 10.21.21.1        //配置交换机的默认路由
[LSW1]quit      //退出系统配置视图,返回用户视图
save      //保存配置
The current configuration will be written to the device.
Are you sure to continue?[Y/N]y
Info: Please input the file name ( *.cfg, *.zip ) [vrpcfg.zip]:
Now saving the current configuration to the slot 0.
Save the configuration successfully.
(2) 配置LAN的网络
以下为LAN所在网络的客户机Client1的配置
交换机LSW2的配置
The device is running!

system-view     //进入系统配置视图
Enter system view, return user view with Ctrl+Z.
[Huawei]sysname LSW2    //修改交换机名为LSW2
[LSW2]
[LSW2]undo info-center enable   //关闭信息提示
Info: Information center is disabled.
[LSW2]interface Vlanif 1    //进入vlan接口配置视图
[LSW2-Vlanif1]ip address 10.1.1.254 24      //配置vlan的IP地址
[LSW2-Vlanif1]quit      //退出vlan接口配置,返回系统配置视图
[LSW2]
[LSW2]ip route-static 0.0.0.0 0.0.0.0 10.1.1.1  //配置交换机的默认路由
[LSW2]quit      //退出系统配置视图,返回用户视图
save      //保存配置
The current configuration will be written to the device.
Are you sure to continue?[Y/N]y
Info: Please input the file name ( *.cfg, *.zip ) [vrpcfg.zip]:
Now saving the current configuration to the slot 0.
Save the configuration successfully.
(3) 配置WAN的网络
以下为WAN所在网络的客户机Client2的配置,其余客户机参考Client2
交换机LSW3的配置
The device is running!

system-view     //进入系统配置视图
Enter system view, return user view with Ctrl+Z.
[Huawei]sysname LSW3    //修改交换机名为LSW3
[LSW3]
[LSW3]undo info-center enable   //关闭信息提示
Info: Information center is disabled.
[LSW3]interface Vlanif 1    //进入vlan接口配置视图
[LSW3-Vlanif1]ip address 10.2.2.254 24      //配置vlan的IP地址
[LSW3-Vlanif1]quit      //退出vlan接口配置,返回系统配置视图
[LSW3]
[LSW3]ip route-static 0.0.0.0 0.0.0.0 10.2.2.1  //配置交换机的默认路由
[LSW3]quit      //退出系统配置视图,返回用户视图
save      //保存配置
The current configuration will be written to the device.
Are you sure to continue?[Y/N]y
Info: Please input the file name ( *.cfg, *.zip ) [vrpcfg.zip]:
Now saving the current configuration to the slot 0.
Save the configuration successfully.
(4) 配置防火墙的接口
分别为防火墙的连接各个网络的接口配置IP地址,网关,允许ping
system-view  //进入系统视图
Enter system view, return user view with Ctrl+Z.
[USG6000V1]info-center disable  //关闭信息提示
Info: Information center is disabled.
[USG6000V1]sysname FW1  //修改设备名称
[FW1]
[FW1]interface GigabitEthernet 1/0/0    //进入GE1/0/0接口
[FW1-GigabitEthernet1/0/0]ip address 10.21.21.1 24      //配置接口的IP地址
[FW1-GigabitEthernet1/0/0]gateway 192.168.10.254            //配置接口网关
[FW1-GigabitEthernet1/0/0]service-manage ping permit        //允许PING
[FW1-GigabitEthernet1/0/0]service-manage http permit        //允许http
[FW1-GigabitEthernet1/0/0]quit      //退出接口配置视图,返回系统视图
[FW1]
[FW1]interface GigabitEthernet 1/0/1    //进入GE1/0/1接口
[FW1-GigabitEthernet1/0/1]ip address 10.1.1.1 24    //配置接口的IP地址
[FW1-GigabitEthernet1/0/1]gateway 10.1.1.254
[FW1-GigabitEthernet1/0/1]service-manage ping permit    //允许PING
[FW1-GigabitEthernet1/0/1]service-manage http permit        //允许http
[FW1-GigabitEthernet1/0/1]quit      //退出接口配置视图,返回系统视图
[FW1]
[FW1]interface GigabitEthernet 1/0/2    //进入GE1/0/2接口
[FW1-GigabitEthernet1/0/2]ip address 10.2.2.1 24    //配置接口的IP地址
[FW1-GigabitEthernet1/0/2]gateway 10.2.2.254        //配置接口网关
[FW1-GigabitEthernet1/0/2]service-manage ping permit    //允许PING
[FW1-GigabitEthernet1/0/2]service-manage http permit        //允许http
[FW1-GigabitEthernet1/0/2]quit      //退出接口配置视图,返回系统视图
[FW1]
(5) 配置防火墙的安全域
为防火墙创建新的安全域,设置其优先级,并把连接各个网络的接口加入到相应的安全域中
[FW1]firewall zone dmz  //进入安全域dmz配置
[FW1-zone-dmz]add interface GigabitEthernet 1/0/0       //把GE1/0/0加入安全域
[FW1-zone-dmz]quit  //退出安全域配置视图,返回系统视图
[FW1]
[FW1]firewall zone trust    //进入安全域trust配置
[FW1-zone-trust]add interface GigabitEthernet 1/0/1     //把GE1/0/1加入安全域
[FW1-zone-trust]quit    //退出安全域配置视图,返回系统视图
[FW1]
[FW1]
[FW1]firewall zone name untrust //进入安全域untrust
[FW1-zone-untrust]add interface GigabitEthernet 1/0/2       //把GE1/0/2加入安全域
[FW1-zone-untrust]quit  //退出安全域配置视图,返回系统视图
[FW1]
(6) 配置SLB
SLB,Server Load Balancing,服务器负载均衡,实现多个服务器之间的负载均衡;
VIP,Virtual IP Address,虚拟IP地址,主要是用来进行不同主机之间的切换;
RIP,Real IP Address,真实IP地址,主要是用来向实服务器组中添加实服务器;
[FW1]
[FW1]slb enable     //启用SLB服务
[FW1]slb            //进入SLB配置视图
[FW1-slb]group 1 ftpservers     //创建服务器组ftpservers
[FW1-slb-group-1]metric weight-least-connection //使用加权最小连接算法
[FW1-slb-group-1]
[FW1-slb-group-1]   // 以下为真实服务设置,IP地址,端口,权重值 //
[FW1-slb-group-1]rserver 1 rip 10.21.21.101 port 21 weight 2 description server1
[FW1-slb-group-1]rserver 2 rip 10.21.21.102 port 21 weight 1 description server2
[FW1-slb-group-1]rserver 3 rip 10.21.21.103 port 21 weight 1 description server3
[FW1-slb-group-1]
[FW1-slb-group-1]health-check type icmp tx-interval 5 times 3 //配置服务健康检查参数
[FW1-slb-group-1]persistence type source-ip aging-time 180  //配置会话保持时间
[FW1-slb-group-1]quit   //退出服务器组视图,返回SLB视图
[FW1-slb]
[FW1-slb]vserver 1 vftpserver   //创建虚拟服务器vftpserver
[FW1-slb-vserver-1]protocol tcp         //配置虚拟服务器的协议类型
[FW1-slb-vserver-1]vip 1 10.2.2.221         //设置虚拟服务器IP地址
[FW1-slb-vserver-1]vport 2121       //设置虚拟服务器端
[FW1-slb-vserver-1]group ftpservers     //关联真实服务器组
[FW1-slb-vserver-1]quit     //退出虚拟服务器视图,返回SLB视图
[FW1-slb]quit       //退出SLB视图,返回系统视图
[FW1]
(7) 配置防火墙的安全策略
为防火墙的安全域之间的访问设置安全策略
[FW1]
[FW1]security-policy    //进入安全策略配置视图
[FW1-policy-security]rule name trust_dmz        //创建安全规则
[FW1-policy-security-rule-trust_dmz]source-zone trust   //设置源安全域
[FW1-policy-security-rule-trust_dmz]destination-zone dmz        //设置目的安全域
[FW1-policy-security-rule-trust_dmz]destination-address range 10.21.21.101 10.21.21.103     //设置目的起止IP
[FW1-policy-security-rule-trust_dmz]destination-address 10.2.2.221 24       //设置目的IP段
[FW1-policy-security-rule-trust_dmz]action permit   //允许匹配规则的流量通过
[FW1-policy-security-rule-trust_dmz]quit        //退出规则视图,返回安全策略视图
[FW1-policy-security]
[FW1-policy-security]rule name untrust_dmz  //创建安全规则
[FW1-policy-security-rule-untrust_dmz]source-zone untrust   //设置源安全域
[FW1-policy-security-rule-untrust_dmz]destination-zone dmz      //设置目的安全域
[FW1-policy-security-rule-untrust_dmz]destination-address 10.2.2.221 24     //设置目的IP段
[FW1-policy-security-rule-untrust_dmz]destination-address range 10.21.21.101 10.21.21.103   //设置目的起止IP
[FW1-policy-security-rule-untrust_dmz]action permit         //允许匹配规则的流量通过
[FW1-policy-security-rule-untrust_dmz]quit      //退出规则视图,返回安全策略视图
[FW1-policy-security]
[FW1-policy-security]rule name local_dmz        //创建安全规则
[FW1-policy-security-rule-local_dmz]source-zone local   //设置源安全域
[FW1-policy-security-rule-local_dmz]destination-zone dmz    //设置目的安全域
[FW1-policy-security-rule-local_dmz]destination-address range 10.21.21.101 10.21.21.103     //设置目的起止IP
[FW1-policy-security-rule-local_dmz]action permit       //允许匹配规则的流量通过
[FW1-policy-security-rule-local_dmz]quit        //退出规则视图,返回安全策略视图
[FW1-policy-security]
[FW1-policy-security]rule name trust_untrust        //创建安全规则
[FW1-policy-security-rule-trust_untrust]source-zone trust   //设置源安全域
[FW1-policy-security-rule-trust_untrust]destination-zone untrust            //设置目的安全域
[FW1-policy-security-rule-trust_untrust]action permit   //允许匹配规则的流量通过
[FW1-policy-security-rule-trust_untrust]quit        //退出规则视图,返回安全策略视图
[FW1-policy-security]quit       //退出安全策略配置视图,返回系统视图
[FW1]
[FW1]
(8) 客户机进行FTP登录测试
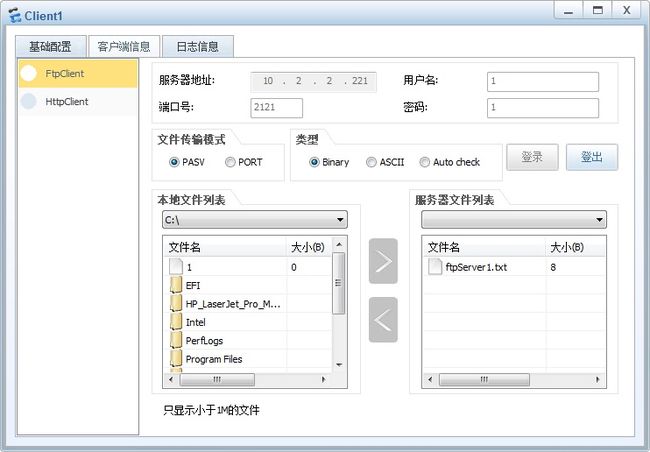
以Client1为客户机,通过FtpClient登录服务器:10.2.2.221 ;端口:2121。其他客户机参考Client1登录,以测试服务器的压力。
(七)参考资料
华为模拟器eNSP软件,
华为模拟器eNSP社区,
HCNA-Security 华为认证网络安全工程师,
HCNP-Security 华为认证网络安全资深工程师,
HUAWEI USG6000V V500R001C10SPC100 典型配置案例,
HUAWEI USG6000V V500R001C10SPC100 管理员指南,
HUAWEI USG6000V V500R001C10SPC100 命令参考 ,
华为ICT相关的英文简称 。
PS:
文档由炖冬瓜用Markdown语言编写,输出PDF或HTML。
炖冬瓜 一枚混迹挨踢江湖十载有余的吃货,好吃懒做,成功的从丝瓜进阶为冬瓜。


