搭建Telegraf+InfluxDB+Grafana监控系统
目录
一、Telegraf
1、Telegraf下载及安装
2、修改配置文件
3、连接influxdb并进行数据采集
二、InfluxDB
1、Influxdb的安装
2、有两种使用配置文件启动InfluxDB的方法
3、配置文件
4、简单使用
三、Grafana
1、Grafana的下载
2、安装
3、启动服务、添加开机启动
4、Grafana使用及配置登录
5、仪器盘
6、Grafana重置admin密码方法
-
一、Telegraf
-
1、Telegraf下载及安装
telegraf版本:Telegraf v1.13
官网地址:https://docs.influxdata.com/telegraf/v1.13/introduction/installation/#verify-the-authenticity-of-downloaded-binary-optional
RedHat & CentOS,使用yum安装
cat <通过以下命令安装并启动telegraf(版本小于7的系统)
sudo yum install telegraf
sudo service telegraf start
或者使用systemd命令(CentOS 7 +,RHEL 7+):
sudo yum install telegraf
sudo systemctl start telegraf
-
2、修改配置文件
我们需要配置telegraf需要写入的数据源,我们选择本机的influxdb作为数据源写入,配置如下:输入命令 vim /etc/telegraf/telegraf.conf
[[outputs.influxdb]]
   urls = ["http://localhost:18086"] # required
   database = "telegraf" # required
   retention_policy = ""
   precision = "s"
   timeout = "5s"
   username = "telegraf"
   password = " telegraf "
然后保存修改,输入命令 service telegraf restart ,重启telegraf。
-
3、连接influxdb并进行数据采集
如果想利用telegraf采集数据并保存到influxdb中,必须在influxdb中创建对应的用户和数据库。
[root@test ~]# influx -host 'localhost' -port '18086'
Connected to http://localhost:18086 version 1.7.10
InfluxDB shell version: 1.7.10
>create user "telegraf" with password 'telegraf'
>create database telegraf
> show databases
name: databases
name
----
_internal
mydb
telegraf
>
> show users
user     admin
----     -----
telegraf false
>
> exit
创建成功后,重启influxdb
-
二、InfluxDB
-
1、Influxdb的安装
官网地址:https://docs.influxdata.com/influxdb/v1.7/introduction/installation/
Red Hat和CentOS使用yum安装,配置yum源
cat
<
通过yum源安装并启动influxdb
sudo yum install influxdb
sudo service influxdb start
或者,如果您的操作系统使用systemd(CentOS 7 +,RHEL 7+):
sudo yum install influxdb
sudo systemctl start influxdb
-
2、有两种使用配置文件启动InfluxDB的方法
- 使用以下-config 选项将过程指向正确的配置文件:
influxd -config /etc/influxdb/influxdb.conf2、将环境变量设置为INFLUXDB_CONFIG_PATH配置文件的路径,然后开始该过程:
echo $INFLUXDB_CONFIG_PATH
/etc/influxdb/influxdb.conf

influxd
-
3、配置文件
1、关键端口
InfluxDB的配置文件位于/etc/influxdb/influxdb.conf中,日志位于/var/log/influxdb中,默认使用下面的网络端口(两个端口都会用到):
1、TCP端口8086用作InfluxDB的客户端和服务端的HTTP API通信;
2、TCP端口8088给备份和恢复数据的RPC服务使用;
可以通过influx命令看出:
[root@test influxdb]# influx

Failed to connect to http://localhost:8086: Get http://localhost:8086/ping: dial tcp 127.0.0.1:8086: connect: connection refused

Please check your connection settings and ensure 'influxd' is running.注:发现8086端口被占用了(可以使用指定配置文件config启动)
2、在配置文件分为几个节点:
[meta]

[data]

[coordinator]

[retention]

[shard-precreation]

[monitor]

[http]

[ifql]

[logging]

[subscriber]

[[graphite]]

[[collectd]]

[[opentsdb]]

[[udp]]

[continuous_queries]
其中涉及存储相关的是:
1、meta,存放数据库元数据;
2、data,存放最终存储的数据,文件以.tsm结尾;
3、wal,存放预写日志文件;
-
4、简单使用
1、修改配置文件
如果需要更改端口号,则修改以下部分配置
[http]

  # Determines whether HTTP endpoint is enabled.

   enabled = true


  # Determines whether the Flux query endpoint is enabled.

  # flux-enabled = false


  # Determines whether the Flux query logging is enabled.

  # flux-log-enabled = false


  # The bind address used by the HTTP service.

   bind-address = ":18086"


  # Determines whether user authentication is enabled over HTTP/HTTPS.

  # auth-enabled = false
2、登陆数据库
指定端口方式登陆:
influx -host 'localhost' -port '18086'
3、数据库常用命令
查看所有的库
show databases创建数据库
create database telegraf删除数据库
drop database telegraf查询数据库
select * from cpuiofo插入数据到measurement中
语法:insert (measurement名称),(tag名称)=(xxoo) value=(ooxx)
insert cpuinfo,item=shijiange_192.168.1.101_cpu.idle value=70使用命令precision rfc3339可以将时间格式化为可读形式
> select * from  cpuinfo

name: cpuinfo

time                           item                             value

----                           ----                             -----

2020-03-07T15:37:01.834752922Z shijiange_192.168.1.101_cpu.idle 80
-
三、Grafana
官网地址:https://grafana.com/grafana/download
-
1、Grafana的下载
对于Redhat或Centos操作系统的主机
wget https://dl.grafana.com/oss/release/grafana-6.6.2-1.x86_64.rpm

sudo yum install grafana-6.6.2-1.x86_64.rpm
-
2、安装
sudo yum grafana-6.6.2-1.x86_64.rpm
-
3、启动服务、添加开机启动
systemctl daemon-reload

systemctl start grafana-server

systemctl status grafana-server

systemctl enable grafana-server.service
or
service grafana-server start

service grafana-server sop

service grafana-server status

service grfana-server enable
-
4、Grafana使用及配置登录
http://localhost:3000,默认用户名admin,密码admin
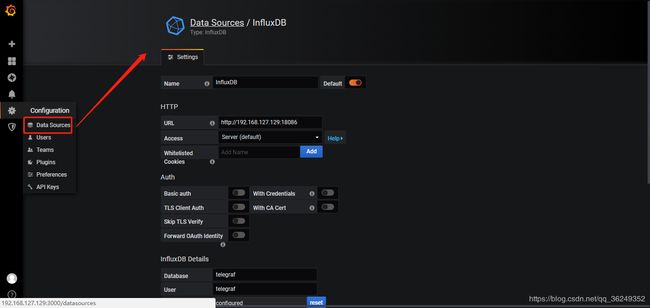
进入后,首先选择Data Sources,添加需要的数据源
PS:选择influxdb作为数据源,需要在influxdb中创建该用户以及对应的数据库!
然后进入dashboard页面,创建仪表盘。
-
5、仪表盘
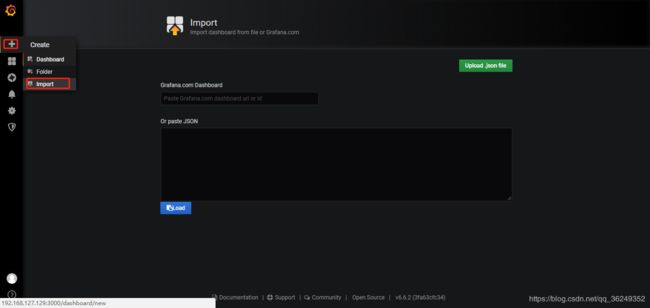
创建好数据源之后,就需要创建DashBoard(仪表盘),可以自定义,也可以导入你需要的仪表盘,官方提供了很多的可选仪表盘。
可以在这个网址选择自己想要的仪器盘,地址:https://grafana.com/grafana/dashboards
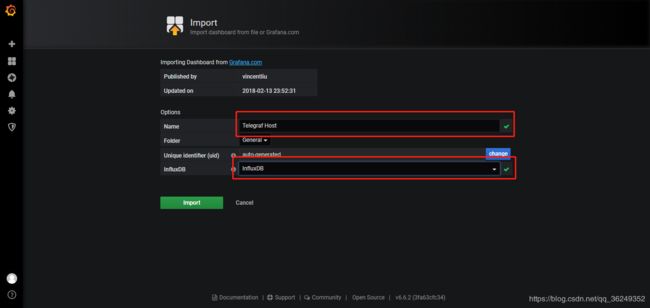
我选择https://grafana.com/dashboards/1443这个仪表盘,该仪表盘内已经基本涵盖对一个系统需要监控的相关参数
a、搜索仪表盘
b、导入仪表盘
c、展示仪表盘
-
6、Grafana重置admin密码方法
使用sqlites修改admin密码
1、通过shell的find工具直接全盘查找grafana.db的路径:
find / -name "grafana.db"2、打开数据库
[root@local]# sqlite3 /var/lib/grafana/grafana.db3、修改user表admin用户的password
#查看数据库中包含的表
.tables


#查看user表内容

select * from user;


#重置admin用户的密码为默认admin

update user set password = '59acf18b94d7eb0694c61e60ce44c110c7a683ac6a8f09580d626f90f4a242000746579358d77dd9e570e83fa24faa88a8a6', salt = 'F3FAxVm33R' where login = 'admin';


#退出sqlite3

.exit
这样就可以登录了
参考网址:
https://www.jianshu.com/p/fe11d681bd58
http://www.meilongkui.com/archives/1806
https://www.cnblogs.com/imyalost/p/9873621.html
https://blog.csdn.net/onlinewan/article/details/82791681


