Django---模板
文章目录
- 模板介绍
- DTL与普通的HTML文件的区别
- 渲染模板
- 模板查找路径
- 模板变量
- DTL模板语法
- 注意
- 常用标签
- if
- for in
- forloop
- for in empty
- 模板常用的过滤器
- 为什么需要过滤器?
- 模板语法
- 过滤器导入
- add
- cut
- date
- default
- safe
- 模板结构优化
- 引入模板
- 模板继承
- 模板继承注意点
- 加载静态资源文件
模板介绍
在之前的章节中,视图函数只是直接返回文本,而在实际生产环境中其实很少这样用,因为实际的页面大多是带有样式的HTML代码,这可以让浏览器渲染出非常漂亮的页面。DTL是Django Template Language三个单词的缩写,也就是Django自带的模板语言。当然也可以配置Django支持Jinja2等其他模板引擎,但是作为Django内置的模板语言,金额Django可以达到无缝衔接而不会产生一些不兼容的情况。
DTL与普通的HTML文件的区别
DTL模板是一种带有特殊语法的HTML文件,这个HTML文件可以被Django编译,可以传递参数进去,实现数据动态化。在编译完成后,生成一个普通的HTML文件,然后发送给客户端。
渲染模板
渲染模板之前先配置好路径,在settings.py文件中配置路径。
项目下的settings文件配置
app下的模板文件配置
app/views.py
from django.shortcuts import render
from django.template.loader import render_to_string
from django.http import HttpResponse

"""
导入模板文件有两种方法
from django.shortcuts import render
from django.template.loader import render_to_string
"""
# render_to_string 其实内部也是也是返回了render这个模块的方法实现


def temp_first(request):
    # html = render_to_string('index.html')
    # print(html)
    # return HttpResponse(html)
    return render(request, 'index.html')
app/urls.py
# @Time : 2020/6/18 17:42
# @Author : SmallJ

from django.urls import path
from . import views

urlpatterns = [
    path("", views.temp_first)
]
模板查找路径
在项目的settings.py文件中。有一个TEMPLATES配置,这个配置包容了模板引擎的配置。模板查找路径的配置,模板上下文的配置等。模板路径可以在两个地方配置。
DIRS: 这是一个列表,在这个列表中可以存放所有的模板路径,以后再视图中可以使用render或者render_to_string渲染模板的时候,会在这个列表的路径中查找模板。DIRS:默认为True,这个设置为True后,会在INSTALLED_APPS的安装了的APP下的templates文件夹中寻找模板。settings.py中INSTALLED_APPS数组中添加你的app名字。- 查找顺序:比如代码
render("index.html")。先会在DIRS这个列表中依次查找路径下有没有这个模板,如果有,就返回。如果DIRS列表中所有的路径都没有找到,那么会先检查当前这个视图所处的app是否以已经安装,如果已经安装了,那么会在其他安装了的app中查找。如果所有路径下都没有找到,那么会抛出一个TemplateDoesNotExist的异常
模板变量
DTL模板语法
模板中可以包含变量,Django在渲 染模板的时候,可以传递变量对应的值过去进行替换。变量的命名规则和Python非常类似,只能是阿拉伯数字和英文字符以及下划线的组合,不能出现标点符号等特殊字符。变量需要通过视图函数渲染,视图函数在使用render或者render_to_string的时候可以传递一个context的参数,这个参数就是一个字典类型。
注意
不能通过中括号的形式访问字典和列表中的值,比如dict['key']和list[1]是不支持的!因为使用.语法获取对象值的时候,可以获取这个对象的属性,如果这个对象是一个字典,也可以获取这个字典的值。所以在给这个字典添加key的时候,千万不能和字典中的一些属性重复。比如items,items是字典的方法,那么如果给这个字典添加一个items作为key,那么以后就不能再通过item来访问这个字典的键值对。
app/views.py
from django.shortcuts import render
from django.template.loader import render_to_string
from django.http import HttpResponse

"""
导入模板文件有两种方法
from django.shortcuts import render
from django.template.loader import render_to_string
"""
# render_to_string 其实内部也是也是返回了render这个模块的方法实现


def temp_first(request):
    html = render_to_string('index.html')
    # print(html)
    # print(type(html))
    return HttpResponse(html)
    # return render(request, 'index.html')


def temp_two(request):
    # 在模板变量中不能使用[]这种形式来获取数据
    # 只能通过.的方式来获取数据
    #
    context = {
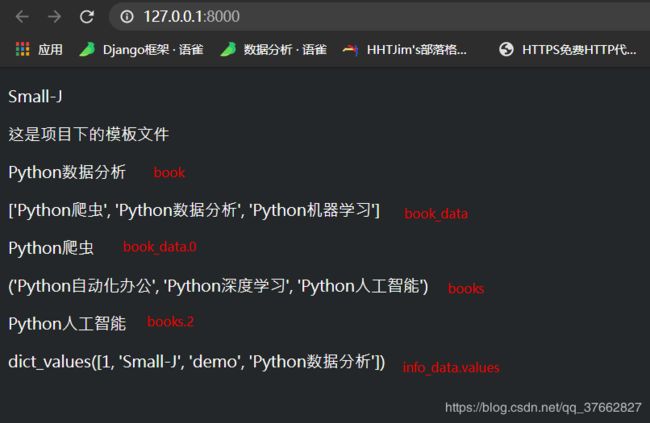
        'book': 'Python数据分析',
        'book_data': ['Python爬虫', 'Python数据分析', 'Python机器学习'],
        'books': ("Python自动化办公", "Python深度学习", "Python人工智能"),
        'info_data': {
            'id': 1,
            'students': 'Small-J',
            'teacher': 'demo',
            'study': 'Python数据分析'
        }
    }
    return render(request, 'index.html', context=context)
app/urls.py
# @Time : 2020/6/18 17:42
# @Author : SmallJ

from django.urls import path
from . import views

urlpatterns = [
    # path("", views.temp_first)
    path("", views.temp_two)
]
<html lang="en">
<head>
    <meta charset="UTF-8">
    <title>Titletitle>
head>
<body>
    <p>Small-Jp>
    <p>这是项目下的模板文件p>
    <p>{{ book }}p>

    <p>{{ book_data }}p>
    <p>{{ book_data.0 }}p>
    <p>{{ books }}p>
    <p>{{ books.2 }}p>
    <p>{{ info_data.values }}p>

body>
html>
常用标签
if
- if标签:if标签相当于Pytho中的if语句,有elif和else相对应,但是所有的标签都需要用标签符号
({% %})进行包裹。if标签中可以使用==, !=, <, <=, >, >=, in, not in, is is not等判断运算符。
{% if age > 18 %}
    <p>成年人p>
    {% elif age == 18 %}
    <p>刚成年p>
    {% else %}
    <p>未成年p>
{% endif %}
    <hr>
for in
- for…in…标签:for…in…类似于Python中的
for ... in ..。可以遍历列表、元组、字符串、字典等一切可以遍历的对象。
{% for book_d in book_data %}
    <p>{{ book_d }}p>
{% endfor %}

    <hr>

{% for demo in info_data.values %}
    <p>{{ demo.0 }}p>
{% endfor %}
    <hr>
- 遍历字典的时候,需要使用
items、key和values等方法。在DTL中,执行一个方法不能使用圆括号的形式
{% for key,value in person.items %}
    <p>key:{{ key }}p>
    <p>value:{{ value }}p>
{% endfor %}
forloop
- 在for循环中,DTL也提供了一些变量可供服务
| 描述 | 作用 |
|---|---|
forloop.counter |
从当前循环的下标,以1作为起始值 |
forloop.counter0 |
从当前循环的下标,以0作为起始值 |
forloop.revcounter |
相当于是倒序进行输出,但是最后一个元素是从1开始 |
forloop.revercounter0 |
相当于是倒序进行输出,但是最后一个元素是从0开始 |
forloop.first |
是否为遍历的第一次,如果是将返回True,如果不是将返回False |
forloop.last |
是否为遍历的最后一次,如果是将返回True,如果不是将返回False |
for in empty
for... in ... empty标签:这个标签使用跟for..in..是一样的,只不过是在遍历的时候对象如果没有元素的情况下,会执行empty中的内容
{% for book in book_data %}
      <p>{{ book }}p>
{% empty %}
      <p>暂无其他内容p>
{% endfor %}
app/views.py
from django.shortcuts import render
from django.template.loader import render_to_string
from django.http import HttpResponse

"""
导入模板文件有两种方法
from django.shortcuts import render
from django.template.loader import render_to_string
"""
# render_to_string 其实内部也是也是返回了render这个模块的方法实现


def temp_first(request):
    html = render_to_string('index.html')
    # print(html)
    # print(type(html))
    return HttpResponse(html)
    # return render(request, 'index.html')


def temp_two(request):
    # 在模板变量中不能使用[]这种形式来获取数据
    # 只能通过.的方式来获取数据
    context = {
        'book': 'Python数据分析',
        'book_data': ['Python爬虫', 'Python数据分析', 'Python机器学习'],
        'books': ("Python自动化办公", "Python深度学习", "Python人工智能"),
        'info_data': {
            'id': 1,
            'students': 'Small-J',
            'teacher': 'demo',
            'study': 'Python数据分析'
        },
        'age': 18
    }
    return render(request, 'index.html', context=context)
index.html
<html lang="en">
<head>
    <meta charset="UTF-8">
    <title>Titletitle>
head>
<body>
    <p>这是前端页面p>
    {% for book in books %}


        <p>序号: {{forloop.last }}p>
        <p>语言: {{ book }}p>
    {% endfor %}

    <hr>

    {% for book in book_data %}
        <p>{{ book }}p>
    {% empty %}
        <p>暂无其他内容p>
    {% endfor %}

body>
html>
- url标签:在模板中,我们经常要写一些url,比如某个a标签中需要定义href属性。当然如果通过硬编码的方式直接将url写死在里面也是可以的。但是这样对应以后项目维护可以不是一件好事。因此建议使用这种反转的方式来实现,类似于Django中
reverser一样。
<html lang="en">
<head>
    <meta charset="UTF-8">
    <title>Titletitle>
head>
<body>
    <p>这是前端登录页面p>
    <a href="{% url 'front:front' %}">前端登录页面跳转a>
body>
html>
当需要传递单个参数的时候
app/views.py
from django.shortcuts import render
from django.http import HttpResponse


def front(request):
    context = {
        'books': ['Python', 'Java', 'PHP'],
        'book_data': []
    }

    return render(request, 'index.html', context=context)


def front_login(request):
    return render(request, 'front_login.html')


def new_detail(request, new_id):
    context = {
        'new_id': new_id
    }
    return render(request, 'article.html', context=context)
app/urls.py
# @Time : 2020/6/21 14:04
# @Author : SmallJ
from django.urls import path
from . import views
# 应用命名空间
app_name = 'front'
urlpatterns = [
path("", views.front, name='front'),
path("login/", views.front_login),
path("article/" , views.new_detail, name='article')
]
article.html
<html lang="en">
<head>
    <meta charset="UTF-8">
    <title>Titletitle>
head>
<body>
    <p>这是文章首页p>
    <p>这是文章的第{{ new_id }}页p>
body>
html>
front_login.html
<html lang="en">
<head>
    <meta charset="UTF-8">
    <title>Titletitle>
head>
<body>
    <p>这是前端登录页面p>
    <a href="{% url 'front:front' %}">前端登录页面跳转a>

    <a href="{% url 'front:article' 12 %}">文章页面跳转a>
body>
html>
当传递多个参数时
<a href="{% url 'front:article' new_id=12 cate_id=2 %}">文章与分类跳转a>
拼接
<a href="{% url 'front:article' new_id=12 cate_id=2 %}?page=10">文章与分类跳转a>
![]()
- with 标签 : 就是给传过来的值取一个别名
{% with books.0 as d %}
     <p>{{ d }}p>
{% endwith %}
- autoescape 标签:自动转义
{% autoescape off %}
    <p>{{ url }}p>
{% endautoescape %}
模板常用的过滤器
在模板中,有时候需要对一些数据进行处理以后才能使用。一般在Python中我们是通过函数的形式来完成的。而在模中,则是通过过滤器来实现。过滤器使用的是|来使用
为什么需要过滤器?
因为在DTL中,不支持函数的调用形式(),因此不能给函数传递参数,这将有很大的局限性。而过滤器其实就是一个函数,可以对需要处理的参数进行处理,并且还可以额外接收一个参数(也就是,最多只能有2个参数)
模板语法
{{变量名|过滤器:可选参数}}
过滤器导入
from django.template import defaultfilters
add
将传进来的参数添加到原来的值上,这个过滤器会尝试将值和参数转换成整形如何进行相加。如果转换成整型过程中失败了,那么会将值和参数进行拼接。如果是字符串,那么会拼接成字符串,如果是列表那么会拼接成一个列表。
<p>{{ values1|add:values2 }}p>
# add 源码
@register.filter(is_safe=False)
def add(value, arg):
    """Add the arg to the value."""
    try:
        return int(value) + int(arg)
    except (ValueError, TypeError):
        try:
            return value + arg
        except Exception:
            return ''
- 当进行两个字符进行相加时,add函数会做相对应的处理,把字符串类型变为整型进行相加
- 当进行两个列表进行相加时,add函数会把两个列表拼接成一个列表
cut
移除字符串中所有指定的字符串。类似于Python中的replace
    <p>{{ "hello_world"|cut:"_"}}p>
    <p>{{ values|cut:'D' }}p>
date
将一个日期按装指定的格式,格式化成字符串。
<p>今天的日期为:{{ today|date:"Y-m-d" }}p>
| 格式字符 | 描述 |
|---|---|
| Y | 四位数字的年份 |
| m | 两位数字的月份 |
| n | 月份,1-9前面没有0前缀 |
| d | 两位数的天 |
| j | 天,但是1-9前面没有0前缀 |
| g | 小时,12小时格式的,1-9前面没有0前缀 |
| h | 小时,12小时格式的,1-9前面有0前缀 |
| G | 小时,24小时格式的,1-9前面没有0前缀 |
| H | 小时,24小时格式的, 1-9前面有0前缀 |
| i | 分钟,1-9前面有0前缀 |
| s | 秒, 1-9前面有0前缀 |
default
如果值被评估为False。比如[], "", None, {}等这些在if判断中为False的值,都会使用default过滤器提供的默认值。
<p>{{ data|default:"暂时没有数据" }}p>
safe
标记一个字符串是安全的。也即会关掉这个字符串的自动转义。
<p>博客跳转:{{ url|safe }}p>
app/views.py
from django.shortcuts import render
from django.http import HttpResponse
from django.template import defaultfilters
from datetime import datetime


def add_views(request):
    context = {
        'values1': [1, 2, 3, 4],
        'values2': [5, 6, 7, 8]
    }
    return render(request, 'add.html', context=context)


def cut_views(request):
    context = {
        'values': 'DPython'
    }
    return render(request, 'cut.html', context=context)


def date_views(request):
    context = {
        'today': datetime.now()
    }
    return render(request, 'date.html', context=context)


def default_views(request):
    context = {
        'data': ""
    }
    return render(request, 'default_data.html', context=context)


def safe_views(request):
    context = {
        'url': 'Small-J博客'
    }
    return render(request, 'save.html', context=context)
app/urls.py
# @Time : 2020/6/22 12:28
# @Author : SmallJ

from django.urls import path
from . import views

urlpatterns = [
    path("add/", views.add_views),
    path("cut/", views.cut_views),
    path('date/', views.date_views),
    path('default/', views.default_views),
    path('safe/', views.safe_views),
]
模板结构优化
引入模板
有时候一些代码是在许多模板中都用到的。如果我们每次都重复的去拷贝代码那肯定不符合项目的规范。一般我们可以把这些重复性的代码抽取出来,就类似于Python中的函数一样,以后想要使用这些代码的时候,就通过include包含进来。这个标签就是include
app/views.py
from django.shortcuts import render
from django.http import HttpResponse


# 首页
def index(request):
    return render(request, 'index.html')


# 公司
def company(request):
    return render(request, 'company.html')


# 学校
def school(request):
    return render(request, 'school.html')
app/urls.py
# @Time : 2020/6/22 15:21
# @Author : SmallJ

from django.urls import path
from . import views

# app命名空间
app_name = 'front'

urlpatterns = [
    path('', views.index),
    path('company/', views.company, name='company'),
    path('school/', views.school, name='school'),
    path('book/', views.book, name='book')
]
header.html
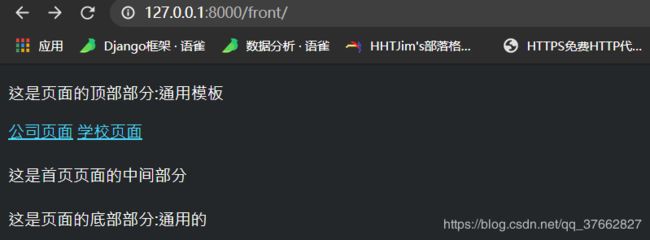
<p>这是页面的顶部部分:通用模板p>
footer.html
<footer>
    这是页面的底部部分:通用的
footer>
index.html
<html lang="en">
<head>
    <meta charset="UTF-8">
    <title>Titletitle>
head>
<body>
    <header>
        {% include 'header.html' %}
        <a href="{% url 'front:company' %}">公司页面a>
        <a href="{% url 'front:school' %}">学校页面a>
    header>
    <br>
    <div class="content">
        这是首页页面的中间部分
    div>
    <br>
    {% include 'footer.html' %}

body>
html>
<html lang="en">
<head>
    <meta charset="UTF-8">
    <title>Titletitle>
head>
<body>
    <header>
        {% include 'header.html' %}
        <p>这是学校页面p>
    header>
    <br>
    <div class="content">
        这是学校的中间部分内容
    div>
    <br>
    {% include 'footer.html' %}
body>
html>
company.html
<html lang="en">
<head>
    <meta charset="UTF-8">
    <title>Titletitle>
head>
<body>
    <head>
        {% include 'header.html' %}
        <p>这是公司页面p>
    head>
    <br>
    <div class="context">
        这是公司的中间内容
    div>
    <br>
    {% include 'footer.html' %}


body>

html>
模板继承
- 在前端页面开发中。有些代码是需要重复使用的。这种情况可以使用include标签来实现。也可以使用另外一个比较强大的方式来实现,那就是模版继承。
- 模版继承类似于Python中的类,在父类中可以先定义好一些变量和方法,然后在子类中实现。模版继承也可以在父模版中先定义好一些子模版需要用到的代码,然后子模版直接继承就可以了。并且因为子模版肯定有自己的不同代码,因此可以在父模版中定义一个block接口,然后子模版再去实现。
- 在使用模板继承的时候,由于子模板中肯定会有自己不同的代码,因此可以在父模板中定义一个
block接口,然后在子模板中实现block接口中的内容。
# 在头部进行继承
{% extends '要继承父模板' %}
模板继承注意点
-
extends标签放在模板的第一行
-
子模板中的代码必须放在block中,否则将不会被渲染
-
如果在某个
block中需要使用父模板的内容,那么可以使用{{block.super}}来继承。 -
在定义block的时候,除了在
block的开始地方定义这个block这个标签的时候,也需要在结尾定义endblock这个标签 -
include标签 :子模板是被引用的那个模板,一般是一些公用的HTML代码片段。作用是:在父模板中插入子模板的HTML代码片段。
-
模板继承 :子模板是引用的那个模板(父模板是被引用的那个模板,与include标签相反),一般是一个完整的HTML文件。作用是用于子模板继承父模板中的所有代码。
base.html
<html lang="en">
<head>
    <meta charset="UTF-8">
    <title>Titletitle>
head>
<body>
    <header>
        {% include 'header.html' %}
        {% block urls%}
        <a href="{% url 'front:company' %}">公司页面a>
        <a href="{% url 'front:school' %}">学校页面a>
        {% endblock%}
    header>
    <br>
    <div class="content">
        {% block content %}
        <p>这是父模板中的内容p>
        {% endblock %}
    div>
    <br>
    {% include 'footer.html' %}

body>
html>
book.html
{% extends 'base.html' %}


{% block urls %}
    <a href="https://www.baidu.com">百度a>
{% endblock %}
<hr>
{% block content %}
    <p>这是图书页面p>

{{ block.super }}
{% endblock %}
加载静态资源文件
在一个网页中,不仅仅有一个html骨架,还需要css样式文件,js执行文件以及一些图片等。因此在DTL中加载静态文件是一个必须要解决的问题。在DTL中,使用static标签加载静态文件。要使用static标签。首先需要{% load static %}
1.首先确保django.contrib.staticfiles已经添加到settings.INSTALLED_APPS中。
2.确保在settings.py中设置了STATIC_URL。
3.在已经安装了的app下创建一个文件夹叫做static,然后再在这个static文件夹下创建一个当前app的名字的文件夹,再把静态文件放到这个文件夹下。
例如你的app叫做book,有一个静态文件叫做logo.jpg,那么路径为book/static/book/logo.jpg。(为什么在app下创建一个static文件夹,还需要在这个static下创建一个同app名字的文件夹呢?原因是如果直接把静态文件放在static文件夹下,那么在模版加载静态文件的时候就是使用logo.jpg,如果在多个app之间有同名的静态文件,这时候可能就会产生混淆。而在static文件夹下加了一个同名app文件夹,在模版中加载的时候就是使用app/logo.jpg,这样就可以避免产生混淆。)
4.如果有一些静态文件是不和任何app挂钩的。那么可以在settings.py中添加STATICFILES_DIRS,以后DTL就会在这个列表的路径中查找静态文件。
 STATICFILES_DIRS = [
     os.path.join(BASE_DIR,"static")
 ]
5.在模版中使用load标签加载static标签。比如要加载在项目的static文件夹下的style.css的文件。
 {% load static %}
 <link rel="stylesheet" href="{% static 'style.css' %}">
6.如果不想每次在模版中加载静态文件都使用load加载static标签,那么可以在settings.py中的TEMPLATES/OPTIONS添加’builtins’:[‘django.templatetags.static’],这样以后在模版中就可以直接使用static标签,而不用手动的load了。
image.html
{% load static %}

<html lang="en">
<head>
    <meta charset="UTF-8">
    <title>Titletitle>
head>
<body>

    <img src="{% static 'front/demo.png' %}" alt="">

    <img src="{% static 'demo1.png' %}" alt="">
body>
html>


