spring集成shiro
spring集成shiro
文章目录
- spring集成shiro
- 环境搭建
- 代码
- shiro的简单权限管理
- 实体类 User.java
- 自定义一个Realm
- 登录Controller
- 密码加密
- 缓存
- Shiro 会话管理
- cookie
- 注解
关于spring集成shiro的配置在官网上有详细的,在w3c上也有常见的 Spring 配置,我们从简单的开始讲起,后面再讲加密、缓存、session、cookie、注解等等
全部的代码在我的Github中,只要打成war包,放到tomcat里面跑就行
环境搭建
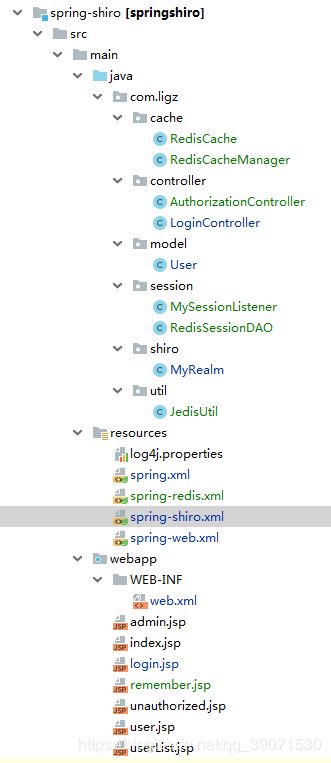
整体的框架结构是这样的
引入下面的maven依赖
            org.springframework
            spring-webmvc
            5.0.7.RELEASE


            org.apache.shiro
            shiro-all
            1.4.0


            log4j
            log4j
            1.2.17


            org.slf4j
            slf4j-log4j12
            1.7.25


            redis.clients
            jedis
            2.9.0
代码
shiro的简单权限管理
实体类 User.java
public class User {
    private String username;

    private String password;

    private boolean rememberMe;//用于cookie的是否记住
	//省略构造函数和get,set
}
自定义一个Realm
/**
 * 自定义的 Realm
 * author:ligz
 */
public class MyRealm extends AuthorizingRealm {
    private static final Logger logger = Logger.getLogger(MyRealm.class);

    @Override
    protected AuthorizationInfo doGetAuthorizationInfo(PrincipalCollection principalCollection) {
        logger.info("从数据库中读取授权信息...");
        SimpleAuthorizationInfo authorizationInfo = new SimpleAuthorizationInfo();

        Set roles = new HashSet<>();
        roles.add("admin");
        authorizationInfo.setRoles(roles);

        Set permissions = new HashSet<>();
        permissions.add("add");
        authorizationInfo.setStringPermissions(permissions);

        return authorizationInfo;
    }

    @Override
    protected AuthenticationInfo doGetAuthenticationInfo(AuthenticationToken authenticationToken) throws AuthenticationException {
        String username = (String) authenticationToken.getPrincipal();

        User user = selectUserByUserName(username);
        if (user == null) {
            throw new UnknownAccountException("账户不存在");
        }
        return new SimpleAuthenticationInfo(user.getUsername(), user.getPassword(), ByteSource.Util.bytes("TestSalt"), super.getName());
    }

    /**
     * 仿照数据库信息
     * @param username
     * @return
     */
    private User selectUserByUserName(String username) {
        if ("ligz".equals(username)) {
            //return new User(username, "123456");
            return new User(username, "e5f728a966d050296c428290c9160dda");//这个是123456加上TestSalt盐后的值
        }
        return null;
    }
}
这是我们重点讲解的地方,在这里我们部访问数据库,就用一个假的账户好了。username是ligz,password是123456
在我们前面的blog里面我们都是用的手工new出来的DefaultSecurityManager,我们这里使用spring的容器帮助我们管理
            /login.jsp = anon
            /login = anon
            /user.jsp = roles[user]
            /admin.jsp = roles[admin]
            /userList.jsp = perms[select]
            /** = authc
securityManager 和自定义 Realm在恰面的blog里面都讲过,这里就不在重复,这里我们主要讲一下shiroFilter,Shiro的权限过滤器。在web端进行权限的过滤,所以我们还需要在web.xml里面加上
    shiroFilter
    org.springframework.web.filter.DelegatingFilterProxy

        targetFilterLifecycle
        true


    shiroFilter
    /*
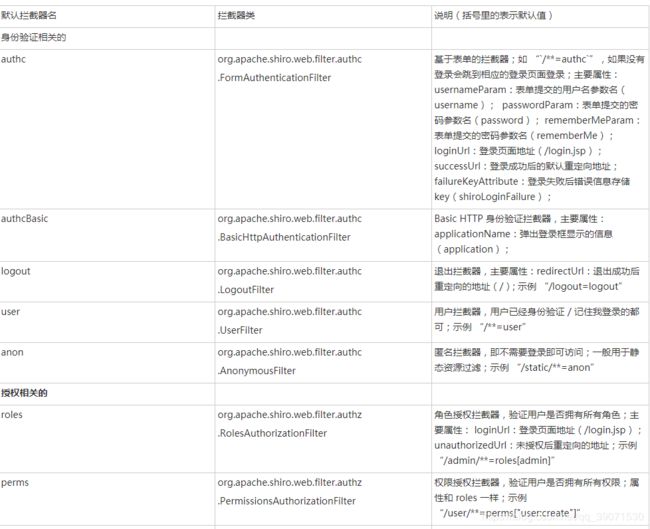
在shiroFilter中其他的比较好理解,就是登陆成功的页面,没有权限的页面等等,那么主要是对过滤器链filterChainDefinitions的理解,我们可以看下图
我们举个例子,我们将 /login.jsp 和 /login 配置成 anon,表示的是可以匿名访问。
这样和上图一一对应我们会发现,各个页面是对应到了每个权限和角色的。不过这样实在是麻烦,我们后面会用注解来代替他。
登录Controller
/**
 * 登录
 * author:ligz
 */
@Controller
public class LoginController {
    @RequestMapping("login")
    @ResponseBody
    public String login(User user) {
        Subject subject = SecurityUtils.getSubject();
        UsernamePasswordToken token =
                new UsernamePasswordToken(user.getUsername(), user.getPassword(), user.getRememberMe());
        try {
            subject.login(token);
        } catch (AuthenticationException e) {
            return e.getMessage();
        }
        return "login success";
    }
}
密码加密
我们会发现上面的代码有一段是这样的
return new SimpleAuthenticationInfo(user.getUsername(), user.getPassword(), ByteSource.Util.bytes("TestSalt"), super.getName());
private User selectUserByUserName(String username) {
    if ("ligz".equals(username)) {
        //return new User(username, "123456");
        return new User(username, "e5f728a966d050296c428290c9160dda");//这个是123456加上TestSalt盐后的值
    }
    return null;
}
这是我们演示使用MD5和盐加密,我们在xml里面配置
在实际的情况里面加密的密码和盐都是存储在数据库中的
缓存
在前面RBAC的框架实现中,我们会碰到每一次的获取授权都要从数据库中去获取,在实际中遇到了大型的系统,会极大的增加数据库的压力,于是我们可以使用shiro来将授权放到redis中或者ehcache中,当然根据实际的情况有不同的优缺点
这里我们使用redis,这是以前写的搭建Redis的博客,新建配置文件 spring-redis.xml:
代码主要是对 redis 的基本增删改查操作,由于是存储到 redis 中,所以我们为缓存数据的 key 添加了前缀,以便再次获取。
/**
 * redis的基本操作
 * author:ligz
 */
@Component
public class JedisUtil {

    @Resource
    private JedisPool jedisPool;

    private Jedis getResource() {
        return jedisPool.getResource();
    }

    public byte[] set(byte[] key, byte[] value) {
        Jedis jedis = getResource();
        try {
            jedis.set(key, value);
            return value;
        } finally {
            jedis.close();
        }
    }

    public void expire(byte[] key, int seconds) {
        Jedis jedis = getResource();
        try {
            jedis.expire(key, seconds);
        } finally {
            jedis.close();
        }
    }

    public byte[] get(byte[] key) {
        Jedis jedis = getResource();
        byte[] bytes = jedis.get(key);
        jedis.close();
        return bytes;
    }

    public void del(byte[] key) {
        Jedis jedis = getResource();
        try {
            jedis.del(key);
        } finally {
            jedis.close();
        }
    }

    public Collection getKeysByPrefix(String prefix) {
        Jedis jedis = getResource();
        try {
            return jedis.keys((prefix + "*").getBytes());
        } finally {
            jedis.close();
        }
    }

    public void delKeysByPrefix(String prefix) {
        Jedis jedis = getResource();
        try {
            Collection keys = getKeysByPrefix(prefix);
            for (byte[] bytes : keys) {
                jedis.del(bytes);
            }
        } finally {
            jedis.close();
        }
    }

    public  Collection getValuesByPrefix(String prefix) {
        ArrayList list = new ArrayList<>();
        Jedis jedis = getResource();
        try {
            Collection keys = getKeysByPrefix(prefix);
            for (byte[] bytes : keys) {
                list.add((V) jedis.get(bytes));
            }
        } finally {
            jedis.close();
        }
        return list;
    }
}
package com.ligz.cache;

import com.ligz.util.JedisUtil;
import org.apache.log4j.Logger;
import org.apache.shiro.cache.Cache;
import org.apache.shiro.cache.CacheException;
import org.springframework.stereotype.Component;
import org.springframework.util.SerializationUtils;

import javax.annotation.Resource;
import java.util.Collection;
import java.util.Set;

/**
 * 缓存shiro的redis信息
 * author:ligz
 */
@Component
public class RedisCache implements Cache {

    private static final Logger logger = Logger.getLogger(RedisCache.class);

    @Resource
    private JedisUtil jedisUtil;

    private final String CACHE_PREFIX = "shiro-cache:";

    private byte[] getKeyBytes(K k) {
        return (CACHE_PREFIX + k).getBytes();
    }

    @Override
    public V get(K k) throws CacheException {
        logger.info("从 Redis 中读取授权信息...");
        byte[] key = getKeyBytes(k);
        byte[] value = jedisUtil.get(key);
        if (value != null) {
            return (V) SerializationUtils.deserialize(value);
        }
        return null;
    }

    @Override
    public V put(K k, V v) throws CacheException {
        byte[] key = getKeyBytes(k);
        byte[] value = SerializationUtils.serialize(v);
        jedisUtil.set(key, value);
        jedisUtil.expire(key, 600);
        return v;
    }

    @Override
    public V remove(K k) throws CacheException {
        byte[] key = getKeyBytes(k);
        byte[] value = jedisUtil.get(key);
        jedisUtil.del(key);

        if (value != null) {
            SerializationUtils.deserialize(value);
        }
        return null;
    }

    @Override
    public void clear() throws CacheException {
        jedisUtil.delKeysByPrefix(CACHE_PREFIX);
    }

    @Override
    public int size() {
        return jedisUtil.getKeysByPrefix(CACHE_PREFIX).size();
    }

    @Override
    public Set keys() {
        return (Set) jedisUtil.getKeysByPrefix(CACHE_PREFIX);
    }

    @Override
    public Collection values() {
        return jedisUtil.getValuesByPrefix(CACHE_PREFIX);
    }
}
/**
 * author:ligz
 */
@Component
public class RedisCacheManager extends AbstractCacheManager {

    @Resource
    private RedisCache redisCache;

    @Override
    protected Cache createCache(String s) throws CacheException {
        return redisCache;
    }
}
然后我们将 RedisCacheManager 配置到 securityManager 中:
对同一个页面访问,首先出现的是下面的图片
会发现先在redis中查询,发现没有数据后,再到数据库中去取,我们再次访问该页面,会发现Redis取授权信息成功,后面就没有访问数据库了
Shiro 会话管理
Shiro 提供了完整的企业级会话管理功能,不依赖于底层容器(如 web 容器 tomcat),不管 JavaSE 还是 JavaEE 环境都可以使用,提供了会话管理、会话事件监听、会话存储 / 持久化、容器无关的集群、失效 / 过期支持、对 Web 的透明支持、SSO 单点登录的支持等特性。即直接使用 Shiro 的会话管理可以直接替换如 Web 容器的会话管理。
所谓会话,即用户访问应用时保持的连接关系,在多次交互中应用能够识别出当前访问的用户是谁,且可以在多次交互中保存一些数据。如访问一些网站时登录成功后,网站可以记住用户,且在退出之前都可以识别当前用户是谁。
获取 Session 方法
Subject subject = SecurityUtils.getSubject();
Session session = subject.getSession();
会话监听器用于监听会话创建、过期及停止事件:
/**
 * Shiro 会话监听器
 * author:ligz
 */
@Component
public class MySessionListener implements SessionListener {

    private static final Logger logger = Logger.getLogger(MySessionListener.class);

    @Override
    public void onStart(Session session) {
        logger.info("create session : " + session.getId());
    }

    @Override
    public void onStop(Session session) {
        logger.info("session stop : " + session.getId());
    }

    @Override
    public void onExpiration(Session session) {
        logger.info("session expiration : " + session.getId());
    }
}
然后将会话监听器配置到 sessionManager 中,在将 sessionManager 配置到 securityManager:
Shiro 提供 SessionDAO 用于会话的 CRUD,我们可以用它来从 Redis 中增删改查 Session 信息,只需要继承自 SessionDAO:
package com.ligz.session;

import com.ligz.util.JedisUtil;
import org.apache.log4j.Logger;
import org.apache.shiro.session.Session;
import org.apache.shiro.session.UnknownSessionException;
import org.apache.shiro.session.mgt.eis.AbstractSessionDAO;
import org.springframework.stereotype.Component;
import org.springframework.util.SerializationUtils;

import javax.annotation.Resource;
import java.io.Serializable;
import java.util.Collection;
import java.util.HashSet;

/**
 * 用于会话的 CRUD,我们可以用它来从 Redis 中增删改查 Session 信息,只需要继承自 SessionDAO
 * author:ligz
 */
@Component
public class RedisSessionDAO extends AbstractSessionDAO {
    private static final Logger logger = Logger.getLogger(RedisSessionDAO.class);

    @Resource
    private JedisUtil jedisUtil;

    private final String SHIRO_SESSION_PREFIX = "shiro-session:";

    @Override
    protected Serializable doCreate(Session session) {
        Serializable sessionId = generateSessionId(session);
        assignSessionId(session, sessionId);
        saveSession(session);
        logger.info("sessionDAO doCreate : " + session.getId());
        return sessionId;
    }

    @Override
    protected Session doReadSession(Serializable sessionId) {
        if (sessionId == null) {
            return null;
        }
        byte[] key = getKeyBytes(sessionId.toString());
        byte[] value = jedisUtil.get(key);
        return (Session) SerializationUtils.deserialize(value);
    }

    @Override
    public void update(Session session) throws UnknownSessionException {
        saveSession(session);
    }

    @Override
    public void delete(Session session) {
        logger.info("session delete : " + session.getId());
        if (session != null && session.getId() != null) {
            byte[] key = getKeyBytes(session.getId().toString());
            jedisUtil.del(key);
        }
    }

    @Override
    public Collection getActiveSessions() {
        Collection keys = jedisUtil.getKeysByPrefix(SHIRO_SESSION_PREFIX);
        Collection sessions = new HashSet<>();
        if (sessions.isEmpty()) {
            return sessions;
        }
        for (byte[] key : keys) {
            Session session = (Session) SerializationUtils.deserialize(jedisUtil.get(key));
            sessions.add(session);
        }
        return sessions;
    }

    private byte[] getKeyBytes(String key) {
        return (SHIRO_SESSION_PREFIX + key).getBytes();
    }

    private void saveSession(Session session) {
        if (session != null && session.getId() != null) {
            byte[] key = getKeyBytes(session.getId().toString());
            byte[] value = SerializationUtils.serialize(session);
            jedisUtil.set(key, value);
            jedisUtil.expire(key, 600);
        }
    }
}
然后将其配置到 sessionManager 中:
我们可以使用 Shiro 提供的这一系列操作会话的工具来完成很多功能,如单点登陆,单设备登陆,踢出用户,获取所有登陆用户等信息
cookie
我们可以使用cookie来帮助网站记住用户,cookie的原理实际是将用户的信息放入在浏览器中,这样的优缺点在这里就不说了,只说可以在 n天内自动登陆
首先需要在 spring-shiro.xml 中配置:
并将 rememberMeManager 添加到 securityManager中:
在登陆时如果不使用上面代码的构造函数,可以使用
token.setRememberMe(true);
来使得cookie生效
注解
我们最后来说一下注解的使用,我们会发现使用xml的方式配置权限很麻烦,我们可以使用注解来帮助我们
首先我们需要在 Spring Web 的配置文件 spring-web.xml 中加入以下内容来开启 Shiro 的注解支持 :
接着就使用shiro带的注解
@RestController
public class AuthorizationController {

    @RequestMapping("/role1")
    @RequiresRoles("user")
    public String role1() {
        return "success";
    }

    @RequestMapping("/role2")
    @RequiresRoles("admin")
    public String role2() {
        return "success2";
    }
}
访问 role1 方法需要当前用户有 user 角色,role2 方法需要 admin 角色。
当然不止有 @RequiresRoles 用来验证角色,Shiro 还提供了以下注解:
@RequiresAuthentication
验证用户是否登陆,等同于方法 subject.isAuthenticated() 。
@RequiresPermissions
验证是否具备权限,可通过参数 logical 来配置验证策略
如果不明白注解的原理也可以看我之前的博客RBAC的框架实现中,且这些方法不仅可以配置在 Controller 层,还可以在 Service 层,DAO 层等,只不过需要通过 IOC 容器来获取对象才能使用。


