Spring MVC整理
文章目录
- 一、第一个Spring MVC程序
- Spring框架结构图
- Spring MVC框架结构图
- HelloWorld程序
- 创建动态web工程
- 导包
- 配置web.xml
- 配置springmvc.xml
- 前端页面(jsp)
- 处理器Controller
- HelloWold程序补充
- 1.不指定SpringMVC配置文件
- 2.url-pattern的拦截内容
- 3.RequestMapping标注在类上
- 二、RequestMapping中参数的设置
- 1.method属性规定请求方式
- 2.params属性规定请求参数
- 3.headers属性规定请求头
- 4.ant风格的url
- 5.使用@PathVariable获取路径上的占位符
- 三、Rest风格的URL地址(get, post, put, delete)
- 配置web.xml
- jsp前端页面
- 控制器类Controller
- 源码分析
- 解决浏览器报错问题
- 四、Request请求处理
- 1.默认方式获取请求参数
- 2.@RequestParam等方式
- 3.传入POJO,自动封装
- 解决获取中文时的乱码问题
- 4.传入原生API
一、第一个Spring MVC程序
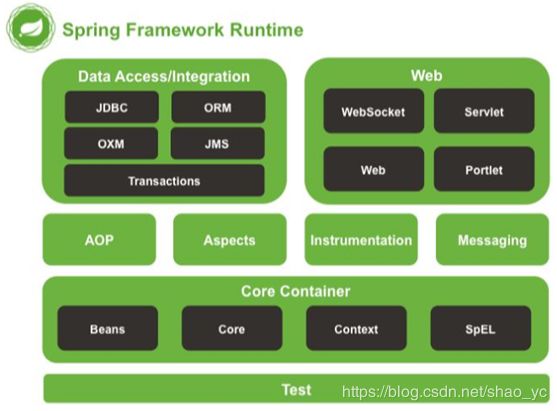
Spring框架结构图
- SpringMVC是Spring实现web模块,用于简化web开发
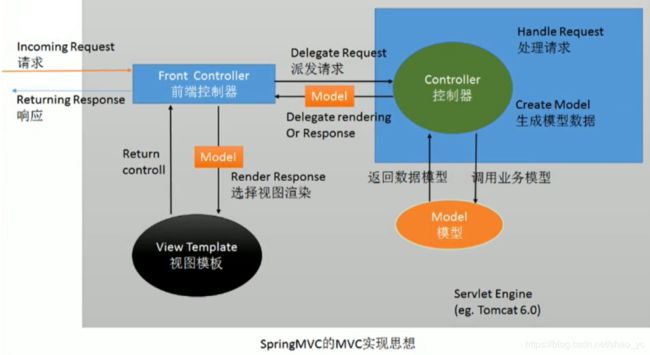
Spring MVC框架结构图
Spring眼中的MVC在保留以前三者的基础上增加了前端控制器。
HelloWorld程序
以在Eclipse中创建动态web工程为例,需要配有tomcat开发环境。
创建动态web工程
在创建工程时,Dynamic web model version 推荐选择2.5,若选择3.0,则需要勾选上生成web.xml配置文件。
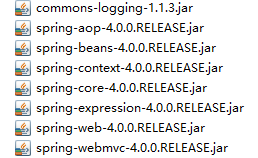
导包
配置web.xml
<web-app xmlns:xsi="http://www.w3.org/2001/XMLSchema-instance"  xmlns="http://java.sun.com/xml/ns/javaee"  xsi:schemaLocation="http://java.sun.com/xml/ns/javaee  http://java.sun.com/xml/ns/javaee/web-app_3_0.xsd"  id="WebApp_ID" version="3.0">
  <display-name>01_springmvc_helloworlddisplay-name>
  <welcome-file-list>
    <welcome-file>index.jspwelcome-file>
  welcome-file-list>


     <servlet>
           <servlet-name>springDispatcherServletservlet-name>
           <servlet-class>org.springframework.web.servlet.DispatcherServletservlet-class>
           <init-param>

                <param-name>contextConfigLocationparam-name>
                <param-value>classpath:springmvc.xmlparam-value>
           init-param>

           <load-on-startup>1load-on-startup>
     servlet>

     <servlet-mapping>
           <servlet-name>springDispatcherServletservlet-name>

           <url-pattern>/url-pattern>
     servlet-mapping>

web-app>
配置springmvc.xml
在类路径下创建springmvc.xml (spring bean configuration file),namespace中选择 context扫描包组件

<beans xmlns="http://www.springframework.org/schema/beans"
	xmlns:xsi="http://www.w3.org/2001/XMLSchema-instance"
	xmlns:context="http://www.springframework.org/schema/context"
	xsi:schemaLocation="http://www.springframework.org/schema/beans http://www.springframework.org/schema/beans/spring-beans.xsd
		http://www.springframework.org/schema/context http://www.springframework.org/schema/context/spring-context-4.0.xsd">

	<context:component-scan base-package="com.syc.controller">context:component-scan>


	<bean class="org.springframework.web.servlet.view.InternalResourceViewResolver">

		<property name="prefix" value="/WEB-INF/pages/">property>
		<property name="suffix" value=".jsp">property>
	bean>
beans>
前端页面(jsp)
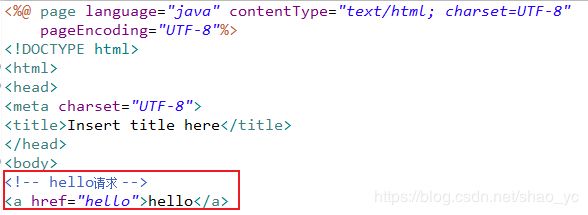
在前端页面中,只是写了一个get请求,然后我们需要编写响应该请求的方法。
处理器Controller
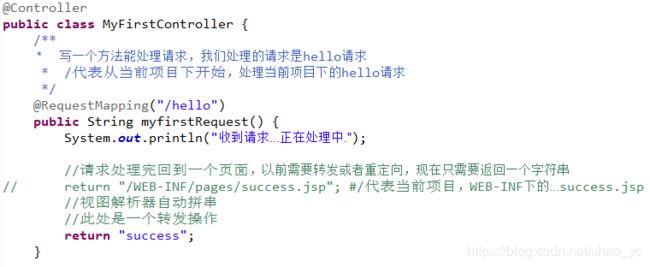
启动程序,在浏览器中点击 hello, 自动跳转到success页面,并且在控制台打印出“收到请求…正在处理中.”
HelloWold程序补充
1.不指定SpringMVC配置文件
在前面的HelloWorld程序中,我们用初始化参数指定了配置文件所在的位置

若我们没有指定这个文件则会默认去找这个配置文件:/WEB-INF/servlet名-servlet.xml
2.url-pattern的拦截内容
/ 拦截所有请求,不拦截jsp页面
/* 拦截所有请求,拦截jsp页面
3.RequestMapping标注在类上
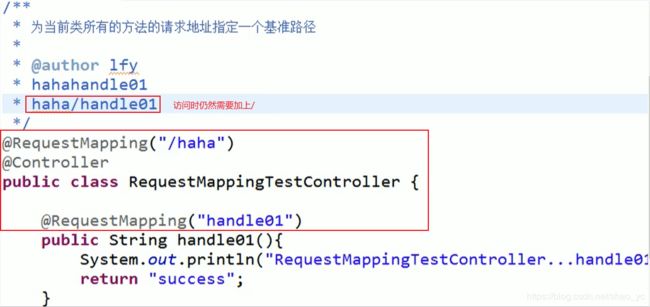
RequestMapping标注在类上,为当前类所有的方法的请求地址指定一个基准路径
二、RequestMapping中参数的设置
RequestMaping中的参数包括:method, params, headers, consumes, prodeces
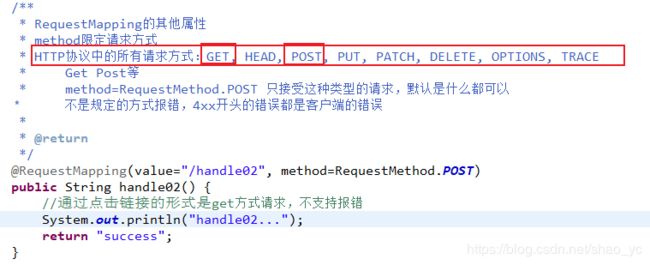
1.method属性规定请求方式
编写jsp页面,以post方式进行请求
handle02 Get方式不支持

form表单方式支持post请求
2.params属性规定请求参数
	@RequestMapping(value="/handle03",params= {"username=123","pwd","!age"})
	public String handle03() {
		return "success";
	}
3.headers属性规定请求头
/**
	 * 只能让火狐进行访问
	 * 谷歌
	 * User-Agent:Mozilla/5.0 (Windows NT 10.0; Win64; x64) AppleWebKit/537.36 (KHTML, like Gecko) Chrome/81.0.4044.138 Safari/537.36
	 * Firefox:
	 * Mozilla/5.0 (Windo ws NT 10.0; Win64; x64; rv:71.0) Gecko/20100101 Firefox/71.0
	 * @return
	 */
	@RequestMapping(value="/handle04", headers="User-Agent=Mozilla/5.0 (Windows NT 10.0; Win64; x64; rv:71.0) Gecko/20100101 Firefox/71.0")
	public String handle04() {
		System.out.println("handle04...");
		return "success";
	}
4.ant风格的url
编写jsp页面
Ant风格的url
精确匹配


单字符匹配
编写响应方法
package com.syc.controller;
import org.springframework.stereotype.Controller;
import org.springframework.web.bind.annotation.PathVariable;
import org.springframework.web.bind.annotation.RequestMapping;
@Controller
public class RequestMappingTest {

     /**
      *  Ant 风格资源地址支持 3 种匹配符:【了解】
           ?:匹配文件名中的一个字符
          *:匹配文件名中的任意个字符
          **:** 匹配多层路径
      * @return
      */
     //精确匹配
     @RequestMapping("/antTest01")
     public String antTest01() {
           System.out.println("antTest01 output ...");
           return "success";
     }

     //1.匹配一个字符,0个或多个都不行
     @RequestMapping("/antTest0?")
     public String antTest02() {
           System.out.println("antTest02 output ...");
           return "success";
     }

     //2.匹配任意多个字符,0个或多个都行
     @RequestMapping("/antTest0*")
     public String antTest03() {
           System.out.println("antTest03 output ...");
           return "success";
     }

     //3.匹配一层路径
     @RequestMapping("/a/*/antTest0*")
     public String antTest04() {
           System.out.println("antTest04 output ...");
           return "success";
     }

     //4.匹配多层路径,0层或多层
     @RequestMapping("/a/**/antTest0*")
     public String antTest05() {
           System.out.println("antTest05 output ...");
           return "success";
     }

}
小结:ant风格的url,在能够满足精确匹配的情况下,优先考虑精确匹配
5.使用@PathVariable获取路径上的占位符
//路径上可以有占位符,占位符的语法就是可以在任意路径的地方写一个{变量名}
	@RequestMapping("/user/{pwdd}")
	public String pathVariableTest(@PathVariable("pwdd")String pwd) {
		System.out.println("路径上的占位符为:" + pwd);
		return "success";
	}
如访问:http://localhost:8080/01_springmvc_helloworld/user/syc
输出: 路径上的占位符为:syc
三、Rest风格的URL地址(get, post, put, delete)
核心思想是:配置filter,这个filter是HiddenHttpMethodFilter
- 使用Rest风格的url地址,在对资源进行增删改查操作,无需在地址中专门写四个不同的请求方式:GET、POST、PUT、DELETE
- 使用Rest风格地址,需要在web.xml中配置Filter,它可以把普通形式的请求转化为规定形式的请求,配置这个filter为 HiddenHttpMethodFilter
- 如何发其他形式的请求?1、创建一个post类型的表单 2、表单携带一个_method的参数 3、这个_method的值就是DELETE、PUT
- Get查询,POST添加,PUT更新,DELETE删除
配置web.xml
主要是编写HiddenHttpMethodFilter
<web-app xmlns:xsi="http://www.w3.org/2001/XMLSchema-instance" xmlns="http://java.sun.com/xml/ns/javaee" xsi:schemaLocation="http://java.sun.com/xml/ns/javaee http://java.sun.com/xml/ns/javaee/web-app_3_0.xsd" id="WebApp_ID" version="3.0">
  <display-name>02_springmvc_restdisplay-name>
  <welcome-file-list>
    <welcome-file>index.htmlwelcome-file>
    <welcome-file>index.htmwelcome-file>
    <welcome-file>index.jspwelcome-file>
    <welcome-file>default.htmlwelcome-file>
    <welcome-file>default.htmwelcome-file>
    <welcome-file>default.jspwelcome-file>
  welcome-file-list>

	<servlet>
		<servlet-name>springmvcservlet-name>
		<servlet-class>org.springframework.web.servlet.DispatcherServletservlet-class>
		<load-on-startup>1load-on-startup>
	servlet>


	<servlet-mapping>
		<servlet-name>springmvcservlet-name>
		<url-pattern>/url-pattern>
	servlet-mapping>

	<filter>
		<filter-name>HiddenHttpMethodFilterfilter-name>
		<filter-class>org.springframework.web.filter.HiddenHttpMethodFilterfilter-class>
	filter>
	<filter-mapping>
		<filter-name>HiddenHttpMethodFilterfilter-name>
		<url-pattern>/*url-pattern>
	filter-mapping>
web-app>
jsp前端页面
<%@ page language="java" contentType="text/html; charset=UTF-8"
    pageEncoding="UTF-8"%>

<html>
<head>
<meta charset="UTF-8">
<title>Insert title heretitle>
head>
<body>


<a href="book/1">查询图书a>
<form action="book" method="post">
	<input type="submit" value="添加图书">
form>
<form action="book/1" method="post">
	<input name="_method" value="delete">
	<input type="submit" value="删除1号图书">
form>
<form action="book/1" method="post">
	<input name="_method" value="put">
	<input type="submit" value="更新1号图书">
form>
body>
html>
控制器类Controller
package com.syc.controller;

import org.springframework.stereotype.Controller;
import org.springframework.web.bind.annotation.PathVariable;
import org.springframework.web.bind.annotation.RequestMapping;
import org.springframework.web.bind.annotation.RequestMethod;

@Controller
public class BookController {

	@RequestMapping(value="/book/{bid}", method=RequestMethod.GET)
	public String getBook(@PathVariable("bid")Integer id) {
		System.out.println("查询到了"+id+"号图书");
		return "success";
	}
	@RequestMapping(value="/book/{bid}", method=RequestMethod.DELETE)
	public String deleteBook(@PathVariable("bid")Integer id) {
		System.out.println("删除了"+id+"号图书");
		return "success";
	}
	@RequestMapping(value="/book/{bid}", method=RequestMethod.PUT)
	public String updateBook(@PathVariable("bid")Integer id) {
		System.out.println("更新了"+id+"号图书");
		return "success";
	}
	@RequestMapping(value="/book", method=RequestMethod.POST)
	public String addBook() {
		System.out.println("添加了新的图书");
		return "success";
	}

}
源码分析
在HiddenHttpMethodFilter中有一个doFilterInternal方法:

其中的methodParam的值为:

如果请求方式为POST,并且paramValue有值,则将该值转化为大写,并且放到HttpServletRequest中,放行时用wrapper放行,否则直接用request进行放行。
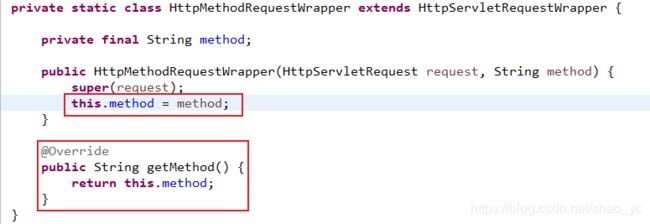
而其中new HttpMethodRequestWrapper(request, method); 的具体做法是:获取到传进来的method,然后重写其中的getMethod()方法
解决浏览器报错问题
在响应delete和put方法请求时,若使用tomcat8及更高的版本,浏览器页面会报错HTTP Status 405 - JSPs only permit GET POST or HEAD
解决方法:在要跳转的success.jsp中写入isErrorPage=“true”
<%@ page language="java" contentType="text/html; charset=UTF-8"
    pageEncoding="UTF-8" isErrorPage="true"%>

<html>
<head>
<meta charset="UTF-8">
<title>Insert title heretitle>
head>
<body>
成功
body>
html>
四、Request请求处理
请求处理的方式:
1、默认方式获取请求参数
2、@RequestParam 获取请求参数
3、@RequestHeader 获取请求头信息
4、@CookieValue 获取cookie的JID值
1.默认方式获取请求参数
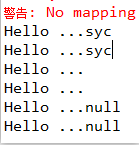
直接给方法入参上写一个和请求参数名相同的变量,这个变量就来接受请求参数的值。
请求时带了参数:有值;没带参数:null
- jsp页面加上请求参数
Hello
- 控制器中将参数写在方法中获取,要求参数名要一样
	@RequestMapping("/handle01")
	public String hello(String username) {
		System.out.println("Hello ..." + username);
		return "success";
	}
说明:若请求的url为:http://localhost:8080/03_springmvc_request/handle01?
即在handle01后未添加username参数,则打印的username为null
2.@RequestParam等方式
- @RequestParam 获取请求参数值,参数默认是必须带的
- value:指定要获取的参数的key
- required:选择参数是否必须
- defaultValue:默认值,没带默认是null
- @RequestHeader 获取请求头信息
- value:指定要获取的参数的key
- required:选择参数是否必须
- defaultValue:默认值,没带默认是null
- @CookieValue 获取cookie的JID值(JSESSIONID值,会话关掉,第一次获取的时候没有JSESSIONID的值)
编写JSP页面代码
<a href="handle02?username=syc">handle02a><br/>
编写控制器类
	@RequestMapping("/handle02")
	public String handle02(@RequestParam(value="user", required=false, defaultValue="我没带")String username,
			@RequestHeader("User-Agent")String userAgent,
			@CookieValue("JSESSIONID")String jid) {
		System.out.println("变量的值:"+username);
		System.out.println("请求头中的浏览器信息:"+userAgent);
		System.out.println("cookie中的jid的值"+jid);
		return "success";
	}
请求地址:http://localhost:8080/03_springmvc_request/handle02?username=syc
该请求对应的输出:
![]()
3.传入POJO,自动封装
如果请求参数是一个POJO,SpringMVC会自动地为这个POJO进行赋值。
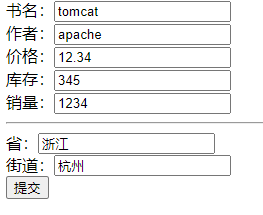
以在jsp表单中添加一本书为例,在后端中获取图书信息
编写JSP页面
<form action="book" method="post">
	书名:<input type="text" name="bookName"/><br/>
	作者:<input type="text" name="author"/><br/>
	价格:<input type="text" name="price"/><br/>
	库存:<input type="text" name="stock"/><br/>
	销量:<input type="text" name="sales"/><br/>
	<hr/>

	省:<input type="text" name="address.CityName"/><br/>
	街道:<input type="text" name="address.Street"/><br/>
	<input type="submit">
form>
package com.syc.book;

public class Book {
	/**
	书名:

	作者:

	价格:

	库存:

	销量:

	 */
	private String bookName;
	private String author;
	private double price;
	private Integer stock;
	private Integer sales;
	private Address address;
	public String getBookName() {
		return bookName;
	}
	public void setBookName(String bookName) {
		this.bookName = bookName;
	}
	public String getAuthor() {
		return author;
	}
	public void setAuthor(String author) {
		this.author = author;
	}
	public double getPrice() {
		return price;
	}
	public void setPrice(double price) {
		this.price = price;
	}
	public Integer getStock() {
		return stock;
	}
	public void setStock(Integer stock) {
		this.stock = stock;
	}
	public Integer getSales() {
		return sales;
	}
	public void setSales(Integer sales) {
		this.sales = sales;
	}

	public Address getAddress() {
		return address;
	}
	public void setAddress(Address address) {
		this.address = address;
	}
	@Override
	public String toString() {
		return "Book [bookName=" + bookName + ", author=" + author + ", price=" + price + ", stock=" + stock
				+ ", sales=" + sales + ", address=" + address + "]";
	}

}
package com.syc.book;

public class Address {
	private String CityName;
	private String Street;
	public String getCityName() {
		return CityName;
	}
	public void setCityName(String cityName) {
		CityName = cityName;
	}
	public String getStreet() {
		return Street;
	}
	public void setStreet(String street) {
		Street = street;
	}
	@Override
	public String toString() {
		return "Address [CityName=" + CityName + ", Street=" + Street + "]";
	}

}
处理响应
/**
	 * 如果请求参数是一个POJO
	 * SpringMVC会自动地为这个POJO进行赋值
	 * 1、将POJO中的每一个属性,从request参数中尝试获取出来,并封装即可,相当于POJO中有一个参数,便使用RequestParam获取该参数
	 * 2、还可以级联封装:属性的属性
	 * @param book
	 * @return
	 */
@RequestMapping("/book")
	public String addBook(Book book) {
		System.out.println("我要保存的图书:"+book);
		return "success";
	}
响应请求
![]()
解决获取中文时的乱码问题
乱码的分两种情况:
1.请求乱码
GET请求:需要修改总的服务器的server.xml
在8080端口的Connector中加入URIEncoding=“UTF-8”,即
POST请求:在第一次获取请求参数之前设置request.setCharacterEncoding(“UTF-8”);
也可以自己写一个filter,SpringMVC中有这个Filter,是 CharacterEncodingFilter
	<filter>
		<filter-name>CharacterEncodingFilterfilter-name>
		<filter-class>org.springframework.web.filter.CharacterEncodingFilterfilter-class>

		<init-param>
			<param-name>encodingparam-name>
			<param-value>UTF-8param-value>
		init-param>
		<init-param>

			<param-name>forceEncodingparam-name>
			<param-value>trueparam-value>
		init-param>
	filter>
	<filter-mapping>
		<filter-name>CharacterEncodingFilterfilter-name>
		<url-pattern>/*url-pattern>
	filter-mapping>
CharacterEncodingFilter的源码部分:


小结:使用SpingMVC前端控制器写完就直接写字符编码过滤器(解决POST请求乱码问题);对于GET请求的乱码问题,应该是Tomcat一装好,就修改server.xml的8080处添加URIEncoding=“UTF-8”;并且设置字符编码的filter应该在其他filter之前,因为要在第一次获取请求参数之前设置字符编码,若其他的filter已经获取请求参数,在此filter之后设置字符编码就无效。
2.响应乱码
响应乱码很好解决:response.setContentType(“text/html;charset=utf-8”);
4.传入原生API
这里的原生API指HttpServletRequest、HttpSession等,直接写在参数中
请求地址
http://localhost:8080/03_springmvc_request/handle03
处理响应
可以用的原生API主要有三个:HttpServletRequest、HttpServletResponse、HttpSession
/**
	 * SpringMVC可以直接在参数上写原生API,可以写的原生API有如下几个
	 * HttpServletRequest
	 * HttpServletResponse
	 * HttpSession
	 *
	 * java.security.Principal:https安全协议相关
	 * Locale:国际化有关的区域信息
	 * InputStream:
	 * 	   ServletInputStream inputStream = request.getInputStream();
	 * OutputStream:
	 * 		ServletOutputStream outputStream = response.getOutputStream();
	 * Reader
	 * 		BufferedReader reader = request.getReader();
	 * Writer
	 * 		PrintWriter writer = response.getWriter();
	 * @return
	 */
	@RequestMapping("/handle03")
	public String handle03(HttpSession session, HttpServletRequest request) {
		request.setAttribute("reqParam", "我是请求域中的");
		session.setAttribute("sessionParam", "我是session域中的");
		return "success";
	}
编写跳转成功的JSP页面
<%@ page language="java" contentType="text/html; charset=UTF-8"
    pageEncoding="UTF-8"%>

<html>
<head>
<meta charset="UTF-8">
<title>Insert title heretitle>
head>
<body>
恭喜!
<h1>成功!h1>
请求:${requestScope.reqParam}<br/>
session: ${sessionScope.sessionParam }<br/>
body>
html>
