《React后台管理系统实战:十五》项目部署:跨域和非跨域部署,nginx的配置
一、在同一个服务器上同一端口运行即:没有跨域问题的直接部署
1.把上节打包好的文件,build目录内所有文件移到后端项目的public中(项目名:react-admin-server)
2.然后把server中的静态文件配置改为:
app.use(express.static('public')) //【1】修改静态文件位置public
/*
应用的启动模块
1. 通过express启动服务器
2. 通过mongoose连接数据库
  说明: 只有当连接上数据库后才去启动服务器
3. 使用中间件
 */
const mongoose = require('mongoose')
const express = require('express')
const app = express() // 产生应用对象

// 声明使用静态中间件
app.use(express.static('public')) //【1】修改静态文件位置public
// 声明使用解析post请求的中间件
app.use(express.urlencoded({extended: true})) // 请求体参数是: name=tom&pwd=123
app.use(express.json()) // 请求体参数是json结构: {name: tom, pwd: 123}
// 声明使用解析cookie数据的中间件
const cookieParser = require('cookie-parser')
app.use(cookieParser())
// 声明使用路由器中间件
const indexRouter = require('./routers')
app.use('/', indexRouter)  //

const fs = require('fs')

// 必须在路由器中间之后声明使用
/*app.use((req, res) => {
  fs.readFile(__dirname + '/public/index.html', (err, data)=>{
    if(err){
      console.log(err)
      res.send('后台错误')
    } else {
      res.writeHead(200, {
        'Content-Type': 'text/html; charset=utf-8',
      });
      res.end(data)
    }
  })
})*/

// 通过mongoose连接数据库
mongoose.connect('mongodb://localhost/server_db2', {useNewUrlParser: true})
  .then(() => {
    console.log('连接数据库成功!!!')
    // 只有当连接上数据库后才去启动服务器
    app.listen('5000', () => {
      console.log('服务器启动成功, 请访问: http://localhost:5000')
    })
  })
  .catch(error => {
    console.error('连接数据库失败', error)
  })
3.启动服务项目:npm start 即可
二、与服务器端项目独立运行或不在同一端口运行的部署
问题: 存在 ajax 请求跨域问题
解决: 由服务器端工程师使用如nginx之类配置代理服务器
1.下载nginx备用
https://www.nginx.cn/nginx-download
2.前端代码中src/api的index.js中代码修改一下基地址
const BASE = '/api' //【1】修改基地址加一个/api

//【2】修复一个问题:登录接口少写一个/,导致请求路径不全,出现404问题
export const reqLogin=(username,password)=>ajax(BASE+'/login',{username,password},'POST')
import ajax from './ajax'
import jsonp from 'jsonp'
import {message} from 'antd' //借用antd返回信息组件
// const BASE = 'http://localhost:5000'
const BASE = '/api' //【1】修改基地址加一个/api
/*
//导出一个函数,第1种写法
//登录接口函数
 export function reqLogin(username,password){
     return ajax('login',{username,password},'POST')
 }
*/


//导出一个函数,第2种写法
// 登录接口函数【2】修复一个问题:登录接口少写一个/,导致请求路径不全,出现404问题
export const reqLogin=(username,password)=>ajax(BASE+'/login',{username,password},'POST')


//获取产品一级/二级分类列表接口
export const reqCategorys=(parentId)=>ajax(BASE+'/manage/category/list',{parentId})
//添加产品分类接口
export const reqAddCategory=(parentId,categoryName)=>ajax(BASE+'/manage/category/add',{parentId,categoryName},'POST')
//修改产品分类接口
export const reqUpdateCategory=({categoryId,categoryName})=>ajax(BASE+'/manage/category/update',{categoryId,categoryName},'POST')
//根据分类Id获取一个分类
export const reqCategory = (categoryId) => ajax(BASE + '/manage/category/info', {categoryId})
//获取产品列表
export const reqProducts=(pageNum,pageSize)=>ajax(BASE+'/manage/product/list',{pageNum,pageSize})
//产品上下架
export const reqUpdateStatus=(productId,status)=>ajax(BASE+'/manage/product/updateStatus',{productId,status},'POST')

/*搜索商品分页列表 (根据商品名称/商品描述)
searchType(搜索的类型): productName/productDesc*/
export const reqSearchProducts = ({pageNum, pageSize, searchName, searchType}) => ajax(BASE + '/manage/product/search', {
    pageNum,
    pageSize,
    [searchType]: searchName,
  })

//添加商品/修改商品:二合一接口,如果参数存在._id则为修改商品,否则为添加商品
export const reqAddUpdatePro=(product)=>ajax(BASE+'/manage/product/'+(product._id?'update':'add'),product,'POST')
// 删除服务器上指定名称图片
export const reqDeletPic=(name)=>ajax(BASE+'/manage/img/delete',{name},'POST')


//请求所有角色列表
export const reqRoles=()=>ajax(BASE+'/manage/role/list')
// 添加角色
export const reqAddRole=(roleName)=>ajax(BASE+'/manage/role/add',{roleName},'POST')
// 更新角色,传过来的参数就是字典格式,所以role参数不用加花括号
export const reqUpdateRole=(role)=>ajax(BASE+'/manage/role/update',role,'POST')


// 请求所有用户列表
export const reqUsers=()=>ajax(BASE+'/manage/user/list')
// 删除指定用户
export const reqUserDel=(userId)=>ajax(BASE+'/manage/user/delete',{userId},'POST')
//添加/修改用户(如果存在._id说明是更新就用update拼接路径,否则就是添加用户)
export const reqUserAdd=(user)=>ajax(BASE+'/manage/user/'+(user._id?'update':'add'),user,'POST')


// 天气接口
export const reqWeather=(city) => {
    const url = `http://api.map.baidu.com/telematics/v3/weather?location=${city}&output=json&ak=3p49MVra6urFRGOT9s8UBWr2`
    //返回一个promise函数
    return new Promise((resolve,reject) => {
        //发送一个jsonp请求
        jsonp(url,{},(err,data) => {
            //输出请求的数据到控制台
            console.log('jsonp()', err, data)
            //如果请求成功
            if(!err && data.status==='success'){
                //从数据中解构取出图片、天气
                const {dayPictureUrl,weather}=data.results[0].weather_data[0]
                //异步返回图片、天气给调用函数者
                resolve({dayPictureUrl,weather})
            }else{//如果请求失败
                message.error('天气信息获取失败')
            }
        })
    })
}
//reqWeather('上海')
3.服务器端项目修改server.js中的
app.use('/api', indexRouter) //修改此处加个/api
4.前端项目处启动一下试试看是否有问题
E:\a\web\reactAdmin>npm start
5.经测试启动正常,查看任何请求可看到前面多了个api
http://localhost:3000/api//manage/product/list?pageNum=1&pageSize=3
6.结束前端运行环境,删除build,再次打包
npm run build
7.运行打包好的build前端状态文件方法
(在前端根目录中运行cmd命令)
//全局安装serve
cnpm install -g serve
//运行
serve build
或
serve dist
运行成功效果:
E:\a\web\reactAdmin>serve build

   ┌───────────────────────────────
─────────────┐
   │                                                  │
   │   Serving!                                       │
   │                                                  │
   │   - Local:            http://localhost:51345     │
   │   - On Your Network:  http://192.168.1.8:51345   │
   │                                                  │
   │   This port was picked because 5000 is in use.   │
   │                                                  │
   │   Copied local address to clipboard!             │
   │                                                  │
   └───────────────────────────────
─────────────┘
或用以下方法,但可能出错,不推荐,推荐用cmpm方式
/* yarn global add serve
 serve -s build

直接运行前端打包好的静态文件命令
serve build*/
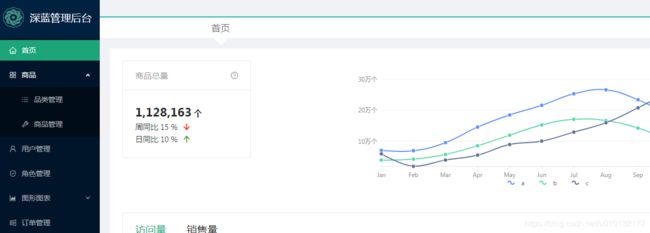
效果:访问此 http://localhost:51345即可正常显示前端
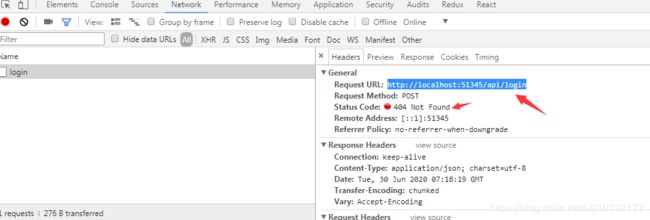
8.问题:登录时会报错404找不到打开控制台network可看到
三、解决跨域问题
1.下载nginx备用
https://www.nginx.cn/nginx-download
下载完成解压文件,把它放入没有中文的路径下
2.配置nginx\conf\nginx.conf
把第一个server处全部注释掉(前面加#号即可)加入如下内容【1-3】
    server {
        # 【1】访问应用时输入的端口(此8000即nginx运行的端口,则访问时的网址为:http://localhost:8000)
        listen       8000;
        server_name localhost;

        # 【2】所有请求(不与下而匹配的请求)都转发给前台应用(前端项目(build)运行的端口)
        location / {
           proxy_pass http://localhost:51345;
        }

        # 【3】所有以/api开头的请求都转发给后台服务器应用(后端项目运行的端口)
        location ~ /api/ {
           proxy_pass http://localhost:5000;
        }

    }
原理是:通过nginx做为中间件,把对应的请求发给前端,或后端接口运行
3.打开nginx根目录,运行nginx.exe
效果访问:http://localhost:8000
访问正常显示页面,实际上,前端运行在了51345端口,后端运行在了5000端口,轻松实现跨域访问

附录
结束nginx进程
#查看所有nginx进程
tasklist /fi "imagename eq nginx.exe"
#关闭所有nginx进程
taskkill /fi "imagename eq nginx.exe" /f
实际运行记录
C:\Users\Administrator>tasklist /fi "imagename eq nginx.exe"

映像名称                       PID 会话名              会话#       内存使用
========================= ======== ================ =========== ============
nginx.exe                    10188 Console                    1      6,128 K
nginx.exe                    10868 Console                    1      6,616 K

C:\Users\Administrator>taskkill /fi "imagename eq nginx.exe" /f
成功: 已终止 PID 为 10188 的进程。
成功: 已终止 PID 为 10868 的进程。

C:\Users\Administrator>tasklist /fi "imagename eq nginx.exe"
信息: 没有运行的任务匹配指定标准。

C:\Users\Administrator>


