4、深入剖析Java Nio编程原理之Buffer
章节概览
Netty源码分析章节概览
1、概述
前面我们做了很多基础知识的准备,包括bio,nio,aio的理论和概念。BIO实现原理和通信原理知识的梳理等。下面我们深入的分析下NIO相关的知识。和Socket类和ServerSocket类相对应的,NIO也提供了SocketChannel和ServerSocketChannel两种不同的套接字接口实现。当然这两种新增的模式支持阻塞模式和非阻塞模式。
2、NIO类库简介
NIO在JDK1.4中引入的。主要用来弥补原来同步阻塞I/O的不足。以后的几个章节中详细分析:Buffer、Channel、Selector
2.1 Buffer深入分析
Buffer从名字可以很直观的看出,它是一个缓冲区。它可以缓冲一些需要写入和读出的数据。传统的IO操作面向数据流,意味着每次从流中读一个或多个字节,直至完成,数据没有被缓存在任何地方。NIO操作面向缓冲区,数据从Channel读取到Buffer缓冲区,随后在Buffer中处理数据。
2.1.1 Buffer入门Demo
入门demo很简单,就是从文件管道中读取数据,输出到控制台。
public class BufferDemo {
    public static void main(String[] args) throws IOException {
        FileInputStream fileInputStream = new FileInputStream("D:\\gc.log");
        FileChannel channel = fileInputStream.getChannel();
        ByteBuffer buffer = ByteBuffer.allocate(20);
        int read = channel.read(buffer);
        while (read != -1) {
            // 在读取数据之前,需要重置下limit参数,让limit = position;
            buffer.flip();
            while (buffer.hasRemaining()) {
                System.out.print((char) buffer.get());
            }
            // 读取结束之后,需要重置下参数limit = capacity;
            buffer.clear();
            read = channel.read(buffer);
        }
    }
}
2.1.2、Buffer 构造器和成员变量

public abstract class Buffer {
    // Invariants: mark <= position <= limit <= capacity
    // mark 用来临时存储当前position的值
    private int mark = -1;
    // 当前数据游标的位置,在读写模式下是不同的:
    // 在写模式下,每次添加一个字节,position++。
    // 在读模式下,先把 limit = position,在把position = 0; 这样每次读取一个字节position++,直到 position < limit 结束。
    private int position = 0;
    // limit 在读写模式下是不同的:
    // 写模式下,limit表示最多能往Buffer里写多少数据,等于capacity值;
    // 读模式下,limit表示最多可以读取多少数据,limit = position。
    private int limit;
    // 表示当前缓冲区的容量大小
    private int capacity;

    // Used only by direct buffers
    // NOTE: hoisted here for speed in JNI GetDirectBufferAddress
    long address;

    // Creates a new buffer with the given mark, position, limit, and capacity,
    // after checking invariants.
    //
    // Buffer 构造函数
    Buffer(int mark, int pos, int lim, int cap) {       // package-private
        if (cap < 0)
            throw new IllegalArgumentException("Negative capacity: " + cap);
        this.capacity = cap;
        limit(lim);
        position(pos);
        if (mark >= 0) {
            if (mark > pos)
                throw new IllegalArgumentException("mark > position: ("
                                                   + mark + " > " + pos + ")");
            this.mark = mark;
        }
    }
	......
}
2.1.3、Buffer 类继承关系说明
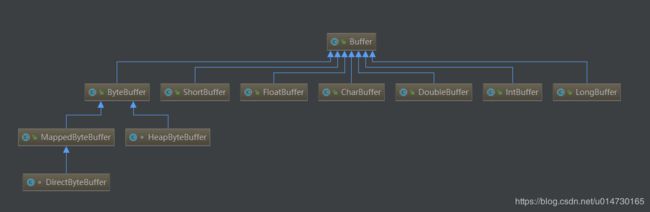
Buffer一些常用的类实现。这里我们主要分析的是ByteBuffer,其他的类关系以此类推。
2.1.3、ByteBuffer 构造函数和成员变量
public abstract class ByteBuffer
    extends Buffer
    implements Comparable<ByteBuffer>
{
    // 在使用堆模式下,创建的hb字节数组,该自己数组由JVM进行管理
    final byte[] hb;                  // Non-null only for heap buffers
    final int offset;
    boolean isReadOnly;                 // Valid only for heap buffers

   // 构造函数
    ByteBuffer(int mark, int pos, int lim, int cap,   // package-private
                 byte[] hb, int offset)
    {
        super(mark, pos, lim, cap);
        this.hb = hb;
        this.offset = offset;
    }

    // 缺省构造函数,主要为了满足于创建非堆字节数组而建立
    ByteBuffer(int mark, int pos, int lim, int cap) { // package-private
        this(mark, pos, lim, cap, null, 0);
    }

    // 创建堆外数组,通过DirectByteBuffer 实现类进行实现。
    public static ByteBuffer allocateDirect(int capacity) {
        return new DirectByteBuffer(capacity);
    }
    // 创建由JVM管理的字节数组。
    public static ByteBuffer allocate(int capacity) {
        if (capacity < 0)
            throw new IllegalArgumentException();
        return new HeapByteBuffer(capacity, capacity);
    }
......
}
这里构造函数采用了缺省方式。其次,创建对象采用的方式是静态工厂的方式创建对象。
2.1.3、HeapByteBuffer 源码详解
class HeapByteBuffer
    extends ByteBuffer
{
    HeapByteBuffer(int cap, int lim) {            // package-private
       super(-1, 0, lim, cap, new byte[cap], 0);
        /*
        hb = new byte[cap];
        offset = 0;
        */
    }

    HeapByteBuffer(byte[] buf, int off, int len) { // package-private

        super(-1, off, off + len, buf.length, buf, 0);
        /*
        hb = buf;
        offset = 0;
        */
    }

    protected HeapByteBuffer(byte[] buf,
                                   int mark, int pos, int lim, int cap,
                                   int off)
    {

        super(mark, pos, lim, cap, buf, off);
        /*
        hb = buf;
        offset = off;
        */
    }
从HeapByteBuffer源码中可以发现,通过自己创建一个字节数组,或者外部传入一个字节数组。来构造ByteBuffer对象。该字节数组完全由jvm内存进行管理的。
2.1.3、DirectBuffer 源码详解
堆外内存是java直接申请JVM以外的内存。这样做的好处是减少jvm gc的时间,因为对象被创建在堆外。其次申请的堆外直接内存,减少数据从堆外内存拷贝到JVM内存的时间。
    DirectByteBuffer(int cap) {                   // package-private
        super(-1, 0, cap, cap);
        boolean pa = VM.isDirectMemoryPageAligned();
        int ps = Bits.pageSize();
        long size = Math.max(1L, (long)cap + (pa ? ps : 0));
        Bits.reserveMemory(size, cap);

        long base = 0;
        try {
            // 通过Java unsafe 分配堆外内存
            base = unsafe.allocateMemory(size);
        } catch (OutOfMemoryError x) {
            Bits.unreserveMemory(size, cap);
            throw x;
        }
        unsafe.setMemory(base, size, (byte) 0);
        if (pa && (base % ps != 0)) {
            // Round up to page boundary
            address = base + ps - (base & (ps - 1));
        } else {
            address = base;
        }
        cleaner = Cleaner.create(this, new Deallocator(base, size, cap));
        att = null;
    }
3、ByteBuffer 常用方法
3.1、 mark()
把当前的position赋值给mark
public final Buffer mark() {
        mark = position;
        return this;
    }
3.2、reset()
把mark值还原给position
public final Buffer reset() {
    int m = mark;
    if (m < 0)
        throw new InvalidMarkException();
    position = m;
    return this;
}
3.3、clear()
一旦读完Buffer中的数据,需要让Buffer准备好再次被写入,clear会恢复状态值,但不会擦除数据
public final Buffer clear() {
    position = 0;
    limit = capacity;
    mark = -1;
    return this;
}
3.4、flip()
Buffer有两种模式,写模式和读模式,flip后Buffer从写模式变成读模式
public final Buffer flip() {
    limit = position;
    position = 0;
    mark = -1;
    return this;
}
3.5、rewind()
public final Buffer rewind() {
    position = 0;
    mark = -1;
    return this;
}
3.6、sun.misc.Cleaner#clean 堆外内存清理
堆外内存清理,有两种方式,一种是JVM进行full gc的时候,会清理堆外内存,这种情况是不可控制的。通常情况下,我们可以自己手动清理堆外内存。以下是部分代码块
 public static void clean(final ByteBuffer byteBuffer) {
        if (byteBuffer.isDirect()) {
           // 手动释放清理堆外内存空间
           ((DirectBuffer)byteBuffer).cleaner().clean();
        }
  }
4、 小结
至此Buffer源码已经分析完成,通过分析可以知道,Buffer内部维护着一个字节数组。字节组数的实现方式分为两种,一个是jvm内存中申请,另外一种通过堆外内存申请。同时数据内部维护着几个位置变量。分别为:limit,position,capacity,mark。在读模式和写模式下不断的切换,达到缓存数据的目的。