微信小程序总结篇
1.style绑定
2.class绑定
3.点击事件传值
例如: data-index="{{index}}" data-id="{{id}}"
解决方案:data-index="{{index}}"
4.背景音乐
const innerAudioContext = wx.createInnerAudioContext()
Page({
  toPlayMusic: function (e) {
        const _this = this //_this指向问题要注意
        const data = e.currentTarget.dataset
        innerAudioContext.src = data.url //音乐外链
        innerAudioContext.play(function () { //播放音乐
        const item = 'goods[' + data.index + '].is_play'
            _this.setData({
                item: 1 //设置参数
            })
            innerAudioContext.destroy()//播放完结以后,进行销毁
        })
    }
})
5.ios下拉出现黑条
在page.json添加禁止滚动
{
  "navigationBarTitleText":"",
  "disableScroll":true
}
6.在自定义导航栏的情况下,适配ios和andriod的标题栏
方法一:
小程序中,Titlebar按钮在ios中的高度是24pt,在andriod中的高度是30pt(测试的时候,感觉ios有的偏下面点)
index.wxml
关卡
index.js
/**
     * 页面的初始数据
     */
    data: {
        phoneInfo: false
    },
/**
     * 生命周期函数--监听页面加载
     */
    onLoad: function (options) {
            wx.getSystemInfo({
                success: function (res) {
                    //判断是否是ios
                    if (res.system.search('iOS') != -1){
                        _this.setData({
                            phoneIos: true
                        });
                    }
                }
            })
    },
index.wxss
.tef-title{
    position: fixed;
    top: 30pt;// andriod

    height:44rpx;
    line-height: 44rpx;
    display: flex;
    align-items: center;

    color: #ffffff;
    text-align: center;
    font-size: 32rpx;

    padding-left: 30rpx;
}

.tef-title image{
    width: 26rpx;
    height: 44rpx;
    margin-right: 20rpx;
}

.iphone-title{
    position: fixed;
    top: 24pt; // ios

    height:44rpx;
    line-height: 44rpx;
    display: flex;
    align-items: center;

    color: #ffffff;
    text-align: center;
    font-size: 32rpx;

    padding-left: 30rpx;
}

.iphone-title image{
    width: 26rpx;
    height: 44rpx;
    margin-right: 20rpx;
}
方法二:
先根据微信小程序的api接口wx.getSystemInfoSync()获取手机状态栏的高度,再来定义我们头部的高度
index.wxml
关卡
index.js
/**
     * 页面的初始数据
     */
    data: {
        bar_Height: wx.getSystemInfoSync().statusBarHeight
    },
index.wxss
.title{
    width: 100%;
    overflow: hidden;
    position: relative;
    top: 0;
    left: 0;
    z-index: 10;
    color: #ffffff;
    text-align: center;
    font-size: 32rpx;
}

.title image{
    width: 26rpx;
    height: 44rpx;
    position: absolute;
    bottom: 0;
    left: 0;
    padding: 10px 15px;
}
.title text{
    width: 100%;
    height: 45px;
    line-height: 45px;
    text-align: left;
    font-size:36rpx;
    letter-spacing:2px;
    position: absolute;
    bottom: 0;
    left: 65rpx;
    z-index: 10;
}
7.适配iphone x
/**
     * 生命周期函数--监听页面加载
     */
    onLoad: function () {
        //iphonex
        if (!app.globalData.phoneInfo) {
            let _this = this
            wx.getSystemInfo({
                success: function (res) {
                    if (res.model.search('iPhone X') != -1) {
                        _this.setData({
                            phoneInfo: true
                        });
                    }
                }
            })
        } else {
            this.setData({
                phoneInfo: app.globalData.phoneInfo
            });
        }
    },
8.获取定位
效果展示: # xx市xx县xx镇xx村xx号
第一步:

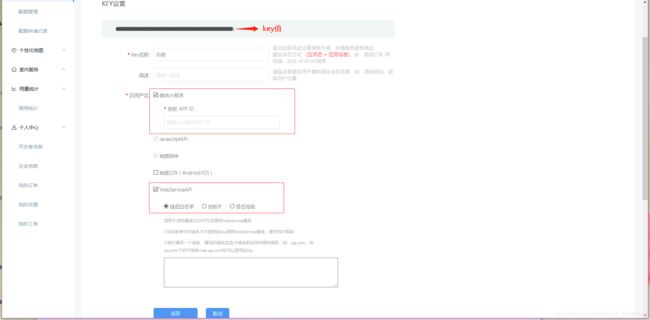
第二步:引入腾讯位置服务的JDK https://lbs.qq.com/qqmap_wx_jssdk/index.html
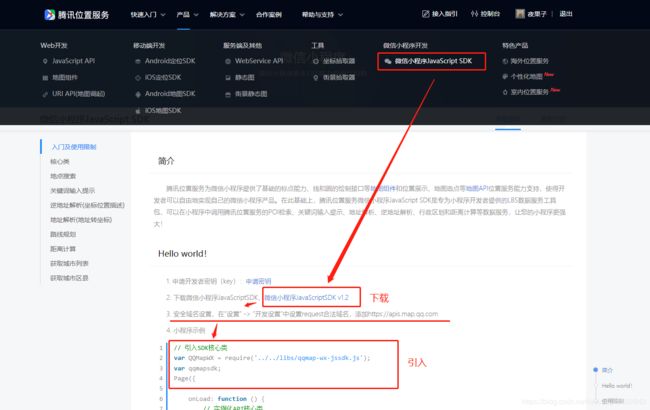
const app = getApp()
var QQMapWX = require('../../utils/qqmap-wx-jssdk.min.js');
var qqmapsdk;
Page({
  /**
   * 页面的初始数据
   */
  data: {
    //定位
    province: '',
    city: '',
    latitude: '',
    longitude: '',
    address:''
  },

  /**
   * 生命周期函数--监听页面加载
   */
  onLoad: function (options) {
    qqmapsdk = new QQMapWX({
      key: '4MHBZ-4DUKR-EBWWF-WMKC2-P65L2-VFFHS'
      //自己的key秘钥 http://lbs.qq.com/console/mykey.html 在这个网址申请
    });
  },

  /**
   * 生命周期函数--监听页面显示
   */
  onShow: function () {
    let vm = this;
    vm.getUserLocation();
  },

  //获取位置
  getUserLocation: function () {
    console.log('执行定位')
    let vm = this;
    wx.getSetting({
      success: (res) => {
        console.log(JSON.stringify(res))
        // res.authSetting['scope.userLocation'] == undefined    表示 初始化进入该页面
        // res.authSetting['scope.userLocation'] == false    表示 非初始化进入该页面,且未授权
        // res.authSetting['scope.userLocation'] == true    表示 地理位置授权
        if (res.authSetting['scope.userLocation'] != undefined && res.authSetting['scope.userLocation'] != true) {
          wx.showModal({
            title: '请求授权当前位置',
            content: '需要获取您的地理位置,请确认授权',
            success: function (res) {
              if (res.cancel) {
                wx.showToast({
                  title: '拒绝授权',
                  icon: 'none',
                  duration: 1000
                })
              } else if (res.confirm) {
                wx.openSetting({
                  success: function (dataAu) {
                    if (dataAu.authSetting["scope.userLocation"] == true) {
                      wx.showToast({
                        title: '授权成功',
                        icon: 'success',
                        duration: 1000
                      })
                      //再次授权,调用wx.getLocation的API
                      vm.getLocation();
                    } else {
                      wx.showToast({
                        title: '授权失败',
                        icon: 'none',
                        duration: 1000
                      })
                    }
                  }
                })
              }
            }
          })
        } else if (res.authSetting['scope.userLocation'] == undefined) {
          //调用wx.getLocation的API
          vm.getLocation();
        }
        else {
          //调用wx.getLocation的API
          vm.getLocation();
        }
      }
    })
  },
  // 微信获得经纬度
  getLocation: function () {
    let vm = this;
    wx.getLocation({
      type: 'wgs84',
      success: function (res) {
        // console.log('用户位置',res)
        var latitude = res.latitude
        var longitude = res.longitude
        var speed = res.speed
        var accuracy = res.accuracy;
        vm.getLocal(latitude, longitude)
      },
      fail: function (res) {
        console.log('fail' + JSON.stringify(res))
      }
    })
  },
  // 获取当前地理位置
  getLocal(latitude, longitude) {
    let vm = this;
    qqmapsdk.reverseGeocoder({
      location: {
        latitude: latitude,
        longitude: longitude
      },
      success: function (res) {
        // console.log(JSON.stringify(res));
        let province = res.result.ad_info.province
        let city = res.result.ad_info.city
        vm.setData({
          province: province,
          city: city,
          latitude: latitude,
          longitude: longitude
        })
      },
      fail: function (res) {
        console.log(res);
      },
      complete: function (res) {
        vm.setData({
          address: res.result.address
        })
      }
    });
  }
})
9.使用iconfont
- iconfont官网 -> 登陆 ->把自己要的图标添加到购物车
- 图标添加到项目 -> 生成在线链接
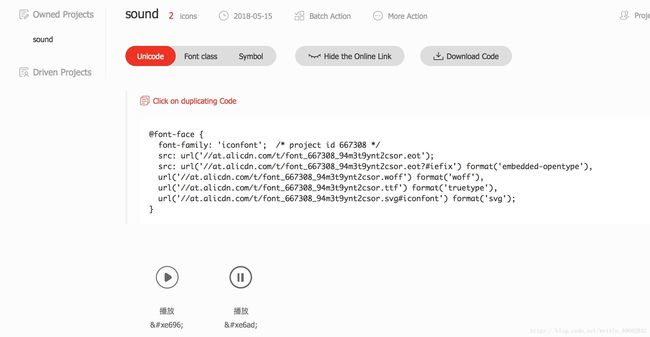
下载文件到本地,文件内容是这样的
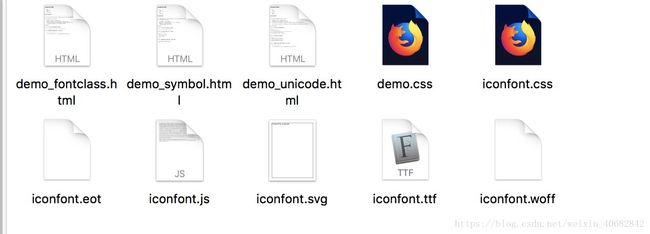
因为微信小程序里的wxss文件的font-face的url不接受http地址作为参数,但可以接受base64,因此需将字体文件下载后,转换为base64,然后引用。
打开https://transfonter.org,把 iconfont.ttf文件拿去转base64

把转好的文件放入小程序的文件夹里,并修改成 xxx.wxss

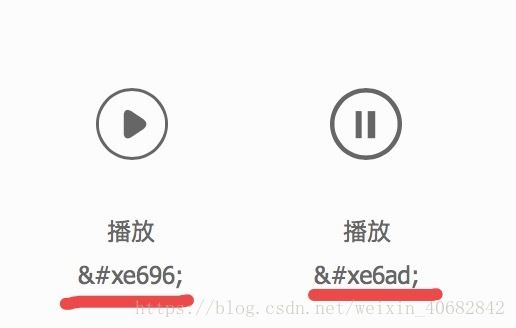
图标的编码在阿里网站理由,取 e696 四位

效果就出来了
10.web-view内嵌网页并转发当前页面
url是从接口获得的需要嵌入网页的地址
// index.js
Page({
  data: {
    img:'',
    title: '',
    color:''
  },
  onLoad: function (options) {
      const _this = this
      app.POST('getinfo',{},function(res){ // 自己封装的接口请求方式,请求接口,获取信息
      if (res.data.errno === 0) {
        const tem = res.data.data
        wx.setNavigationBarTitle({ // 设置头部标签栏的标题
          title: tem.title
        })
        wx.setNavigationBarColor({ // 设置头部标签栏的背景颜色
          frontColor: '#000000',
          backgroundColor: tem.color,
        })
        _this.setData({
          img: tem.img,
          title: tem.title,
          color: tem.color,
          url:tem.url
        })
      } else {
        wx.showToast({
          title: '网络错误',
          icon: 'warn',
          duration: 2000
        })
      }
    })
     _this.setData({
       url: decodeURIComponent(options.url) // 解码获得转发信息中的链接
     })
  },
  onShareAppMessage(options) {
    return {
      title: this.data.title,
      path: '/skywen_webviewapp/pages/index/index?url=' + encodeURIComponent(options.webViewUrl),// 加密链接地址:因为单纯的放链接的话,微信会将链接数据分解(如下图)
      imageUrl: this.data.img,
      success: function (res) {
        console.log('成功')
      },
      fail: function(res){
        console.log('失败')
      }
    }
  }
})
11.背景图片
1.图片转base64后,放在.wxss里
// Base64 在CSS中的使用
.box{
  background-image: url("data:image/jpg;base64,/9j/4QMZR...");
}
// Base64 在HTML中的使用

2.图片放在.wxml页面中,相对于父元素定位,或固定
12.历史性难题textarea
问题描述:placeholder字体不随着页面一起滚动,在页面上浮动
解决方法:首先设置textarea中的字体为无色。当用户点击textarea的时候,textarea获得焦点,隐藏文字展示框,并设置字体为黑色;当textarea失去焦点的时候,字体为无色,文字展示框显示
代码在此:
xxxx.wxml
xxxx.wxss
.ta__placeholder{
  color: #CFCFCF;
  width: 100%;
}

.ta__textarea{
  width:calc(100% - 202rpx);
  height:162rpx;
  line-height: 45rpx;
  padding:22rpx 0;
}

.ta__textarea-placeholder{
  color: #CFCFCF;
  width: 100%;
  padding: 22rpx 0;
  position: absolute;
  left: 0;
  top: 0;
}
xxxx.js
Page({
  data: {
      isarea: true,
      text: ''
  },
 // 获取焦点
  bindText(e) {
    const _this = this
    _this.setData({
      isarea: false
    })
  },
  // 失去焦点
  bindTexttwo(e) {
    const _this = this
    this.setData({
      isarea: true,
      text: e.detail.value
    })
  }
})
13.语音输入
微信官方插件Wechat开源:https://github.com/Tencent/Face2FaceTranslator
开发文档:https://mp.weixin.qq.com/wxopen/plugindevdoc?appid=wx069ba97219f66d99&token=&lang=zh_CN
简单使用:
app.json
{
  ...
    "plugins": {
        ...
        "WechatSI": {
            "version": "0.0.7",
            "provider": "wx069ba97219f66d99"
        }
    }
}
xxx.wxss
.yu{
  width:100%;
  height: 98rpx;
  border-radius: 54rpx;
  display: flex;
  align-items: center;
  justify-content: center;
  box-sizing: border-box;
  margin-bottom: 30rpx;
}

.yu-box{
  width:100%;
  height:98rpx;
  text-align:center;
  display: flex;
  align-items: center;
  justify-content: center;
}
xxx.js
const plugin = requirePlugin("WechatSI")
const manager = plugin.getRecordRecognitionManager()
Page({
    data: {
        isShowBtn: false //按钮样式的切换
    },
   // 语音识别
  streamRecord: function () {  //按下话筒,开始语音
    this.setData({
      isShowBtn: true
    })
    manager.start({
      lang: 'zh_CN',
    })
  },
  streamRecordEnd: function () {   //再次按下话筒,结束语音
    manager.stop()
    this.setData({
      isShowBtn: false
    })
  },
  initRecord: function () {
    const _this = this
    //有新的识别内容返回,则会调用此事件
    manager.onRecognize = (res) => {   //没有用到这个方法
      let text = res.result
    }
    // 识别结束事件
    manager.onStop = (res) => {
      const _this = this
      let text = res.result
      if (text == '') {
        // 用户没有说话,可以做一下提示处理...
        return
      }
        _this.setData({
          text: _this.data.text + text,//语音后的文字赋值,如果之前用户有打别的字,那就先把那些文本和语音的文本一起赋值
        })

    }
  },
  onLoad: function () {
    this.initRecord()
  },
  // 语音识别结束
})
xxx.wxml
                  点击说话


                  点击结束

