SpringBoot——微服务,启动器,YAML和注解装配,profiles,日志slf4j,springmvc优化,原理,JPA和RestTemplate
springBoot
微服务
集群:一个业务,分布在不同的计算机上
Redis服务器
分布式:多个业务分布在不同的计算机上
MapReduce
微服务:可以理解为一种分布式
单体应用架构——SOA架构——微服务架构
优点:从紧耦合到松耦合到解耦合,便于修改
缺点:分布式系统的复杂性
单体应用架构是一个整体,将MVC三层同时打包
SOA架构,将三层分开设计
微服务架构,将三层又分别切分为一个个微服务
每一个微服务都是不同的功能
一个简单的hello程序(简化springmvc)
1:导入Maven依赖
        org.springframework.boot
        spring-boot-starter-parent
        2.2.1.RELEASE


         org.springframework.boot
         spring-boot-starter-web
2:编写主程序
@SpringBootApplication
public class HelloWorldMainApplication {
    public static void main(String[] args) {
        //启动
        SpringApplication.run(HelloWorldMainApplication.class, args);
    }
}
3:编写业务模型(handler)
@RestController
public class HelloController {
    @RequestMapping("/hello")
    public String hello(){
        return "hello SpringBoot,this is my first Application";
    }
}
执行上述程序,即可在页面上打印:hello SpringBoot,this is my first Application
启动器
基本依赖:
        org.springframework.boot
        spring-boot-starter-parent
        2.2.1.RELEASE


        org.springframework.boot
        spring-boot-starter-web
1:父依赖
若ABC分别倒入log4j,当修改版本,则都要修改。
优化为parent倒入log4j,则ABC只需要倒入parent即可
根据版本仲裁原则进行依赖
版本仲裁原则:对于依赖某个组件的多个版本,maven的仲裁过程,并不是简单的使用高版本,而是根据从根节点到各个组件节点之间的路径深度,路径短的组件优先,如果路径深度相同,则是先发现的那个。类似一棵树的广度遍历
2:spring-boot场景启动器dependency
父依赖实际上就是包含多个启动器dependency
spring-boot-starter:帮我们导入了web模块正常运行所依赖的组件;
Spring Boot将所有的功能场景都抽取出来,做成一个个的starters(启动器)
starters:包含了一系列可以集成到应用里面的依赖包
Spring Initializer?
简单的生成一个Spring Boot项目,包含快速启动所需的一切。和往常一样,我们需要一个好的项目框架;它有助于你正确创建项目结构/框架。
通过图形化选择取代maven加载包等
YAML
标记语言:用于为 Bean读入数据
以前的配置文件;大多都使用的是 xxxx.xml文件;
YAML:以数据为中心,比json、xml等更适合做配置文件;
对象、Map(属性和值):
k: v在下一行来写对象的属性和值的关系;注意缩进
person:
  name: 张三
  gender: 男
  age: 22
数组(List、Set)
fruits:
  - 苹果
  - 桃子
  - 香蕉
实例:Bean文件的注解装配
方式一:@ConfigurationProperties
方式二:@Component和@value
但是@ConfigurationProperties支持复杂类型封装,支持校验,不支持EL表达式。
@ConfigurationProperties(prefix = “person.yaml”)
public class Person{
-----
}
person.yml文件:
person:
  name: 张三
  gender: 男
  age: 36
  boss: true
  birth: 1982/10/1
  maps: {k1: v1,k2: v2}
  lists:
    - apple
    - peach
    - banana
  pet:
    name: 小狗
    age: 12
测试文件:@SpringBootTest表明测试文件
@SpringBootTest
class HelloworldquickstartApplicationTests {
@Autowired
private Person person;
@Test
void contextLoads() {
System.out.println(person);
}
}
@PropertySource:导入标记语言配置文件,利用value进行赋值
@ImportResource:导入主配置文件
切换开发环境profiles
当需要不同的开发环境,测试环境的时候,需要不同的配置文件。
默认执行的配置文件application.yaml/properties
方式一:yaml文档块
配置文件:
application.yaml:利用不同的dev关闭或者prod开启制定配置文件文档块
server:
	port:8081
spring:
	profiles:dev
---
server:
	port:8082
spring:
	profiles:prod
---
server:
	port:8082
spring:
	profiles:dev
方式二:
运行主配置文件application.properties
在其中选择激活次配置文件
application-xxx.properties
参考资料
日志slf4j:门面模式
问题背景一:
我们自己的系统中使用了logback这个日志系统
我们的系统使用了A.jar,A.jar中使用的日志系统为log4j
我们的系统又使用了B.jar,B.jar中使用的日志系统为slf4j-simple
这样,我们的系统就不得不同时支持并维护logback、log4j、slf4j-simple三种日志框架,非常不便。
解决方法:引用门面模式
slf4j只是一个日志标准,并不是日志系统的具体实现
提供日志接口
提供获取具体日志对象的方法
如果只配置slf4j而不配置具体实现,无法打印日志
实现原理:
1:每一种实现类log4j,logback都有StaticLoggerBinder.class
2:slf4j调用LoggerFactory.getLogger方法,会绑定某一个StaticLoggerBinder.class,拿到之后调用具体的getLogger就可以得到实现类
@Test
public void testSlf4j() {
	Logger logger = LoggerFactory.getLogger(Object.class);
	logger.error("123");
}
如果有多个实现类,会随机选择一个进行绑定
SpringBoot选用 SLF4j和logback
问题背景二:其它框架依赖不同的日志,如Spring(commons-logging)等
解决方法:利用适配器模式
用中间包日志文件替换Spring(commons-logging)日志,中间包日志文件
拥有commons-logging相同的功能,使得Spring正常运行,并且能够被slj4f回调
导入slj4f中的实现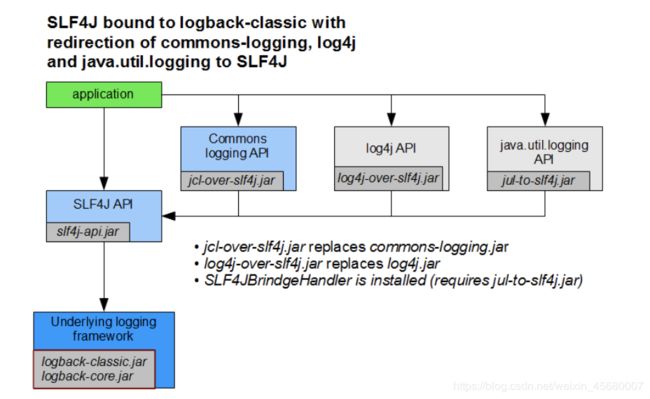
Springmvc的优化
thymeleaf
没有传统web项目的webapps目录,所以需要将项目放入指定的目录下
若以jar包的形式:访问静态资源webjars
JSP等模板引擎作为伪前端技术(实际上是服务器端技术):不是一种前端与后端分离的技术,不能实现前端与后端各自的语言独立。本质上是依靠服务器解析,完成页面预编译之后,通过HTTP发送到用户浏览器端。
模版引擎:用户界面与业务数据分离
,最简单的是“置换型”模板引擎,这类模板引擎只是将指定模板内容(字符串)中的特定标记(子字符串)替换一下便生成了最终需要的业务数据(比如网页)。
不支持JSP,使用thymeleaf:
JSP:${}
< div id=“a”. th:id=" i d " . t h : t e x t = " {id}". th:text=" id".th:text="{hello}">aaa< /div>
任意属性替换原生属性
SpringMVC自动配置:
1:WebMvc AutoConfiguration自动配置ViewResolver等
2:扩展自动配置
以前的配置文件中的配置
< mvc:view-controller path="/hello" view-name=“success”/>表示将/hello的访问重定向到/success中
现在的解决方法:
编写一个配置类(@Configuration),是WebMvcConfigurer类型;不能标注@EnableWebMvc
@Configuration
public class MyMvcConfig implements WebMvcConfigurer {
    @Override
    public void addViewControllers(ViewControllerRegistry registry) {
        registry.addViewController("/hi").setViewName("success");
    }
}
实现原理:
while(var2.hasNext()) {
            WebMvcConfigurer delegate = (WebMvcConfigurer)var2.next();
            //将所有的WebMvcConfigurer相关配置都来一起调用;
            delegate.configureViewResolvers(registry);
        }
3:全面接管SpringMVC
@EnableWebMvc使得所有的SpringMVC的自动配置都失效了
WebMvcAutoConfiguration拥有@ConditionalOnMissingBean({WebMvcConfigurationSupport.class})注解
而@EnableWebMvc会将WebMvcConfigurationSupport组件导入进来;
使得AutoConfiguration注解失效
4:增加新的ViewResolver等组件,以Bean的形式返回ViewResolver
@Bean
public ViewResolver myVIewResolver(){
return new ViewResolver{
public View. resolverViewName(—){
return null;
}
}
}
配置模式:
SpringBoot在自动配置很多组件的时候,先看容器中有没有用户自己配置的ConditionOnMissingBean(@Bean、@Component)如果有就用用户配置的,如果没有,才自动配置;如果有些组件可以有多个(ViewResolver)将用户配置的和自己默认的组合起来;
服务器
默认服务器:tomcat
ServletWebServerFactoryAutoConfiguration
@Import({ServletWebServerFactoryAutoConfiguration.BeanPostProcessorsRegistrar.class, EmbeddedTomcat.class, EmbeddedJetty.class, EmbeddedUndertow.class})
对于每一个class,都会执行下列判断,以EmbeddedTomcat.class为例子
判断当前是否引入了Tomcat依赖;
@ConditionalOnClass({Servlet.class, Tomcat.class, UpgradeProtocol.class})
@ConditionalOnMissingBean(
value = {ServletWebServerFactory.class},
search = SearchStrategy.CURRENT
)
利用抽象工厂方法:
抽象方法接口:public interface ServletWebServerFactory
tomcat, jetty,undertow等服务器都实现了其接口

ServletWebServerFactory:抽象工厂方法服务器工厂
修改服务器配置:是否可以在Spring boot中更改嵌入式Tomcat服务器的端口?
方法一:
application.properties文件更改端口。但需要提到“server.port”(即server.port=8081)本质上也是WebServerFactoryCustomizer
方法二:Return WebServerFactoryCustomizer
xxconfigure是扩展功能,xxCustomizer是替换功能
原理:
1:添加相应的XXXServletWebServerFactory
2:容器中某个组件要创建对象就会惊动后置处理器 webServerFactoryCustomizerBeanPostProcessor
只要是嵌入式的是Servlet容器工厂,后置处理器就会工作;
后置处理器,从容器中获取所有的WebServerFactoryCustomizer,调用定制器的定制方法给工厂添加配置
Docker:
1:pom文件中加入依赖
2:将项目复制到dockef中docker:build,启动成功
Docker的特点+有很多开源镜像,移植性更强
自动配置原理
参考资料
主程序类
@SpringBootApplication:标注在某个类上说明这个类是SpringBoot的主配置类,SpringBoot就应该运行这个类的main方法来启动SpringBoot应用;
@Target({ElementType.TYPE})    //可以给一个类型进行注解,比如类、接口、枚举
@Retention(RetentionPolicy.RUNTIME)    //可以保留到程序运行的时候,它会被加载进入到 JVM 中
@Documented    //将注解中的元素包含到 Javadoc 中去。
@Inherited    //继承,比如A类上有该注解,B类继承A类,B类就也拥有该注解
@SpringBootConfiguration
@EnableAutoConfiguration

/*
*创建一个配置类,在配置类上添加 @ComponentScan 注解。
*该注解默认会扫描该类所在的包下所有的配置类,相当于之前的 。
*/
@ComponentScan(
    excludeFilters = {@Filter(
    type = FilterType.CUSTOM,
    classes = {TypeExcludeFilter.class}
), @Filter(
    type = FilterType.CUSTOM,
    classes = {AutoConfigurationExcludeFilter.class}
)}
)
public @interface SpringBootApplication
主要看两个注解:
@SpringBootConfiguration——@Configuration——@Component:说明其是一个配置类
@EnableAutoConfiguration:开启自动配置功能,主要有
@AutoConfigurationPackage——@Import({Registrar.class}):Registrar.class将主配置所在包及下面所有子包里面的所有组件扫描到Spring容器;
@Import({AutoConfigurationImportSelector.class}):会给容器中导入非常多的自动配置类(xxxAutoConfiguration);就是给容器中导入这个场景需要的所有组件,并配置好这些组件;
而配置类是如何导入的?
AutoConfigurationImportSelector.class
selectImports()
spring.factories的jar包:这个spring.factories文件也是一组一组的key=value的形式,其中一个key是EnableAutoConfiguration类的全类名,而它的value是一个xxxxAutoConfiguration的类名的列表。
将这些自动配置类装在到Spring容器中
xxxxAutoConfiguration:实际上
@EnableConfigurationProperties:开启配置属性
ServerProperties:含有@ConfigurationProperties的Bean
而Bean的值就是application.perperties里的配置
@Conditional派生注解
作用:对于xxxxAutoConfiguration,必须是@Conditional指定的条件成立,才给容器中添加组件,配置配里面的所有内容才生效;
所以综上,我们实现了一个访问功能。原来需要配置springmvc:
handler:AutoConfigurationPackage导入
handlerMapping,handlerAdapter,ViewResolver:AutoConfigurationImportSelector.class导入
SpringBoot启动原理
基础知识:
参考资料
上下文初始化器:ApplicationContextInitializer
{initialize}
应用事件监听器:SpringApplicationRunListener:
starting
environmentPrepared()
contextPrepared
contextLoaded
finished
ApplicationRunner和CommandLineRunner
{run}
Environment:包括当前有效的PropertySource以及Profile。
applicationContext:IOC容器
primarySources:@SpringBootApplication扫描到的Bean和自动装配的Bean会作为主Bean来源
原理:
public static ConfigurableApplicationContext run(Class[] primarySources, String[] args) {
return (new SpringApplication(primarySources)).run(args);
}
步骤一:new SpringApplication()
判断是否web模块,即servlet等是否存在是否在maven中导入
加载应用:ApplicationContextInitializer
加载:ApplicationListener
获取主程序类
步骤二:run(
1:SpringApplicationRunListeners实例化。调用started()
2:创建并配置Environment,包括当前有效的PropertySource以及Profile。
3:SpringApplicationRunListeners的environmentPrepared()
4:打印SpringBoot应用的banner:SpringApplication的showBanner属性为true时,如果classpath下存在banner.txt文件,则打印其内容,否则打印默认banner。
5:创建对应的applicationContext
6:加载ApplicationContextInitializer初始化器,调用initialize方法,对创建的ApplicationContext进一步初始化。
7:SpringApplicationRunListeners的contextPrepared方法,通知这些Listener当前ApplicationContext已经创建完毕。
8:将之前通过@SpringBootApplication获取的所有配置以及其他形式的IoC容器配置加载到已经准备完毕的ApplicationContext。
9:用所有的SpringApplicationRunListener的contextLoaded方法,加载准备完毕的ApplicationContext。
10:获取当前所有ApplicationRunner和CommandLineRunner接口的实现类,执行其run方法
11:遍历所有的SpringApplicationRunListener的finished()方法,完成SpringBoot的启动。
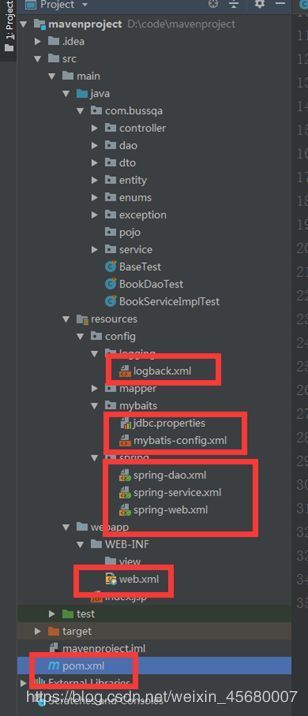
SSM项目结构:
主要是六大文件:
pom.xml
spring: Dao,service ,web
springmvc:web.xml
mybatis:mybatis-config.xml
spring-Dao.xml:
连接数据库
与mybatis关联
扫描@Repository
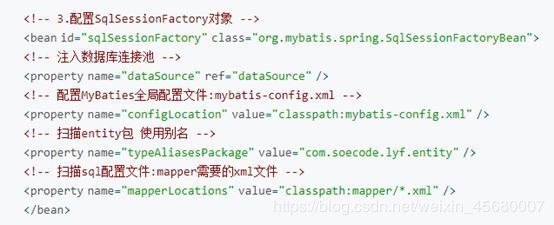
mybatis-config.xml:自增主键
spring-Service.xml:
扫描@Service
spring-Web:连接springmvc
web.xml
扫描@Controller
spring:
datasource:
username: root
password: root
url: jdbc:mysql://172.16.145.137:3306/springboot
driver-class-name: com.mysql.cj.jdbc.Driver
DataSourceAutoConfiguration
步骤一:
1:利用配置文件获取ConfigurationProperties
@ConfigurationProperties(“spring.datasource”)
DataSourceProperties
步骤二:
根据DataSourceConfiguration的分析默认使用tomcat数据源。这里我理解就是connection
步骤三:
数据源初始化器DataSourceInitializer
运行建表语句:
运行插入数据的sql语句
步骤四:
如果配置了jdbcTemplate,还会实例化并将其加入IOC容器中。
如果ORM,则会去实例化ORM
jdbcTemplate:JDBC的封装。@Autowired注入数据源后,直接调用下列语句执行
JdbcTemplate template
template.update(sql, params);
整合mvc:
基于注解的方式配置mybatis方法接口
@Mapper
public interface DepartmentMapper {

    @Select("select * from department")
    public List selectAll();

    @Select("select * from department where id=#{id}")
    public Department selectById(Integer id);

    @Options(useGeneratedKeys = true, keyProperty = "id")
    @Insert("insert into department(departmentName) values(#{departmentName})")
    public int save(Department department);

    @Update("update department set departmentName=#{departmentName}")
    public int update(Department department);

    @Delete("delete from department where id =#{id}")
    public int delete(Integer id);
}
利用直接装配的方式获取代理对象,而不需要再
DepartmentMapper departmentMapper =session.getMapper(DepartmentMapper);
@RestController
public class DepartmentController {

    @Autowired
    private DepartmentMapper departmentMapper;

    @RequestMapping("/dep/{id}")
    public List getDepById(@PathVariable Integer id) {
        return departmentMapper.selectAll();
    }

    @RequestMapping("/dep")
    public Department getDepById(Department department) {
        departmentMapper.save(department);
        return department;
    }
}
热部署:
springboot-devtools:这里对类加载采用了两种类加载器,对于第三方jar包采用base-classloader来加载,对于开发人员自己开发的代码则使用restartClassLoader来进行加载,这使得比停掉服务重启要快的多,因为使用插件只是重启开发人员编写的代码部分。
spring data:简化数据库访问的项目
JPA操作关系型数据源
1:实体类和数据表映射 @Entity指定数据表,@Table指定和name为–的数据表
generatedValue主键,column列名
@Entity
@Table(name = "tbl_user")
public class User{
	//属性--
}
2:编写DAO接口操作实体类的数据表(Repository)
public interface UserRepository extends JpaRepository< User,Integer>{}
3:基本ymal配置
4:实现基本的增删改查,JPA已经封装成各种方法直接调用
@RestController
public class UserController{
	@Autowired
	UserRepository userRepository;

	@GetMapping(-)
	public User getUser(@PathVariable("id") Integer id){
		User user= userRepository.findOne(id);
		return user;
	}
}
此时,就可以在浏览器中输入IP端口+@GetMapping(-)就可以调用方法
RestTemplate封装了http链接, 我们只需要传入url及返回值类型即可调用
1:配置RestTemplate
//配置RestTemplate交给spring管理
@Bean
public RestTemplate getRestTemplate() {
    return new RestTemplate();
}
2:编写下订单方法
@PostMapping("/{id}")
    public String order(Integer num) {
//通过restTemplate调用商品微服务
        Product object =
restTemplate.getForObject("http://127.0.0.1:9002/product/1", Product.class);
        System.out.println(object);
return "操作成功"; }
controller中使用的@GetMapping是一个组合注解,相当与@RequestMapping(method=“get”)。 类似的注解还有@PostMapping,@PutMapping,@DeleteMapping